Notices
04-06 Lancer Ralliart Show & Shine Post your pictures, photoshops, and videos!

Official 04-06 Lancer Ralliart Engine Bay Picture Thread

Thread Tools
 
Search this Thread
 
Old Oct 11, 2012, 11:41 AM
  #16  
Evolved Member
iTrader: (1)
 
truthdweller's Avatar
 
Join Date: May 2011
Location: So. Jersey (San Diego native)
Posts: 1,732
Received 9 Likes on 9 Posts
We cant leave out Brent's bay:

Name:  photo4.jpg
Views: 0
Size:  74.6 KB

TURBO-KITS.COM TURBO KIT RUNNING ON THEUVTUNE TURBO MAPPING/ECU RE-FLASH WITH LAUNCH CONTROL Dyno Proven 250whp 257wtq PSI stage 3 clutch with ceramic plate Vibrant coolant overflow tank EVO 9 Leather seats EVO 9 steering wheel Rota Boost wheels glow shift guages SPDI Spark Programmable Plasma Ignition (YOU NEED THIS)!
Old Oct 11, 2012, 06:15 PM
  #17  
Newbie
 
mivec eric's Avatar
 
Join Date: Oct 2012
Location: puerto rico
Posts: 0
Likes: 0
Received 0 Likes on 0 Posts
My ecu is microtech lt8 I really need that msd
Old Nov 6, 2012, 06:00 AM
  #18  
Newbie
 
Naldo_ralli's Avatar
 
Join Date: Nov 2012
Location: Puerto Rico
Posts: 10
Likes: 0
Received 0 Likes on 0 Posts
here's mine, Bone stock
Name:  615990_10151312671503179_1368851494_o.jpg
Views: 0
Size:  273.4 KB
Old Nov 6, 2012, 07:48 AM
  #19  
Evolved Member
iTrader: (1)
 
truthdweller's Avatar
 
Join Date: May 2011
Location: So. Jersey (San Diego native)
Posts: 1,732
Received 9 Likes on 9 Posts
looks clean
Old Nov 6, 2012, 07:55 AM
  #20  
Evolving Member
iTrader: (5)
 
kapitolralliart's Avatar
 
Join Date: Mar 2012
Location: DMV - Silver Spring
Posts: 195
Likes: 0
Received 0 Likes on 0 Posts
crispy...
Old Nov 6, 2012, 09:04 AM
  #21  
Newbie
 
MirrorEyes's Avatar
 
Join Date: Aug 2012
Location: Ontario, Canada
Posts: 92
Likes: 0
Received 0 Likes on 0 Posts
Real clean dude!
Old Dec 15, 2012, 12:51 PM
  #22  
Newbie
iTrader: (1)
 
FourG69's Avatar
 
Join Date: Nov 2012
Location: Delta BC
Posts: 19
Likes: 0
Received 0 Likes on 0 Posts
Old Dec 15, 2012, 01:01 PM
  #23  
Newbie
iTrader: (1)
 
FourG69's Avatar
 
Join Date: Nov 2012
Location: Delta BC
Posts: 19
Likes: 0
Received 0 Likes on 0 Posts
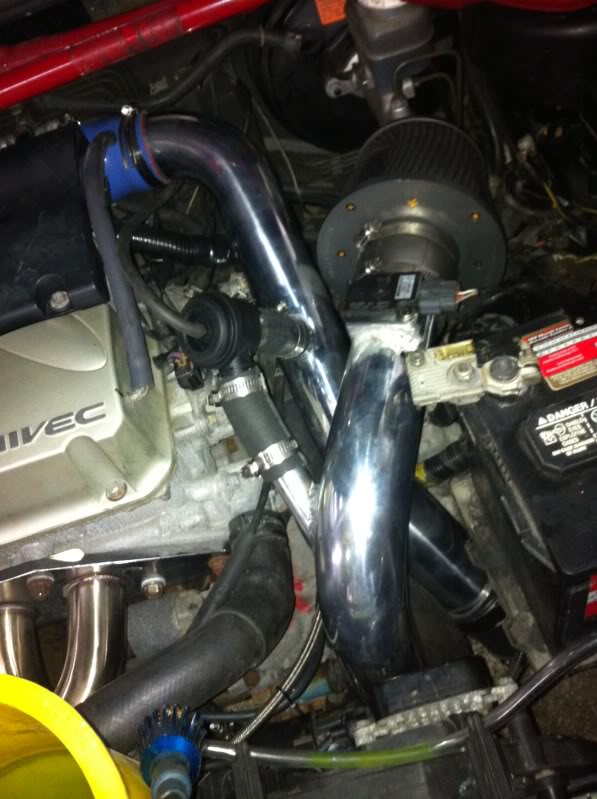
I'm super happy with my custom cai I had the cai pipe into the wheel well but I hated the sound that it made at WOT, the vibration of the pipe drove me nuts.

Anyway, I ended up converting to short ram because of the noise at the expense of the hot engine bay air. Then I saw truthdweller's set up and was inspired to go to the hardware store except that I improved on his design a bit with the completely enclosed intake path, no hot air! Mission accomplished
Old Dec 15, 2012, 01:48 PM
  #24  
EvoM Super Moderator
Thread Starter
iTrader: (15)
 
lanzerralliart's Avatar
 
Join Date: Apr 2006
Location: South USA
Posts: 3,347
Likes: 0
Received 4 Likes on 4 Posts
Looks nice , is the header cover painted gold ?
Old Dec 15, 2012, 01:51 PM
  #25  
Newbie
iTrader: (1)
 
FourG69's Avatar
 
Join Date: Nov 2012
Location: Delta BC
Posts: 19
Likes: 0
Received 0 Likes on 0 Posts
Originally Posted by lanzerralliart
Looks nice , is the header cover painted gold ?
hah ya, it was a little rusty so I painted it with some leftover wheel paint I had.
Old Dec 15, 2012, 04:19 PM
  #26  
Evolved Member
iTrader: (1)
 
truthdweller's Avatar
 
Join Date: May 2011
Location: So. Jersey (San Diego native)
Posts: 1,732
Received 9 Likes on 9 Posts
Originally Posted by FourG69
Then I saw truthdweller's set up and was inspired to go to the hardware store except that I improved on his design a bit with the completely enclosed intake path, no hot air! Mission accomplished
Did you seal the wide end of the filter/cone as well, a pretty cheap DIY mod eh? It looks like you may have the smaller filter attached which enabled you to bury the filter completely inside your DIY cone. I was chasing a "too lean" code during that time and it went away after fitting the larger filter and changing to the richer 91-93 fuel, so there it sits today...good job!


Share what supplies you used and where you got them...

Last edited by lanzerralliart; Dec 15, 2012 at 06:47 PM.
Old Dec 15, 2012, 08:58 PM
  #27  
Newbie
iTrader: (1)
 
FourG69's Avatar
 
Join Date: Nov 2012
Location: Delta BC
Posts: 19
Likes: 0
Received 0 Likes on 0 Posts
Haha very cheap :P I bought the flexible coupling 2 inch to 4 inch from home depot for under 10 bucks. The filter and heat shield are bolted together, no need to seal it
Old Dec 15, 2012, 09:08 PM
  #28  
Evolved Member
iTrader: (1)
 
truthdweller's Avatar
 
Join Date: May 2011
Location: So. Jersey (San Diego native)
Posts: 1,732
Received 9 Likes on 9 Posts
What is the heat shieild?
Old Dec 15, 2012, 09:34 PM
  #29  
Newbie
iTrader: (1)
 
FourG69's Avatar
 
Join Date: Nov 2012
Location: Delta BC
Posts: 19
Likes: 0
Received 0 Likes on 0 Posts
Originally Posted by truthdweller
What is the heat shieild?
The heat shield is part of the filter. I bought them together, that part isn't custom
Old Dec 15, 2012, 09:38 PM
  #30  
Newbie
iTrader: (1)
 
FourG69's Avatar
 
Join Date: Nov 2012
Location: Delta BC
Posts: 19
Likes: 0
Received 0 Likes on 0 Posts
http://www.dnamotoring.com/tsk/ebay/AF-T1-3-CF.jpg

Exactly like that


Quick Reply: Official 04-06 Lancer Ralliart Engine Bay Picture Thread


All times are GMT -7. The time now is 02:23 AM.