Changing HVAC Bulbs
 Oct 6, 2010, 03:55 PM
#1
Newbie
Thread Starter
Join Date: Apr 2010
Location: SoCal
Posts: 74
Likes: 0
Received 0 Likes
on
0 Posts
Changing HVAC Bulbs
Disclaimer: Should your car burn to the ground it is not my fault.
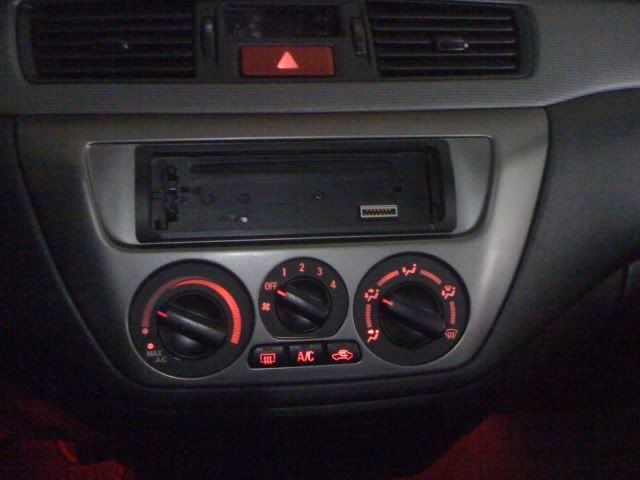
I've had a few people ask me how I made my HVAC lights red, so I decided to write a quick how-to on the matter. The bulbs in the HVAC controls are #74 bulbs seated in a T1.5 adaptor and can be pulled directly out of the adapters without having to get behind the circuit board. I've found through trial and error that the majority of LED lights aren't really suited for this application as they are primarily forward firing and only light up small spots on of the dash. The best type of bulb for this application would be painted incandescent bulbs, size #74. I purchased mine from autolumination.com.
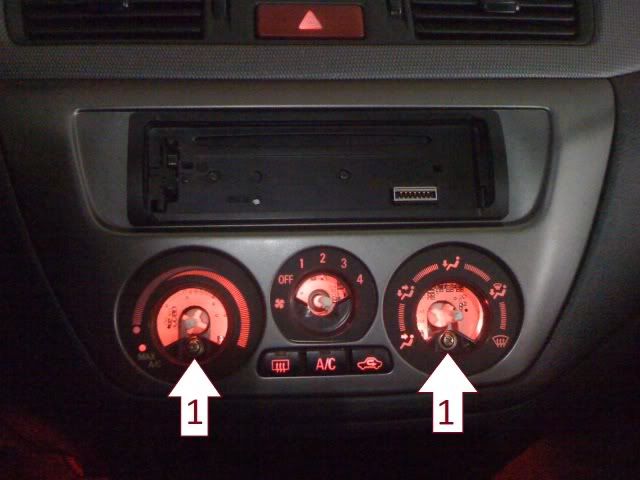
Now to get down to business, start by removing your 3 control knobs by pulling them straight out towards you. Underneath the outer two knobs, you will see two screws, labeled #1 in the photos below, unscrew them and don't lose them. To remove the trim, grab the inside of the knobs and pull straight out towards you again, you will hear some clicking, try to pull it out evenly, the trim panel is held in by 4 clips on the side and inch below and above each corner.
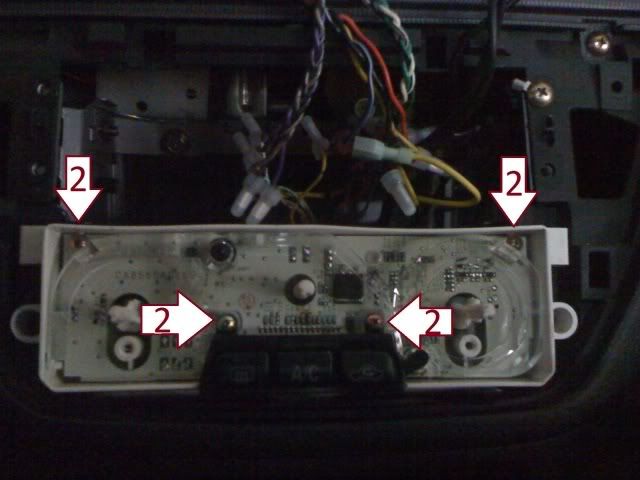
You may disconnect the radio if you like, but if you're like me and hate having to reset your clock, radio presents, and equalizer settings, just balance it carefully on your dash on top of a cloth. Next remove the four screws labeled #2 in the photos below, and remove the 3 black button thingamajigs and the clear diffuser(?).
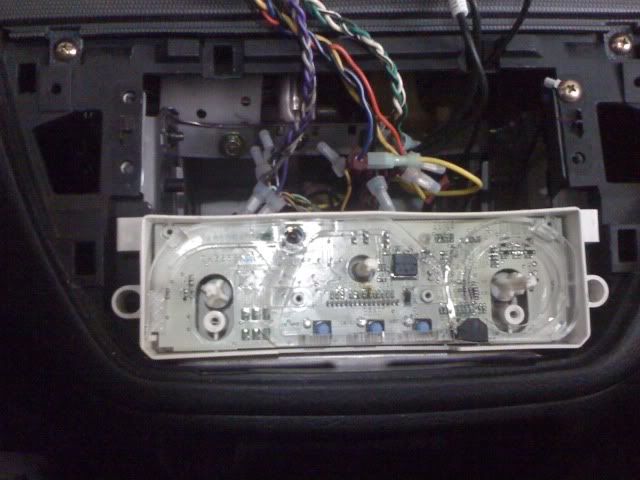
Now you have your bulbs in the open, pull them straight out, but take car not to squeeze to hard as they will break and then you'll have to pull out the adapter from behind and yadayada yada. Just don't break them. Once you have them out, put the new ones in, but wear rubber gloves whilst you're doing them if you want them to last longer. (Oil from your skin can remain on the bulb leading it to burn out quicker due to heat) Reverse the steps and you're done!
Afterthoughts: The red bulbs can be a little bright as you can see from the little guys head on the air selection being brighter than the rest, the black piece of electrical tape I placed on the clear diffuser over the left side bulb seems to take care of that.
Enjoy guys.
I've had a few people ask me how I made my HVAC lights red, so I decided to write a quick how-to on the matter. The bulbs in the HVAC controls are #74 bulbs seated in a T1.5 adaptor and can be pulled directly out of the adapters without having to get behind the circuit board. I've found through trial and error that the majority of LED lights aren't really suited for this application as they are primarily forward firing and only light up small spots on of the dash. The best type of bulb for this application would be painted incandescent bulbs, size #74. I purchased mine from autolumination.com.
Now to get down to business, start by removing your 3 control knobs by pulling them straight out towards you. Underneath the outer two knobs, you will see two screws, labeled #1 in the photos below, unscrew them and don't lose them. To remove the trim, grab the inside of the knobs and pull straight out towards you again, you will hear some clicking, try to pull it out evenly, the trim panel is held in by 4 clips on the side and inch below and above each corner.
You may disconnect the radio if you like, but if you're like me and hate having to reset your clock, radio presents, and equalizer settings, just balance it carefully on your dash on top of a cloth. Next remove the four screws labeled #2 in the photos below, and remove the 3 black button thingamajigs and the clear diffuser(?).
Now you have your bulbs in the open, pull them straight out, but take car not to squeeze to hard as they will break and then you'll have to pull out the adapter from behind and yadayada yada. Just don't break them. Once you have them out, put the new ones in, but wear rubber gloves whilst you're doing them if you want them to last longer. (Oil from your skin can remain on the bulb leading it to burn out quicker due to heat) Reverse the steps and you're done!
Afterthoughts: The red bulbs can be a little bright as you can see from the little guys head on the air selection being brighter than the rest, the black piece of electrical tape I placed on the clear diffuser over the left side bulb seems to take care of that.
Enjoy guys.

 Oct 6, 2010, 04:26 PM
#5
Newbie
Thread Starter
Join Date: Apr 2010
Location: SoCal
Posts: 74
Likes: 0
Received 0 Likes
on
0 Posts
It takes the same amount of effort to paint the bulbs as it does to replace them because all you have to do once you get to the painting step is simply pull them out. I've found that paint tends to fade over time, unless you use glass paint but I'm too lazy to do all that so I just order them pre-painted.

Trending Topics
 Oct 7, 2010, 05:45 PM
#10
Newbie
Thread Starter
Join Date: Apr 2010
Location: SoCal
Posts: 74
Likes: 0
Received 0 Likes
on
0 Posts
"#74 Wedge Based Bulbs"
I ordered 5 of those, just in case. I noticed that white light was coming through in a small spot on one of them, so I'm glad I had extra. You only need two but I tend to overkill. I wouldn't recommend these bulbs for the dash, just stick with the stock red ones.
Last edited by Kroelav; Oct 7, 2010 at 05:55 PM.
 Nov 10, 2010, 08:15 AM
#13
Evolving Member
iTrader: (1)
Join Date: Sep 2010
Location: Halifax, Canada
Posts: 383
Likes: 0
Received 0 Likes
on
0 Posts
wicked write up....it was easier than i thought.
my problem though is that I went to canadian tire and got #74 bulbs. The guy confirmed in their computer that i had the right size as well. But when i go to swap them out, the bulbs i got were too big and wouldn't fit in the adapter. fuuuuuuuuuuuuuuuuuuuu...
The brand I got was GE...also tried a a #37 but same problem. I can tell my lights are a TINY bit smaller than the GE ones i got....
I'm gonna order from autolumination....wish i could get stuff locally. 7.50 for shipping, so i got 8 bulbs. :S
Jan 31, 2011, 08:03 PM
#14
i just did this and it looks freaking wicked. i think the leds i bought though are so bright that they're brighter than the gauge cluster
thanks for the awesome writeup
my one question though was why you removed your radio. i was listening to mine the whole time while in the car lol
thanks for the awesome writeup
my one question though was why you removed your radio. i was listening to mine the whole time while in the car lol
Last edited by Raikiri; Jan 31, 2011 at 09:07 PM.