How to raise the Stock Recaro seat.
 Jun 12, 2009, 06:39 AM
#1
Newbie
Thread Starter

Join Date: Jun 2009
Location: Houston, Texas
Posts: 11
Likes: 0
Received 0 Likes
on
0 Posts
How to raise the Stock Recaro seat.
Someone else had a nice write up on this topic, but I can't seem to find it anymore since it was not placed in the How-to section of the forum.
I am 6' tall and still find the Recaro seat pad angle to be too steep downward. I felt like I was always having to lean forward just to get a decent view while driving. So I followed one posters recommendation of adding steel spacers on the rear bolts of the drivers seat to increase the height. Increasing the height also provided better thigh support.
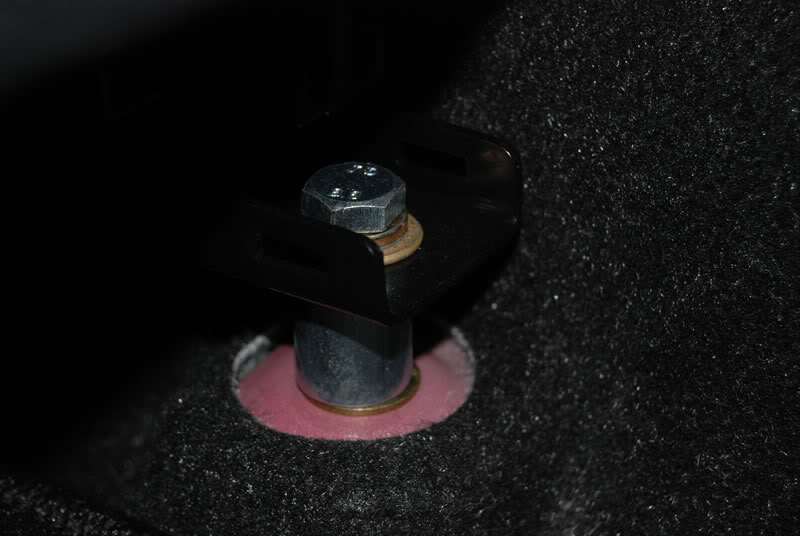
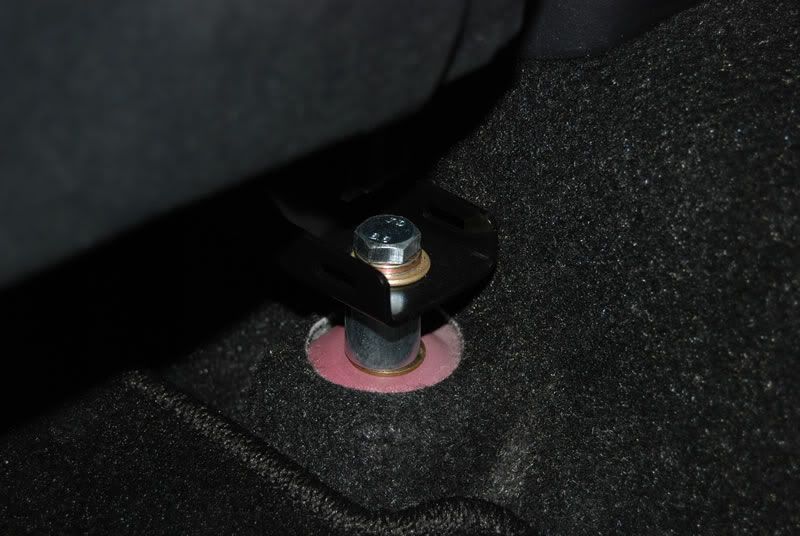
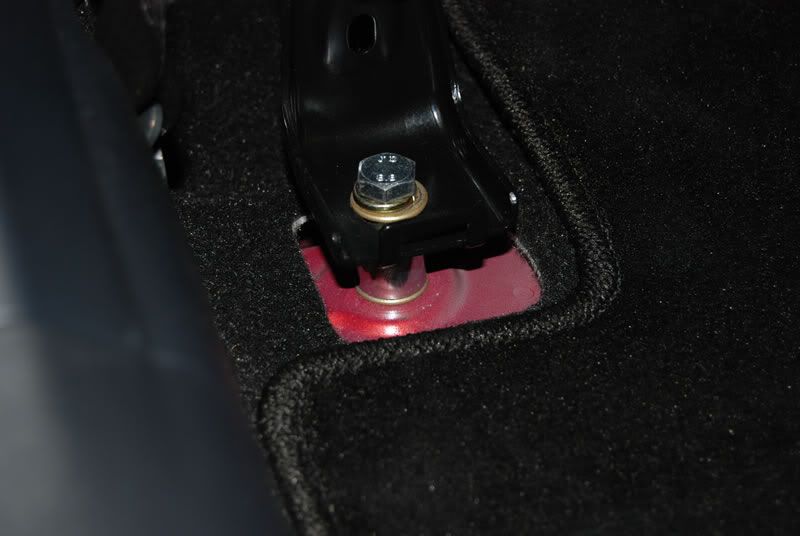
Step 1: Remove the plastic bolt covers from the seat rails.
Step 2: Remove the two existing rear bolts from the seat rail. The bolt is a 10mm with 1.25 course thread. Go to ACE Hardware and buy the same size bolt but with a length increase of 1". Also buy two 10mm lock washers, four 10mm butterfly washers, and two 1" steel spacers. I purchased the grade 8 bolts which offer a high tensile strength.
Step 3: Take the new bolt and insert a lock washer, butterfly washer in said order and insert it into the seat rail hole. Then insert a second butterfly washer into the bolt and then insert the 1" steel spacer. Now place the bolt in the threaded hole and tighten it down just a little and proceed to insert the second rear bolt.
I had to loosen the two front bolts in order to allow me to straiten the rear bolts so
that I could insert them in the threaded holes properly.
Step 4: Attach the plastic bolt covers.
Total cost of the project was around $3.00 and the seating position is just right for me now.


I am 6' tall and still find the Recaro seat pad angle to be too steep downward. I felt like I was always having to lean forward just to get a decent view while driving. So I followed one posters recommendation of adding steel spacers on the rear bolts of the drivers seat to increase the height. Increasing the height also provided better thigh support.
Step 1: Remove the plastic bolt covers from the seat rails.
Step 2: Remove the two existing rear bolts from the seat rail. The bolt is a 10mm with 1.25 course thread. Go to ACE Hardware and buy the same size bolt but with a length increase of 1". Also buy two 10mm lock washers, four 10mm butterfly washers, and two 1" steel spacers. I purchased the grade 8 bolts which offer a high tensile strength.
Step 3: Take the new bolt and insert a lock washer, butterfly washer in said order and insert it into the seat rail hole. Then insert a second butterfly washer into the bolt and then insert the 1" steel spacer. Now place the bolt in the threaded hole and tighten it down just a little and proceed to insert the second rear bolt.
I had to loosen the two front bolts in order to allow me to straiten the rear bolts so
that I could insert them in the threaded holes properly.
Step 4: Attach the plastic bolt covers.
Total cost of the project was around $3.00 and the seating position is just right for me now.
Last edited by Nismo2k6; Jun 14, 2009 at 07:12 PM.

 Jun 12, 2009, 03:22 PM
#3
Evolving Member
Join Date: Apr 2007
Location: Sacramento, CA
Posts: 159
Likes: 0
Received 0 Likes
on
0 Posts
Good to know the seat can be easily raised. I've been considering the Ralliart but was having doubts about the Recaro package due to the lack of height adjustment.

 thanks a lot man!
 . Nice write up
  Jun 23, 2009, 11:10 AM
#7
Evolved Member
iTrader: (2)

Join Date: Apr 2009
Location: west coast
Posts: 931
Likes: 0
Received 0 Likes
on
0 Posts
Just make sure you guys go get grade 8 bolts and washer and lock tight it all down... i raised my buddy's Recaros with a solid piece of aluminum i drilled the holes and got new bolts and bolted them down.. i feel its more safe when the seat is not flowing on just 4 small raiser.. since is sitting on top of a solid piece of aluminum...
oh yeah i raised it 25mm so about 1 inch
evil
oh yeah i raised it 25mm so about 1 inch
evil
Trending Topics
Jul 1, 2009, 08:02 AM
#9
Newbie
Thread Starter
Join Date: Jun 2009
Location: Houston, Texas
Posts: 11
Likes: 0
Received 0 Likes
on
0 Posts
Yes, once you put back the bolt covers, it looks stock. If you are sitting in the rear seat looking down you won't be able to tell that any modification was made.
Jul 14, 2009, 01:09 PM
#11
Evolving Member
Join Date: Mar 2009
Location: Miami, FL
Posts: 359
Likes: 0
Received 0 Likes
on
0 Posts
Someone else had a nice write up on this topic, but I can't seem to find it anymore since it was not placed in the How-to section of the forum.
I am 6' tall and still find the Recaro seat pad angle to be too steep downward. I felt like I was always having to lean forward just to get a decent view while driving. So I followed one posters recommendation of adding steel spacers on the rear bolts of the drivers seat to increase the height. Increasing the height also provided better thigh support.
Step 1: Remove the plastic bolt covers from the seat rails.
Step 2: Remove the two existing rear bolts from the seat rail. The bolt is a 10mm with 1.25 course thread. Go to ACE Hardware and buy the same size bolt but with a length increase of 1". Also buy two 10mm lock washers, four 10mm butterfly washers, and two 1" steel spacers. I purchased the grade 8 bolts which offer a high tensile strength.
Step 3: Take the new bolt and insert a lock washer, butterfly washer in said order and insert it into the seat rail hole. Then insert a second butterfly washer into the bolt and then insert the 1" steel spacer. Now place the bolt in the threaded hole and tighten it down just a little and proceed to insert the second rear bolt.
I had to loosen the two front bolts in order to allow me to straiten the rear bolts so
that I could insert them in the threaded holes properly.
Step 4: Attach the plastic bolt covers.
Total cost of the project was around $3.00 and the seating position is just right for me now.
you said The bolt is a 10mm with 1.25 course thread .. but how big is it? lengh wise...
wat would be the exact size to increse it .. please let me know..
Oct 29, 2010, 12:48 PM
#13
Newbie

Join Date: Nov 2009
Location: Saskatoon
Posts: 6
Likes: 0
Received 0 Likes
on
0 Posts
 Oct 29, 2010, 12:57 PM
#14
Evolved Member

Join Date: May 2009
Location: Eastern NC
Posts: 844
Likes: 0
Received 0 Likes
on
0 Posts
Oct 29, 2010, 01:17 PM
#15
Evolved Member
iTrader: (2)
Join Date: Apr 2009
Location: west coast
Posts: 931
Likes: 0
Received 0 Likes
on
0 Posts
it already has happen to one of my buddies... lost control on the track and spun out in to dirt and all four broke the seat was completely loose and bend a tab aswell....
we welded the riser block to the car and soo far soo goo
