My 2006 Evo MR clutch install/review
 Dec 8, 2009, 10:59 PM
#1
Evolving Member
Thread Starter
iTrader: (21)

Join Date: Feb 2009
Location: rainy WA
Posts: 263
Likes: 0
Received 0 Likes
on
0 Posts
My 2006 Evo MR clutch install/review
Well, after searching and only finding a couple good write-ups to print and use as a "guide" or resource when not being able to figure things out on my own...i decided to take on the task of replacing my 6spd clutch! oooh boy was this fun! Yes, on the floor of a garage.
Ill try my best to write this out step-by step (the way i did it) and consolidate some of the info on this site! That way...for those that are on the fence about doing such a task...this might sway you one way, or the other.
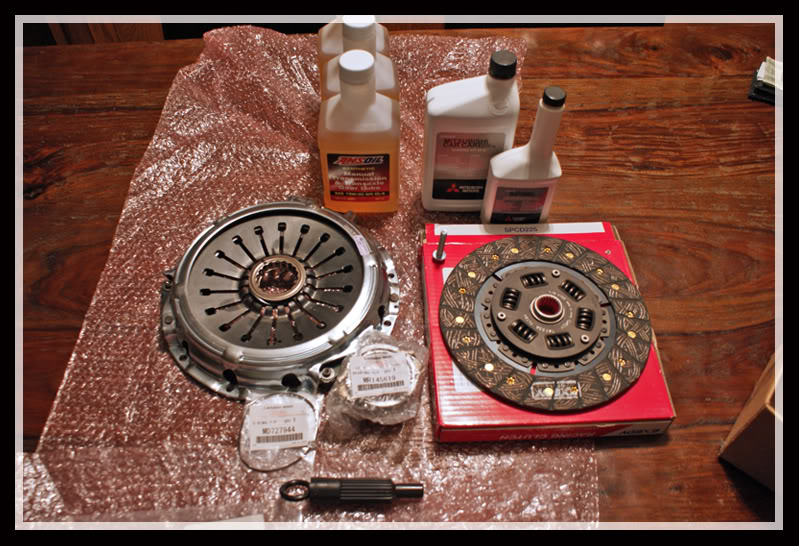
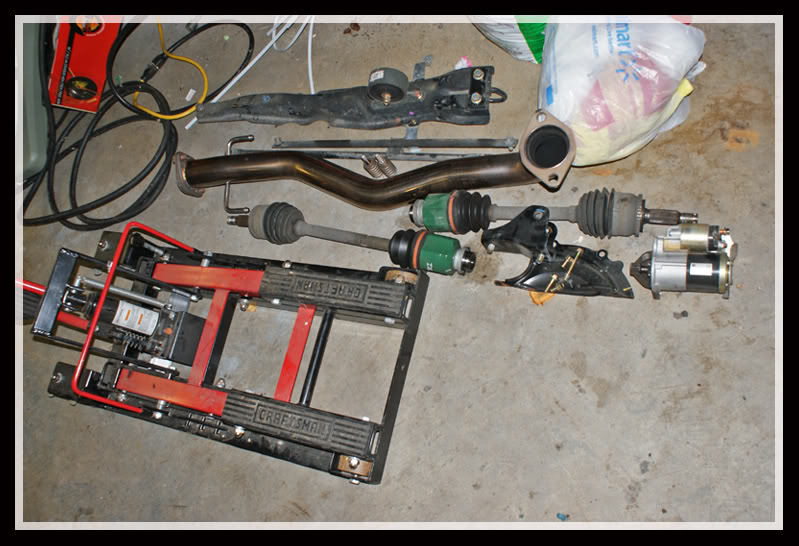
To START...make sure you have everything you will need. **NOTE: you dont have to replace everything i did, but i figure while the stuff is out..why not!?**
Stuff i had ready before even parking the car in the garage:
Amsoil MTG fluid (3qts--- mitsu says out 6spd take 2.3qts)
Mitsu LSD gear oil (for transfer case)
Mitsu ATF SPIII fluid (for ACD unit...i bought 3qts JUST to be careful. Mitsu says .9qts or so)
Mitsu OEM Throwout bearing
OEM Flywheel (resurfaced)
Exedy stage 1 clutch disk & PP
OEM axle seals
OEM transfer case oil seal (the big seal)
OEM transfer case o-ring (large)
OEM transfer case o-ring (small) <--- ill add the mitsu part#s later
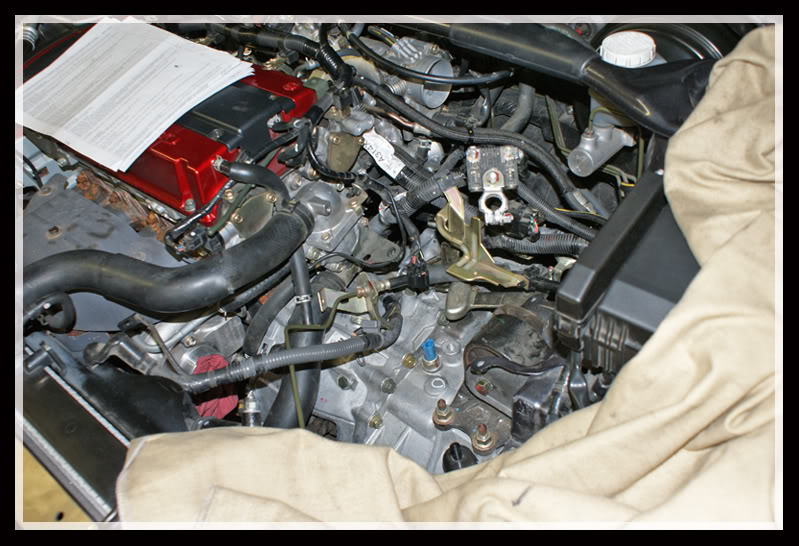
After having everything set aside, and before jacking up the car for the jackstands. i removed the following parts
battery & tray
remove Upper intercooler pipe (from throttle body to hardpipe by fan)
remove my ARC airbox( or oem airbox and air guide)
remove turbo inlet pipe
remove cotter pins and washers from shift linkages
remove the 3 12mm bolts from linkage bracket/clutch hardline bracket
unplug reverse light sensor
unplug speed sensor on rear of tranny (couldnt figure out how to take off the metal clip...but the sensor gets in the way of a tranny bolt and its only a 1-10mm bolt and it pops out)
unclip the wire harness from the harness mounting brackets
remove 2 12mm bolts for slave cylinder (do not disconnect lines..just swing it out to the side or up by the windshield!!)
Untorque the wheels
After doing all that, its time to jack the car up and put it on stands. Make sure you have the car high enough to be able to slide the tranny out from under the car. The 6spd is pretty bulky!
Well if you have the OEM undertray, it now need to be removed. I however had the beatrush undertray so that only took a few minutes to take that off.
remove the front wheels and slide them under the side of the car (JUST IN CASE haha)
remove the 2 tie bars- 5 14mm bolts
remove crossmember beam w/front mount (2 front 17mm bolts and 1 rear 17mm)
remove the 14mm bolt from the front mount and drop beam!
remove downpipe (2 14mm spring/bolts and 2 17mm that connect to cat) NOTE: remember to support the rear exhaust with a jackstand or jack...otherwise it will fall pretty hard!
unplug the elect. connectors on the starter
remove starter 2 14mm bolts (one actually goes from opposite side and thru trans)
remove black inspection plate (2 14mm bolts and 2 10mm bolts)
Now is a good time to drain the transfer case/transmission while your down there.
At this point you're ready to take out axles ( i did both and ill explain in a bit).
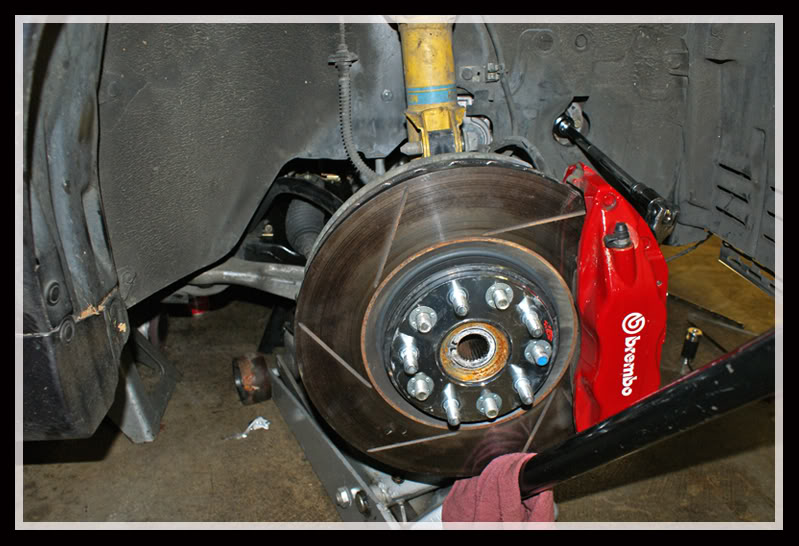
remove cotter pins from axle nuts
remove axle nuts&washers (1.25" socket i think)
unclip brake lines
remove both 19mm bolts from struts to knuckle
remove tie rod ends (yes.... it will be helpful later)
remove both axles carefully from splines and set aside (using pry bar between axle and trans
put one 19mm bolt back in to hold the strut/knuckle together
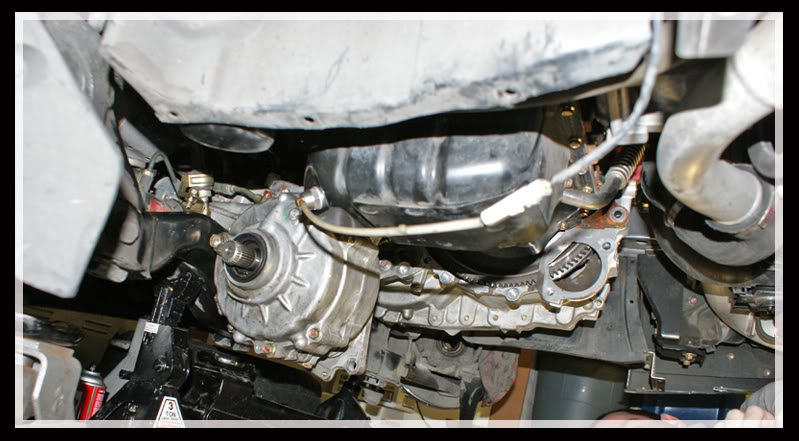
On the drivers side you will need to remove the output shaft from the transmission using a slap hammer and a M8x40mm bolt (you do not need to take the passenger side one out) in order to free the transfer case from the tranny.
only takes a few good slaps and the shaft will slide out. put in safe/clean area!
Now... having removed BOTH axles its a lot EASIER to access and remove the t-case bolts
remove the 5 of 6 bolts from the t-case (17mm short- 3 bottom 2 top--closest to front of car)
pinch off ACD line
remove ACD banjo bolt using a 22mm wrench/socket
remove the last 17mm bolt from t-case.
remove t-case by lifting up on rear near propellar shaft and move it far enough to the passenger side of the car.
**after removing each part..put them all aside with their proper bolts...makes life so much easier putting the car back together**
Now with the t-case removed from the tranny and pushed aside, it will make your life MUCH easier to drop the subframe (all the way) or just a few inches. i decided to lower it a few inches to make enough room for the tranny to drop.
First remove the 1 14mm bolt that goes through the rear mount
remove the 10mm bolt for the p/s high pressure line clamp (this to relieve tension on the line)
support the subframe with a jack or two jacks on either side as i did
remove the steering column 10mm bolt from inside the car
remove the 6 subframe bolts (2 19mm nuts/ 2 17mm bolts/2 14mm)
now SLOWLY lower the subframe a few inches
put something under it to keep it supported (although its still attatched to the front susp.)
Now... you can remove the rear mount bracket (silver portion) to make sure it doesnt hang-up on the way down.
remove the 2 17m bolts ( i got these from underneath the car using a wobble socket...trying to get the from the top wont work too well)
before you get too far you need to release the TOB from the PP using the acces hole on the bottom side of the trans. This is a pain...and if you cant get it to release, dont waste too much time as you can just remove the 6 PP bolts thru that hold using a 1/4 wobble and 12mm socket (this is what i had to do)
Now that the TOB is free from the PP u can prepare to take the trans out.
remove the 5 14mm tranny bolts (2 from bottom, 3 on top)
remove the 5 10mm bolts from the shifter/counterweight assembly (pull up on it and twist rotate to clear frame rail)
support the engine with a jack
support the tranny with a jack as well ( i had a motorcycle jack that was useful)
down take out the bolt that runs thru the drivers side mount
lower the tranny carefully
remove drivers mount bracket if need be.
RELAX.....go slow.... and the tranny should come out pretty damn smoothly!!

Now its time to put the new stuff on!
remove the 6 12mm pressure plate bolts
remove clutch disk
remove 7 flywheel bolts
slap on new parts (dont forget to use the clutch alignment tool and torque to specs...flywheel is 96ft/lbs and PP bolts are 15ft/lbs i believe)
You will most likely need to replace the TOB.
first remove the copper looking freeze plug from the top of tranny
unbolt the fork rod from the housing (10mm bolt)
slide rod out and up thru freeze plug hole
remove springs and cloth washers (NOTE: remember how it all went together! the springs mainly..the cloth washers just go between the forks recessed holes and the fork springs)
remove old TOB
add hi-temp grease to inside of fork and TOB contact areas
install new TOB
NOTE: adding a little bit of grease will make the metal rod slide back down easier!! tap it in gently
Take a break, eat some lunch, have a few brews....
Time to put the tranny back in. slide the tranny under the car and muscle it onto you jack (its easier to have the jack towards the rear half the tranny.)
** you will want the rear of the tranny to kind of go up first**
**make sure the drivers mount is OFF**
** turn the shifter/counter weights all the way, counterclockwise**
jack the tranny up slowly, having a extra set of hands is helpful if you can. You will want the rear portion of the tranny to clear the lowered subframe first. At that point you will notice that the shifter is really close to the drivers frame rail. Be sure to get that to clear before anything else (move rear end of trans up and towards pass. side of car to help)...once thats clear its pretty much smooth sailing.
** be sure to watch the tranny input shaft as it gets higher and higher, as you dont want to knock the retaining clip off the PP**
** having the engine almost level helps ALOT, and also pulling it forward helps a little when you align the trans..
** i also had a ratcheting strap that i hooked to the rear of the tranny and i wrapped it around the strut tower bar..to help support the weight**
TAKE YOUR TIME, dont rush it...
once you get it splined in...install a couple bolts, attach the drivers mount and the rest is the exact opposite.
Ill try my best to write this out step-by step (the way i did it) and consolidate some of the info on this site! That way...for those that are on the fence about doing such a task...this might sway you one way, or the other.
To START...make sure you have everything you will need. **NOTE: you dont have to replace everything i did, but i figure while the stuff is out..why not!?**
Stuff i had ready before even parking the car in the garage:
Amsoil MTG fluid (3qts--- mitsu says out 6spd take 2.3qts)
Mitsu LSD gear oil (for transfer case)
Mitsu ATF SPIII fluid (for ACD unit...i bought 3qts JUST to be careful. Mitsu says .9qts or so)
Mitsu OEM Throwout bearing
OEM Flywheel (resurfaced)
Exedy stage 1 clutch disk & PP
OEM axle seals
OEM transfer case oil seal (the big seal)
OEM transfer case o-ring (large)
OEM transfer case o-ring (small) <--- ill add the mitsu part#s later
After having everything set aside, and before jacking up the car for the jackstands. i removed the following parts
battery & tray
remove Upper intercooler pipe (from throttle body to hardpipe by fan)
remove my ARC airbox( or oem airbox and air guide)
remove turbo inlet pipe
remove cotter pins and washers from shift linkages
remove the 3 12mm bolts from linkage bracket/clutch hardline bracket
unplug reverse light sensor
unplug speed sensor on rear of tranny (couldnt figure out how to take off the metal clip...but the sensor gets in the way of a tranny bolt and its only a 1-10mm bolt and it pops out)
unclip the wire harness from the harness mounting brackets
remove 2 12mm bolts for slave cylinder (do not disconnect lines..just swing it out to the side or up by the windshield!!)
Untorque the wheels
After doing all that, its time to jack the car up and put it on stands. Make sure you have the car high enough to be able to slide the tranny out from under the car. The 6spd is pretty bulky!
Well if you have the OEM undertray, it now need to be removed. I however had the beatrush undertray so that only took a few minutes to take that off.
remove the front wheels and slide them under the side of the car (JUST IN CASE haha)
remove the 2 tie bars- 5 14mm bolts
remove crossmember beam w/front mount (2 front 17mm bolts and 1 rear 17mm)
remove the 14mm bolt from the front mount and drop beam!
remove downpipe (2 14mm spring/bolts and 2 17mm that connect to cat) NOTE: remember to support the rear exhaust with a jackstand or jack...otherwise it will fall pretty hard!
unplug the elect. connectors on the starter
remove starter 2 14mm bolts (one actually goes from opposite side and thru trans)
remove black inspection plate (2 14mm bolts and 2 10mm bolts)
Now is a good time to drain the transfer case/transmission while your down there.
At this point you're ready to take out axles ( i did both and ill explain in a bit).
remove cotter pins from axle nuts
remove axle nuts&washers (1.25" socket i think)
unclip brake lines
remove both 19mm bolts from struts to knuckle
remove tie rod ends (yes.... it will be helpful later)
remove both axles carefully from splines and set aside (using pry bar between axle and trans
put one 19mm bolt back in to hold the strut/knuckle together
On the drivers side you will need to remove the output shaft from the transmission using a slap hammer and a M8x40mm bolt (you do not need to take the passenger side one out) in order to free the transfer case from the tranny.
only takes a few good slaps and the shaft will slide out. put in safe/clean area!
Now... having removed BOTH axles its a lot EASIER to access and remove the t-case bolts
remove the 5 of 6 bolts from the t-case (17mm short- 3 bottom 2 top--closest to front of car)
pinch off ACD line
remove ACD banjo bolt using a 22mm wrench/socket
remove the last 17mm bolt from t-case.
remove t-case by lifting up on rear near propellar shaft and move it far enough to the passenger side of the car.
**after removing each part..put them all aside with their proper bolts...makes life so much easier putting the car back together**
Now with the t-case removed from the tranny and pushed aside, it will make your life MUCH easier to drop the subframe (all the way) or just a few inches. i decided to lower it a few inches to make enough room for the tranny to drop.
First remove the 1 14mm bolt that goes through the rear mount
remove the 10mm bolt for the p/s high pressure line clamp (this to relieve tension on the line)
support the subframe with a jack or two jacks on either side as i did
remove the steering column 10mm bolt from inside the car
remove the 6 subframe bolts (2 19mm nuts/ 2 17mm bolts/2 14mm)
now SLOWLY lower the subframe a few inches
put something under it to keep it supported (although its still attatched to the front susp.)
Now... you can remove the rear mount bracket (silver portion) to make sure it doesnt hang-up on the way down.
remove the 2 17m bolts ( i got these from underneath the car using a wobble socket...trying to get the from the top wont work too well)
before you get too far you need to release the TOB from the PP using the acces hole on the bottom side of the trans. This is a pain...and if you cant get it to release, dont waste too much time as you can just remove the 6 PP bolts thru that hold using a 1/4 wobble and 12mm socket (this is what i had to do)
Now that the TOB is free from the PP u can prepare to take the trans out.
remove the 5 14mm tranny bolts (2 from bottom, 3 on top)
remove the 5 10mm bolts from the shifter/counterweight assembly (pull up on it and twist rotate to clear frame rail)
support the engine with a jack
support the tranny with a jack as well ( i had a motorcycle jack that was useful)
down take out the bolt that runs thru the drivers side mount
lower the tranny carefully
remove drivers mount bracket if need be.
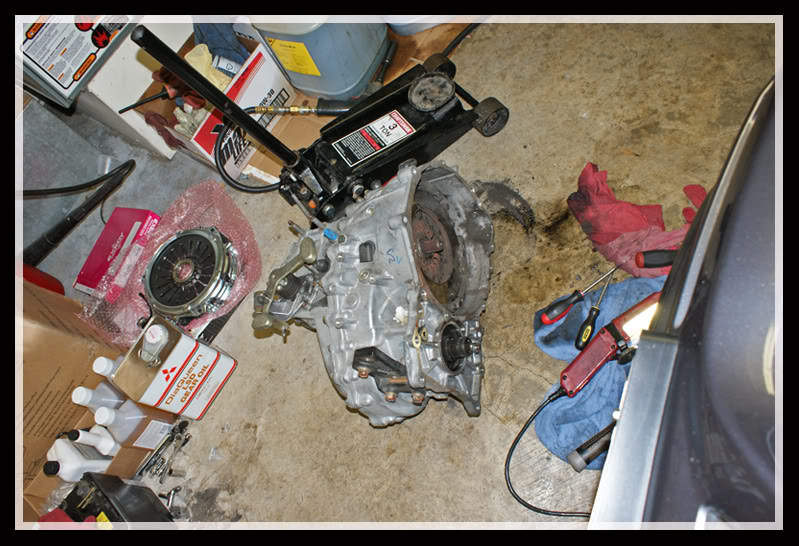
RELAX.....go slow.... and the tranny should come out pretty damn smoothly!!
Now its time to put the new stuff on!
remove the 6 12mm pressure plate bolts
remove clutch disk
remove 7 flywheel bolts
slap on new parts (dont forget to use the clutch alignment tool and torque to specs...flywheel is 96ft/lbs and PP bolts are 15ft/lbs i believe)
You will most likely need to replace the TOB.
first remove the copper looking freeze plug from the top of tranny
unbolt the fork rod from the housing (10mm bolt)
slide rod out and up thru freeze plug hole
remove springs and cloth washers (NOTE: remember how it all went together! the springs mainly..the cloth washers just go between the forks recessed holes and the fork springs)
remove old TOB
add hi-temp grease to inside of fork and TOB contact areas
install new TOB
NOTE: adding a little bit of grease will make the metal rod slide back down easier!! tap it in gently
Take a break, eat some lunch, have a few brews....
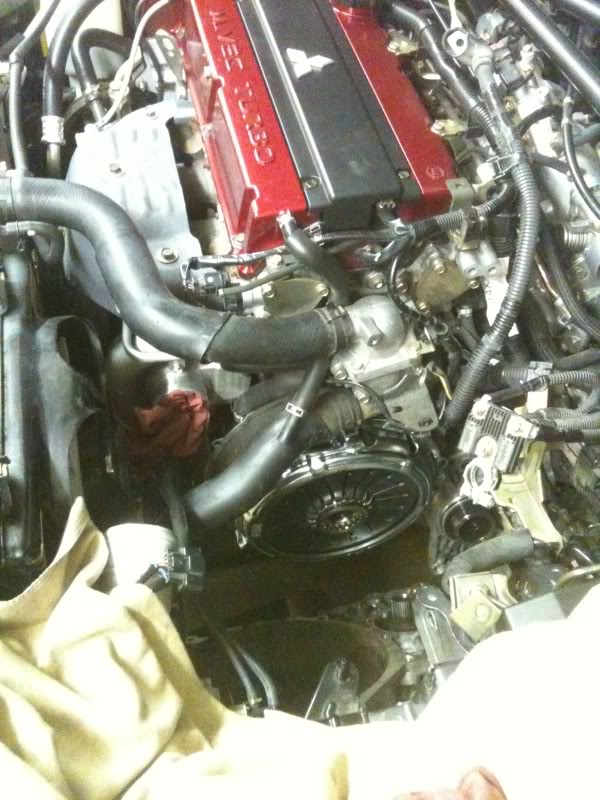
Time to put the tranny back in. slide the tranny under the car and muscle it onto you jack (its easier to have the jack towards the rear half the tranny.)
** you will want the rear of the tranny to kind of go up first**
**make sure the drivers mount is OFF**
** turn the shifter/counter weights all the way, counterclockwise**
jack the tranny up slowly, having a extra set of hands is helpful if you can. You will want the rear portion of the tranny to clear the lowered subframe first. At that point you will notice that the shifter is really close to the drivers frame rail. Be sure to get that to clear before anything else (move rear end of trans up and towards pass. side of car to help)...once thats clear its pretty much smooth sailing.
** be sure to watch the tranny input shaft as it gets higher and higher, as you dont want to knock the retaining clip off the PP**
** having the engine almost level helps ALOT, and also pulling it forward helps a little when you align the trans..
** i also had a ratcheting strap that i hooked to the rear of the tranny and i wrapped it around the strut tower bar..to help support the weight**
TAKE YOUR TIME, dont rush it...
once you get it splined in...install a couple bolts, attach the drivers mount and the rest is the exact opposite.
Last edited by halfnhalf83; Dec 8, 2009 at 11:38 PM.
 Dec 8, 2009, 11:00 PM
#2
Evolving Member
Thread Starter
iTrader: (21)
Join Date: Feb 2009
Location: rainy WA
Posts: 263
Likes: 0
Received 0 Likes
on
0 Posts
Now that everything is BACK together and you have added fluid to the tranny and t-case, its time to bleed the ACD system.
this is exactly how i did it and it was successful!! (3 person method. lol)
have plenty of Mitsu ATF SPIII fluid ready.
Fill reservoir
hook up pneumatic fluid evactuator to bleeder
open bleeder
turn key to acc. (2nd position), WOT, and move steering wheel from left to right erratically
turn off
add fluid as needed
REPEAT process until all air is out of system. I had one person watching the fluid as it was being sucked/pumped out, pone person constantly watchng the reservoir level, and one person turning the pump on from inside the car. I did not close the and re-open the bleeder each time i turned on the pump...just kept the bleeder open while the pneumatic fluid evacuator sucked out fluid/air.
We went through 2 bottles of fluid just to be sure as i had my ACD line off for 2 weeks. After all air was out, and bleeder closed..... prime the pump once or twice more , and the fluid reservoir will go down a bit. Add fluid if needed to appropriate level. DONE!
------------------------------------------------------------------------------------------------------------------------------------------------------------
Now...for those who had to remove the PP bolts individually through the service hole, in order to release the TOB...
you will need a flat head screwdriver and pliers!
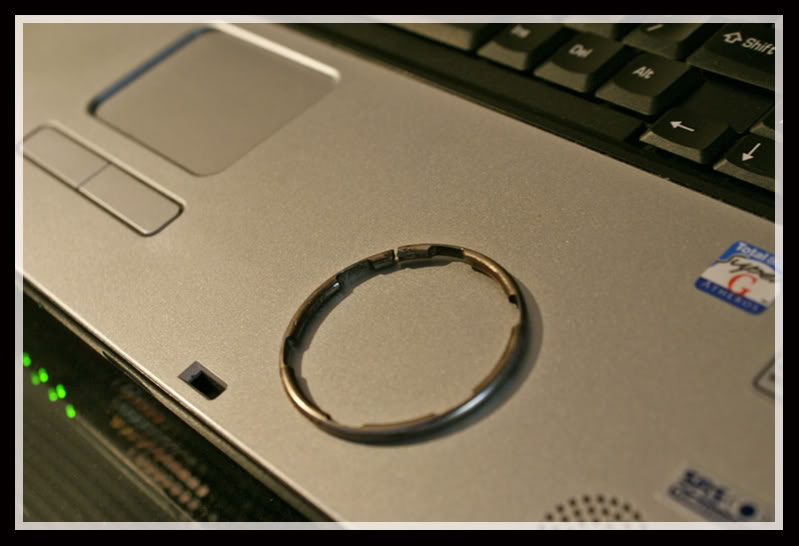
NOTE: see how i pushed the tabs up off the PP retainer....now wedge the flathead on one side and push/pull until you see a snap ring pop out a little (this is holding everything together, u need to get this out and everything will seperate!!)
this is the snap ring that i was talking about that you will need to pry out ( its easy with a second person..took 30 seconds)
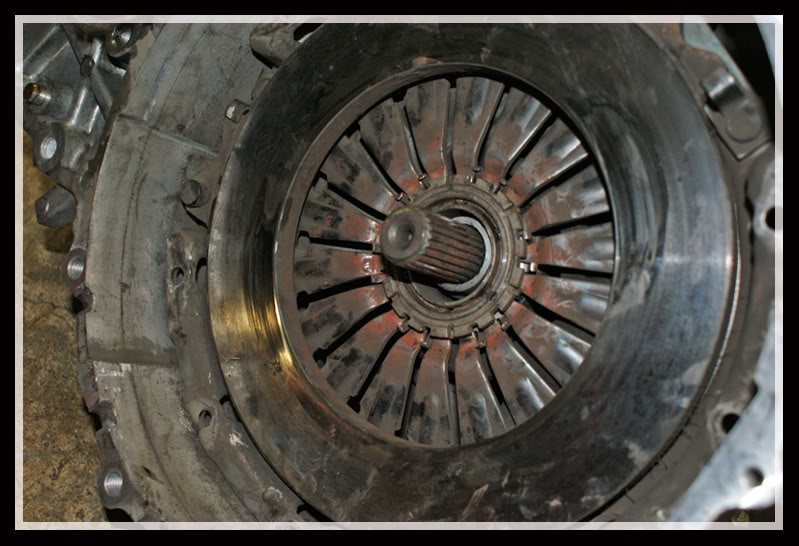
My OLD clutch (always had a problem with chatter ever since i picked the car up with 38k on it) ive never launched the car, and its quite obvious as to why it chattered so bad.
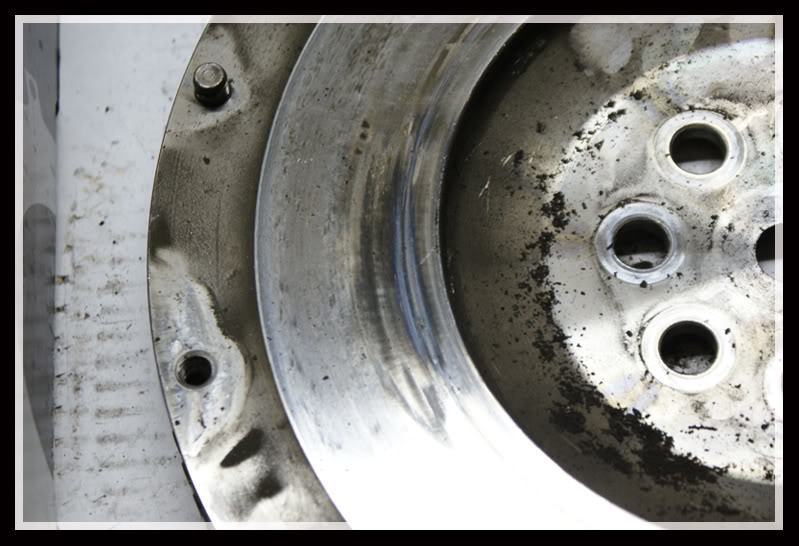
FLYWHEEL damage (there are 2 really bad spots like this....and similar areas all around that arent as deep/big)
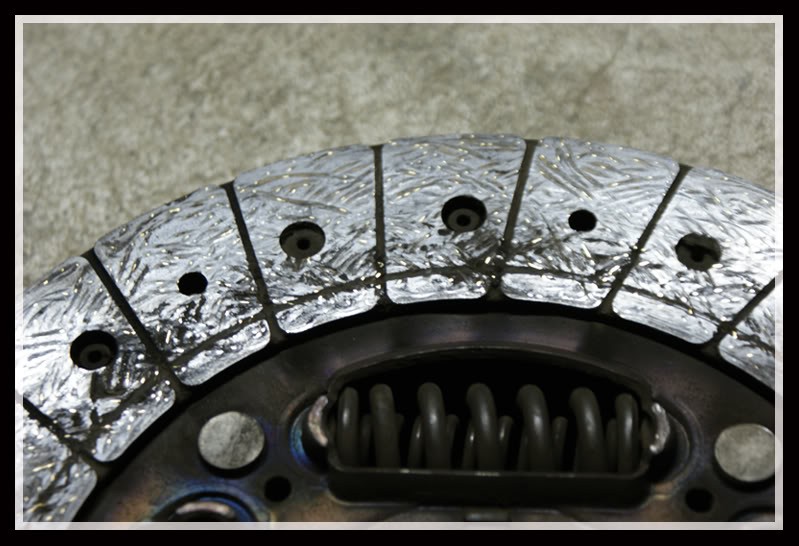
CLUTCH damage
NOTE:
If you notice...the OEM MR clutch uses 4 dual springs on the clutch disk hub, MY EXEDY stage 1 uses 6 shorter springs.
Im not entirely sure what this does...but i noticed that my clutch engagement point is NOT the same from what it was. Its definately not as smooth as the OEM MR clutch (despite having chatter) and the NEW Exedy disk seems to have more vibration when it starts to grab.
i can definately feel it through the clutch pedal/drivetrain. Its only when the clutch is engaging and its a slight vibration (not chatter). Maybe someone can shed some light as to why this is..... is it due to the clutch disk differences????
this is exactly how i did it and it was successful!! (3 person method. lol)
have plenty of Mitsu ATF SPIII fluid ready.
Fill reservoir
hook up pneumatic fluid evactuator to bleeder
open bleeder
turn key to acc. (2nd position), WOT, and move steering wheel from left to right erratically
turn off
add fluid as needed
REPEAT process until all air is out of system. I had one person watching the fluid as it was being sucked/pumped out, pone person constantly watchng the reservoir level, and one person turning the pump on from inside the car. I did not close the and re-open the bleeder each time i turned on the pump...just kept the bleeder open while the pneumatic fluid evacuator sucked out fluid/air.
We went through 2 bottles of fluid just to be sure as i had my ACD line off for 2 weeks. After all air was out, and bleeder closed..... prime the pump once or twice more , and the fluid reservoir will go down a bit. Add fluid if needed to appropriate level. DONE!
------------------------------------------------------------------------------------------------------------------------------------------------------------
Now...for those who had to remove the PP bolts individually through the service hole, in order to release the TOB...
you will need a flat head screwdriver and pliers!
NOTE: see how i pushed the tabs up off the PP retainer....now wedge the flathead on one side and push/pull until you see a snap ring pop out a little (this is holding everything together, u need to get this out and everything will seperate!!)
this is the snap ring that i was talking about that you will need to pry out ( its easy with a second person..took 30 seconds)
My OLD clutch (always had a problem with chatter ever since i picked the car up with 38k on it) ive never launched the car, and its quite obvious as to why it chattered so bad.
FLYWHEEL damage (there are 2 really bad spots like this....and similar areas all around that arent as deep/big)
CLUTCH damage
NOTE:
If you notice...the OEM MR clutch uses 4 dual springs on the clutch disk hub, MY EXEDY stage 1 uses 6 shorter springs.
Im not entirely sure what this does...but i noticed that my clutch engagement point is NOT the same from what it was. Its definately not as smooth as the OEM MR clutch (despite having chatter) and the NEW Exedy disk seems to have more vibration when it starts to grab.
i can definately feel it through the clutch pedal/drivetrain. Its only when the clutch is engaging and its a slight vibration (not chatter). Maybe someone can shed some light as to why this is..... is it due to the clutch disk differences????
Last edited by halfnhalf83; Dec 8, 2009 at 11:58 PM.
Dec 8, 2009, 11:17 PM
#3
Evolved Member
iTrader: (4)
Join Date: Jan 2008
Location: Chicago
Posts: 956
Likes: 0
Received 0 Likes
on
0 Posts
I am t-minus two and a half weeks and counting out on this... Exedy Twin HD for me  Everyone of these walkthroughs help for someone like myself undertaking this for the first time. Thanks for the effort! I do have a lift luckily...
If you dont mind me asking, why the OEM seals? I was unaware this was necessary. I only have 16k on my car though... Were they pricey items?
Everyone of these walkthroughs help for someone like myself undertaking this for the first time. Thanks for the effort! I do have a lift luckily...If you dont mind me asking, why the OEM seals? I was unaware this was necessary. I only have 16k on my car though... Were they pricey items?
Last edited by Protostar1; Dec 8, 2009 at 11:19 PM.
Dec 8, 2009, 11:26 PM
#4
Evolving Member
Thread Starter
iTrader: (21)
Join Date: Feb 2009
Location: rainy WA
Posts: 263
Likes: 0
Received 0 Likes
on
0 Posts
I am t-minus two and a half weeks and counting out on this... Exedy Twin HD for me Everyone of these walkthroughs help for someone like myself undertaking this for the first time. Thanks for the effort! I do have a lift luckily...
If you dont mind me asking, why the OEM seals? I was unaware this was necessary. I only have 16k on my car though... Were they pricey items?
Everyone of these walkthroughs help for someone like myself undertaking this for the first time. Thanks for the effort! I do have a lift luckily...If you dont mind me asking, why the OEM seals? I was unaware this was necessary. I only have 16k on my car though... Were they pricey items?
they were only like 30 bucks for all of them.
Dec 8, 2009, 11:35 PM
#6
Evolving Member
Thread Starter
iTrader: (21)
Join Date: Feb 2009
Location: rainy WA
Posts: 263
Likes: 0
Received 0 Likes
on
0 Posts
no problem man! i gotta give back to the community somehow. i kinda figured we needed a 6spd clutch install version that includes the following all in one place.
removal
installation
TOB replacement
ACD bleeding steps (alternative method)
Tips, etc etc
PS- i have about 5 more pictures to add and some more info...but its late and ive been typing this up for the past hour and a half. HAHA
Trending Topics
Dec 9, 2009, 07:20 AM
#8
Evolved Member
iTrader: (4)
Join Date: Jan 2008
Location: Chicago
Posts: 956
Likes: 0
Received 0 Likes
on
0 Posts
meh, my evo just rolled over 60k, and im used to replacing axles seals with every clutch. Maybe not necessary...but it was an extra 10 minutes to replace and peace of mind. i dont wanna have to tear everything apart AGAIN because of an oil seal leak that i could have changed while it was out.
they were only like 30 bucks for all of them.
they were only like 30 bucks for all of them.
 Dec 9, 2009, 08:30 AM
#10
Evolving Member
Thread Starter
iTrader: (21)
Join Date: Feb 2009
Location: rainy WA
Posts: 263
Likes: 0
Received 0 Likes
on
0 Posts
yup, ordered them all from my local mitsu dealer. 
thanks man! i owe you a thanks as well, for answering all my random texts and PMs on here. Not to mention your little write-up during your clutch swap.
How is your new clutch? Not sure what you installed, but did you notice any differences in engagement??
thanks man! i owe you a thanks as well, for answering all my random texts and PMs on here. Not to mention your little write-up during your clutch swap.
How is your new clutch? Not sure what you installed, but did you notice any differences in engagement??
Dec 9, 2009, 08:50 AM
#13

I've helped do a few clutch installs, and on the 2 ACD cars, we left the banjo fitting intact. I used a stubby 17mm wrench, and backed the bolt that the banjo fitting blocks out all the way, but that trapped the wrench. We used a come along to hold the transfer case out of the way. This was with a lift, so on the garage floor might be harder to get to that bolt.
Dec 9, 2009, 09:50 AM
#15
Evolving Member
Thread Starter
iTrader: (21)
Join Date: Feb 2009
Location: rainy WA
Posts: 263
Likes: 0
Received 0 Likes
on
0 Posts
would i do it again.... yeah, now knowing all the things necessary to get it done.
I've helped do a few clutch installs, and on the 2 ACD cars, we left the banjo fitting intact. I used a stubby 17mm wrench, and backed the bolt that the banjo fitting blocks out all the way, but that trapped the wrench. We used a come along to hold the transfer case out of the way. This was with a lift, so on the garage floor might be harder to get to that bolt.
not to mention trying to get to the banjo with the car on the ground is almost impossible...a lift would make it easier. there was just NO leverage
ah i see! yeah i hear you about not wanting to do it again.... i would if i needed to, but not willingly! lol
Last edited by halfnhalf83; Dec 9, 2009 at 09:54 AM.