How To Install [BINARY] Recaro Seat Lowering Brackets
 Feb 16, 2008, 05:54 PM
#1
Evolved Member
Thread Starter
iTrader: (62)
Join Date: Feb 2004
Location: Redmond - Lake Tapps ,WA
Posts: 3,336
Likes: 0
Received 6 Likes
on
6 Posts
How To Install [BINARY] Recaro Seat Lowering Brackets
Installing [BINARYENG.COM] seat lowering brackets is straight forward and can be done with hand tools  .
.
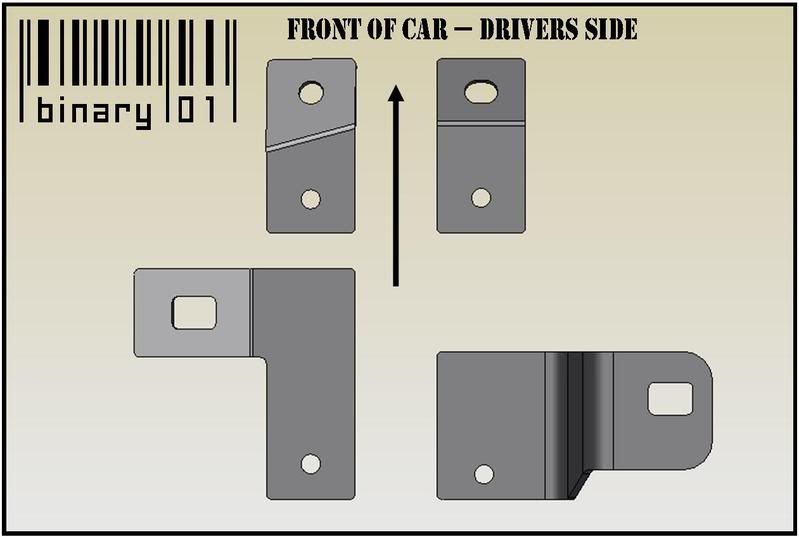
First things first - you need to be able to distinguish between Drivers Side Brackets and Passenger Side Brackets. There is only one bracket that is shared for both seats, this is the front center bracket. The same part is used on each seat. All the other brackets are unique to each side. Passenger side brackets have ONE chamfered (angled) corner, that is how you tell them apart from the drivers side parts.

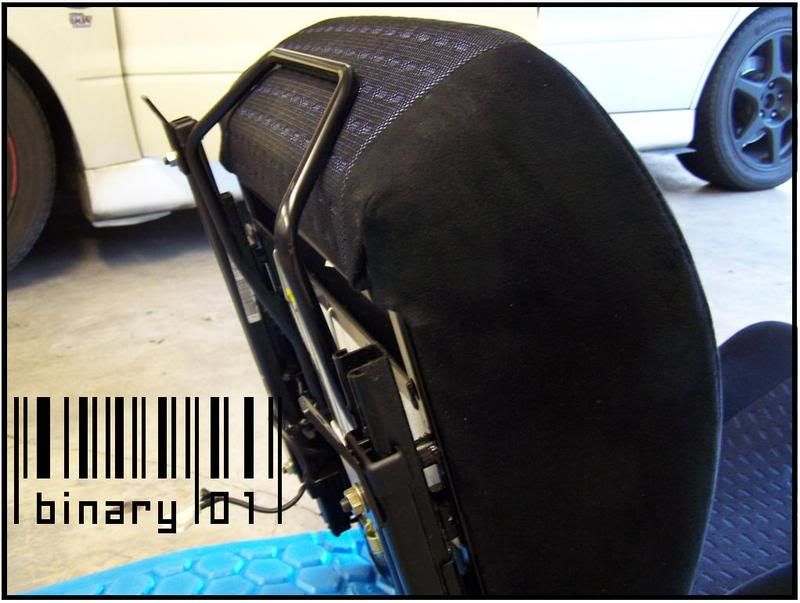
The pictures below showing removal of the seat actually show the [BINARY] lowering brackets, not the factory brackets. This is because I didn't want to re-install them to show how to remove them
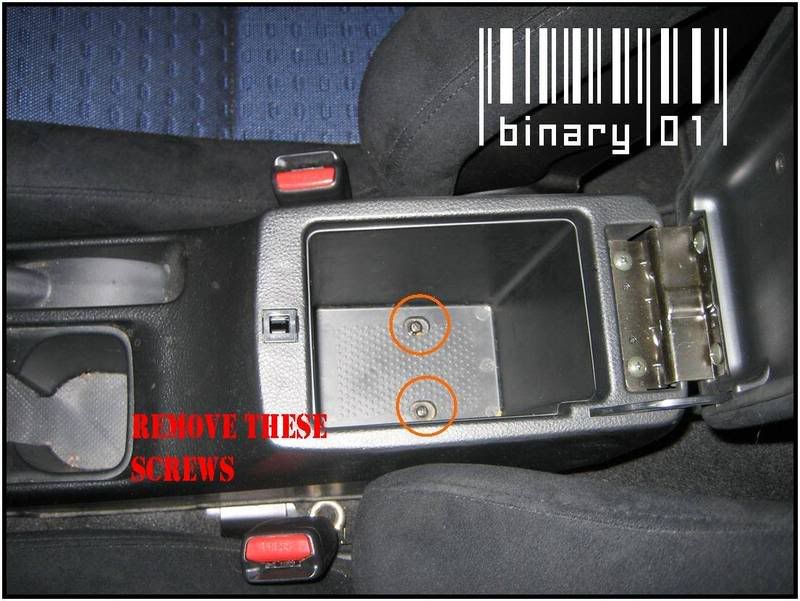
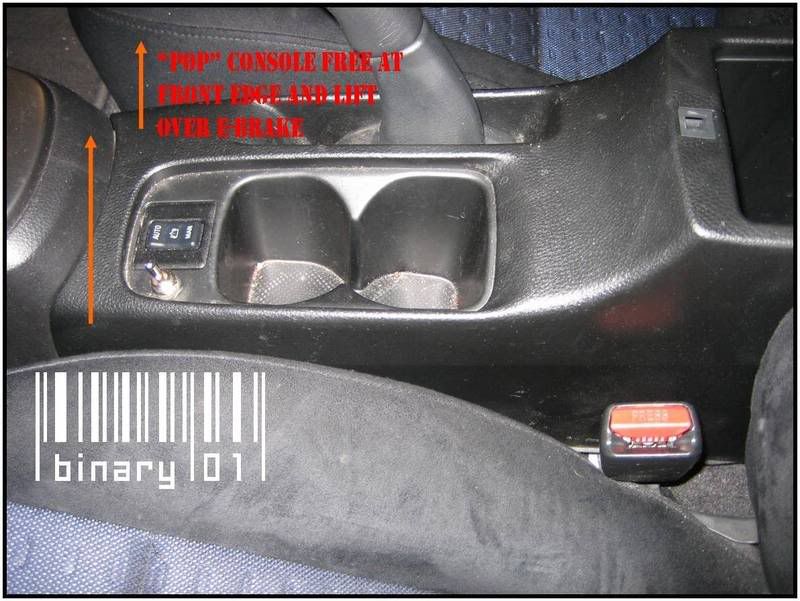
1. Remove the center console by opening it up and removing the two screws at the bottom of the compartment. Then "pop" the front edge up by pulling straight up near the shifter. With the E-Brake up you can remove the console. You may need to disconnect the IC spray button.
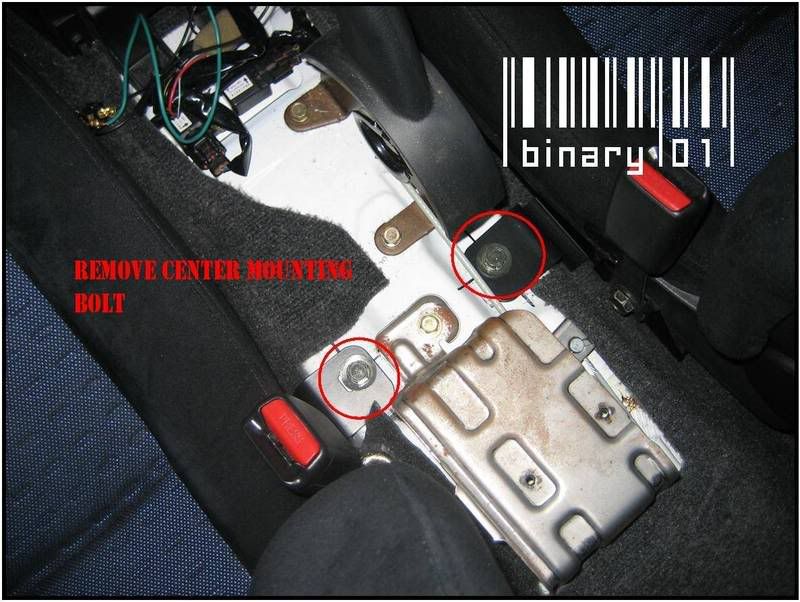
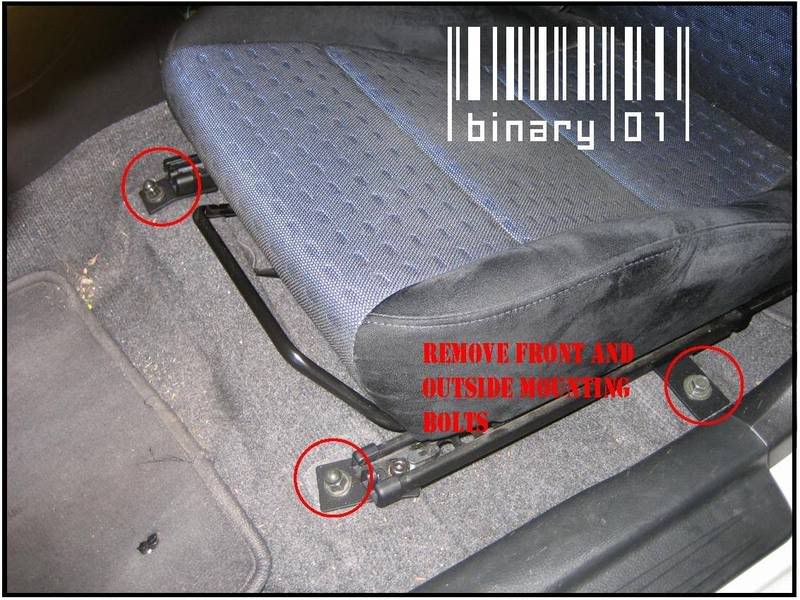
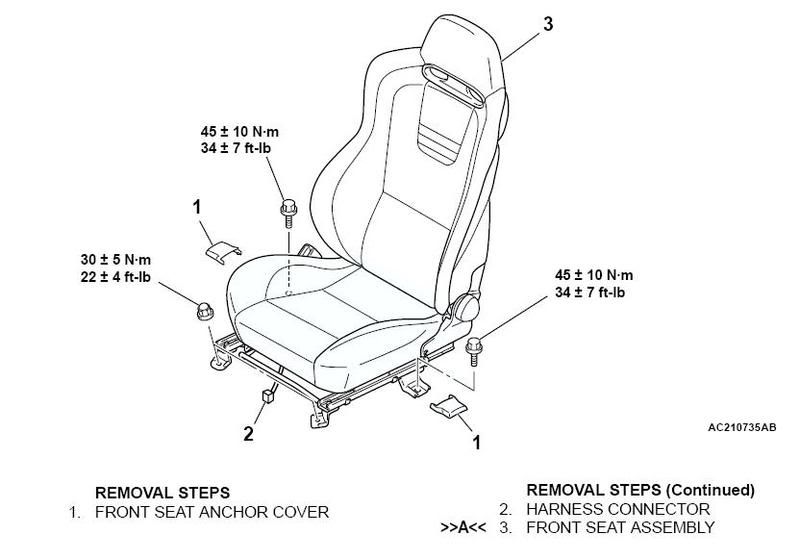
2. With the console out of the way you can access and remove the center mounting bolts for the seats. Use a 14mm socket. Also remove the two front mounting nuts, and the outside mounting bolt. You'll need to pop off the plastic cover from the outside. With the 4 mounting fasteners removed you can pull your seat out - once you disconnect the seatbelt warning harness (wire) underneath the seat.
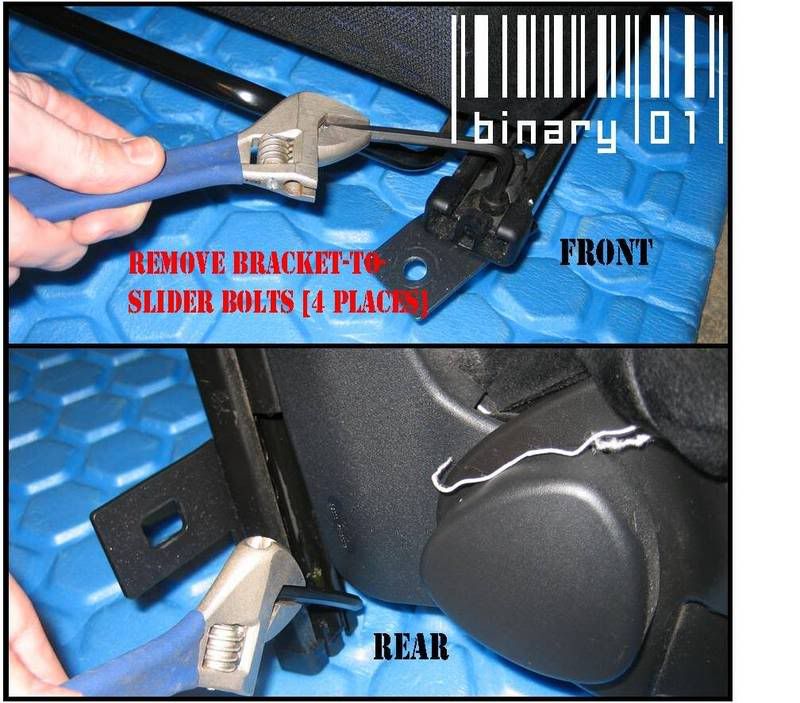
3. With the seat removed from the car you can now remove the factory mounting brackets from the sliders. This is done with a 6mm allen wrench. They are pretty tight, so I use a crescent wrench for leverage. There are 4 bolts, the 2 fronts are easiest to access by sliding the rails all the way forward. The 2 rears are best accessed by sliding the rails all the way back.
4. Factory "skyscrapers" booo.

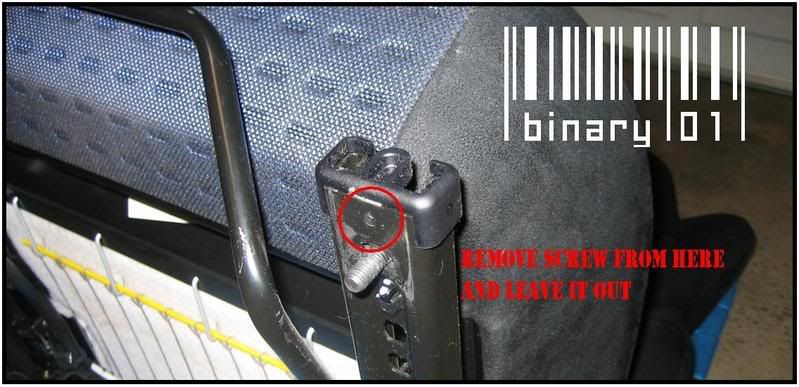
5. On the front of the sliders there are plastic caps, these are held in place by a small screw. Remove the screw, it interferes with the lowering brackets. This only has to be done on the FRONT of the sliders. The rears are ok.
6. Install the [BINARY] Lowering Brackets using the factory bolts and supplied nuts. USE BLUE LOCTITE. The images below show the correct orientation.
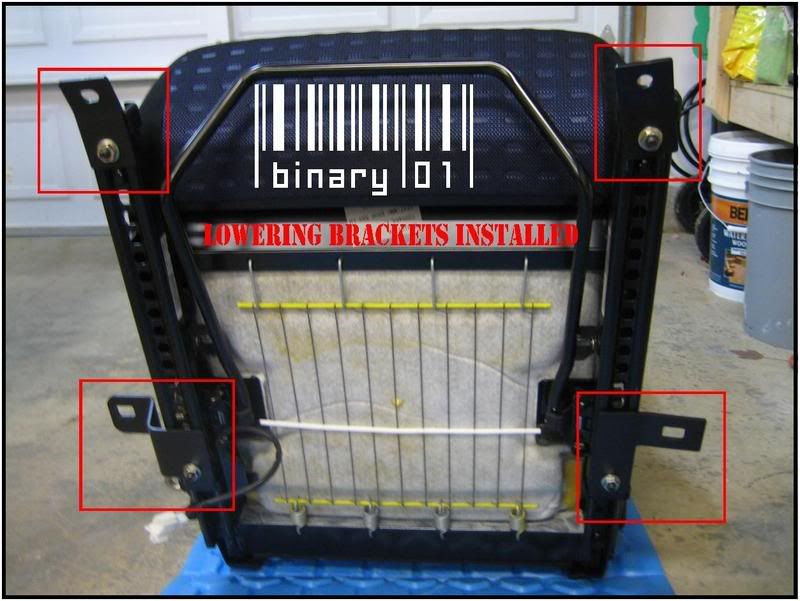
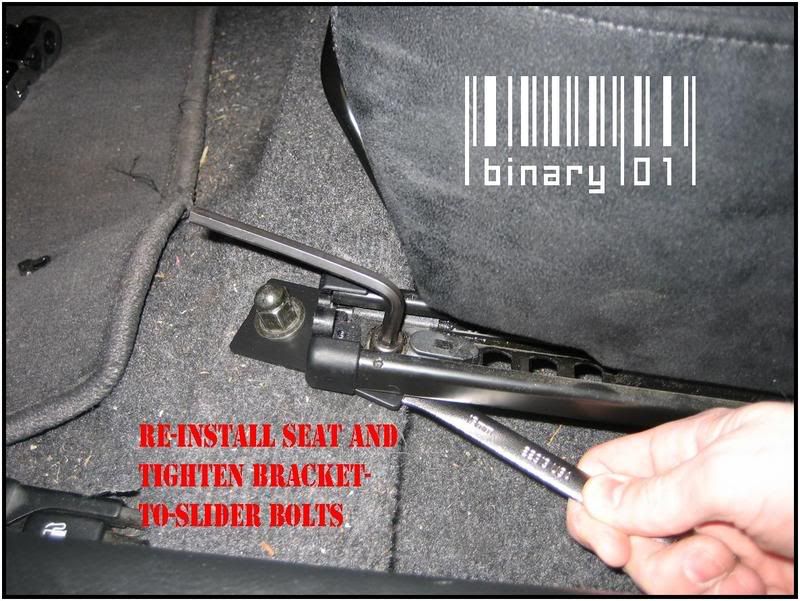
7. With the [BINARY] Brackets installed you can put your seat back in. Adjust each bracket so it aligns with the mounting stud/hole. The factory sliders use slotted holes to create some flexibility for alignment. The fronts slide side-to-side, the rears slide front-to-back. The [BINARY] Brackets also use slotted/square holes, like the factory brackets to allow for proper alignment. Once everything is lined up re-install the factory bolts/nuts, tighten with the 14mm socket. The bolts/nuts for the slider-to-brackets can be tightened in place also. Torque values for the fasteners can be seen in the images below.

8. Re-install the console.
9. Enjoy your EVO in a proper motorsports style driving position - the way it should have come from the factory.
UPDATE:
I've got some feedback about two issues: harness eyelets and the adjustment lever. So here are some pointers for these two issues.
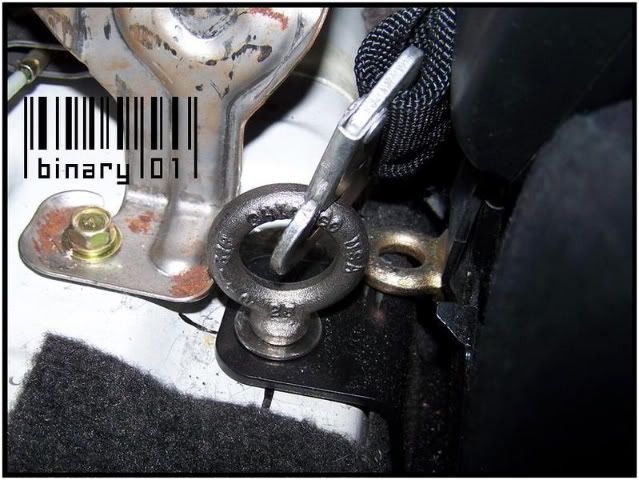
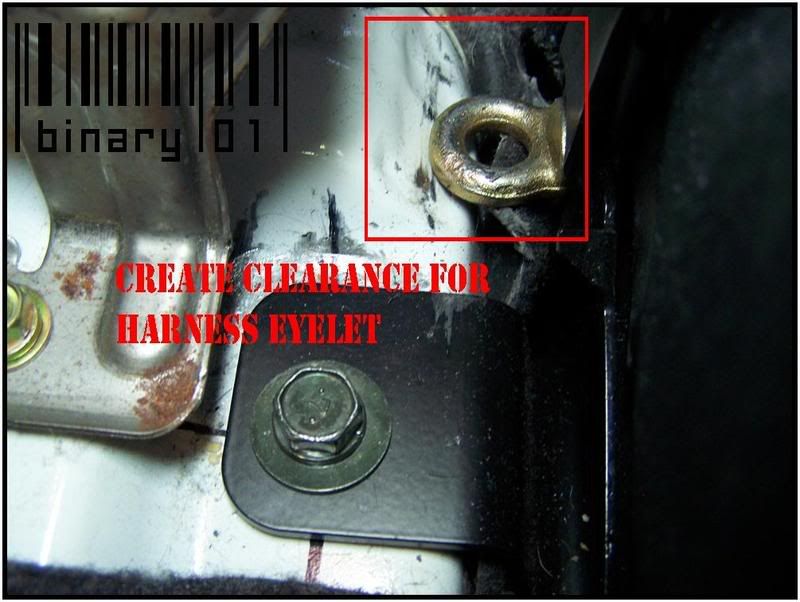
1. Some harness eyelets require modifications to create enough clearance near the center tunnel of the car. This can be done with a hammer, just make a slight impression in the tunnel where the interference is. A washer can also be placed under the rear center bracket to lift it slightly.
The other option is to mount the eyelet in place of the standard bolt for the rear center bracket. This places the eyelet under the center console for daily driving and requires you to remove the center console on track days to access the eyelet. People have had success with both solutions.
UPDATE PART 2
I now have compatible harness eyebolts available. They are custom made as the standard seatbelt ones that come with a harness are not the correct thread size. I tried to help a buyer find these and they weren't readily available - so I got these custom built.
Price is $14 shipped for one, or $24 shipped for two.
2. The seat has around 15 positions front to back, starting with position 1 at the full front orientation. Of these 15 there are some, around 5-9 that the adjustment lever interferes with the floor support a little. This can be fixed quickly and easily by slightly bending the adjustment lever.
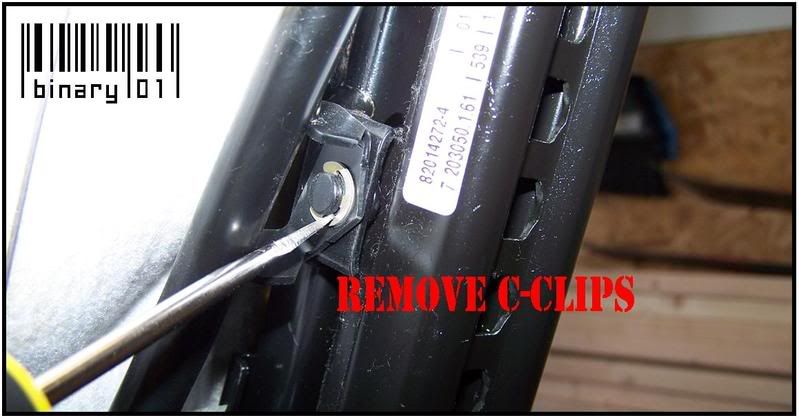
First remove the adjustment lever by using a flat blade screw driver to pop off the C-Clips which hold it in place under the seat.
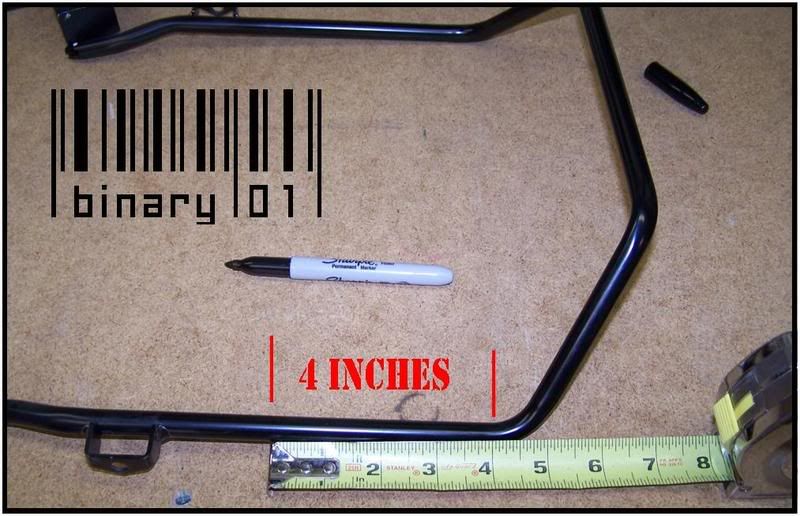
With the lever removed mark the spot for the bend at 4 inches from the front on both sides of the lever.
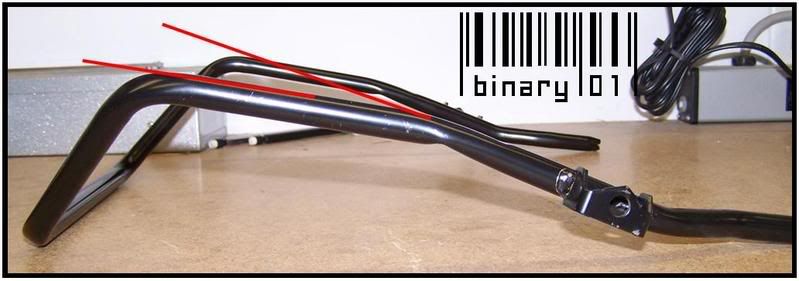
Use a vise or some large pliers to bend each leg of the lever around 10 degrees.
With the lever modified reinstall it on the seat and pop the C-Clips back on. You are good to go!
binary
[BINARY]
. First things first - you need to be able to distinguish between Drivers Side Brackets and Passenger Side Brackets. There is only one bracket that is shared for both seats, this is the front center bracket. The same part is used on each seat. All the other brackets are unique to each side. Passenger side brackets have ONE chamfered (angled) corner, that is how you tell them apart from the drivers side parts.
The pictures below showing removal of the seat actually show the [BINARY] lowering brackets, not the factory brackets. This is because I didn't want to re-install them to show how to remove them
1. Remove the center console by opening it up and removing the two screws at the bottom of the compartment. Then "pop" the front edge up by pulling straight up near the shifter. With the E-Brake up you can remove the console. You may need to disconnect the IC spray button.
2. With the console out of the way you can access and remove the center mounting bolts for the seats. Use a 14mm socket. Also remove the two front mounting nuts, and the outside mounting bolt. You'll need to pop off the plastic cover from the outside. With the 4 mounting fasteners removed you can pull your seat out - once you disconnect the seatbelt warning harness (wire) underneath the seat.
3. With the seat removed from the car you can now remove the factory mounting brackets from the sliders. This is done with a 6mm allen wrench. They are pretty tight, so I use a crescent wrench for leverage. There are 4 bolts, the 2 fronts are easiest to access by sliding the rails all the way forward. The 2 rears are best accessed by sliding the rails all the way back.
4. Factory "skyscrapers" booo.
5. On the front of the sliders there are plastic caps, these are held in place by a small screw. Remove the screw, it interferes with the lowering brackets. This only has to be done on the FRONT of the sliders. The rears are ok.
6. Install the [BINARY] Lowering Brackets using the factory bolts and supplied nuts. USE BLUE LOCTITE. The images below show the correct orientation.
7. With the [BINARY] Brackets installed you can put your seat back in. Adjust each bracket so it aligns with the mounting stud/hole. The factory sliders use slotted holes to create some flexibility for alignment. The fronts slide side-to-side, the rears slide front-to-back. The [BINARY] Brackets also use slotted/square holes, like the factory brackets to allow for proper alignment. Once everything is lined up re-install the factory bolts/nuts, tighten with the 14mm socket. The bolts/nuts for the slider-to-brackets can be tightened in place also. Torque values for the fasteners can be seen in the images below.
8. Re-install the console.
9. Enjoy your EVO in a proper motorsports style driving position - the way it should have come from the factory.
UPDATE:
I've got some feedback about two issues: harness eyelets and the adjustment lever. So here are some pointers for these two issues.
1. Some harness eyelets require modifications to create enough clearance near the center tunnel of the car. This can be done with a hammer, just make a slight impression in the tunnel where the interference is. A washer can also be placed under the rear center bracket to lift it slightly.
The other option is to mount the eyelet in place of the standard bolt for the rear center bracket. This places the eyelet under the center console for daily driving and requires you to remove the center console on track days to access the eyelet. People have had success with both solutions.
UPDATE PART 2
I now have compatible harness eyebolts available. They are custom made as the standard seatbelt ones that come with a harness are not the correct thread size. I tried to help a buyer find these and they weren't readily available - so I got these custom built.
Price is $14 shipped for one, or $24 shipped for two.
2. The seat has around 15 positions front to back, starting with position 1 at the full front orientation. Of these 15 there are some, around 5-9 that the adjustment lever interferes with the floor support a little. This can be fixed quickly and easily by slightly bending the adjustment lever.
First remove the adjustment lever by using a flat blade screw driver to pop off the C-Clips which hold it in place under the seat.
With the lever removed mark the spot for the bend at 4 inches from the front on both sides of the lever.
Use a vise or some large pliers to bend each leg of the lever around 10 degrees.
With the lever modified reinstall it on the seat and pop the C-Clips back on. You are good to go!
binary
[BINARY]


Trending Topics
 Mar 21, 2008, 10:09 PM
#13
Evolving Member
iTrader: (1)
Join Date: Jun 2007
Location: Ridgely, Maryland
Posts: 156
Likes: 0
Received 0 Likes
on
0 Posts
I have been looking for this forever cause i seen it once in a japanese mag. Been waiting for someone in the us to do it! How much to ship to 21660?
Mar 24, 2008, 07:23 AM
#15
Evolved Member
Thread Starter
iTrader: (62)
Join Date: Feb 2004
Location: Redmond - Lake Tapps ,WA
Posts: 3,336
Likes: 0
Received 6 Likes
on
6 Posts
You probably saw HKS lowering rails in the Japanese magazine. These do the same thing, but allow you to retain the factory rails and save money. Binary brackets are half the cost of HKS, FTW!