How to: Make your own undertray (cheap & easy)
 Feb 28, 2010, 08:26 PM
#16
Evolved Member
iTrader: (75)
Join Date: Jul 2007
Location: NorCal
Posts: 515
Likes: 0
Received 0 Likes
on
0 Posts
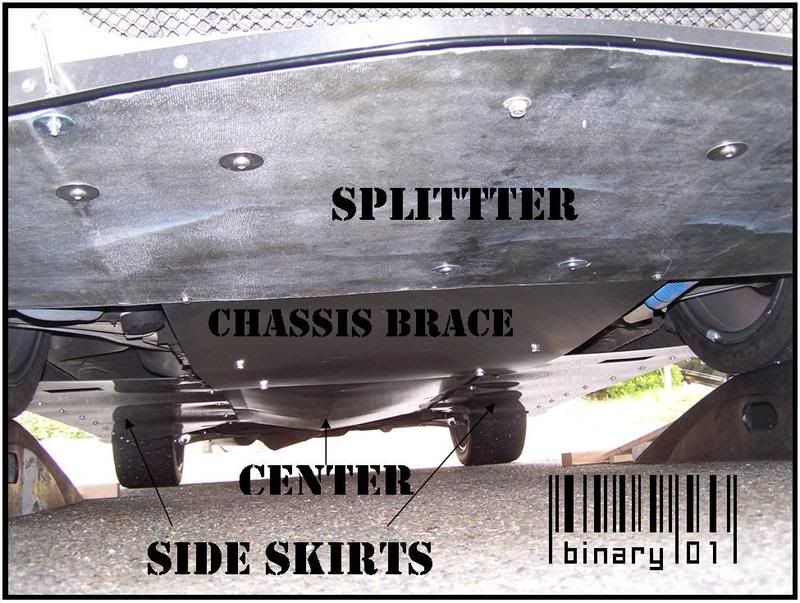
^^^very nice. When I do this, I'll probably use something like thick cardboard to make a good outline with and then use a thin sheet of aluminum and make as much of an undertray as possible...like you have done. Looks good! Does yours actually go out into an actual splitter or is it just an undertray?
 Mar 1, 2010, 11:19 AM
#18

And to address the weight question...I don't have an exact answer for you, but its not more than a few lbs. in its final form, i carried it to my garage holding it between my thumb and forefinger..very light-weight
Last edited by YogSaahoth; Mar 1, 2010 at 11:22 AM.
Mar 2, 2010, 05:50 AM
#20
 Mar 6, 2010, 09:08 PM
#22
Newbie
iTrader: (1)

Join Date: Jan 2010
Location: Hawaii *****!!
Posts: 56
Likes: 0
Received 0 Likes
on
0 Posts
plus these things are great for people that live up north during the winter i just put my evo through its first and most likely the last .
thanks for the new project and me spending more money !!
good job
thanks for the new project and me spending more money !!
good job
 Mar 8, 2010, 10:53 AM
#25
it's still holding up well. i've driven it a few more times around town and theres no heat damage. i changed out some parts and haven't tuned it yet so i haven't beaten on it yet but i think it will be fine. if it starts to melt just put some sheet metal in that spot...i say go for it for those of you debating it. pm the guy who posted the pic of his car here to see what material he used for comparison
 Apr 21, 2010, 12:01 PM
#28
Just an update since Ive been driving the car more over the past few weeks...the tray is holding up good. no heat damage. one of the u-bolts was snagged on an awkward incline at the shop that did my alignment. I simply took them off inverted them and reinstalled, so the curved side now faces the road. I recommend using this method from the start and I have updated the original post
Apr 24, 2010, 04:25 PM
#29
Newbie
iTrader: (1)
Join Date: Nov 2006
Location: South Florida
Posts: 31
Likes: 0
Received 0 Likes
on
0 Posts
After driving with no undertray for about 3 years I finally decided I NEED one. The stock one is a piece of crap...i find the whole multi-piece design is more inconvenient than anything, and having to use like 25 of those hard to find/expensive plastic clips doesnt help either. There are some high-quality replacements out there, from buschur or beatrush for example, that arent too expensive, but to ship them is like $150+, which isnt anyones fault, thats just the way it is. I was quoted no less than 300 shipped (around $350 to NY) from the vendors i asked. The undertray isnt absolutely essential, but my engine bay/underside of the engine is always filthy, and no undertray does mess with aero, which track guys will attest to. If i were a track junky i would probably go with a legit piece from one of the above companies, but $300+ for something thats not visible, only gets dirty and scuffed up, and isnt really required for daily driving is too much. Plus, whenever I looked at the aftermarket undertrays, I would say "that doesnt look that hard to make." So let's give it try:
Before I start, I want to say to anyone willing to try this, its not that hard. I'm no mechanic or craftsman...I'm in the process of getting my doctorate in pharmacy, so im more of a nerd than anything. I do all the work on my cars and have had numerous manual labor/maintenance type jobs so i know how to work with my hands. The only tools you will need are: a pencil, straightedge and tape measure for measurements, a cutting tool (i used a dremel), a drill and some basic hardware and tools for mounting.
-The hardest part was figuring the dimensions for this thing. I just jacked up the car and took some rough measurements. Also, finding a good plastic rivet to use was hard. most of them suck, I luckily have a privatly owned auto parts store near me that has a great selection. oem fasteners are great too but i was quoted $1.62 a piece. BS
-Budget is key. If you spend too much it defeats the purpose of this project. I kid you not, I spent less than $40 on this project. $25 for the material, and $10-15 for mounting hardware.
Here's what i used: This is a $25 piece of 4' x 8' FRP wall panel from home depot or lowe's. I questioned whether it would be tough/heat resistant enough, but its held up fine so far.

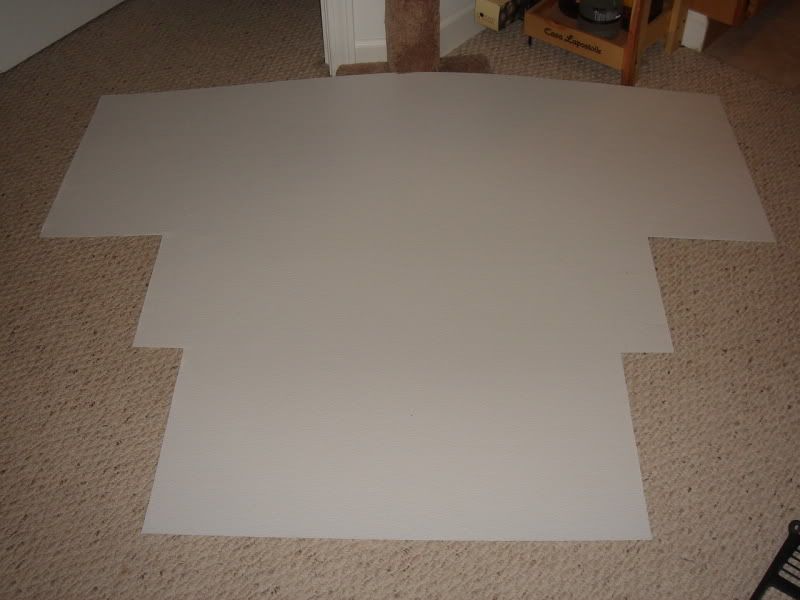
Made some rough measurements, did some cutting...By the way, I am more than willing to share my dimensions for this thing. The only measuring i did was for the portion you see below. everything else was eyeballed or traced.
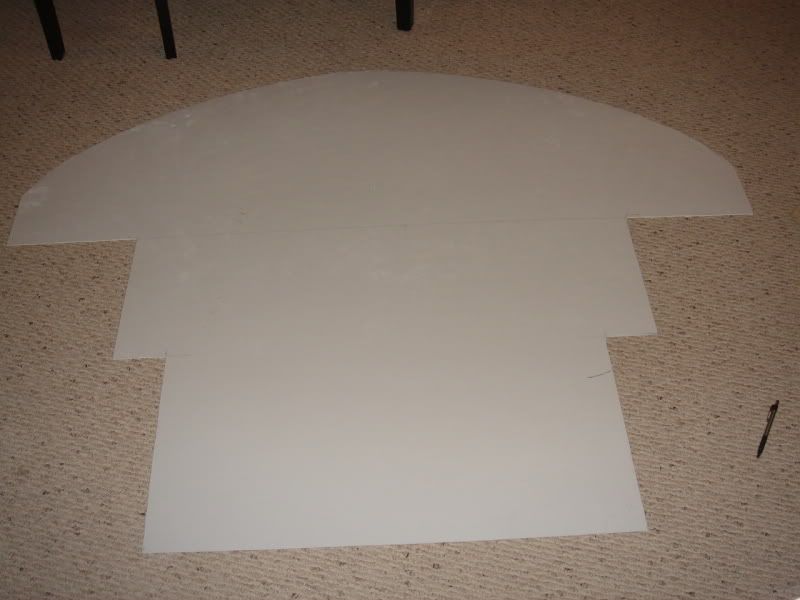
Next, I took off the front bumper and used the lip as a template to trace out and cut for the curved shape of the bumper. then i just lined up the holes on the lip with the piece and drilled them out.
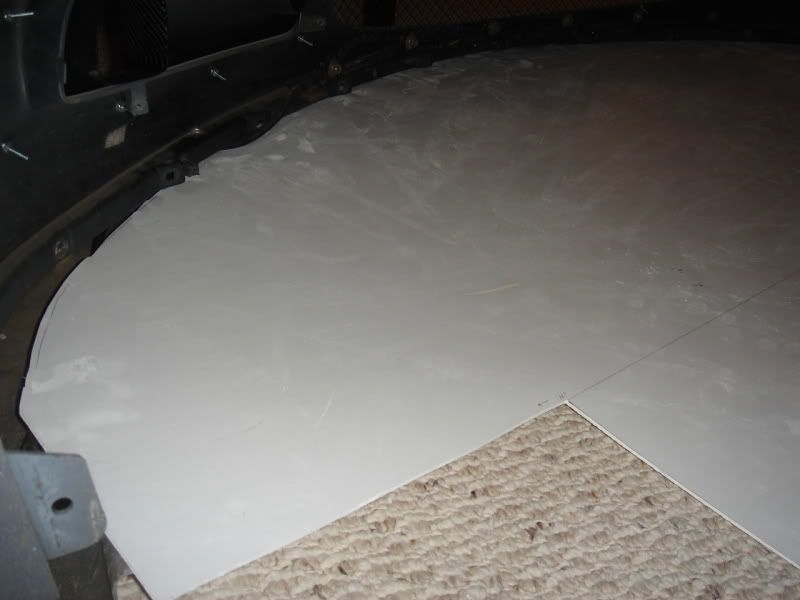
It actually lined up and mounted great. This is when i realized my bastard plan was actually going to work.


Planning ahead, I drilled some holes next to the holes on the interior of the bumper so i could stick an allen wrench or something in there to hold the undertray down when fastening clips
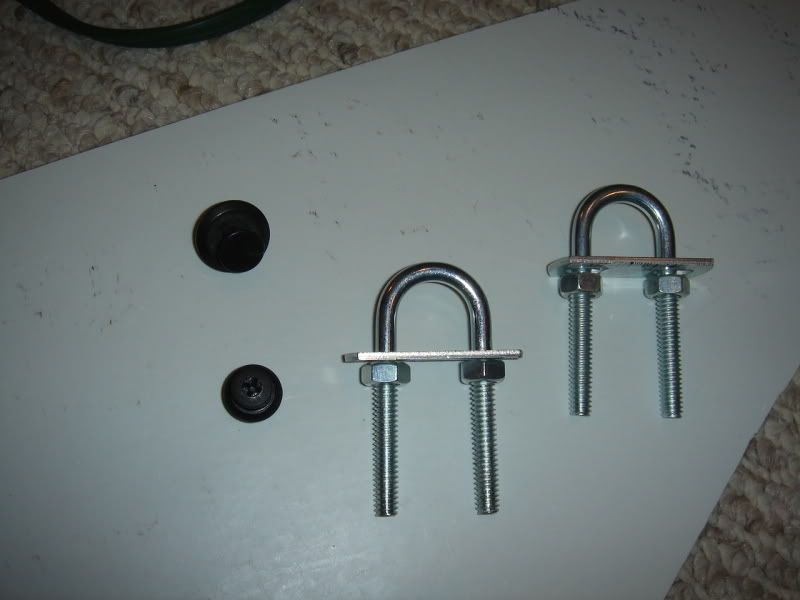
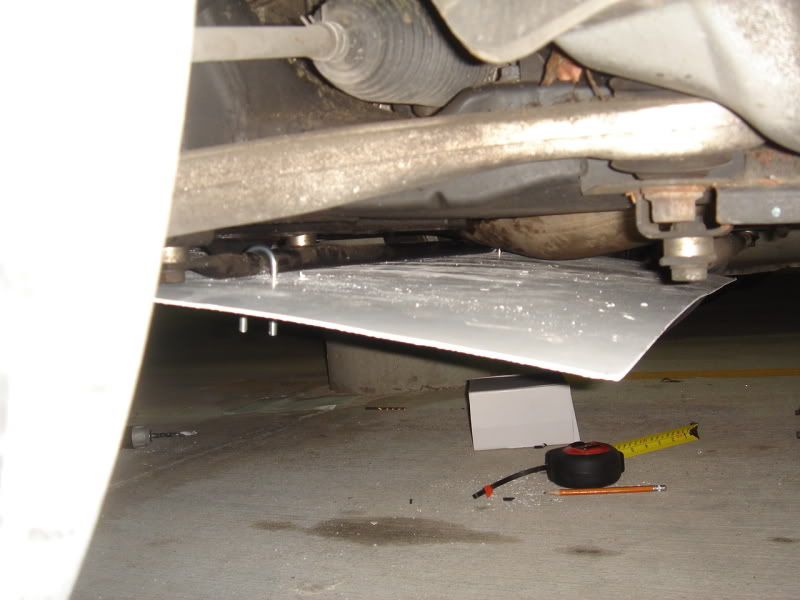
Got some u-bolts from lowe's, 80cents a piece. I'm going to use these to attach the rear of the undertray to the forward underbrace. Use some plastic rivets to attach the front to your lip...your drill bit size for the holes should obviously match these rivets, or close to it at least.
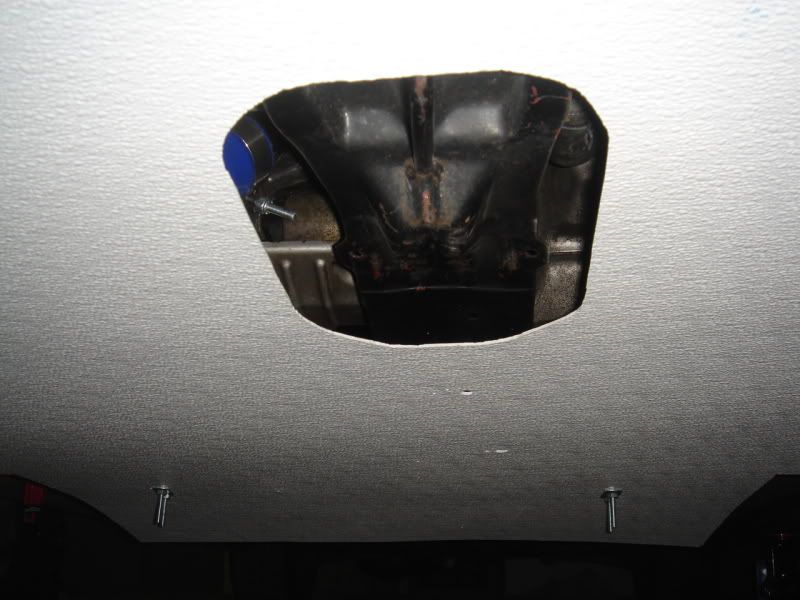
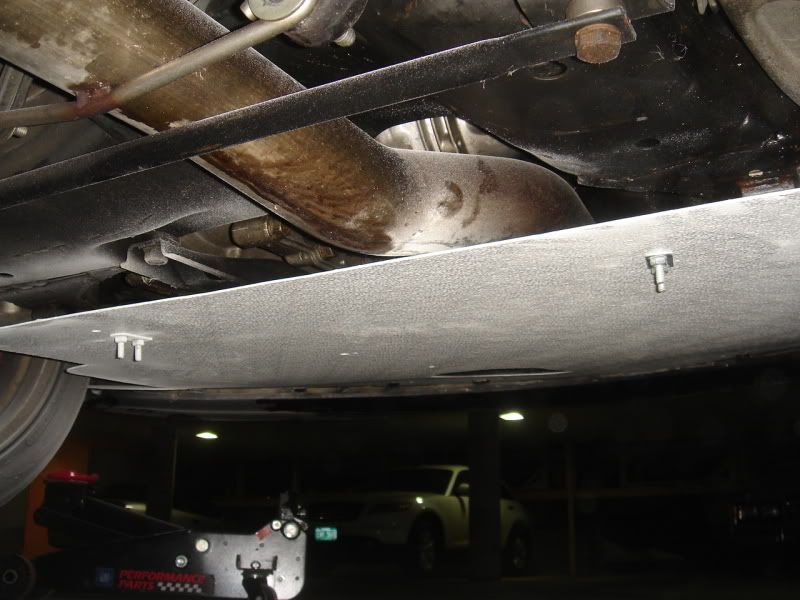
Its awkward maneuvering this thing up in here but i got it on. I had to trim some away for my licp and its clamp to the ic. its just a tiny amount and will be different for everybody. I use ETS ic parts, but im sure it will be similar for others. You also have the downpipe which comes close as we will see in a moment..
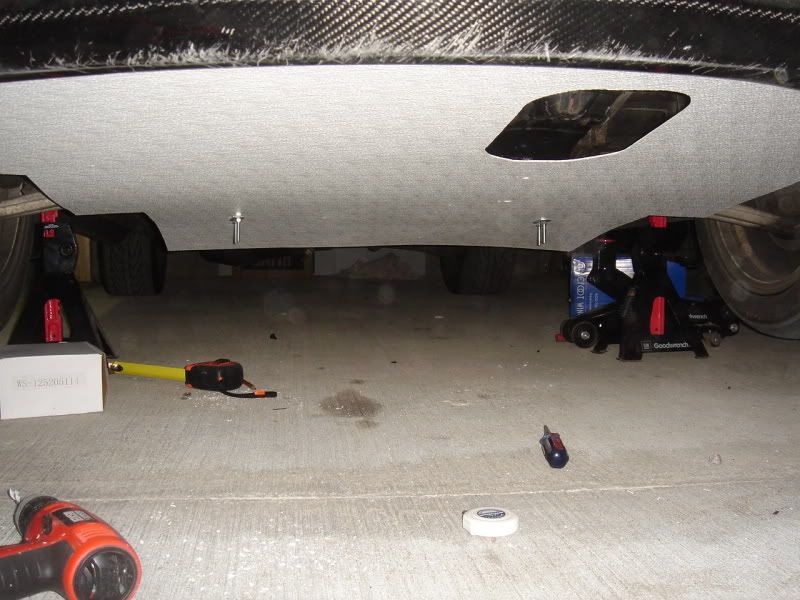
As you can see i have cut a portion so i will not have to remove the panel to access the jack point here. My measuring for this was extremely crude so i wont even discuss the details. You'll figure it out...and it doesnt have to be perfect, or nearly as large as mine for that matter.
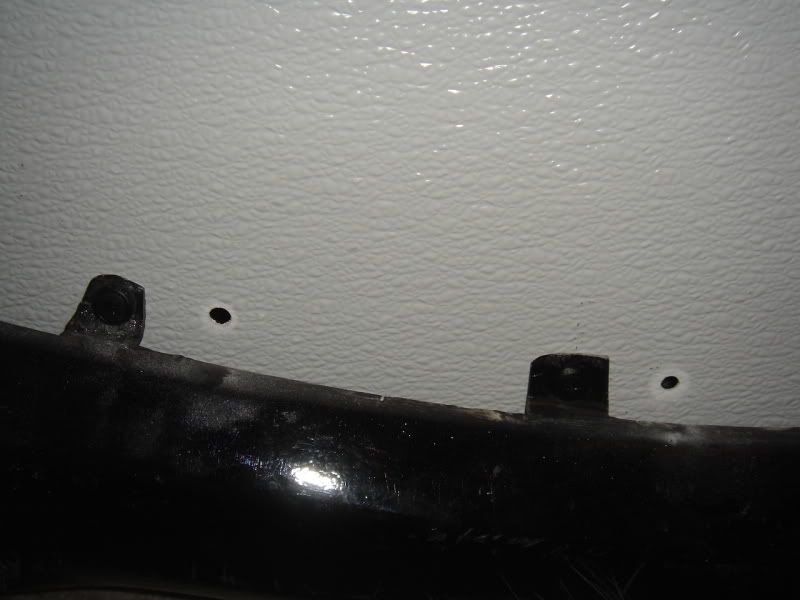
Here is a shot from the rear. you can see how i have attached the u-bolts to the bar. I just peeked up at the underbrace as i was mounting the undertray and marked on the opposite side where I would drill the hole. then i measured for the other hole. there is a bracket that goes across the bolt to fasten it so the holes dont have to be perfect.
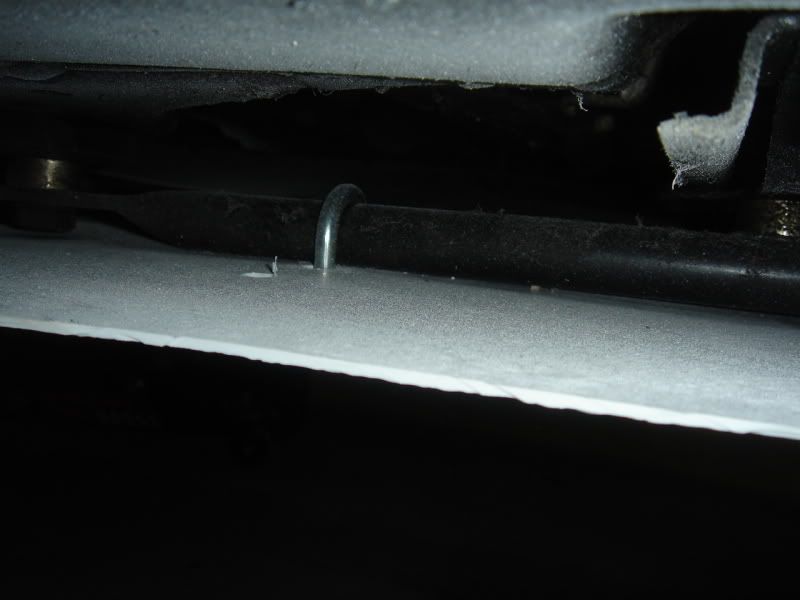
Trimmed some of the rear away to neaten things up. UPDATE...after driving around for a while, I ended up snagging one of these u-bolts on something. the fix: install them inverted to what you see here. Its a little more troublesome to sqeeze ur hands in to get the nuts on, but much safer. u could also trim the threds down more than i have here
A better look at the u-bolt from the top
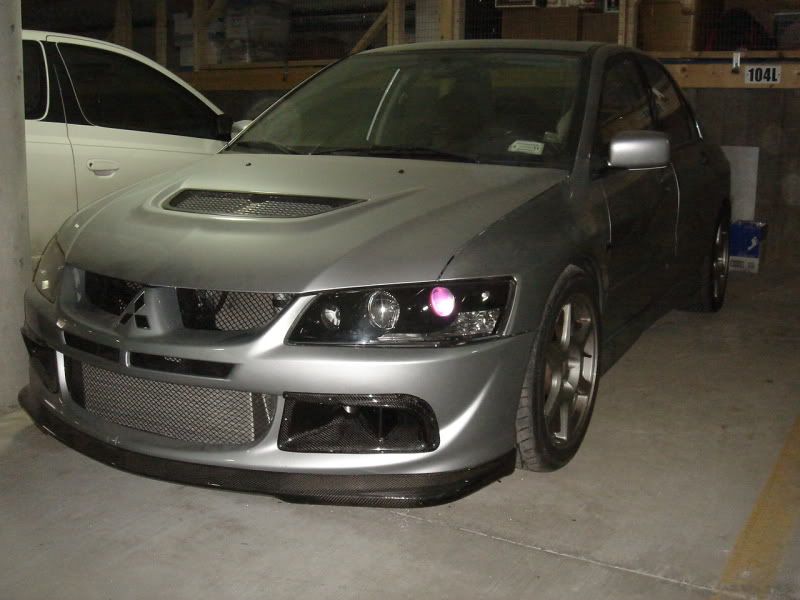
And here's the car
As you can see I did the prep for this project in my small apartment, cutting and trimming out on the doorstep, and installed it in the parking garage...so anyone can do this.
I don't drive the evo in winter, but i have let it run numerous times, and went for a quick 15min drive down the road the other day. no signs of heat damage. I bought a small sheet of aluminum, 6" x 18" at lowe's also for about $10, to use as a heat shield in case the dp starts melting the panel. So beware here, because i have not tested this under hard driving...this thing may melt away the first time i drive hard. there is a good inch to 1.5" between the dp and the undertray...this is the reason there is no fastener in the center of the undertray, to allow this space. It is securely fastened to the car and there is no rattling or other noise while driving.
I'm on the forum quite often so ill be available to answer questions..although i spent way too much time on this write up so it should be good. If the thread shows significant interest ill post up some dimensions. However, I don't know how popular the 'how to' section is...enjoy
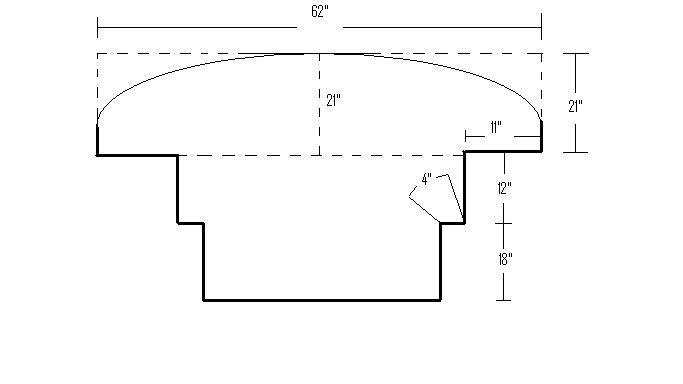
EDIT: Due to some requests, here is a diagram for dimensions...keep in mind this is for an VIII bumper with an aftermarket do-luck style cf lip. that 62" across the top may not fit quite right for you, so you may want to double check with your exact bumper & lip setup...also, some of the 18" at the bottom got trimmed off. these dimensions will get you a rough shape, you will be responsible for trimming it according to your individual setup...i did alot of trimming with the tray on the car for better accuracy
Before I start, I want to say to anyone willing to try this, its not that hard. I'm no mechanic or craftsman...I'm in the process of getting my doctorate in pharmacy, so im more of a nerd than anything. I do all the work on my cars and have had numerous manual labor/maintenance type jobs so i know how to work with my hands. The only tools you will need are: a pencil, straightedge and tape measure for measurements, a cutting tool (i used a dremel), a drill and some basic hardware and tools for mounting.
-The hardest part was figuring the dimensions for this thing. I just jacked up the car and took some rough measurements. Also, finding a good plastic rivet to use was hard. most of them suck, I luckily have a privatly owned auto parts store near me that has a great selection. oem fasteners are great too but i was quoted $1.62 a piece. BS
-Budget is key. If you spend too much it defeats the purpose of this project. I kid you not, I spent less than $40 on this project. $25 for the material, and $10-15 for mounting hardware.
Here's what i used: This is a $25 piece of 4' x 8' FRP wall panel from home depot or lowe's. I questioned whether it would be tough/heat resistant enough, but its held up fine so far.
Made some rough measurements, did some cutting...By the way, I am more than willing to share my dimensions for this thing. The only measuring i did was for the portion you see below. everything else was eyeballed or traced.
Next, I took off the front bumper and used the lip as a template to trace out and cut for the curved shape of the bumper. then i just lined up the holes on the lip with the piece and drilled them out.
It actually lined up and mounted great. This is when i realized my bastard plan was actually going to work.
Planning ahead, I drilled some holes next to the holes on the interior of the bumper so i could stick an allen wrench or something in there to hold the undertray down when fastening clips
Got some u-bolts from lowe's, 80cents a piece. I'm going to use these to attach the rear of the undertray to the forward underbrace. Use some plastic rivets to attach the front to your lip...your drill bit size for the holes should obviously match these rivets, or close to it at least.
Its awkward maneuvering this thing up in here but i got it on. I had to trim some away for my licp and its clamp to the ic. its just a tiny amount and will be different for everybody. I use ETS ic parts, but im sure it will be similar for others. You also have the downpipe which comes close as we will see in a moment..
As you can see i have cut a portion so i will not have to remove the panel to access the jack point here. My measuring for this was extremely crude so i wont even discuss the details. You'll figure it out...and it doesnt have to be perfect, or nearly as large as mine for that matter.
Here is a shot from the rear. you can see how i have attached the u-bolts to the bar. I just peeked up at the underbrace as i was mounting the undertray and marked on the opposite side where I would drill the hole. then i measured for the other hole. there is a bracket that goes across the bolt to fasten it so the holes dont have to be perfect.
Trimmed some of the rear away to neaten things up. UPDATE...after driving around for a while, I ended up snagging one of these u-bolts on something. the fix: install them inverted to what you see here. Its a little more troublesome to sqeeze ur hands in to get the nuts on, but much safer. u could also trim the threds down more than i have here
A better look at the u-bolt from the top
And here's the car
As you can see I did the prep for this project in my small apartment, cutting and trimming out on the doorstep, and installed it in the parking garage...so anyone can do this.
I don't drive the evo in winter, but i have let it run numerous times, and went for a quick 15min drive down the road the other day. no signs of heat damage. I bought a small sheet of aluminum, 6" x 18" at lowe's also for about $10, to use as a heat shield in case the dp starts melting the panel. So beware here, because i have not tested this under hard driving...this thing may melt away the first time i drive hard. there is a good inch to 1.5" between the dp and the undertray...this is the reason there is no fastener in the center of the undertray, to allow this space. It is securely fastened to the car and there is no rattling or other noise while driving.
I'm on the forum quite often so ill be available to answer questions..although i spent way too much time on this write up so it should be good. If the thread shows significant interest ill post up some dimensions. However, I don't know how popular the 'how to' section is...enjoy
EDIT: Due to some requests, here is a diagram for dimensions...keep in mind this is for an VIII bumper with an aftermarket do-luck style cf lip. that 62" across the top may not fit quite right for you, so you may want to double check with your exact bumper & lip setup...also, some of the 18" at the bottom got trimmed off. these dimensions will get you a rough shape, you will be responsible for trimming it according to your individual setup...i did alot of trimming with the tray on the car for better accuracy
How long did it take to do this once the dimensions were cut out ?