How To Make A Cheap Alternative To An Ash Tray Gauge Pod
 Mar 8, 2012, 07:33 PM
#1
Newbie
Thread Starter
iTrader: (15)

Join Date: Mar 2007
Location: CT
Posts: 36
Likes: 0
Received 0 Likes
on
0 Posts
How To Make A Cheap Alternative To An Ash Tray Gauge Pod
I've been wanting one of those sweet Evo Dave ash tray gauge pods for my car since I bought it but am never at the right place at the right time. I didn't want to have gauges in my gruppe s panel that didn't match, and already have my boost gauge on the steering wheel. Pretty safe to say another production run of the legit pods will never happen, so I got bored and tried to see what else I could come up to put a gauge in the ash tray since I liked that spot for placement.
Some Prosport 52mm gauges come with a meter hood sun blocker thing, so decided to pick one up and see if I can use it backwards to angle the gauge a bit instead of putting it flush in the ash tray. I believe Defi sells 60mm ones, so those with the bigger size gauges have an option too.
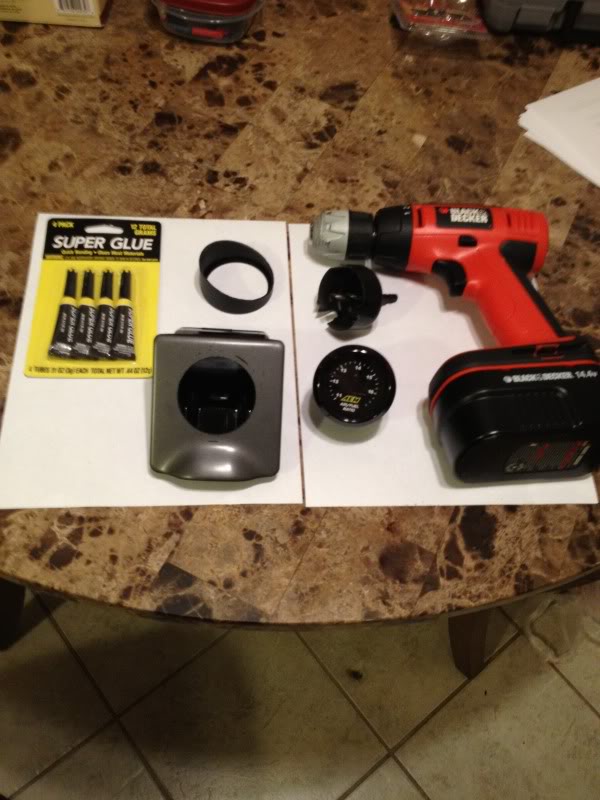
Got the hood for about $6 shipped, so went into the toolbox to see what else I needed. I had a 2 1/8" hole saw bit and figured that would make a much better hole than me in charge of a dremel . I measured the center of the ash tray lid and drilled a pilot hole first, then used the hole saw while the ash tray was in a vice. The lid is a bit convex, so you need to do it nice a slow while alternating pressure from side to side until it makes it all the way through. Laid it all out:
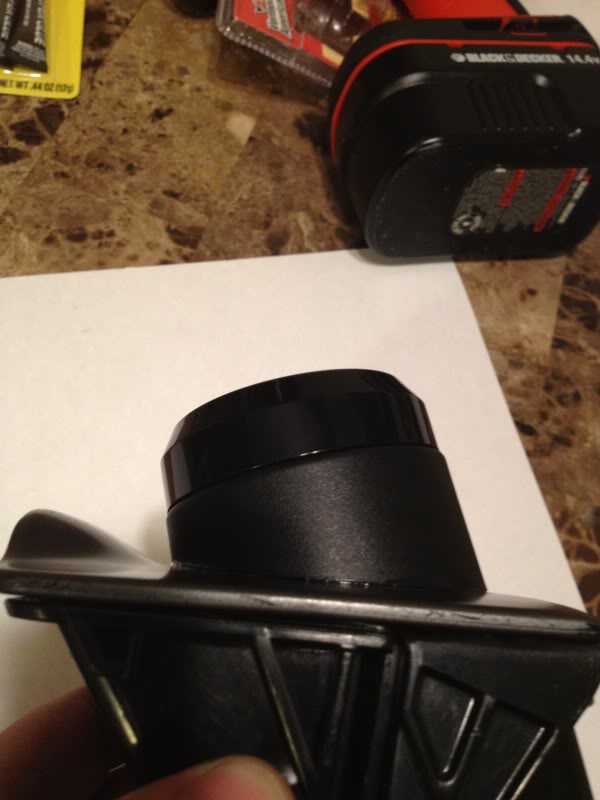
Since the lid is convex, I had to use a dremel to shape the bottom of the prosport piece so it would fit with no gaps. I positioned it so it was slightly angled towards the driver and super glued the sucker on:
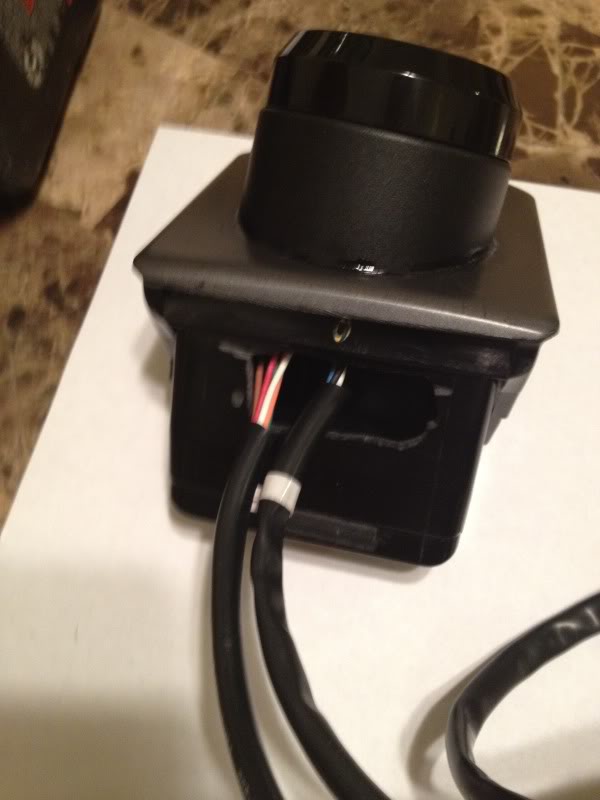
I then used the dremel to cut an opening in the back to run my wires to the gauge (now you see why I didn't attempt to free hand the hole in the top):
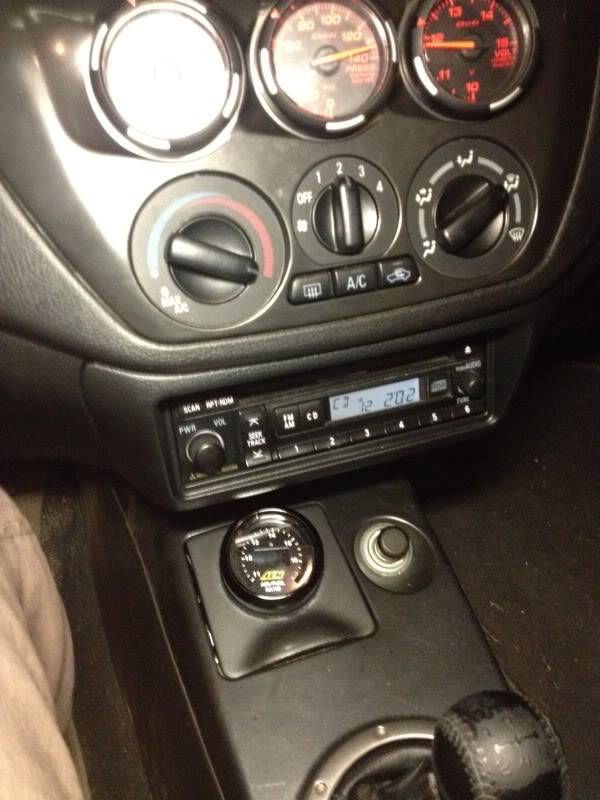
Here is a pic of what it looks like from the drivers seat. Not as cool as the actual Evo Dave piece, but I'm pretty happy with the way it turned out. I think I'm going to paint it so it's all one color and matches the stock center piece, so I'll post up another pic once it's done and hooked up.
You can tap into the cigarette lighter or radio harness for whatever gauge you have, or search the Evo X section on how to make a sweet distribution block for all your gauges like I did .
.
May seem a little ghetto to some, but I got it all done for about $10 and had fun doing it.
Some Prosport 52mm gauges come with a meter hood sun blocker thing, so decided to pick one up and see if I can use it backwards to angle the gauge a bit instead of putting it flush in the ash tray. I believe Defi sells 60mm ones, so those with the bigger size gauges have an option too.
Got the hood for about $6 shipped, so went into the toolbox to see what else I needed. I had a 2 1/8" hole saw bit and figured that would make a much better hole than me in charge of a dremel
. I measured the center of the ash tray lid and drilled a pilot hole first, then used the hole saw while the ash tray was in a vice. The lid is a bit convex, so you need to do it nice a slow while alternating pressure from side to side until it makes it all the way through. Laid it all out:Since the lid is convex, I had to use a dremel to shape the bottom of the prosport piece so it would fit with no gaps. I positioned it so it was slightly angled towards the driver and super glued the sucker on:
I then used the dremel to cut an opening in the back to run my wires to the gauge (now you see why I didn't attempt to free hand the hole in the top
):Here is a pic of what it looks like from the drivers seat. Not as cool as the actual Evo Dave piece, but I'm pretty happy with the way it turned out. I think I'm going to paint it so it's all one color and matches the stock center piece, so I'll post up another pic once it's done and hooked up.
You can tap into the cigarette lighter or radio harness for whatever gauge you have, or search the Evo X section on how to make a sweet distribution block for all your gauges like I did
.May seem a little ghetto to some, but I got it all done for about $10 and had fun doing it.

 Mar 14, 2012, 06:40 AM
#3
Newbie

Looks good .. I think if you put it at a slight angle using filler and resin compound and paint it it would flow a bit better and be easier to look at while driving.
 Mar 15, 2012, 12:58 PM
#5

That's prett decent! I would go a bit crazy on making it all completely stealth-like seamless but it's a great way to start! When and if I get around to doing this, I'll make it still functional for loose change also I'll be sure to make a write up too of course.
I'll be sure to make a write up too of course.

Thread
Thread Starter
Forum
Replies
Last Post
kevinlubitski
For Sale - Interior / Exterior / Sound / Styling
2
Sep 22, 2012 11:00 AM
kevinlubitski
For Sale/WTB - Engine / Drivetrain / Power
13
Dec 27, 2011 08:55 AM
Paulito
For Sale - Cars For Sale
17
Jul 20, 2010 04:29 PM