Evo 8/9 Coilover Installation
 May 10, 2012, 06:37 PM
#1
Evo 8/9 Coilover Installation
I used to be a VW guy, and was spoiled with how detailed some of the diys on vwvortex are. In the spirit, I made a spoon feeding DIY on installing a set of Fortune auto 500 coilovers. Mine came with standard valving, 9 front dampening, and 8 rear dampening.
If you are following this as an install guide, read absolutely everything before starting.

Tools:
21mm deep socket
17mm deep socket
14mm deep socket
17mm wrench
pliers
Breaker bar
Floor jack / stands
anti seize
Micrometer ($30 @ advance auto)
Front:
Loosen wheel bolts

Lift from the jack point behind the front end tow hook

Place jack stands on frame rails between the pinch welds

Remove wheels, and place a jack under the steering knuckle, or it could fall down when you disconnect it from the strut.
Remove the clip attaching the brake line to the strut bracket with pliers.
Remove the nuts fastening the bolts on the bottom of the strut, and be sure not to mix the bolts up, the top one is special.

Lower the steering knuckle, and push it out of the way a bit. With the jack supporting the bottom of the strut, remove the 3 bolts at the top of the strut, being careful no to allow the strut to drop out with the third bolt is removed.

The strut can then just be wiggled out, bottom first.

draw lines with anti seize on the threads, and spin one of the adjustment rings all the way through it. This will push the goop into the threads, which will make it easier to make adjustments if you decide to in the future.

Installation of the front coilovers is the reverse of everything done so far. Slide it in top first, and lightly fasten the 2 bolts on the strut tower. If you have camber adjustment, it's a good idea to make sure those bolts are tight.

You can use anything from string to a ruler to measure the ride height adjustment but a micrometer will get it the closest. I had no idea how hight the suspension would ride with the way they were set out of the box, so i just made sude they were the same height with the micrometer before attaching the lower strut bolt.
If the ride is too high/low when you put the car back together, just measure how much higher/lower it should be, and raise the locking rings that much.
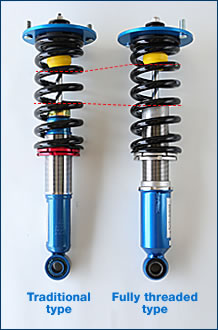
Keep in mind that these coilover are fully-threaded which uses 3 locking rings, and ride height adjustment is independent of shock travel setting.
After the desired ride height is set, fasten the lower bolt on the bottom of the strut. The top bolt has a little half-moon hump in the middle of the bolt, and also has flattened edges on two sides.
When the bolt is in, and the half-moon is facing the center of the car, it adds 1 degree of negative camber. With the half moon facing the utside of the car, it adds 2 degrees of negative camber. I faced mine inward.
Whether or not you face the bolt inside or to the outside, make sure both the left and right of the car have them facing accordingly, or it'll be hard to get your alignment right.

Make sure the top and bottom strut bolts are tight, and reattach the clip holding the brake line to the shock.
These coil overs came with a sandwich plate that matches the shock, so pay attention to your shock design and any included plates before the lower strut bolts are in tight.
Reinstall the wheels, remove stands and enjoy baller status.

Rear:

Jack from the target cross on the rear diff, place stands between pinch welds on the frame rails.
Once secure, remove the sway bar end link from the sway bar. Remove lower strut bolt, then the bolt on the outside of the rear control arm. All 3 bolts are 17mm.

The strut is now held in by two 14mm nuts inside the trunk. To get to them, remove the trunk liners.

After the 14mm nuts are removed, the strut will come right out, so be sure to support the bottom, like was done with the front struts.

As with the fronts, measure and make sure the left and right strut have the same height setting.
Then, just as with the fronts, slide the strut in top first, and attach the 14mm top bolts. Attach the lower strut bolt, control arm bolt, and the nut attaching the sway bar end link to the sway bar (all 17mm.
Put trunk back together, attach wheels, tighten everything up, enjoy baller status.
Don't forget an alignment or you'll ruin the tires!

Update:
after drving around for 3 days I took the wheels off to make sure everything was still nice and tight. Adjustment rings if not tightened properly will sometimes spin and change your settings if not on there tight.
I remeasured the ride heights (distance between the second and third lock ring on the coilovers) and they are as follows:
Front: 2.80"
Rear: 1.9"
Of course, your ideal setting may be different with another make of coilovers, but this should give you a general idea.
I had the car aligned with -2 degrees camber all around, with otherwise factory specs all around. With rear dampening On max, and the fronts set to 20/30 this setup rides very nicely. I've driven on other coil over brands (Mainly partially threaded) and these showed me that there is a huge difference between partially and fully threaded coils. They allow you to go as low as you want and still maintain ride comfort, cornering ability,and oversteer predictability. If you're on the fence about what suspension setup you would be good for you, I would recommend these, especially at $1100.
If you are following this as an install guide, read absolutely everything before starting.
Tools:
21mm deep socket
17mm deep socket
14mm deep socket
17mm wrench
pliers
Breaker bar
Floor jack / stands
anti seize
Micrometer ($30 @ advance auto)
Front:
Loosen wheel bolts
Lift from the jack point behind the front end tow hook
Place jack stands on frame rails between the pinch welds
Remove wheels, and place a jack under the steering knuckle, or it could fall down when you disconnect it from the strut.
Remove the clip attaching the brake line to the strut bracket with pliers.
Remove the nuts fastening the bolts on the bottom of the strut, and be sure not to mix the bolts up, the top one is special.
Lower the steering knuckle, and push it out of the way a bit. With the jack supporting the bottom of the strut, remove the 3 bolts at the top of the strut, being careful no to allow the strut to drop out with the third bolt is removed.
The strut can then just be wiggled out, bottom first.
draw lines with anti seize on the threads, and spin one of the adjustment rings all the way through it. This will push the goop into the threads, which will make it easier to make adjustments if you decide to in the future.
Installation of the front coilovers is the reverse of everything done so far. Slide it in top first, and lightly fasten the 2 bolts on the strut tower. If you have camber adjustment, it's a good idea to make sure those bolts are tight.
You can use anything from string to a ruler to measure the ride height adjustment but a micrometer will get it the closest. I had no idea how hight the suspension would ride with the way they were set out of the box, so i just made sude they were the same height with the micrometer before attaching the lower strut bolt.
If the ride is too high/low when you put the car back together, just measure how much higher/lower it should be, and raise the locking rings that much.
Keep in mind that these coilover are fully-threaded which uses 3 locking rings, and ride height adjustment is independent of shock travel setting.
After the desired ride height is set, fasten the lower bolt on the bottom of the strut. The top bolt has a little half-moon hump in the middle of the bolt, and also has flattened edges on two sides.
When the bolt is in, and the half-moon is facing the center of the car, it adds 1 degree of negative camber. With the half moon facing the utside of the car, it adds 2 degrees of negative camber. I faced mine inward.
Whether or not you face the bolt inside or to the outside, make sure both the left and right of the car have them facing accordingly, or it'll be hard to get your alignment right.
Make sure the top and bottom strut bolts are tight, and reattach the clip holding the brake line to the shock.
These coil overs came with a sandwich plate that matches the shock, so pay attention to your shock design and any included plates before the lower strut bolts are in tight.
Reinstall the wheels, remove stands and enjoy baller status.
Rear:
Jack from the target cross on the rear diff, place stands between pinch welds on the frame rails.
Once secure, remove the sway bar end link from the sway bar. Remove lower strut bolt, then the bolt on the outside of the rear control arm. All 3 bolts are 17mm.
The strut is now held in by two 14mm nuts inside the trunk. To get to them, remove the trunk liners.
After the 14mm nuts are removed, the strut will come right out, so be sure to support the bottom, like was done with the front struts.
As with the fronts, measure and make sure the left and right strut have the same height setting.
Then, just as with the fronts, slide the strut in top first, and attach the 14mm top bolts. Attach the lower strut bolt, control arm bolt, and the nut attaching the sway bar end link to the sway bar (all 17mm.
Put trunk back together, attach wheels, tighten everything up, enjoy baller status.
Don't forget an alignment or you'll ruin the tires!
Update:
after drving around for 3 days I took the wheels off to make sure everything was still nice and tight. Adjustment rings if not tightened properly will sometimes spin and change your settings if not on there tight.
I remeasured the ride heights (distance between the second and third lock ring on the coilovers) and they are as follows:
Front: 2.80"
Rear: 1.9"
Of course, your ideal setting may be different with another make of coilovers, but this should give you a general idea.
I had the car aligned with -2 degrees camber all around, with otherwise factory specs all around. With rear dampening On max, and the fronts set to 20/30 this setup rides very nicely. I've driven on other coil over brands (Mainly partially threaded) and these showed me that there is a huge difference between partially and fully threaded coils. They allow you to go as low as you want and still maintain ride comfort, cornering ability,and oversteer predictability. If you're on the fence about what suspension setup you would be good for you, I would recommend these, especially at $1100.
Last edited by djdnav; May 16, 2012 at 08:10 PM.

The following users liked this post:
Medik10 (May 9, 2017)

 Don't forget alignment. I was able to get away with no alignment for two weeks until a noticed tire wear on the inside.
May 13, 2012, 08:27 PM
Don't forget alignment. I was able to get away with no alignment for two weeks until a noticed tire wear on the inside.
May 13, 2012, 08:27 PM
#3
Newbie
iTrader: (2)

Join Date: Jun 2008
Location: ontario
Posts: 52
Likes: 0
Received 0 Likes
on
0 Posts
i just got the same coils, and I have to tell they look awesome! I have a few questions for you:
What were your exact measurements for the ride height for front and rear? Which way did you have your half moon bolt facing? and Also Did you order them with the standard spring rates?
I have yet to install these so your advice would help me alot! thanks in advance
What were your exact measurements for the ride height for front and rear? Which way did you have your half moon bolt facing? and Also Did you order them with the standard spring rates?
I have yet to install these so your advice would help me alot! thanks in advance
May 15, 2012, 08:28 AM
#5
i just got the same coils, and I have to tell they look awesome! I have a few questions for you:
What were your exact measurements for the ride height for front and rear? Which way did you have your half moon bolt facing? and Also Did you order them with the standard spring rates?
I have yet to install these so your advice would help me alot! thanks in advance
What were your exact measurements for the ride height for front and rear? Which way did you have your half moon bolt facing? and Also Did you order them with the standard spring rates?
I have yet to install these so your advice would help me alot! thanks in advance
The fronts measured 2.8 inches from between the height locking ring and the lower spring lock ring. I didn't write down the measurement of the rears, sorry. I really recommend a micrometer when setting ride height!
I faced the half- moon bolts to the center of the car.
When you order from fortune you can specify whatever spring rate or valuing you like, but mine came with a rate of 9 in the front and 8 in the back.
Additionally, the set came with keys to adjust the dampening on all four struts. I set the rear to full stiff, and the fronts are full stiff minus 10 clicks. The way I have it set up rides great with no rubbing or bottoming. Lmk if you need any other info to help you through your install.
Last edited by djdnav; May 15, 2012 at 08:35 AM.

 Apr 12, 2013, 01:01 PM
#12
 Take a look at this thread:
https://www.evolutionm.net/forums/ev...cs-thread.html
Apr 12, 2013, 01:28 PM
#13
Since you're from beantown I will help you out Take a look at this thread:
https://www.evolutionm.net/forums/ev...cs-thread.html
Take a look at this thread:https://www.evolutionm.net/forums/ev...cs-thread.html