DIY COP Coil On Plug Setup
 Apr 6, 2013, 08:28 PM
#1

DIY COP Coil On Plug Setup
Much (read: all) of the basis of this came from reading Rampant's write-up over on Lancer Register (thread here). Without the knowledge that he posted I'd be a dead fish in water. All I'm trying to do with this thread is preserve his info because there's nothing more frustrating than broken images, forums that don't work anymore, etc., etc.
This is pretty much going to be a picture-book with some narrative to describe the pictures. The premise of the project is very straight-forward and just requires an afternoon to sit down and do
Here is a list of the coils that will work; this write-up is based on the 02244 Denso coils:
What you need
The Steps
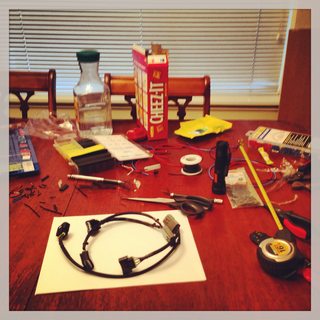
Get a nice clean work area, gather all necessary tools, and get some snack food, water, and sickness cleanser (because why else would you sit inside on a saturday afternoon when it's sunny, 65* outside, and the middle of April). You should then realize that you don't have needle-nose pliers, run to the local electronics store, and take a picture of the cute bunny that's in the store
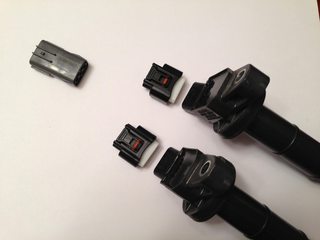
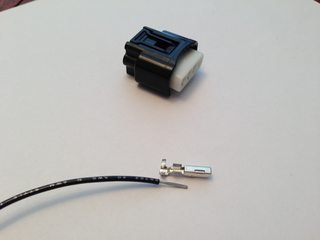
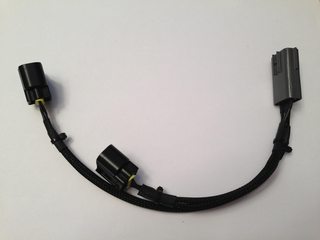
This is what we are trying to accomplish. The stock coils are a 2-in-1 setup; 1 coil powers two plugs. This means there are two coil plugs on the evo as opposed to four. We will be splitting each coil into two plugs as seen below
The first thing to understand is the pin-out of the Mitsubishi coil connectors. Pretty self-explanatory
The second thing to understand is the pin-out on the Toyota coil connectors. Also pretty self-explanatory
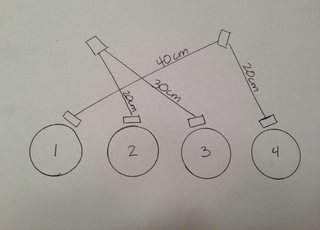
Now to cut proper wire lengths. If you want to use the same lengths I did (which are the same lengths from the initial post I referenced), use this diagram below. One Mitsubishi plug will have a 20cm and 40cm run, the other will have a 20cm and 30cm run
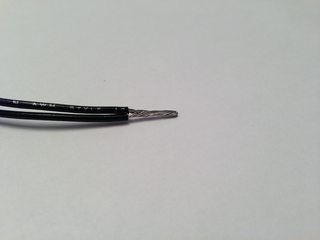
Once you've decided on wire lengths it's time to wire up the Mitsubishi side of the connectors. Strip the two "pairs" (20cm/40cm or 20cm/30cm in my case) wires back about 9mm, twist together, and put them into the connector. I believe you're supposed to fold the wire back over the "wings" of the connector after you crimp it down, but as you can see, I didn't on these ones. I put heat shrink tubing over the end of the connector on the last step as you can see to make it look cleaner as it exited the connector
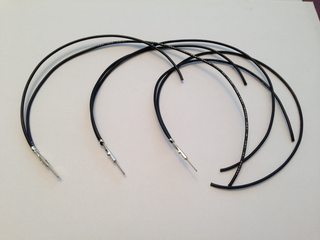
Repeat that last part two more times so that you have a total of three identical connectors. Don't mind my all black wires, they ended up being a pain to keep track of
Next step is to slide these nifty little plugs on to the connector so they can slip into the Toyota connector once it's mounted. Do this now or you will forget to do it later and hate yourself
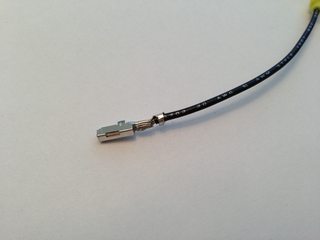
Now for the Toyota side of the connector. Strip back about 8mm of the wire, bend the wire at a right angle, and fold the inner "wings" of the connector over the wire to secure it. Crimp down the wings and then fold the wire back over the wings as seen to prevent the wire from easily pulling out. Gently loop the rear-most "wings" around the wire. You want the insulation of the wire to begin right before the rear-most wings as seen in the pictures to give the wings something soft to grab
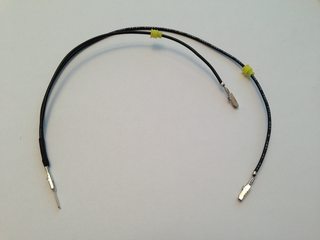
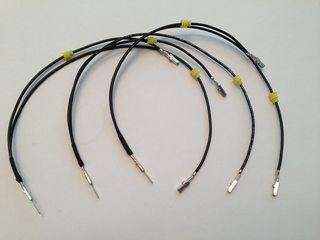
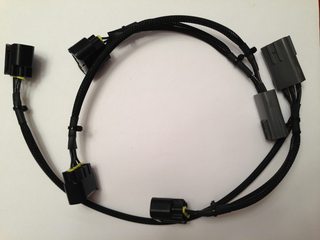
Congratulations, you now have one completed wiring run! Repeat this five more times (two for each set of wires) so that you have a total of three pairs of wires
Now time to plug the Mitsubishi-side of the connectors into place. The wire pins have little "teeth" on them and these go into the notched side of the connectors. You'll have to peek inside the connector to see which way they align
DO NOT PLUG IN THE MITSUBISHI CONNECTOR YET! ONLY PLUG IT IN ONCE YOU'VE MADE THE PROPER SLEEVING ARRANGEMENTS WITH THE WIRES!
For me, I put the flexi-sleeving on, two pieces of heat-shrink (one for each end), and then plugged in the connector. Once you plug in the connector pins they will not come out!
I'm not going to explain how I mounted all the sleeving of this, so you'll just have to follow the picture diagram. If you've worked with this stuff before you'll know how to manipulate it. If not, there's a first for everything. Everyone will have a different way they want to wire this up
An important note; I chose to make a "dead-end" pin for slot 2 of the Toyota connector. I wanted the plug to look normal so I made the wire long enough to be inside the sleeving, and then wrapped it back on itself and put heat-shrink around it to keep it sealed
Back to the sleeving. I zip-tied everything when done to ensure the sleeving didn't come loose. The heat-shrink provides some anchoring, but it's really there for looks. I wanted the zip-tie for added security
Do this again to the other plug and get yourself a total of two connectors! Admire your now trashed work area
I am not covering the mounting plate, as some people will custom-make theirs, others will order one pre-made, whatever, whatever. These coils are plug-and-play (pending you wired them correctly). The diagram seen is for an Evo 9; I don't believe the 8's need the radius cutouts on the left-hand side. All credit for the image below goes to Rampant
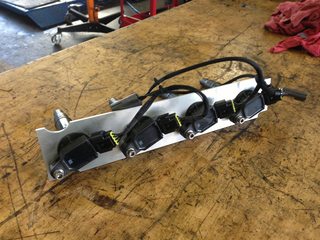
Finished Product
This is pretty much going to be a picture-book with some narrative to describe the pictures. The premise of the project is very straight-forward and just requires an afternoon to sit down and do
Here is a list of the coils that will work; this write-up is based on the 02244 Denso coils:
Denso# 9091902240
Fit under the spark plug cover:
2000-2005 Toyota Echo
2001-2008 Toyota Prius
2006-2008 Toyota Yaris
2004-2006 Scion xA
2004-2006 Scion xB
Denso# 9091902244
Don't fit under the spark plug cover:
2005-2010 Scion tC
2001-2006 Toyota RAV4
2007 Toyota RAV4 2.4 L4
2008 Toyota RAV4
2001-2007 Toyota Highlander 2.4 L4
2002-2003 Toyota Solara 2.4 L4
2006 Toyota Solara 2.4 L4
2007-2009 Toyota Camry 2.4 L4 2AZFE
2007-2009 Toyota Camry Hybrid 2.4 L4 2AZFXE
2010 Toyota Camry Hybrid 2.4 L4
2009-2010 Toyota Corolla XRS 2.4 L4
2009-2010 Toyota Matrix 2.4 L4
- 4x Coils (I chose Toyota Denso 02244 coils)
- 4x Toyota Denso Coil Connector (purchased from Spoolin Up)
- 2x EVO 4-9 Coil Connector - Crimp (purchased from Spoolin Up)
- 25' 20AWG stranded wire (either one color for "clean looks" or three colors for ease-of-use when figuring out which wires are which). You don't use nearly 25' total, but that's the general size they sell wire spools in. 10' roll would work fine as well
- Crimping tool
- Needle-nose pliers
- Hobby knife / wire stripper
- Heat Shrink tubing to make everything pretty / sealed better. More-so pretty.
- Sleeving of your choosing to make everything pretty
The Steps
Get a nice clean work area, gather all necessary tools, and get some snack food, water, and sickness cleanser (because why else would you sit inside on a saturday afternoon when it's sunny, 65* outside, and the middle of April). You should then realize that you don't have needle-nose pliers, run to the local electronics store, and take a picture of the cute bunny that's in the store
 |  |
This is what we are trying to accomplish. The stock coils are a 2-in-1 setup; 1 coil powers two plugs. This means there are two coil plugs on the evo as opposed to four. We will be splitting each coil into two plugs as seen below
 |
The first thing to understand is the pin-out of the Mitsubishi coil connectors. Pretty self-explanatory
 |
The second thing to understand is the pin-out on the Toyota coil connectors. Also pretty self-explanatory
 |
Now to cut proper wire lengths. If you want to use the same lengths I did (which are the same lengths from the initial post I referenced), use this diagram below. One Mitsubishi plug will have a 20cm and 40cm run, the other will have a 20cm and 30cm run
 |
Once you've decided on wire lengths it's time to wire up the Mitsubishi side of the connectors. Strip the two "pairs" (20cm/40cm or 20cm/30cm in my case) wires back about 9mm, twist together, and put them into the connector. I believe you're supposed to fold the wire back over the "wings" of the connector after you crimp it down, but as you can see, I didn't on these ones. I put heat shrink tubing over the end of the connector on the last step as you can see to make it look cleaner as it exited the connector
 |  |  |  |
Repeat that last part two more times so that you have a total of three identical connectors. Don't mind my all black wires, they ended up being a pain to keep track of
 |
Next step is to slide these nifty little plugs on to the connector so they can slip into the Toyota connector once it's mounted. Do this now or you will forget to do it later and hate yourself
 |
Now for the Toyota side of the connector. Strip back about 8mm of the wire, bend the wire at a right angle, and fold the inner "wings" of the connector over the wire to secure it. Crimp down the wings and then fold the wire back over the wings as seen to prevent the wire from easily pulling out. Gently loop the rear-most "wings" around the wire. You want the insulation of the wire to begin right before the rear-most wings as seen in the pictures to give the wings something soft to grab
 |  |  |  |
Congratulations, you now have one completed wiring run! Repeat this five more times (two for each set of wires) so that you have a total of three pairs of wires
 |  |
Now time to plug the Mitsubishi-side of the connectors into place. The wire pins have little "teeth" on them and these go into the notched side of the connectors. You'll have to peek inside the connector to see which way they align
 |
DO NOT PLUG IN THE MITSUBISHI CONNECTOR YET! ONLY PLUG IT IN ONCE YOU'VE MADE THE PROPER SLEEVING ARRANGEMENTS WITH THE WIRES!
For me, I put the flexi-sleeving on, two pieces of heat-shrink (one for each end), and then plugged in the connector. Once you plug in the connector pins they will not come out!
I'm not going to explain how I mounted all the sleeving of this, so you'll just have to follow the picture diagram. If you've worked with this stuff before you'll know how to manipulate it. If not, there's a first for everything. Everyone will have a different way they want to wire this up
 |  |  |
An important note; I chose to make a "dead-end" pin for slot 2 of the Toyota connector. I wanted the plug to look normal so I made the wire long enough to be inside the sleeving, and then wrapped it back on itself and put heat-shrink around it to keep it sealed
 |  |
Back to the sleeving. I zip-tied everything when done to ensure the sleeving didn't come loose. The heat-shrink provides some anchoring, but it's really there for looks. I wanted the zip-tie for added security
 |  |
Do this again to the other plug and get yourself a total of two connectors! Admire your now trashed work area
  |
I am not covering the mounting plate, as some people will custom-make theirs, others will order one pre-made, whatever, whatever. These coils are plug-and-play (pending you wired them correctly). The diagram seen is for an Evo 9; I don't believe the 8's need the radius cutouts on the left-hand side. All credit for the image below goes to Rampant
 |
Finished Product
 |  |  |
Last edited by llDemonll; Jan 29, 2014 at 05:55 PM.

The following 5 users liked this post by llDemonll:
Ho Wa (Jul 6, 2017),
sontoofly (Apr 17, 2018),
Tommyfacekicker (Jun 24, 2019),
WelDun1 (Apr 5, 2018),
Zvick91 (Aug 21, 2021)
 Apr 8, 2013, 09:46 AM
#5
almost done making mine, i have the wires cut already from this and it is PERFECT length.
Just finishing the hold down plate im using 02240 coils and i did have to strech the spring to get good contact but only a fraction. Ill put a pic after im done.
Ive also decided to Jewel my aluminum plate.
Just finishing the hold down plate im using 02240 coils and i did have to strech the spring to get good contact but only a fraction. Ill put a pic after im done.
Ive also decided to Jewel my aluminum plate.
Apr 8, 2013, 11:04 AM
#6
I have new spark plugs I'm putting in so while I have them out I'm going to measure the depths of these plugs/coils (the 02244 coils) and see if i'll need to stretch them
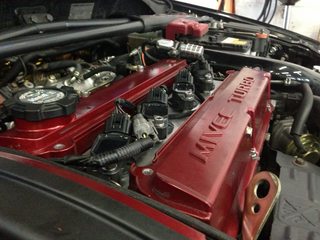
This is the only "installed" image I have now because I was testing them. Don't mind the dirt, bay hasn't been cleaned in a long time and this is the first time the spark plug cover has been off in probably a year. I don't have a plate to mount them on yet so I've only started the car, haven't driven, but it started up first try and everything which made me quite happy. A lot better than some catastrophic failure (not likely, car just wouldn't start if they'd been wired improperly)
Edit: Hmm, I just noticed pictures now link differently. The pictures I posted are all thumbnails that link to the full-size image, but I may have to go back and change that so people can see larger images than what's embedded in the post
This is the only "installed" image I have now because I was testing them. Don't mind the dirt, bay hasn't been cleaned in a long time and this is the first time the spark plug cover has been off in probably a year. I don't have a plate to mount them on yet so I've only started the car, haven't driven, but it started up first try and everything which made me quite happy. A lot better than some catastrophic failure (not likely, car just wouldn't start if they'd been wired improperly)
 |
Edit: Hmm, I just noticed pictures now link differently. The pictures I posted are all thumbnails that link to the full-size image, but I may have to go back and change that so people can see larger images than what's embedded in the post
Last edited by llDemonll; Apr 8, 2013 at 06:10 PM.
The following users liked this post:
Tommyfacekicker (Jun 24, 2019)
Apr 8, 2013, 09:12 PM
#7
Finished mine, I'll post pic tomorrow. Came out perfect, got the plate from home depot for 8 bucks, it was brushed aluminum. That was a PITA to make for the ix, I did jewel it cause damn aluminum scratches so easily and it al came out perfectly car started right up, coils are totally fastened down perfectly.
Trending Topics
Apr 10, 2013, 08:53 PM
#9
I gave the dimensions of the plate to one of our machinists today so hopefully by next week i'll have a plate!
only changes I made were moving the bolt holes 17mm below center-line instead of above like the drawing has. this is just because of the 02244 coil packs looking nicer that way (so they line up how they are in my test fit pics)
the coil pack holes are drilled to 28mm diameter so that the coils have a little play in the mounting plate for making sure the mounting hole lines up straight
Apr 13, 2013, 02:11 PM
#11
Here are my finished pics, using this write up! it went perfect thanks dude. the only thing i changed was the direction my coils were facing cause i wasnt sure how they would have worked the way the plate was layed out so i did that part my self. The jeweled plate looks good, although it fits under the stock cover so im going to put the stock cover on for now. Dont mind the mess its a paper processing plant so it gets dusty quick here, and this car has been under the knife for 7 months and its finally ready! cleaning it up now.
I did have to tape the ends of the plug to the Evo plug cause you cant fit the yellow boots around 2 wires and it didnt want crap to get into it.
 Uploaded with ImageShack.us
 Uploaded with [URL=http://imageshack.us]ImageShack.us[/URL
I did have to tape the ends of the plug to the Evo plug cause you cant fit the yellow boots around 2 wires and it didnt want crap to get into it.
 Uploaded with ImageShack.us
 Uploaded with [URL=http://imageshack.us]ImageShack.us[/URL
Apr 13, 2013, 07:21 PM
Uploaded with [URL=http://imageshack.us]ImageShack.us[/URL
Apr 13, 2013, 07:21 PM
#12
I like! Those were the coils I was originally shopping for just because they do fit under the stock cover, but I got a killer deal on the ones I picked up
Did you use the same dimensions for the plate as the ones I posted? or did you drill the big holes then just stick the coil in and mark where it needed to be drilled for the bolt that secures the coils?
Did you use the same dimensions for the plate as the ones I posted? or did you drill the big holes then just stick the coil in and mark where it needed to be drilled for the bolt that secures the coils?
Apr 14, 2013, 09:48 AM
#13
i drilled the big holes first with a little play in them, then put it all on the car to match where i should put the coil holes, just cause i wasnt sure if the coils were going to fit with those hole and i want the connectors to face the front of the engine. After yesterday, i clipped the Evo connectors and ran it direct to the coil wires with Heat shrink connectors just cause i didnt like that way the connectors looked. It actuly looks better now, less crammed.
Apr 14, 2013, 10:23 AM
#14
Nice - I'm having the machinist drill 28mm diameter holes for the coils on mine to give some play as well. 27mm is a perfect fit, but that extra 1mm will give enough room to not stress the coil, bolt, or plate if they're a little bit off. Plus the coil will be bolted down anyhow so a little bit of play doesn't matter there
Apr 14, 2013, 07:45 PM
#15
Newbie
iTrader: (5)
Join Date: Dec 2012
Location: Oshawa, Canada
Posts: 21
Likes: 0
Received 0 Likes
on
0 Posts
very nice and detailed write up. Thanks for the help. Mines all done now just have to make a mounting plate as well. Most of my time was spent triple checking all the wires lol