How to: Install OEM Backup Camera (above license plate)
#1
Evolving Member
Thread Starter
iTrader: (1)
Join Date: Feb 2004
Location: Hawaii
Posts: 105
Likes: 0
Received 0 Likes
on
0 Posts
How to: Install OEM Backup Camera (above license plate)
HOW TO: INSTALL OEM BACKUP CAMERA (above license plate)
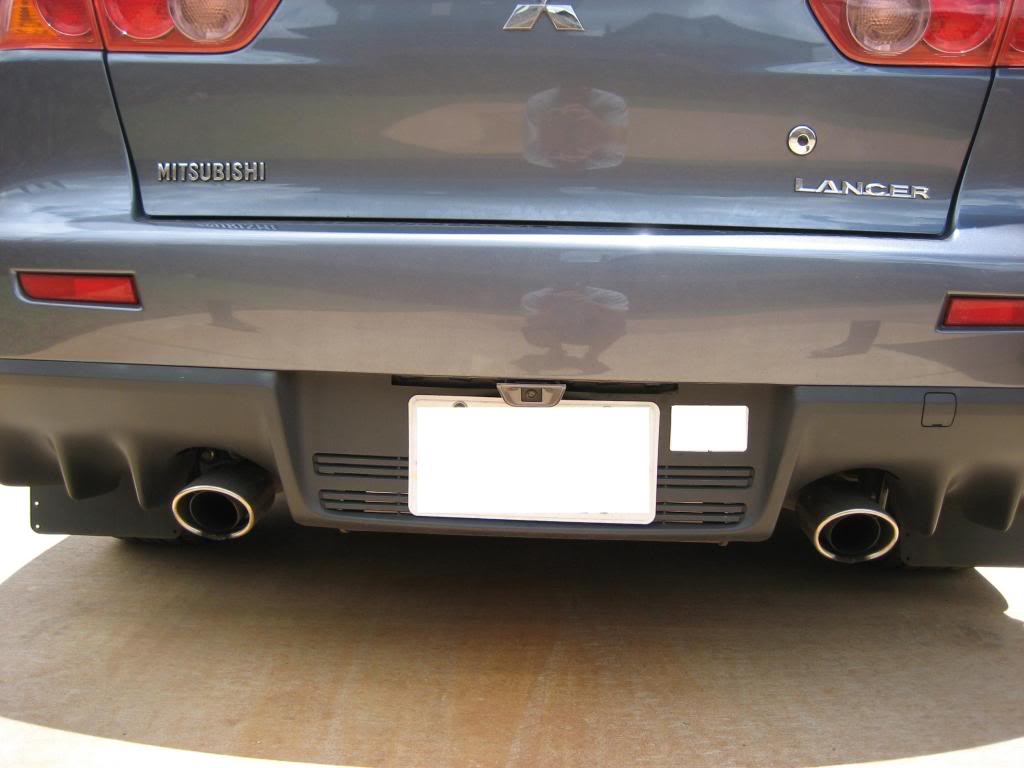
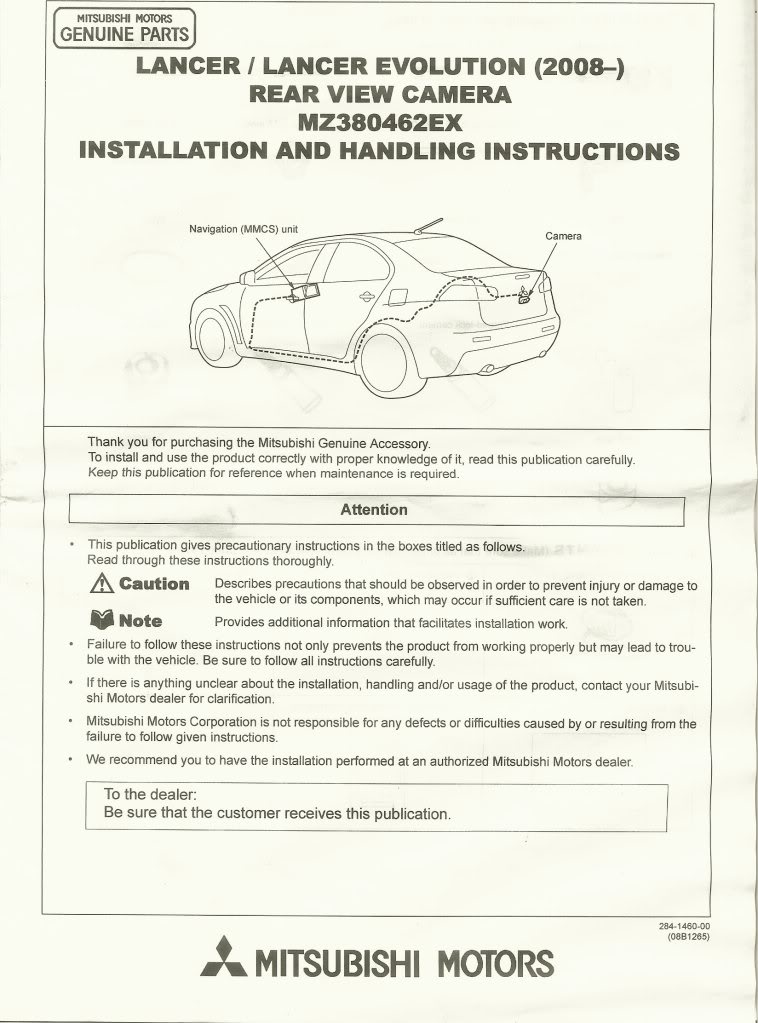
This installation provides commentary to the OEM installation of the camera harness and then provides specific instructions for the modified location of the OEM camera.
This instruction may also be used to aid in installing an aftermarket camera either to the MMCS or to an aftermarket head unit.
Placing the backup camera just above the license plate does not affect the effectiveness of the camera. The OEM location does provide a view of the bumper cover for reference but it is not worth affecting the appearance of the car.
Parts
I purchased the parts from RussellM from mitsubishiparts.net.
1 - Camera kit, MZ380462EX, $302.20
1 - Harness, MZ607384EX $65.98 (This is nice even for aftermarket cameras to have because it is insulated and is plug and play to the MMCS)
1 - Cover (A39 graphite gray), MZ607432EX, $22.80
2 - Corner braces (can be purchased from Lowes, Home Depot, etc)
2 - M6x1.00 15mm long bolts (can be purchased from Lowes, Home Depot, auto parts store, etc)
2 - Tinnerman Clip Nuts M6x1.00 size (can be purchased from Lowes, Home Depot, auto parts store, etc)
This comes out to ~$400 shipped. I got it for $360 shipped because it was discounted.
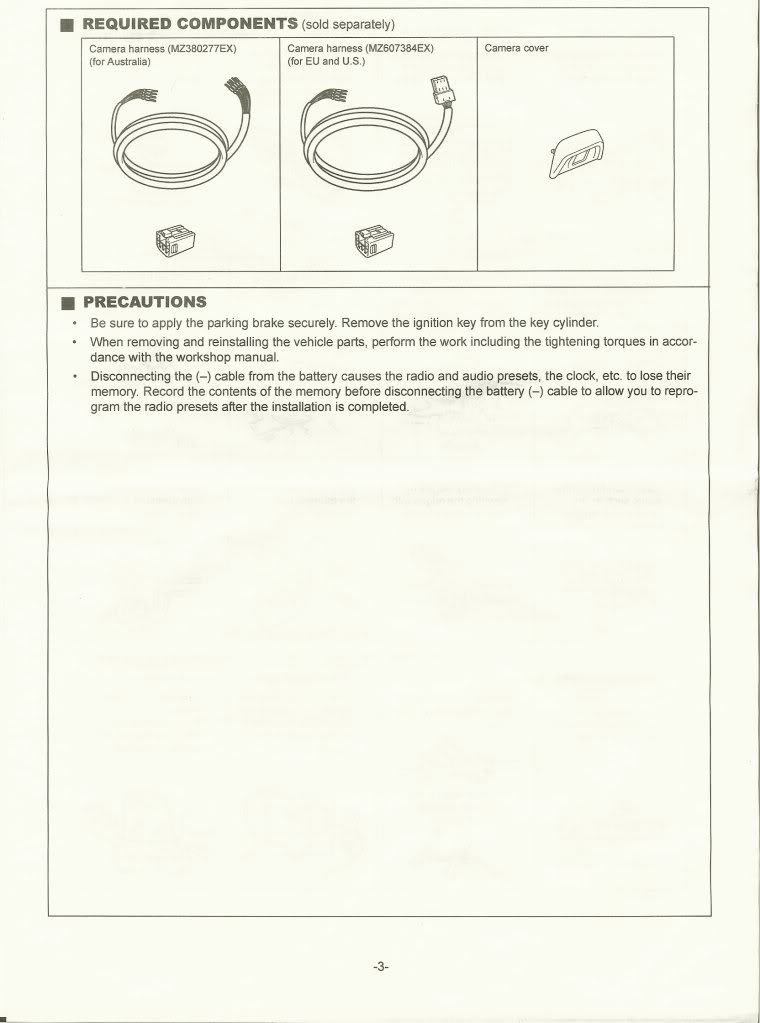
Tools and Materials
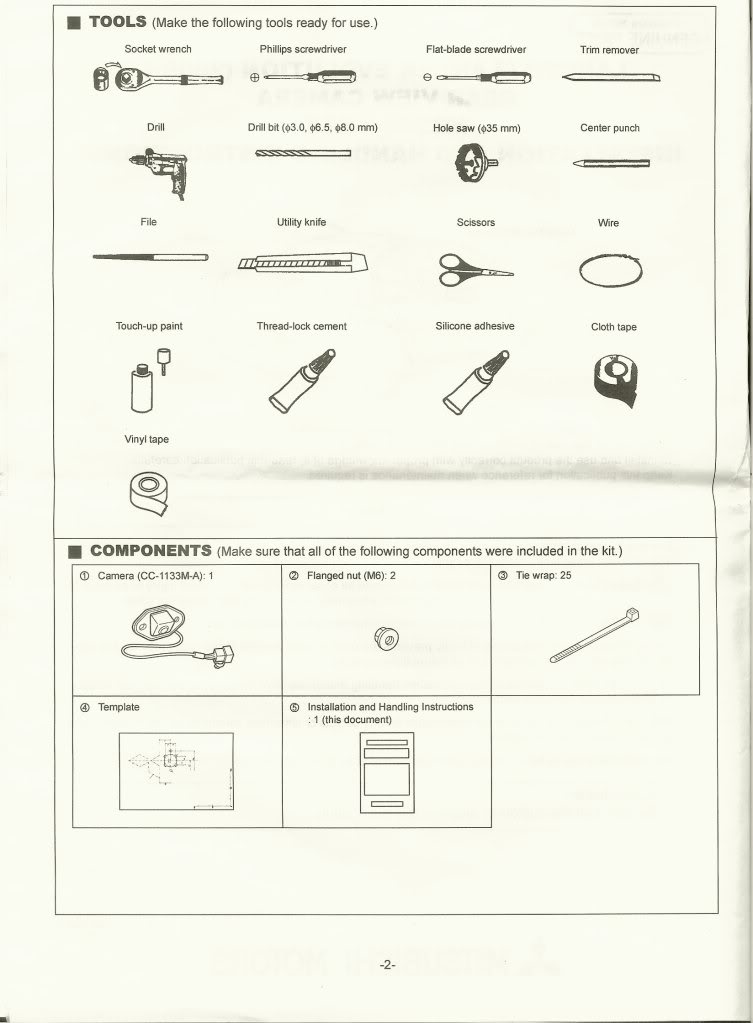
Notes and Warnings
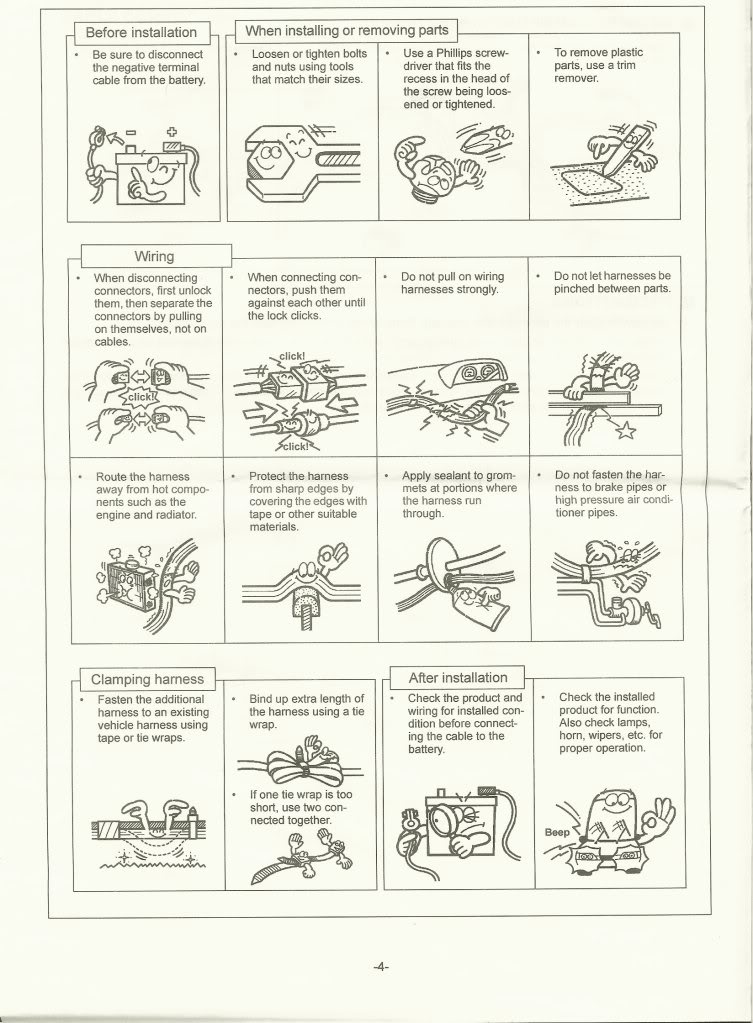
Installation Instructions
Note: You don't really have to remove the battery negative cable.
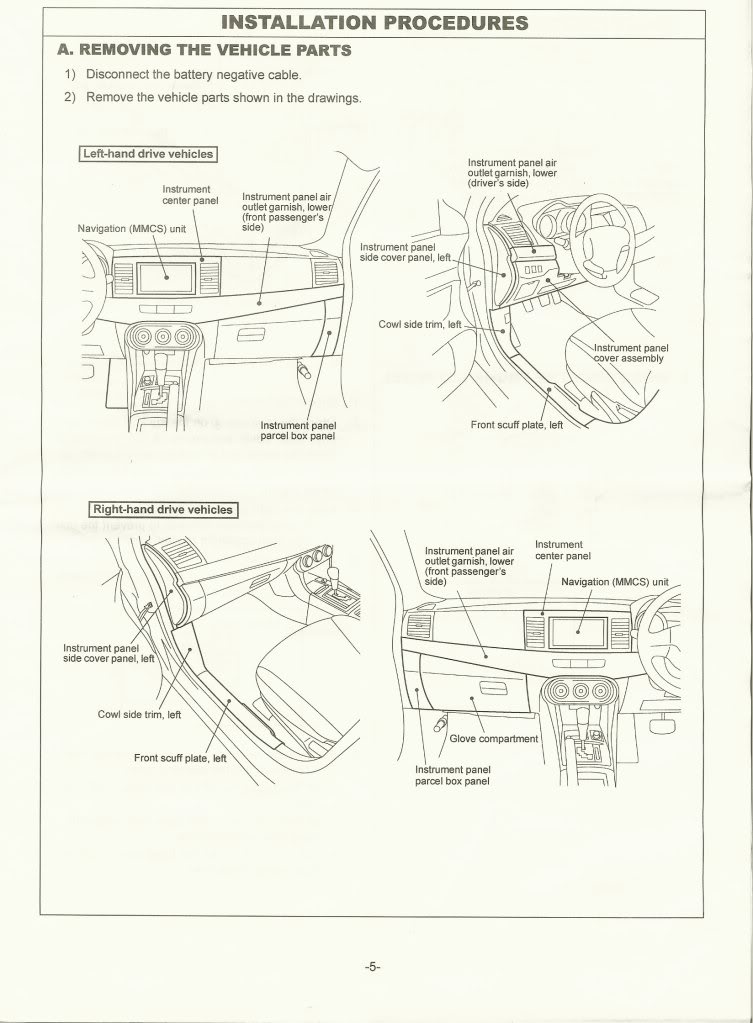
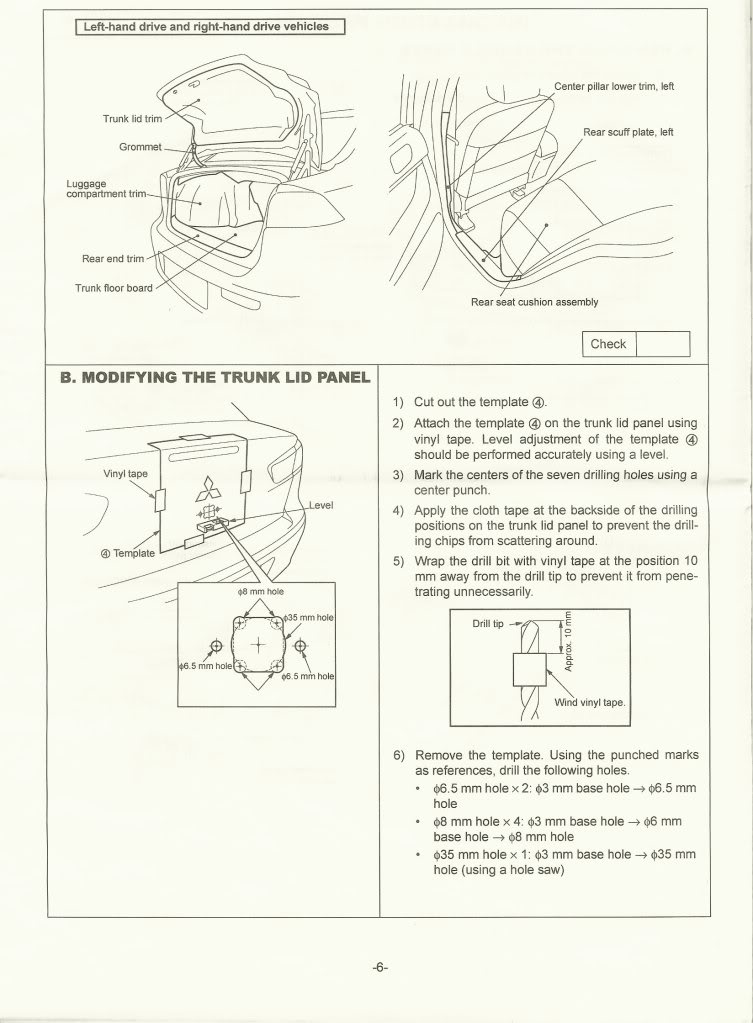
Remove all of the items shown below except for the trunk lid trim and grommet.
Note: Do not perform Step B.
Remove only Items 1, 2, and 3 shown below.
Note: Do not unplug the MMCS unit.
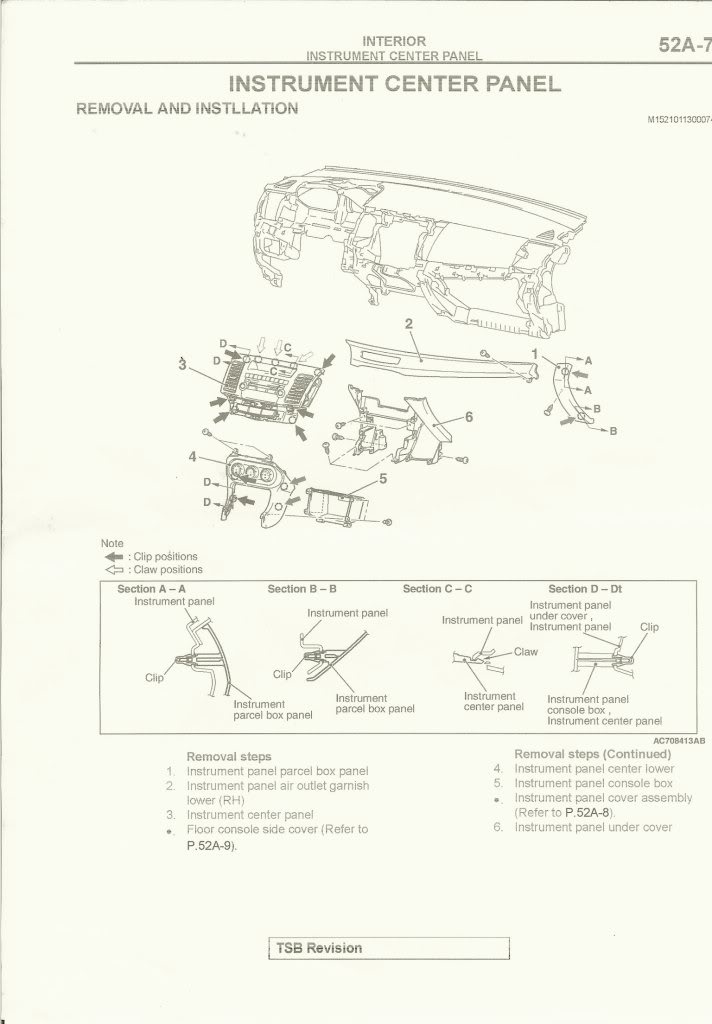
Remove Items 1, 2, and 3 shown below.
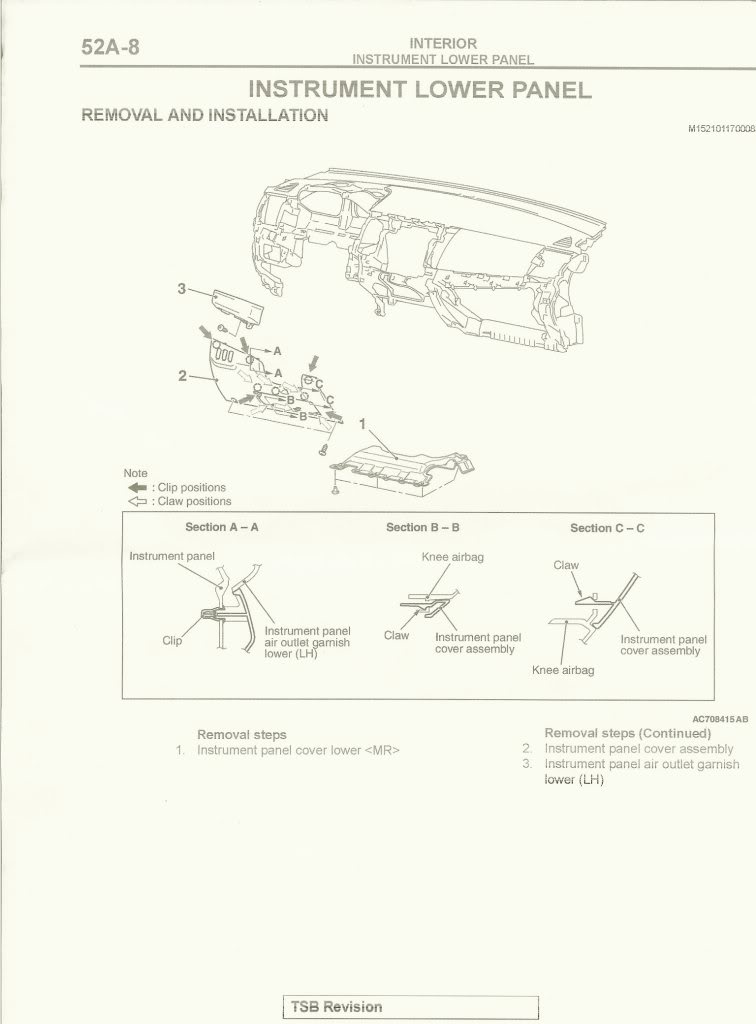
Remove Cowl side trim (2), Front scuff plate (1), Center pillar trim (7), Rear scuff plate (3).
Note: You may have to peel back the front and rear door opening trims (4 & 5). RH side shown in pictures below.
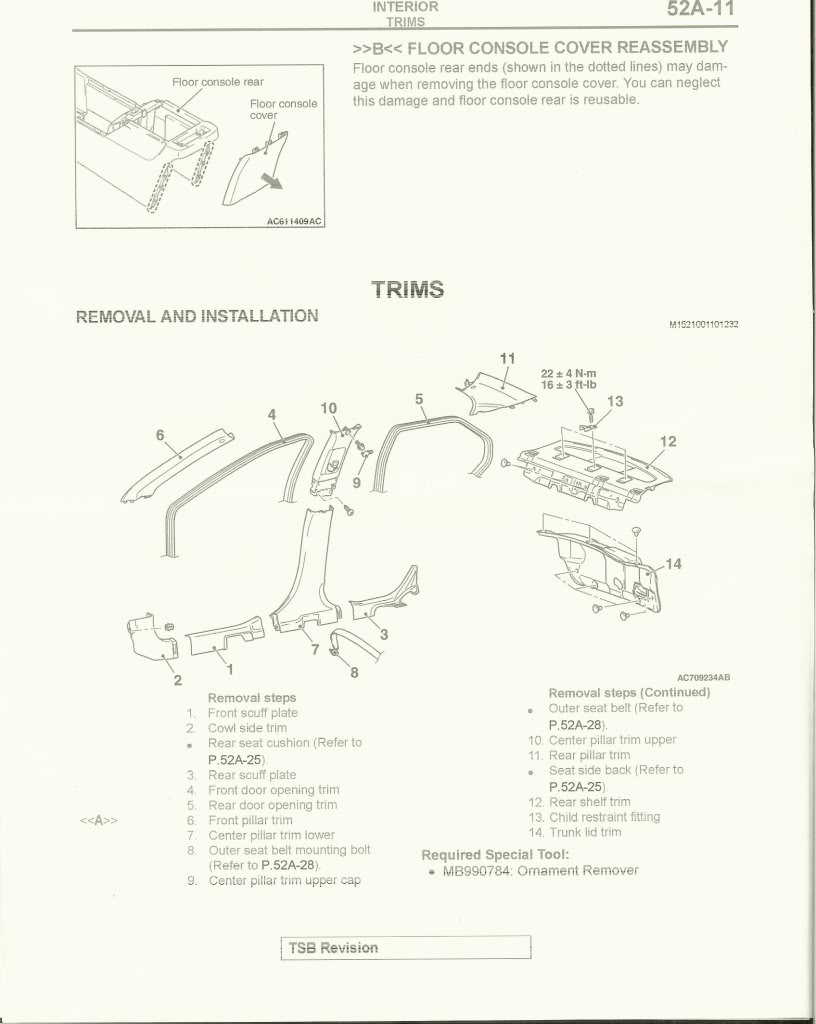
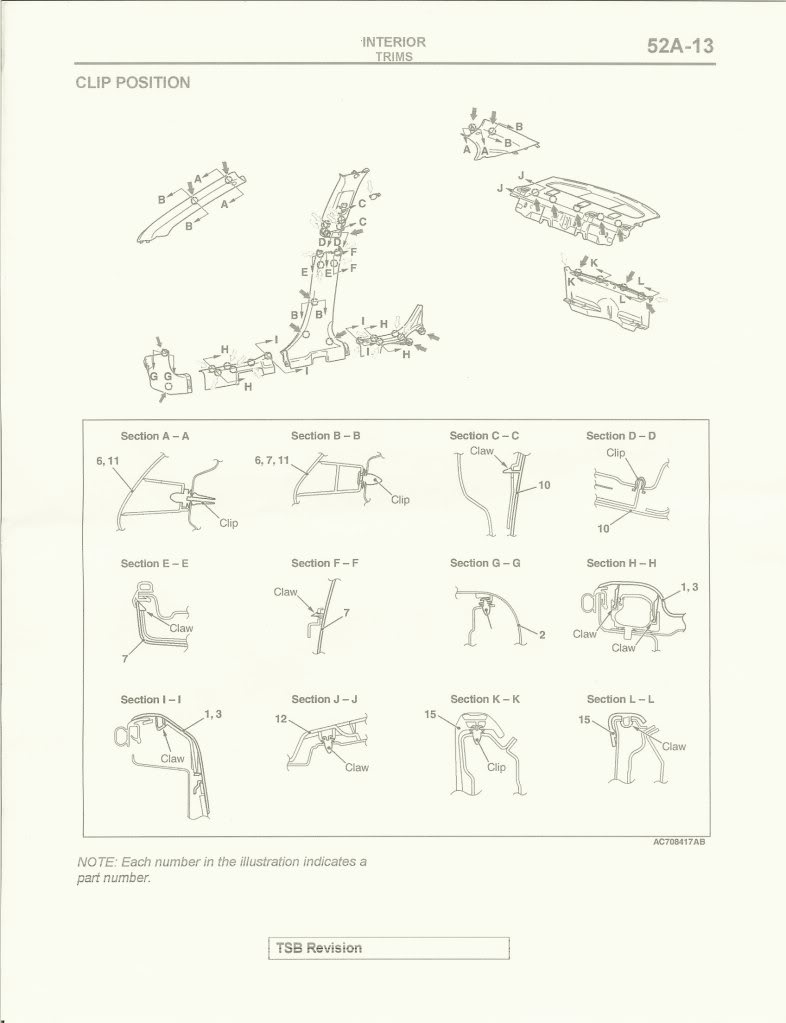
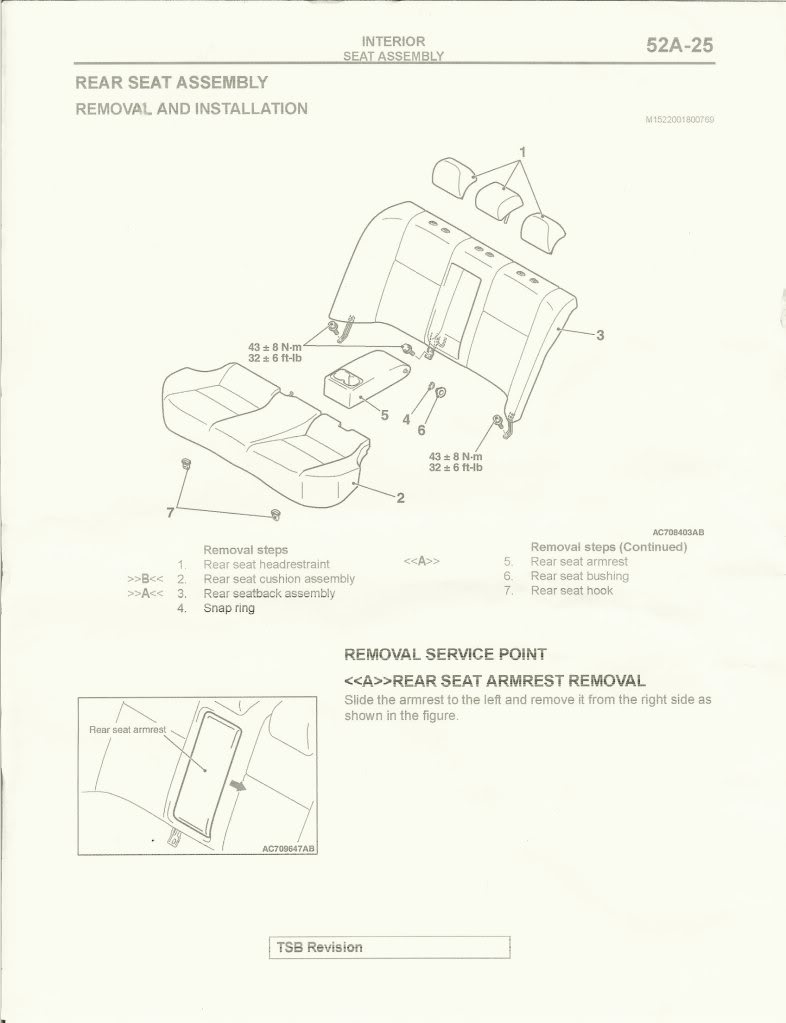
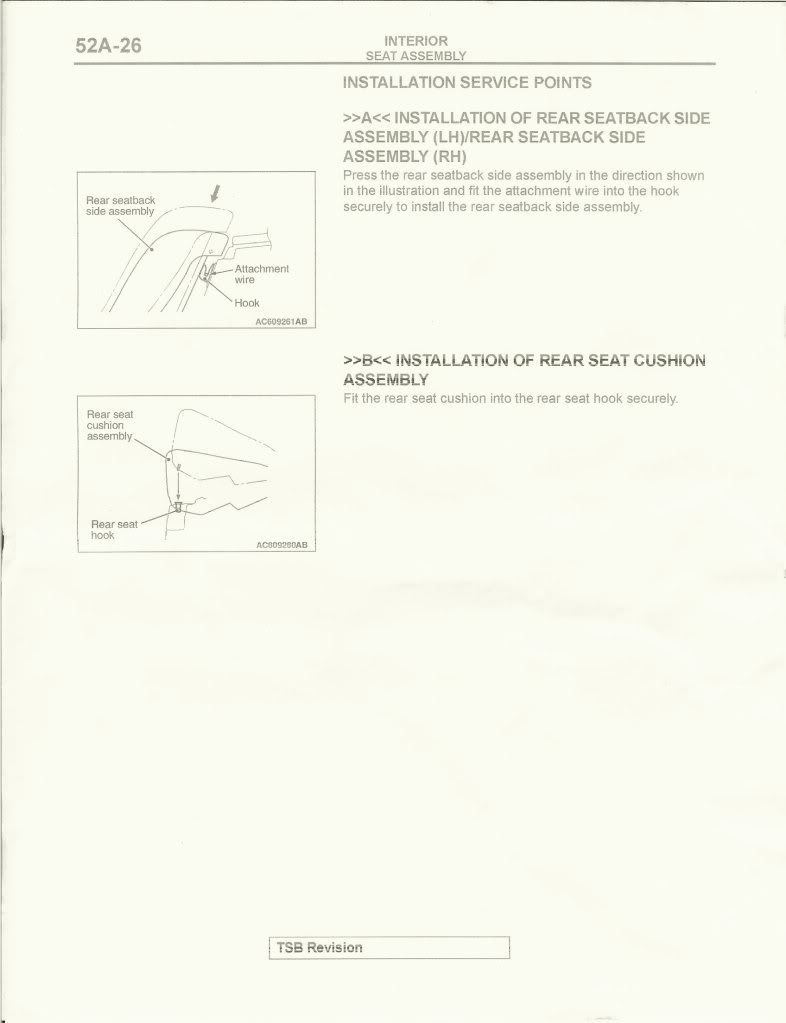
Remove the upper and lower rear seat.
Note: When you reinstall the rear upper seat, make sure you hang it correctly. This is probably the hardest part of the install as it is very difficult to engage it on all 3 hangers.
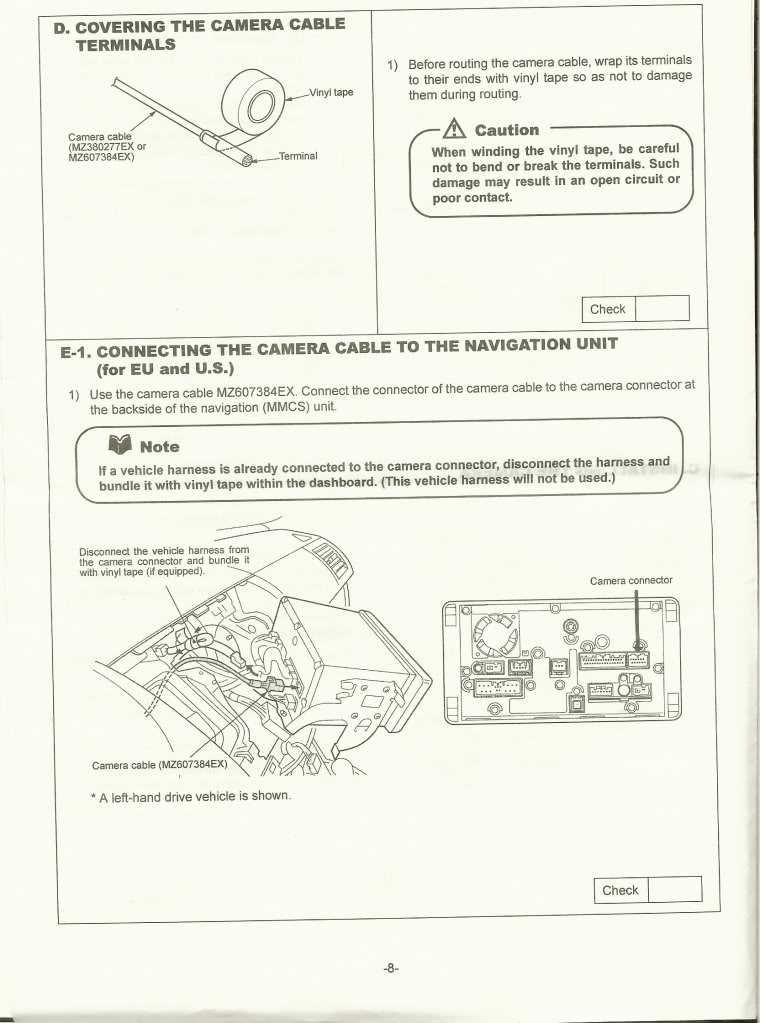
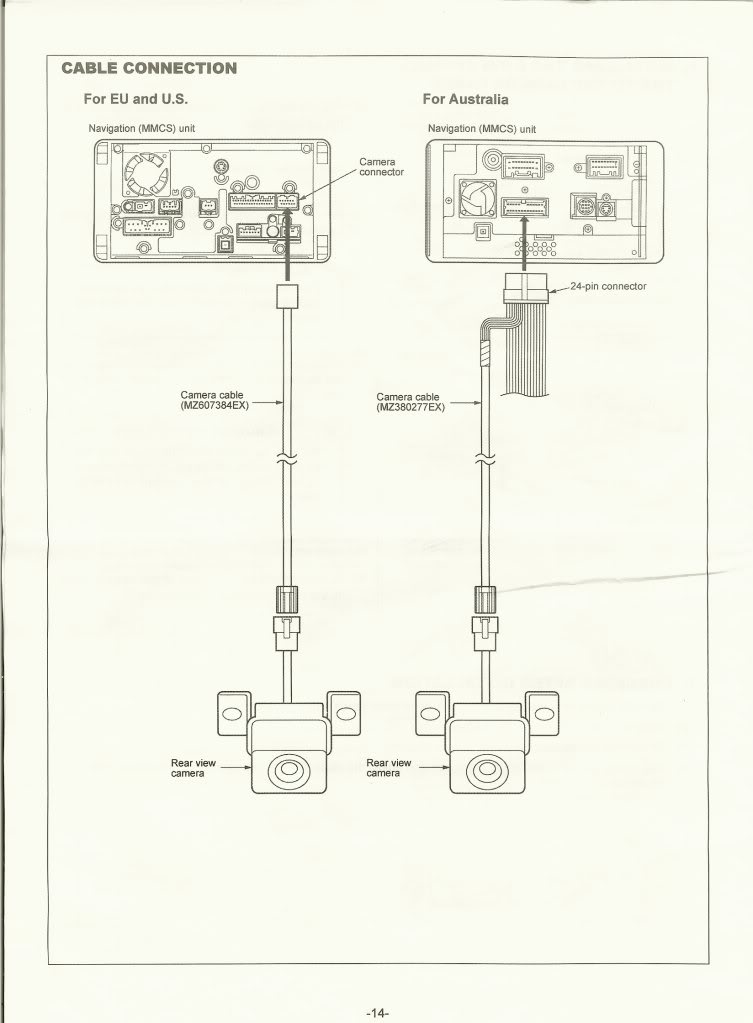
Install the harness into the MMCS unit.
Note: See Reference Page 9 for Non-USDM wiring.
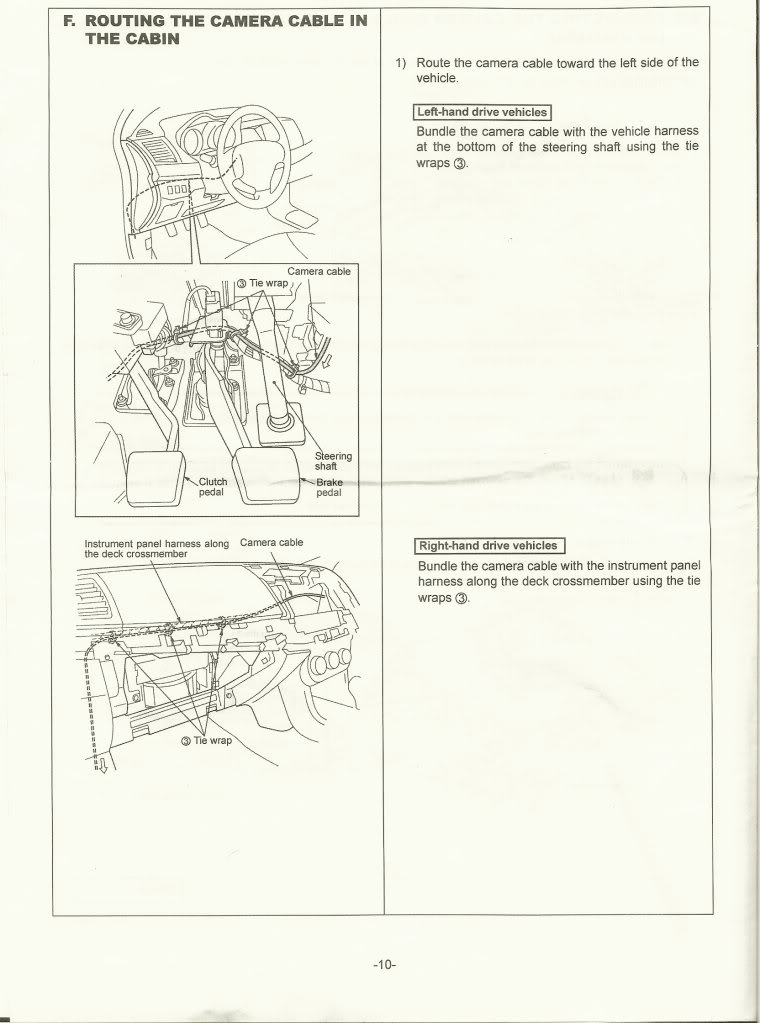
Run the wires across the dash and down to the kick panel.
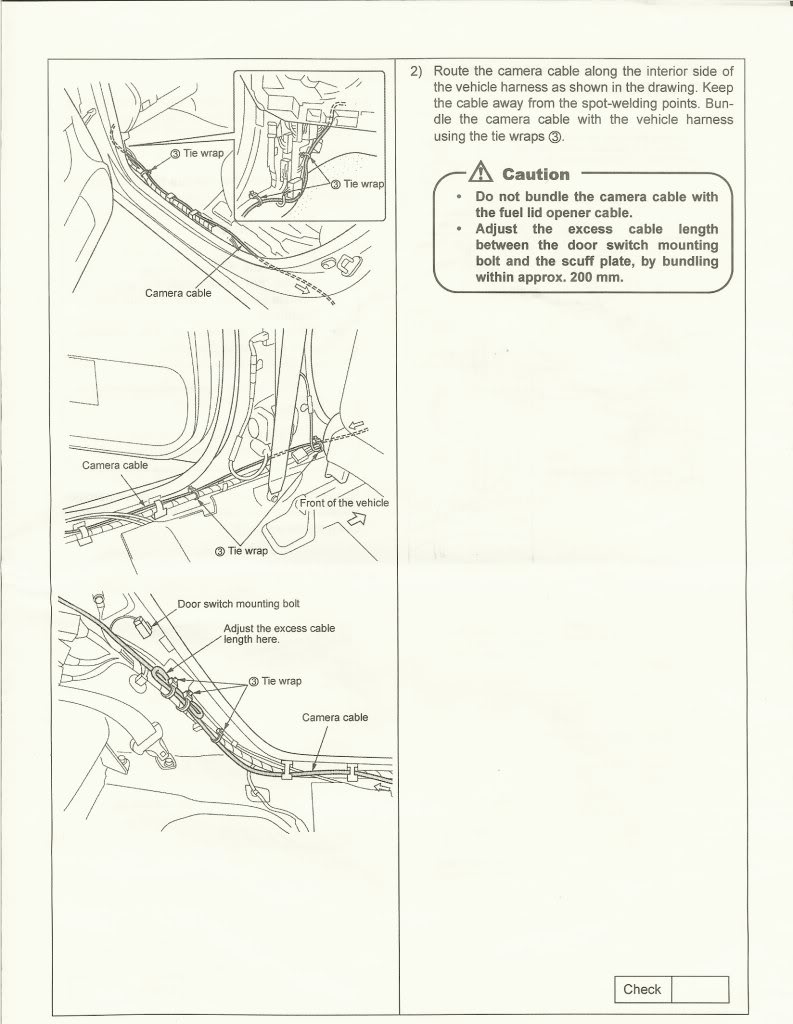
Run the wires along the side sill and through to the trunk.
Modified Location Installation Instructions
With the rear seat and trunk lining removed, continue to route the harness along the wiring harness that leads to the back bumper. There will be a grommet located just below the rear LH taillight.
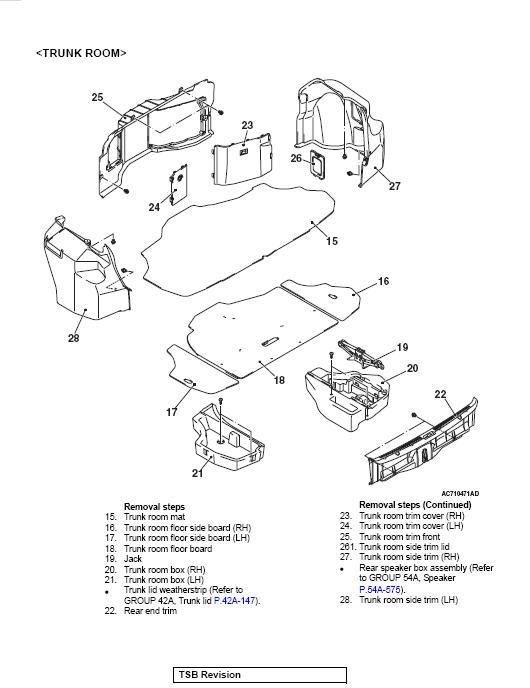
Remove Trunk room trim front (23, 24, 25), LH Trunk room side trim (28), LH Trunk room box (21), LH Trunk room floor side board (17), Trunk room floor board (18), Trunk room bat (15), Rear end trim (22), and RF subwoofer (if installed).
Remove the rear bumper cover. This picture is confusing to look at but make sure you remove the center bolt located underneath the license plate. Pulling the bumper cover sides from the rear bumper side brackets (9) is the hardest part. You may need to use a pry tool to disengage the tabs. Be careful not to damage the paint. If you are afraid, tape over the painted areas with masking tape.
Note: If your car is fitted with the optional mud guards you wil have to remove them too. Be careful removing the bumper cover and make sure you remove all of the required fasteners. If it seems hard to remove, you probably didn't remove all of the fasteners. The bumper cover sides are the only parts that require some force to remove.

Run the harness through the grommet below the LH tail light. Route the harness above the bumper reinforcement and to the license plate area. I routed mine so that it came to the RH side of the camera so that the harness coming out of the camera wouldn't have to make a 180 degree turn.
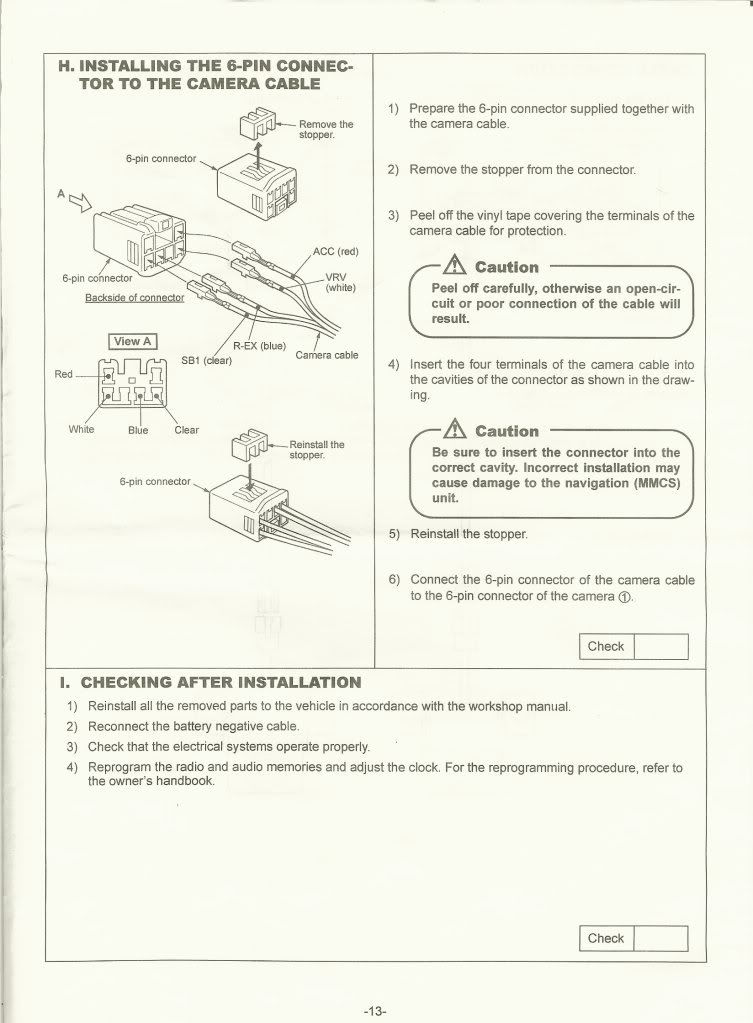
Prep the connector as shown below.
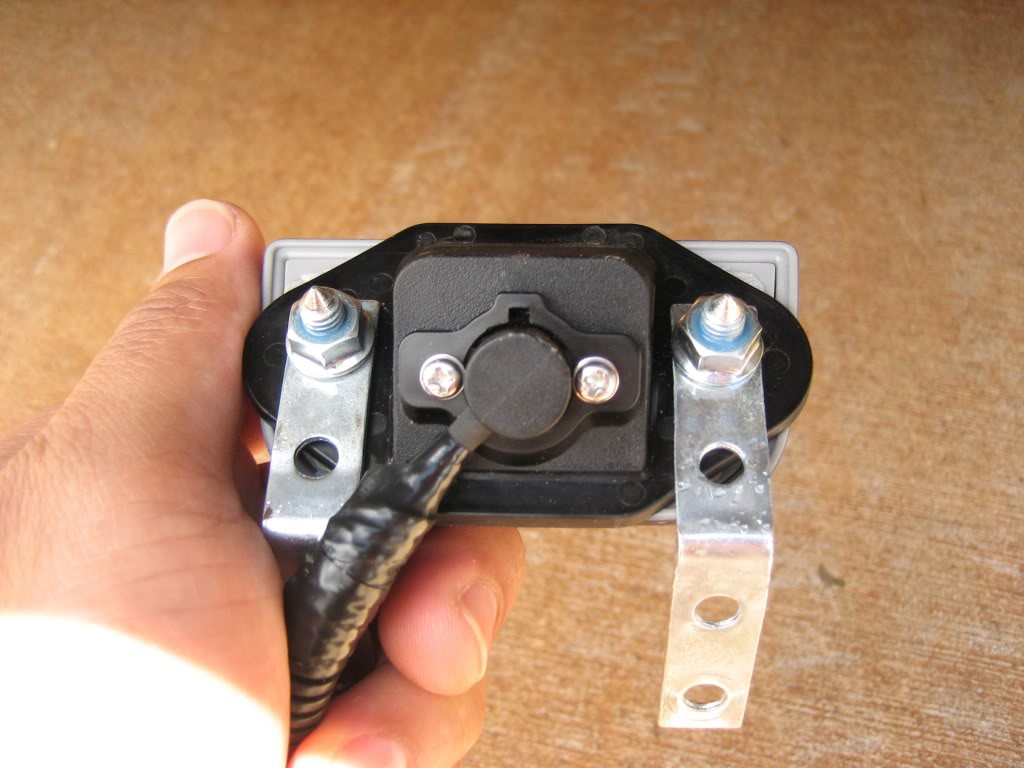
The camera assembly consists of 2 pieces; the camera itself and a camera bracket. The camera bracket is that diamond shaped plastic piece that has the fastener holes in it. The camera is cube shaped with a wiring harness coming out of it. The camera is mounted to the camera bracket with 2 small fasteners on the back.
If you look at the installed picture, you will notice that the camera is actually mounted upside down compared to the OEM orientation. What I did was that I removed the camera from the bracket and flipped it over. There is a locating tab on the camera that I cut off in order to do this. So when you flip the camera over, you can mount the camera in the orientation shown in the pic and have the image appear right-side-up.
Camera modification and assembly
1. Remove the 2 small fasteners from the back of the camera assembly.
2. Remove the camera from the bracket. Be careful not to damage the harness as it is a tight fit.
3. Cut off the tab on the back of the camera.
4. Reorient the camera upsidedown in the camera bracket. Reinstall using the 2 small fasteners removed in step 1.
5. Obtain the 2 corner brackets and bend them approximately 45 degrees outwards.
6. Assemble the cover on to the camera assembly.
7. Install the 2 corner brackets over the fasteners on the cover an attach using the 2 M6x1.00 nuts supplied with the camera kit. Use 'loctite' threadlocker to ensure it doesn't loosen.
After assembly, it should look like the pics below:
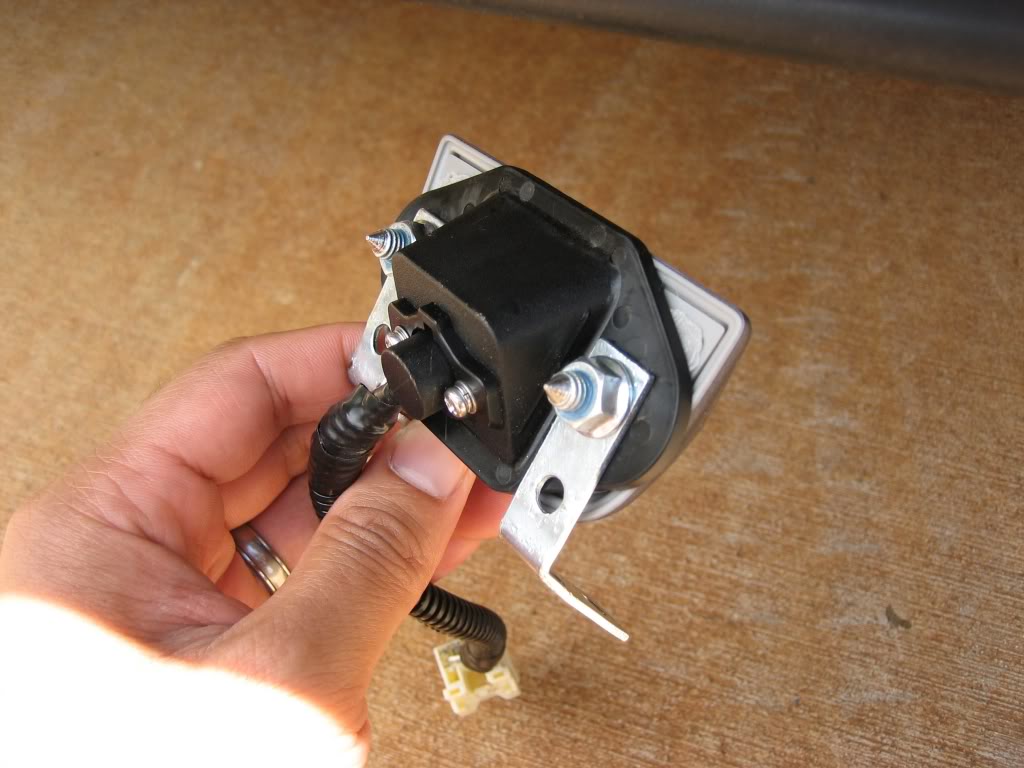
Bumper cover modification
1. Determine the location of the camera assembly. Be sure to test fit the camera with the license plate in place. Place the camera assembly in the desired location and mark the mounting location with a pen.
2. Drill a 8mm (5/16") hole in the marked locations.
3. Cut a small notch in the recess of the bumper cover in order to install the Tinnerman clip. Repeat on the other side. You may need to cut away some of the bumper foam on the RH Tinnerman to gain clearance.
After installation of the clips, it should look like the pic below.
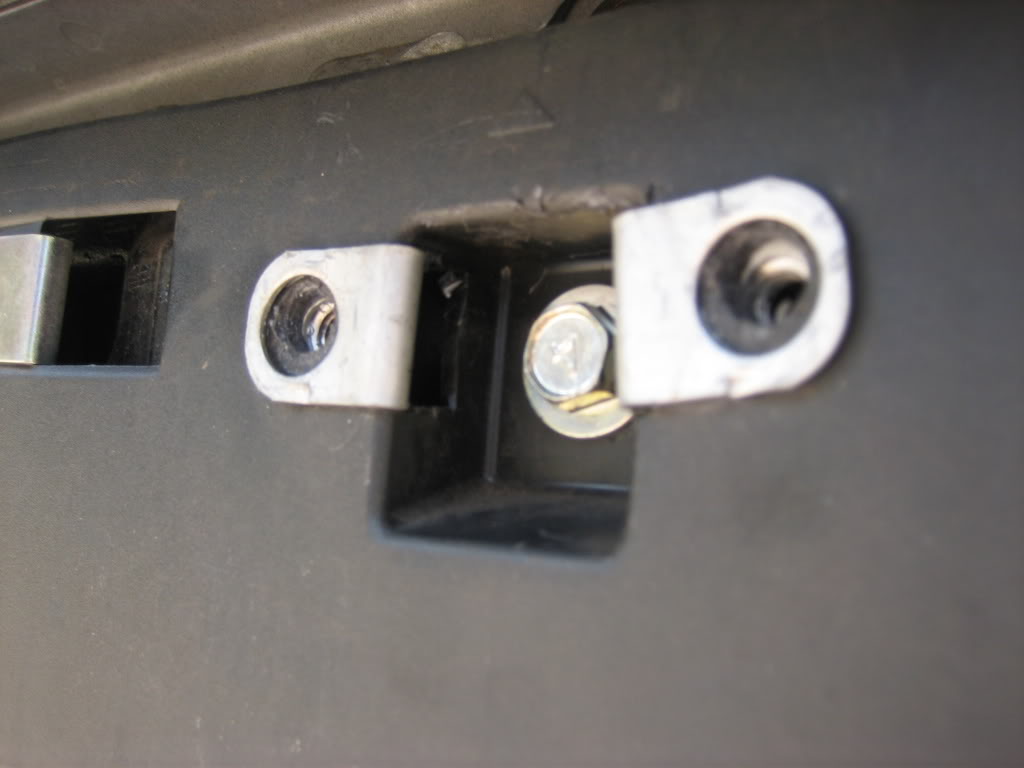
4. Install the camera using 2 M6x1.00 bolts.
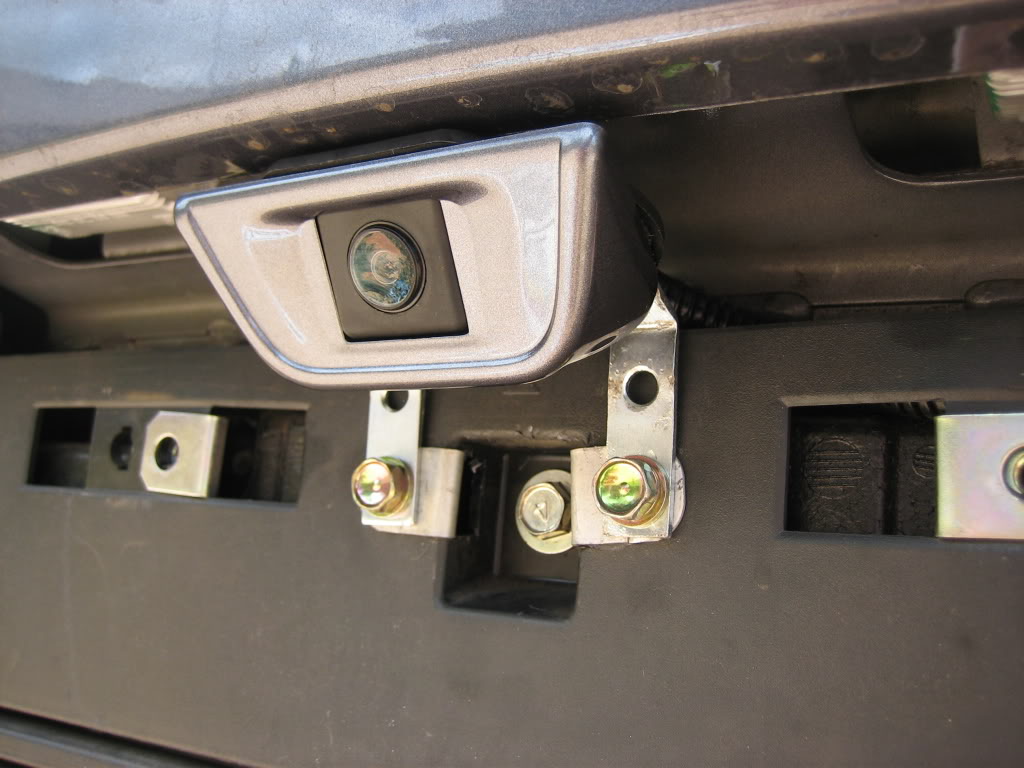
5. Install the license plate.
6. Connect the harness to the camera. Tuck it behind the bumper cover taking care not to pinch the harness.
Notes:
Do not make tight bends or cram the harness into an area where it may chafe over time.
I used some dielectric grease in the connector to protect against corrosion. The connector is not really designed for outdoor use.
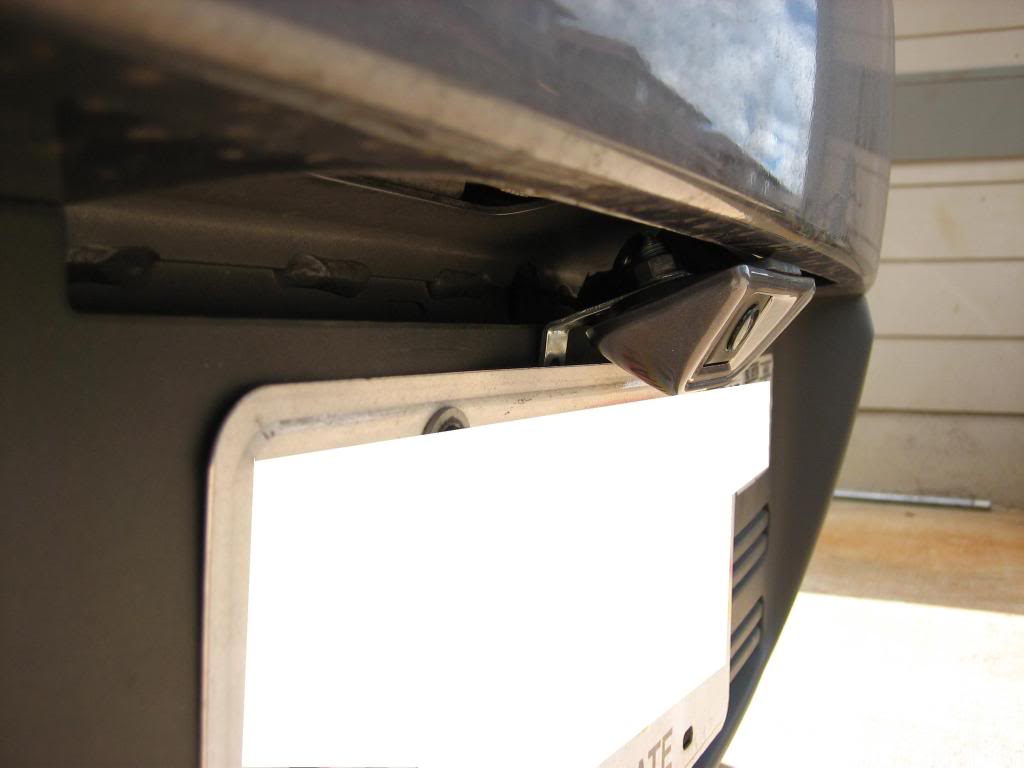
7. Check the image in the screen and adjust the angle as necessary.
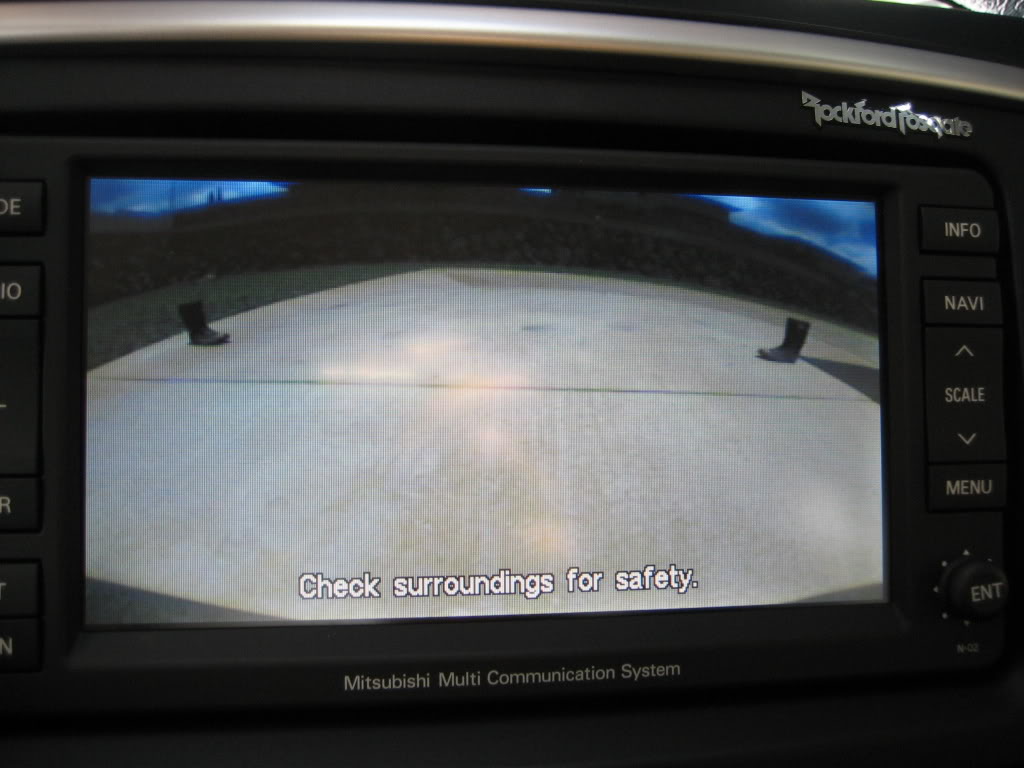
Here is a view from outside the car. Compare it to the view in the screen and you will see that the wide angle lens covers a lot.
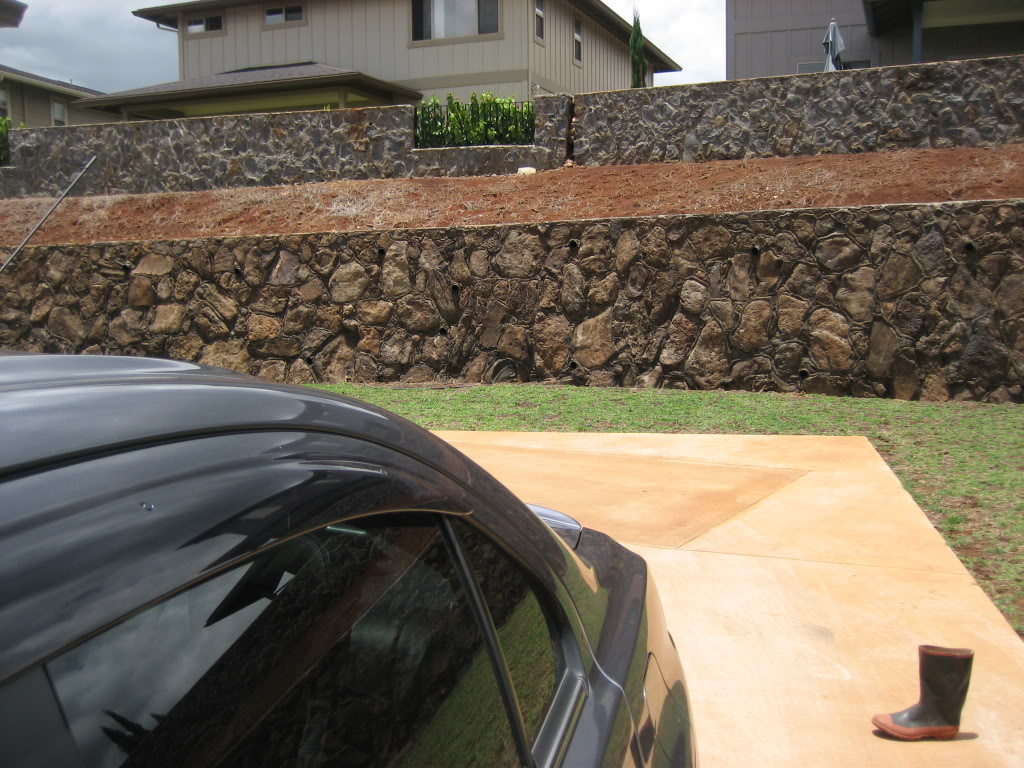
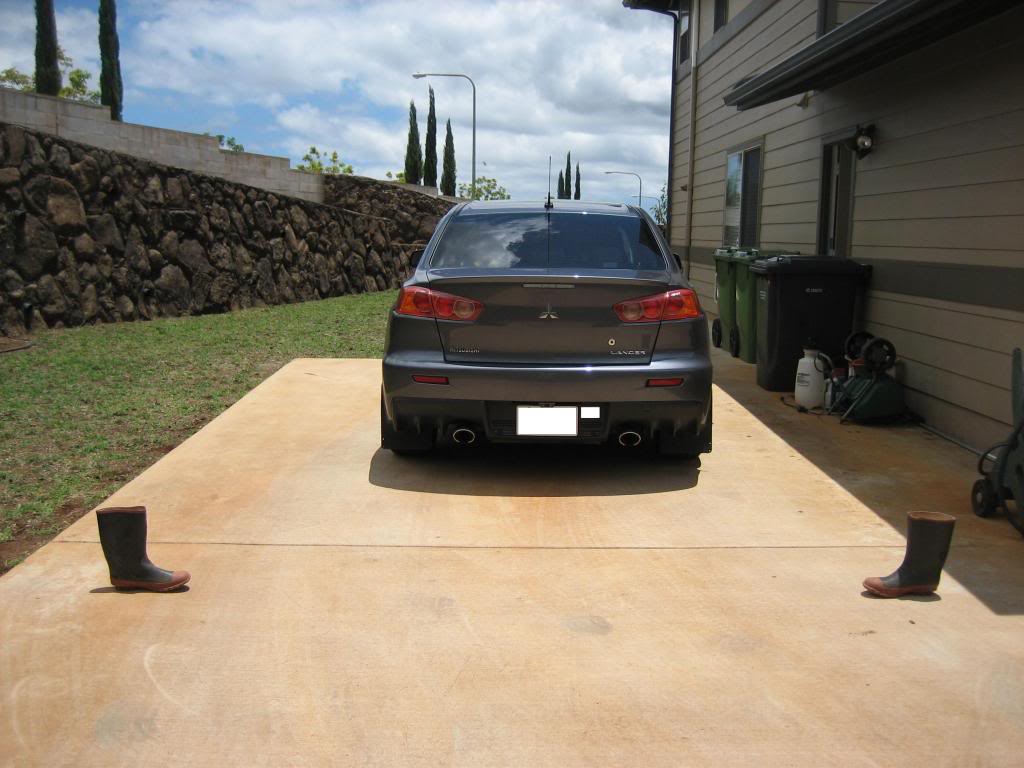
Here is a view of the boots to show how wide the coverage is.
Comments
I kinda would prefer that the camera cover be painted flat black to match the lower diffuser. It would be less conspicuous that way. I actually had the camera mounted without the cover before and you could barely notice it.
The cover is not required for installation but it gives it a clean look.
Total installation time is approximately 2-4 hours. The tedious part is actually pulling all the trims and seats. Like I had said earlier, putting back the rear seat is very difficult.
Reference Info
Page 7 Required for OEM camera location installation
Page 9 Required for Australian wiring
Page 12 Required for OEM camera location installation
Template A Required for OEM camera location installation
Template B Required for OEM camera location installation

This installation provides commentary to the OEM installation of the camera harness and then provides specific instructions for the modified location of the OEM camera.
This instruction may also be used to aid in installing an aftermarket camera either to the MMCS or to an aftermarket head unit.
Placing the backup camera just above the license plate does not affect the effectiveness of the camera. The OEM location does provide a view of the bumper cover for reference but it is not worth affecting the appearance of the car.
Parts
I purchased the parts from RussellM from mitsubishiparts.net.
1 - Camera kit, MZ380462EX, $302.20
1 - Harness, MZ607384EX $65.98 (This is nice even for aftermarket cameras to have because it is insulated and is plug and play to the MMCS)
1 - Cover (A39 graphite gray), MZ607432EX, $22.80
2 - Corner braces (can be purchased from Lowes, Home Depot, etc)
2 - M6x1.00 15mm long bolts (can be purchased from Lowes, Home Depot, auto parts store, etc)
2 - Tinnerman Clip Nuts M6x1.00 size (can be purchased from Lowes, Home Depot, auto parts store, etc)
This comes out to ~$400 shipped. I got it for $360 shipped because it was discounted.

Tools and Materials

Notes and Warnings

Installation Instructions

Note: You don't really have to remove the battery negative cable.

Remove all of the items shown below except for the trunk lid trim and grommet.
Note: Do not perform Step B.

Remove only Items 1, 2, and 3 shown below.
Note: Do not unplug the MMCS unit.

Remove Items 1, 2, and 3 shown below.

Remove Cowl side trim (2), Front scuff plate (1), Center pillar trim (7), Rear scuff plate (3).
Note: You may have to peel back the front and rear door opening trims (4 & 5). RH side shown in pictures below.


Remove the upper and lower rear seat.
Note: When you reinstall the rear upper seat, make sure you hang it correctly. This is probably the hardest part of the install as it is very difficult to engage it on all 3 hangers.


Install the harness into the MMCS unit.
Note: See Reference Page 9 for Non-USDM wiring.

Run the wires across the dash and down to the kick panel.

Run the wires along the side sill and through to the trunk.

Modified Location Installation Instructions
With the rear seat and trunk lining removed, continue to route the harness along the wiring harness that leads to the back bumper. There will be a grommet located just below the rear LH taillight.
Remove Trunk room trim front (23, 24, 25), LH Trunk room side trim (28), LH Trunk room box (21), LH Trunk room floor side board (17), Trunk room floor board (18), Trunk room bat (15), Rear end trim (22), and RF subwoofer (if installed).

Remove the rear bumper cover. This picture is confusing to look at but make sure you remove the center bolt located underneath the license plate. Pulling the bumper cover sides from the rear bumper side brackets (9) is the hardest part. You may need to use a pry tool to disengage the tabs. Be careful not to damage the paint. If you are afraid, tape over the painted areas with masking tape.
Note: If your car is fitted with the optional mud guards you wil have to remove them too. Be careful removing the bumper cover and make sure you remove all of the required fasteners. If it seems hard to remove, you probably didn't remove all of the fasteners. The bumper cover sides are the only parts that require some force to remove.

Run the harness through the grommet below the LH tail light. Route the harness above the bumper reinforcement and to the license plate area. I routed mine so that it came to the RH side of the camera so that the harness coming out of the camera wouldn't have to make a 180 degree turn.
Prep the connector as shown below.


The camera assembly consists of 2 pieces; the camera itself and a camera bracket. The camera bracket is that diamond shaped plastic piece that has the fastener holes in it. The camera is cube shaped with a wiring harness coming out of it. The camera is mounted to the camera bracket with 2 small fasteners on the back.
If you look at the installed picture, you will notice that the camera is actually mounted upside down compared to the OEM orientation. What I did was that I removed the camera from the bracket and flipped it over. There is a locating tab on the camera that I cut off in order to do this. So when you flip the camera over, you can mount the camera in the orientation shown in the pic and have the image appear right-side-up.
Camera modification and assembly
1. Remove the 2 small fasteners from the back of the camera assembly.
2. Remove the camera from the bracket. Be careful not to damage the harness as it is a tight fit.
3. Cut off the tab on the back of the camera.
4. Reorient the camera upsidedown in the camera bracket. Reinstall using the 2 small fasteners removed in step 1.
5. Obtain the 2 corner brackets and bend them approximately 45 degrees outwards.
6. Assemble the cover on to the camera assembly.
7. Install the 2 corner brackets over the fasteners on the cover an attach using the 2 M6x1.00 nuts supplied with the camera kit. Use 'loctite' threadlocker to ensure it doesn't loosen.
After assembly, it should look like the pics below:


Bumper cover modification
1. Determine the location of the camera assembly. Be sure to test fit the camera with the license plate in place. Place the camera assembly in the desired location and mark the mounting location with a pen.
2. Drill a 8mm (5/16") hole in the marked locations.
3. Cut a small notch in the recess of the bumper cover in order to install the Tinnerman clip. Repeat on the other side. You may need to cut away some of the bumper foam on the RH Tinnerman to gain clearance.
After installation of the clips, it should look like the pic below.

4. Install the camera using 2 M6x1.00 bolts.

5. Install the license plate.
6. Connect the harness to the camera. Tuck it behind the bumper cover taking care not to pinch the harness.
Notes:
Do not make tight bends or cram the harness into an area where it may chafe over time.
I used some dielectric grease in the connector to protect against corrosion. The connector is not really designed for outdoor use.

7. Check the image in the screen and adjust the angle as necessary.

Here is a view from outside the car. Compare it to the view in the screen and you will see that the wide angle lens covers a lot.

Here is a view of the boots to show how wide the coverage is.

Comments
I kinda would prefer that the camera cover be painted flat black to match the lower diffuser. It would be less conspicuous that way. I actually had the camera mounted without the cover before and you could barely notice it.
The cover is not required for installation but it gives it a clean look.
Total installation time is approximately 2-4 hours. The tedious part is actually pulling all the trims and seats. Like I had said earlier, putting back the rear seat is very difficult.
Reference Info
Page 7 Required for OEM camera location installation
Page 9 Required for Australian wiring
Page 12 Required for OEM camera location installation
Template A Required for OEM camera location installation
Template B Required for OEM camera location installation
Last edited by markpaco; May 2, 2009 at 06:21 PM.
#7
Evolved Member
Join Date: Apr 2008
Location: Denver, CO
Posts: 1,016
Likes: 0
Received 0 Likes
on
0 Posts
Fabulous writeup! I'd love to do this mod, and I imagine I will someday. I can't stand the height of the recaros. Makes me think I'm missing/not seeing something when I'm backing up.
Trending Topics
#9
installed !
markpaco...
a BIG aloha to zee islands! zänk you for your most marvelous writeUp again. just installed my OEM camera yesterday. your description and additionally included pix of those 'damn' trim bits were worth gold! [btw. got mine from russell at http://www.mitsubishiparts.net/catalog/?section=603. anybody contemplating: send him a PM, maybe he'll set you up with a sweet deal; my dealer wanted over $500!!]
and DÄNG: you gotta take zat car apart! i started from the front and worked my way back disassembling & reassembling as i went along [often checking that the camera 'still' worked]. will post pics once i have taken some shots of the completed install, since i finished in the dark...
OFF TOPIC: since the bumper was off, i also removed the bumper reflectors and wrapped them in dk grey vinyl: now they still function as reflectors at nite, but by day they're nice + dark, integrating perfectly with my car's graphite grey instead of being glaringly red.
#14
Evolved Member
Join Date: Apr 2008
Location: Denver, CO
Posts: 1,016
Likes: 0
Received 0 Likes
on
0 Posts
orly???? So you're saying that the wire should be run ALL the way back to the trunk form the nav and the only thing that needs to be purchased is the camera? If so, where the hell do I sign up? lol
#15
But I agree with you if that was the case damn that would be a sweet easy install


