Evo X Front Mount Intercooler (FMIC) Installation Howto (Illustrated)
 Jul 6, 2009, 06:57 PM
#1
Evolving Member
Thread Starter
Evo X Front Mount Intercooler (FMIC) Installation Howto (Illustrated)
To install your FMIC, you're going to have to remove the front bumper. This is a pretty easy task - I'd rate it maybe a 2 out of 10 if you've ever worked on a car before. Take your time, follow the directions, and everything will go smoothly.
You can do this with the car on the ground. If you've lowered your car, you may want to get it up on some jack stands though, since you'll need to get to some bolts and plastic clips underneath the front of the car. My car is at stock height and has the OEM ground effects package and I was able to do this with the car on the ground.
We're going to start off by removing the upper radiator cover. This cover is indicated in the illustration below with a red arrow. It's plastic, and flexes quite a lot.

To remove the upper radiator cover, you'll have to remove 5 plastic clips. These clips are standard automotive clips and are used on many cars. They generally come in two flavors - one with a flat top and one with a top which looks like a Phillips screw. The two smaller clips, which hold the front of the airbox shroud down, are the Phillips screw type.
Use a standard Phillips screwdriver to remove the screw portion most of the way from the clip, and then pull the clip straight up and out. Be careful with these, as the threads on the screw are plastic. You don't want to strip them out because obviously they have to be re-used. Almost NO force should be required to put them back upon reinstallation.
The second type are what you'll run in to probably 90% of the time on this bumper removal project - they have a flat head to them, and you'll use a small flat-headed screwdriver to pop the head up before pulling the rest of the clip out. The head is attached to a shaft that's inside the clip, which causes little arms on the clip to expand once it's installed. Note that the shaft does not come all the way out - just pop it out until it's as far out as it will come, and then pull the plastic clip out.
You'll need to remove the two Phillips clips from the airbox shroud, and the 3 flat-headed plastic clips from the upper radiator cover as indicated below.
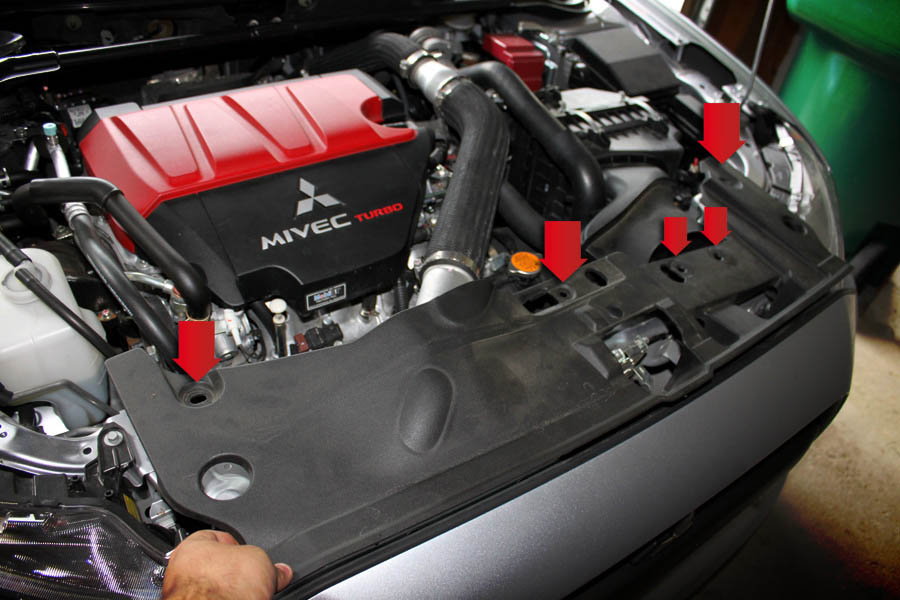
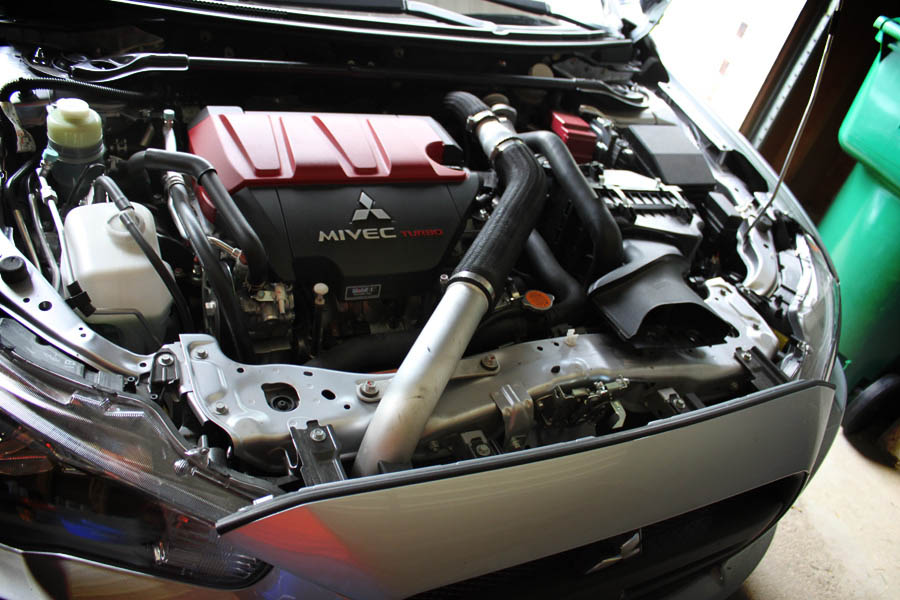
This is after the radiator cover has been removed. As you can see, we can now gain access to the 5 10mm bolts that hold the front bumper on, as well as the two 12mm bolts that hold the upper intercooler pipe in place.
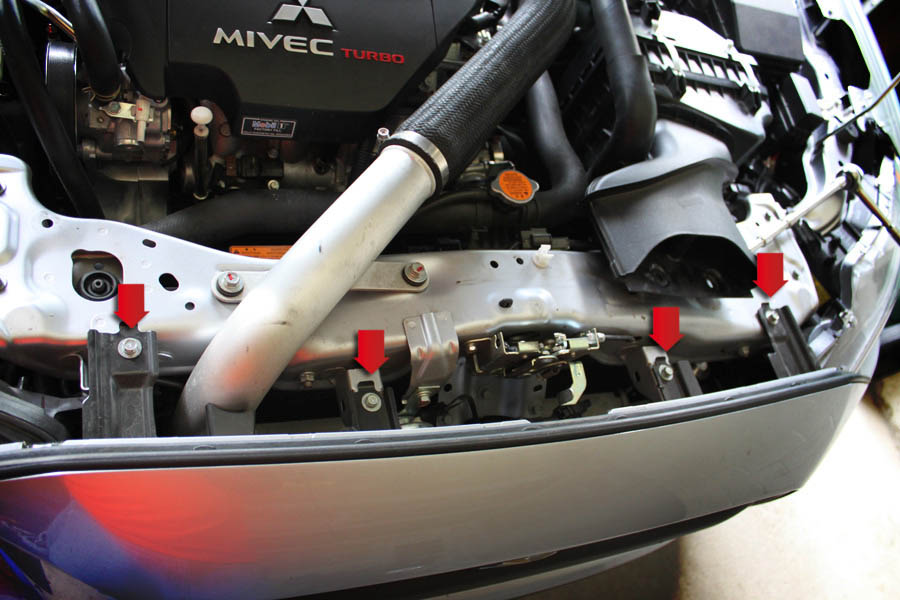
The front bumper is held on up top by 5 10mm bolts and one plastic clip. Here are 4 of the bolts.
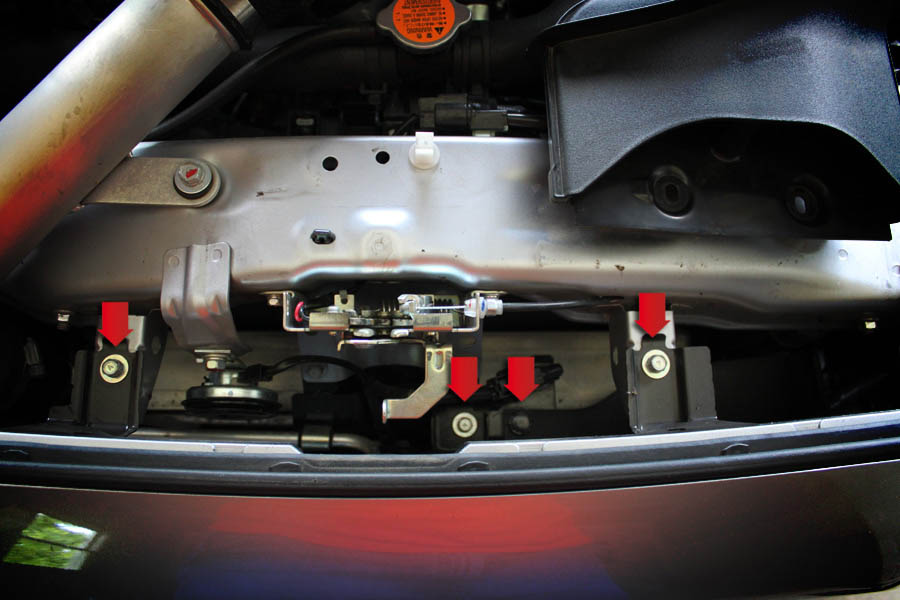
To gain access to the 5th bolt and the plastic clip, look straight down in next to the hood latch mechanism. This picture shows the 5th 10mm bolt and the plastic clip, as well as two of the 10mm bolts that we saw in the previous picture.
Next we'll remove two black bolts from either side of the grill. These are located in the "mouth" of the front bumper, and there's one on the left side of the bumper and one on the right side. Here are two pictures which show the location of these bolts:
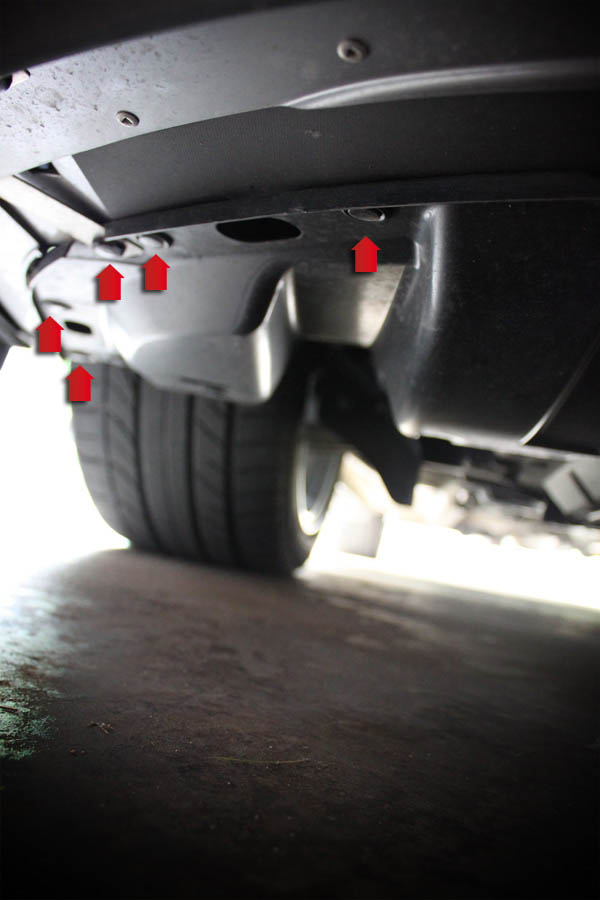
Next, we move on to the fender wells. Here we have 1 Phillips screw (indicated with the upper-most red arrow in the below picture), as well as 3 of the Phillips screw type plastic clips. The Phillips screw has a 10mm bolt head on it as well, and goes straight up through the plastic bumper and in to the fender. To see it, get on the ground and look straight up. Each wheel well is the same, so I'll only show a picture of one. You'll need to remove all of these and set them aside.
Next, we go under the front of the car. There are 6 10mm screws that hold the front bumper to the splash shield. These are indicated below. ALL of these are bright silver and all go through the black plastic splash shields on the bottom of the car. Note that there is another row of 10mm bolts that are more toward the front of the car - leave those alone.
On either side of the front bumper, still underneath the car, there are 5 more plastic clips. These are the same flat-top kind as before, so just pop the top with a small, flat screwdriver and pull them out. These may be harder to get off, especially if you live on a dirt road (I don't, thankfully), as any dirt that gets up on top of the splash shield can make removing these guys a little bit more difficult than the earlier ones. Also make note that one of these 5 clips is a little different and slightly bigger than the rest, so pay special attention to where it goes and make sure you put the correct clips back in the correct places.
Now comes the scary part - pulling the bumper off. At this point you've removed the hardware from the top of the bumper, the bottom of the bumper, and both wheel wells. The front of the bumper should move up a down freely, but you'll notice that the portion in between the headlights and where you took out the screws that attach the bumper to the front fenders will not. In this area, on either side of the car, there are little plastic teeth that hold the front bumper to the car. The bumper snaps off these teeth by pulling the bumper straight away from the fender. The first time you do this it will require a bit of effort, but give it a good yank, and it will come free.
This is a good time to have a buddy around to help you hold the bumper so it doesn't fall on the ground. I've done this before, so I just put a towel down and was ok... but bumpers are pretty unwieldy and flex all over once you get them off, so if you've never handled one that's not attached to a car before, it's best to get another set of hands.
If you look around the intercooler you'll see that it's held on in a couple spots. This is where I got freaked out because it started getting dark outside, so I'm sorry I didn't get pics of everything. On the bottom of the intercooler is a little tab with a 10mm or 12mm bolt through it. Remove this bolt. The IC is also connected to the factory charge piping via Phillips screw driven pipe clamps and the black couplers shown below. You can remove those as well:
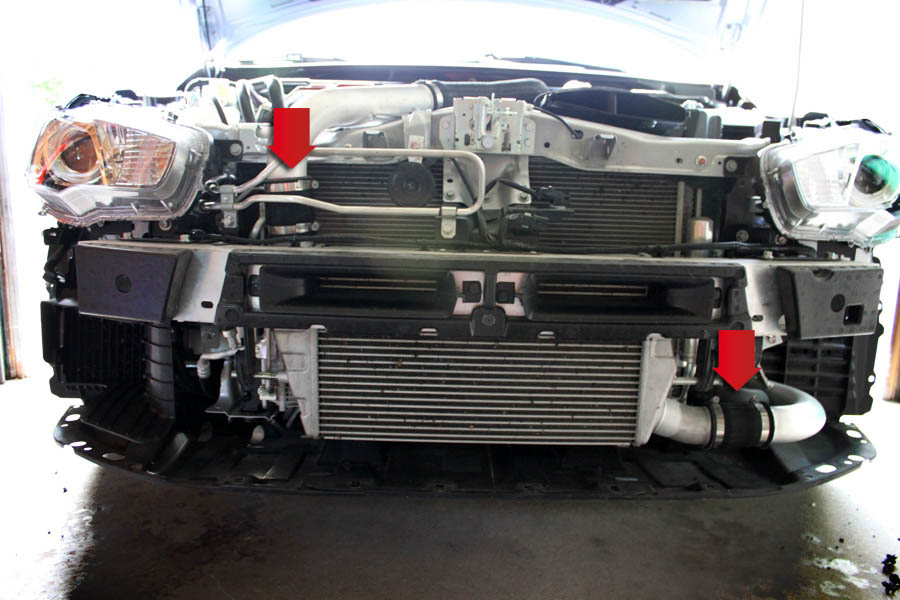
On the top pipe, remove them here:
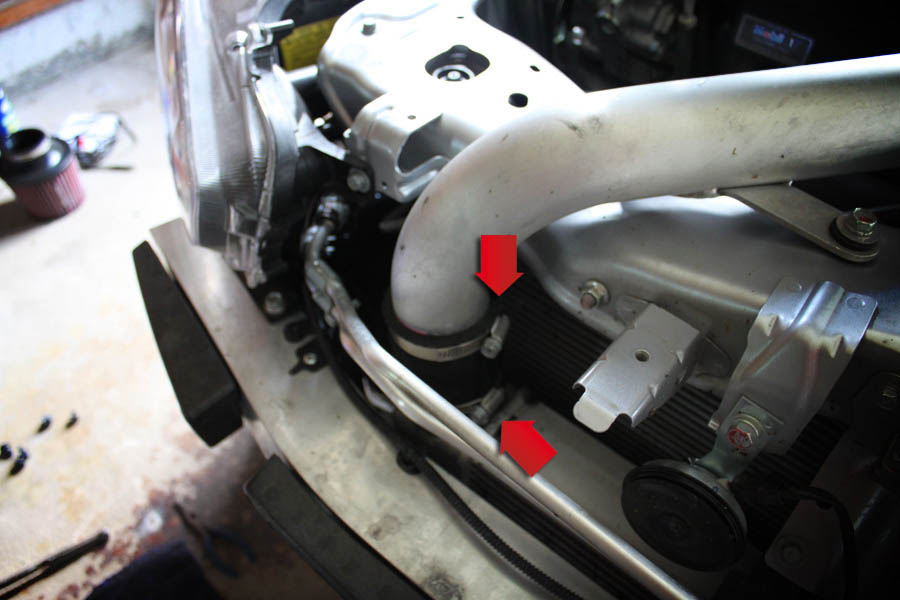
and on the bottom pipe, remove them here:
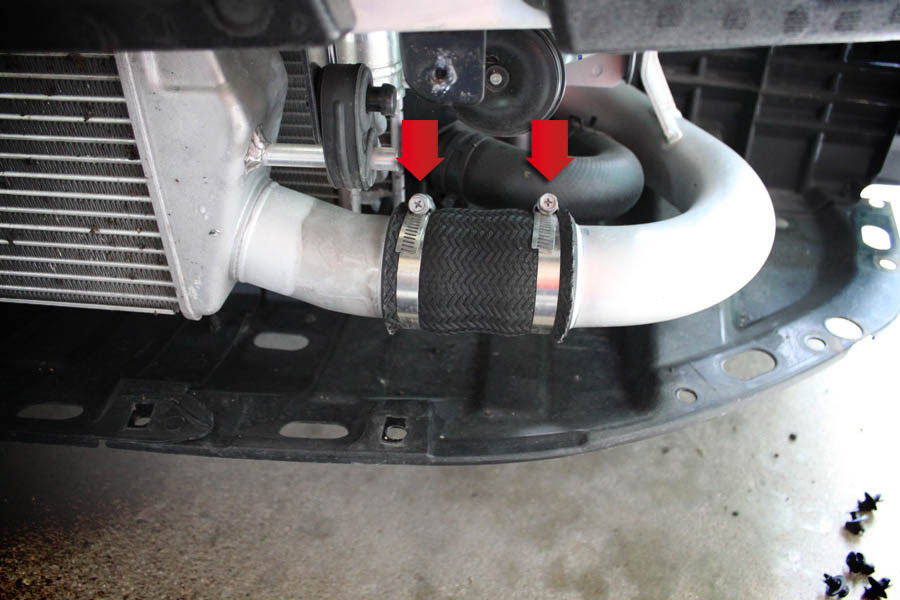
On that last picture you can also see the last method which Mitsu used to attach the intercooler to the car. On each side they've welded a post, which is attached through a rubber hanger, much like an exhaust hanger attaches to a car. You'll obviously want to pull these off. Once the single 10/12mm bolt is removed from the bottom of the IC, the hose clamps and couplers are removed, and you slide these rubber hangers off, you can slide the IC out of the car from the bottom.
Be careful not to drag the IC across the AC condenser (looks like a radiator, directly behind the IC). You don't want to bend any condenser fins or otherwise damage the condenser, as this could obviously cause leaks. AC systems are under pressure, so if you blast a leak in this, you're definitely going to know it.
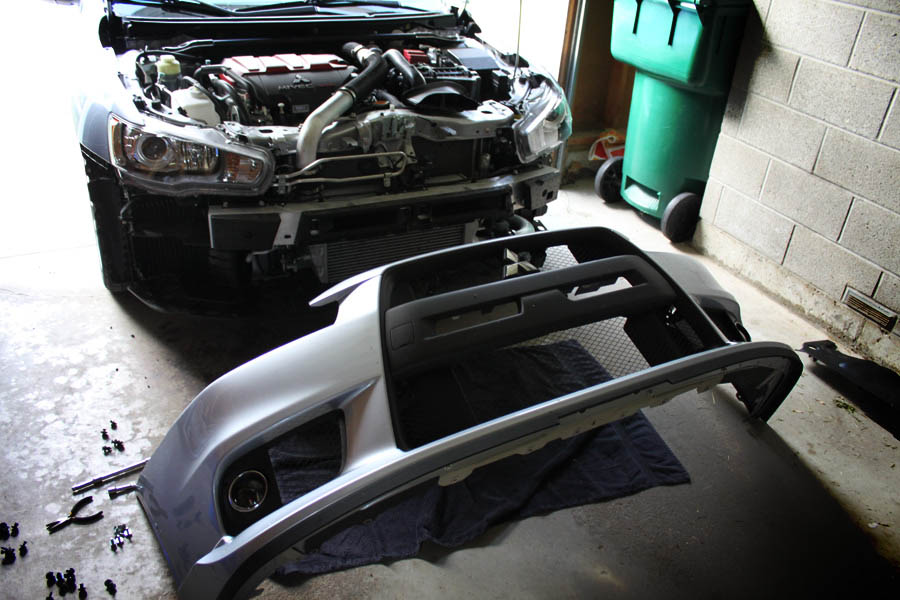
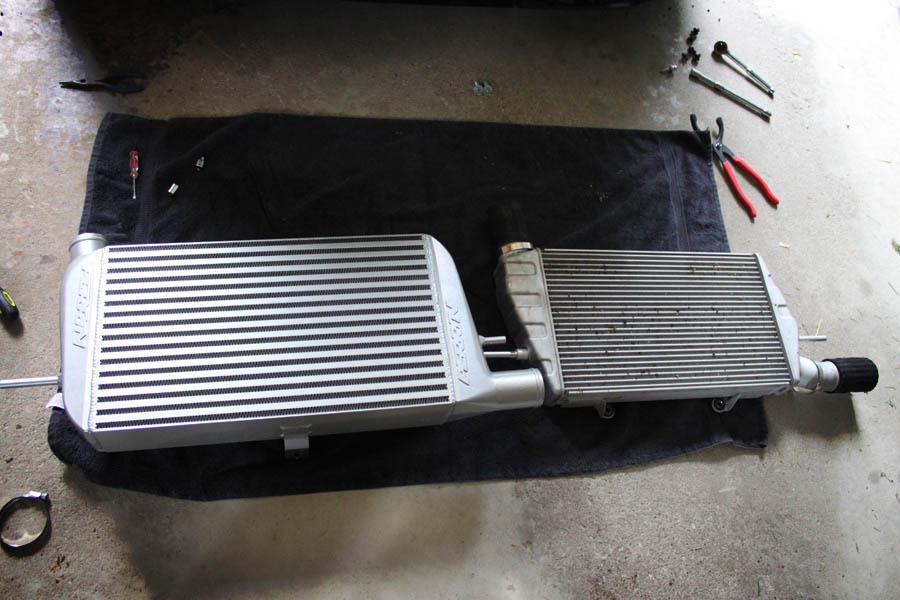
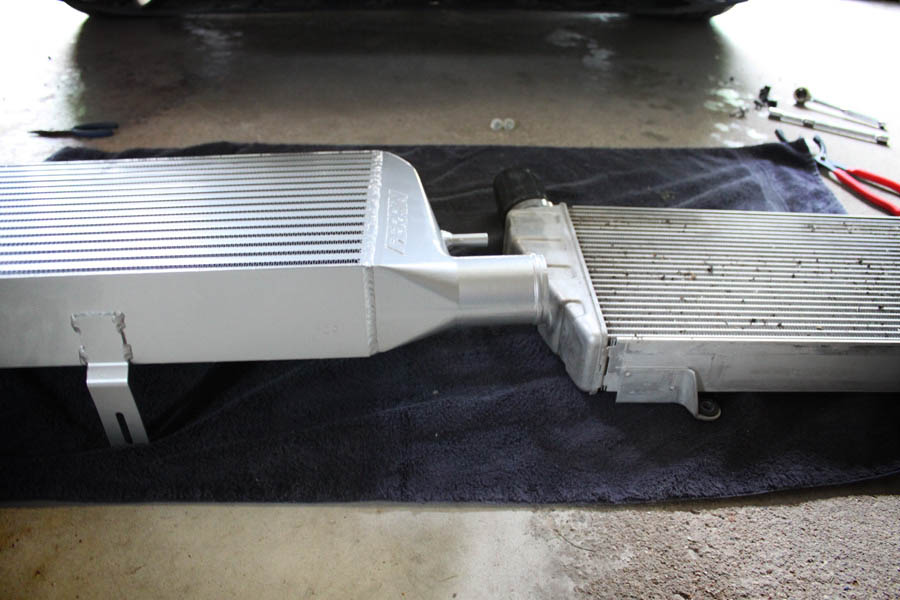
Below are some fun shots of my stock IC vs the Perrin IC.
Installation of the new IC is the exact reverse of the above instructions. The IC will slide up through the bottom, and hang on the factory hangers. Larger ICs like the Perrin one will not use the 10/12mm bolt that was located under the factory IC to hold it in place. Rather, the Perrin IC has a bracket on the bottom which bolts to existing bolts on the under side of the car, between the lower cross member and the splash shields. I can't speak with any other brand of IC, but the brackets on these things are pretty simple, so if you got this far you should be able to figure it out.
A couple tips - installation of the new FMIC is easier if you remove the two 12mm bolts which hold the UICP in place, and remove the one 12mm bolt that holds the LICP in place. This gives you more wiggle room on these pipes and makes it MUCH easier to slip the new couplers over the pipes, as well as over the huge openings on the new FMIC.
You can do this with the car on the ground. If you've lowered your car, you may want to get it up on some jack stands though, since you'll need to get to some bolts and plastic clips underneath the front of the car. My car is at stock height and has the OEM ground effects package and I was able to do this with the car on the ground.
We're going to start off by removing the upper radiator cover. This cover is indicated in the illustration below with a red arrow. It's plastic, and flexes quite a lot.
To remove the upper radiator cover, you'll have to remove 5 plastic clips. These clips are standard automotive clips and are used on many cars. They generally come in two flavors - one with a flat top and one with a top which looks like a Phillips screw. The two smaller clips, which hold the front of the airbox shroud down, are the Phillips screw type.
Use a standard Phillips screwdriver to remove the screw portion most of the way from the clip, and then pull the clip straight up and out. Be careful with these, as the threads on the screw are plastic. You don't want to strip them out because obviously they have to be re-used. Almost NO force should be required to put them back upon reinstallation.
The second type are what you'll run in to probably 90% of the time on this bumper removal project - they have a flat head to them, and you'll use a small flat-headed screwdriver to pop the head up before pulling the rest of the clip out. The head is attached to a shaft that's inside the clip, which causes little arms on the clip to expand once it's installed. Note that the shaft does not come all the way out - just pop it out until it's as far out as it will come, and then pull the plastic clip out.
You'll need to remove the two Phillips clips from the airbox shroud, and the 3 flat-headed plastic clips from the upper radiator cover as indicated below.
This is after the radiator cover has been removed. As you can see, we can now gain access to the 5 10mm bolts that hold the front bumper on, as well as the two 12mm bolts that hold the upper intercooler pipe in place.
The front bumper is held on up top by 5 10mm bolts and one plastic clip. Here are 4 of the bolts.
To gain access to the 5th bolt and the plastic clip, look straight down in next to the hood latch mechanism. This picture shows the 5th 10mm bolt and the plastic clip, as well as two of the 10mm bolts that we saw in the previous picture.
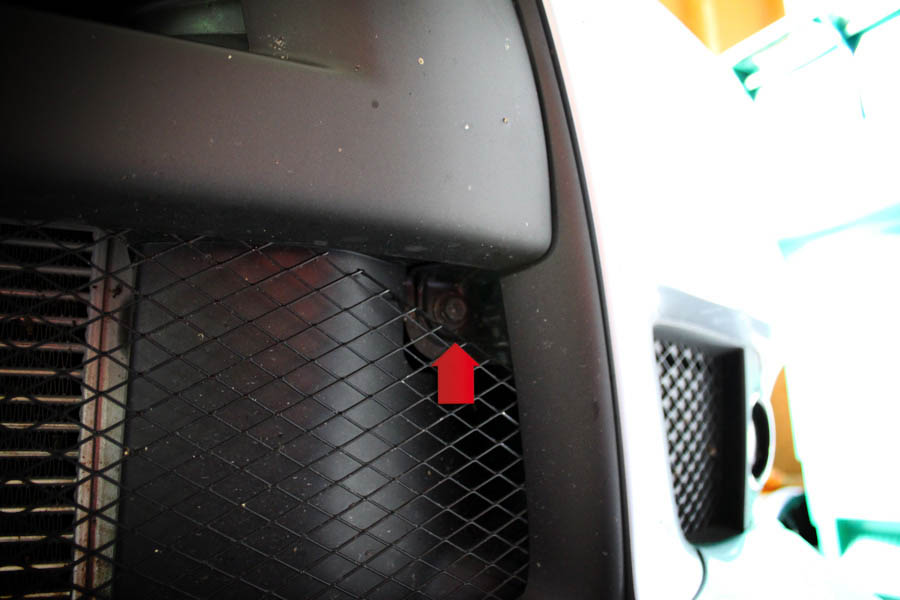
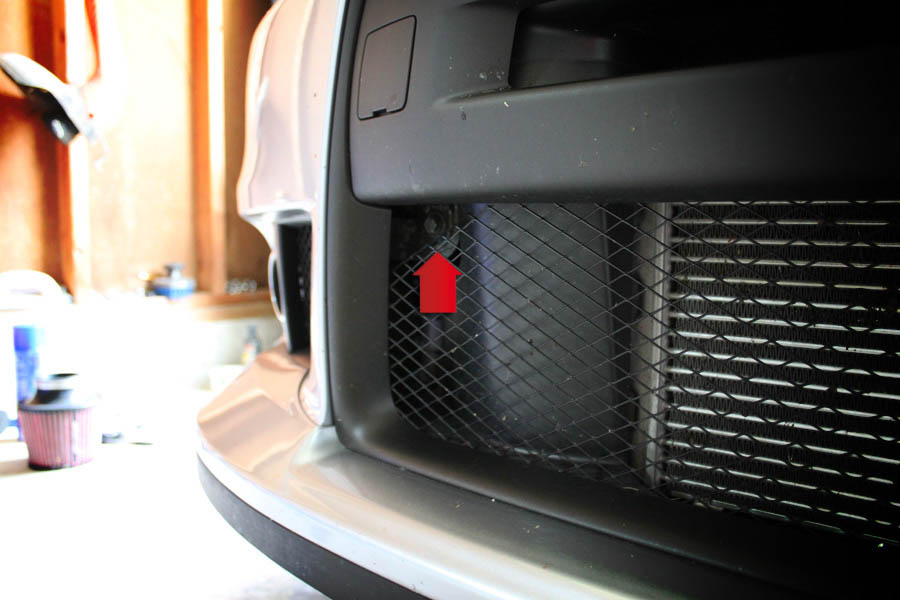
Next we'll remove two black bolts from either side of the grill. These are located in the "mouth" of the front bumper, and there's one on the left side of the bumper and one on the right side. Here are two pictures which show the location of these bolts:
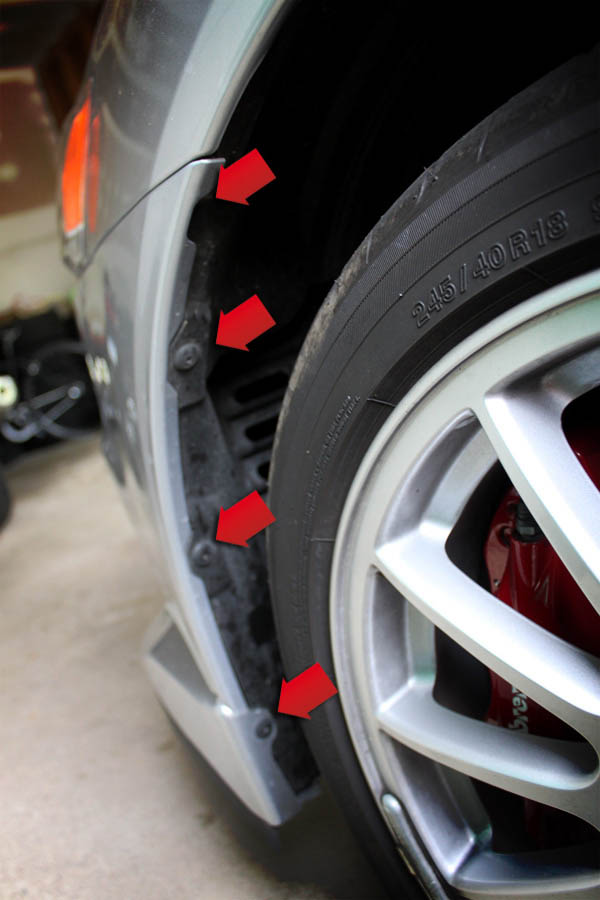
Next, we move on to the fender wells. Here we have 1 Phillips screw (indicated with the upper-most red arrow in the below picture), as well as 3 of the Phillips screw type plastic clips. The Phillips screw has a 10mm bolt head on it as well, and goes straight up through the plastic bumper and in to the fender. To see it, get on the ground and look straight up. Each wheel well is the same, so I'll only show a picture of one. You'll need to remove all of these and set them aside.
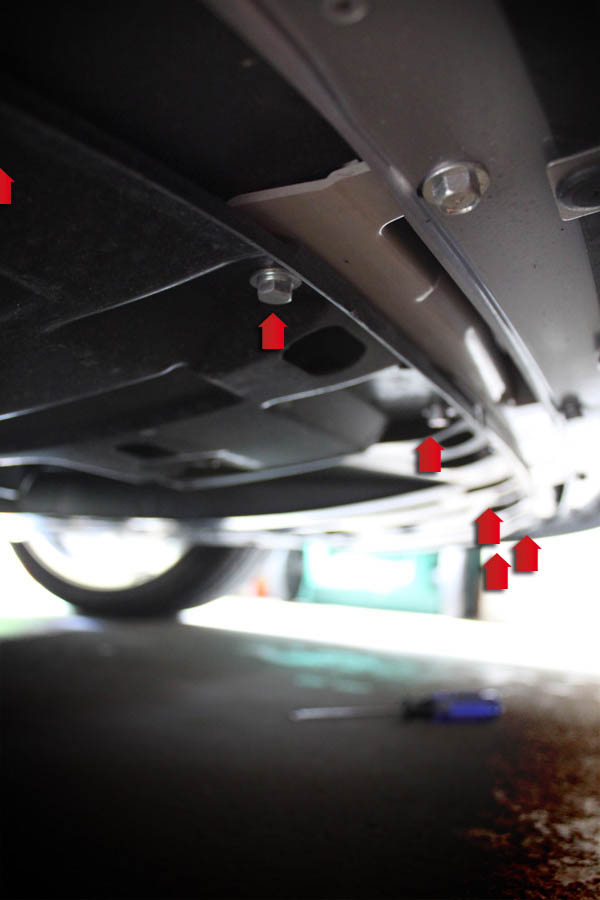
Next, we go under the front of the car. There are 6 10mm screws that hold the front bumper to the splash shield. These are indicated below. ALL of these are bright silver and all go through the black plastic splash shields on the bottom of the car. Note that there is another row of 10mm bolts that are more toward the front of the car - leave those alone.
On either side of the front bumper, still underneath the car, there are 5 more plastic clips. These are the same flat-top kind as before, so just pop the top with a small, flat screwdriver and pull them out. These may be harder to get off, especially if you live on a dirt road (I don't, thankfully), as any dirt that gets up on top of the splash shield can make removing these guys a little bit more difficult than the earlier ones. Also make note that one of these 5 clips is a little different and slightly bigger than the rest, so pay special attention to where it goes and make sure you put the correct clips back in the correct places.
Now comes the scary part - pulling the bumper off. At this point you've removed the hardware from the top of the bumper, the bottom of the bumper, and both wheel wells. The front of the bumper should move up a down freely, but you'll notice that the portion in between the headlights and where you took out the screws that attach the bumper to the front fenders will not. In this area, on either side of the car, there are little plastic teeth that hold the front bumper to the car. The bumper snaps off these teeth by pulling the bumper straight away from the fender. The first time you do this it will require a bit of effort, but give it a good yank, and it will come free.
This is a good time to have a buddy around to help you hold the bumper so it doesn't fall on the ground. I've done this before, so I just put a towel down and was ok... but bumpers are pretty unwieldy and flex all over once you get them off, so if you've never handled one that's not attached to a car before, it's best to get another set of hands.
If you look around the intercooler you'll see that it's held on in a couple spots. This is where I got freaked out because it started getting dark outside, so I'm sorry I didn't get pics of everything. On the bottom of the intercooler is a little tab with a 10mm or 12mm bolt through it. Remove this bolt. The IC is also connected to the factory charge piping via Phillips screw driven pipe clamps and the black couplers shown below. You can remove those as well:
On the top pipe, remove them here:
and on the bottom pipe, remove them here:
On that last picture you can also see the last method which Mitsu used to attach the intercooler to the car. On each side they've welded a post, which is attached through a rubber hanger, much like an exhaust hanger attaches to a car. You'll obviously want to pull these off. Once the single 10/12mm bolt is removed from the bottom of the IC, the hose clamps and couplers are removed, and you slide these rubber hangers off, you can slide the IC out of the car from the bottom.
Be careful not to drag the IC across the AC condenser (looks like a radiator, directly behind the IC). You don't want to bend any condenser fins or otherwise damage the condenser, as this could obviously cause leaks. AC systems are under pressure, so if you blast a leak in this, you're definitely going to know it.
Below are some fun shots of my stock IC vs the Perrin IC.
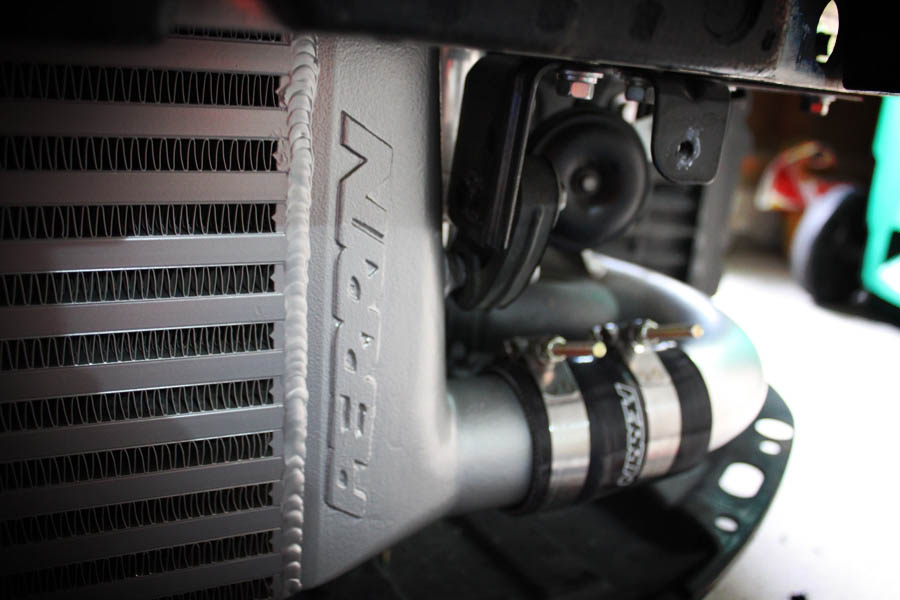
Installation of the new IC is the exact reverse of the above instructions. The IC will slide up through the bottom, and hang on the factory hangers. Larger ICs like the Perrin one will not use the 10/12mm bolt that was located under the factory IC to hold it in place. Rather, the Perrin IC has a bracket on the bottom which bolts to existing bolts on the under side of the car, between the lower cross member and the splash shields. I can't speak with any other brand of IC, but the brackets on these things are pretty simple, so if you got this far you should be able to figure it out.
A couple tips - installation of the new FMIC is easier if you remove the two 12mm bolts which hold the UICP in place, and remove the one 12mm bolt that holds the LICP in place. This gives you more wiggle room on these pipes and makes it MUCH easier to slip the new couplers over the pipes, as well as over the huge openings on the new FMIC.

The following users liked this post:
Anth (May 17, 2018)


 Jul 7, 2009, 03:13 AM
#4
Evolving Member
Thread Starter
The logo is behind the grill so without taking the front bumper off I can't get you exact measurements. It's *about* 5" tall and 3" shorter than the visible width of the IC between the two plastic air ducts on either side.
Jul 7, 2009, 07:21 AM
#6
Evolving Member
Thread Starter
I was talking about the actual logo trace on the IC.
It did come with the vinyl thing - which is what I'm talking about - you stick it on, paint over it, peel it off, and then it's ruined. Mine's wadded up in a little ball in the trash with paint all over it. Sorry, I used it.
It did come with the vinyl thing - which is what I'm talking about - you stick it on, paint over it, peel it off, and then it's ruined. Mine's wadded up in a little ball in the trash with paint all over it. Sorry, I used it.

Trending Topics
Jul 7, 2009, 07:49 AM
#8
I was talking about the actual logo trace on the IC.
It did come with the vinyl thing - which is what I'm talking about - you stick it on, paint over it, peel it off, and then it's ruined. Mine's wadded up in a little ball in the trash with paint all over it. Sorry, I used it.
It did come with the vinyl thing - which is what I'm talking about - you stick it on, paint over it, peel it off, and then it's ruined. Mine's wadded up in a little ball in the trash with paint all over it. Sorry, I used it.


 Jul 7, 2009, 01:47 PM
#13
Evolving Member
Thread Starter
BTW - thanks guys. Perrin turboback is coming at the end of the week. I also have a UICP coming. I'll try to throw both of those in to a how-to similar to this one.
