Red vinyl front Mitsu emblem overlay?
 Jun 6, 2010, 07:36 PM
#1
Red vinyl front Mitsu emblem overlay?
I had a red vinyl overlay on my IX front Mitsu badge and was wondering if anyone knows of one available for the X? I absolutely hate the Mitsu symbol in chrome. I'd like to do the rear too if that's available. So far I've checked eBay and LancerShop (crappy vendor, but they sold this type of stuff for the VIII/IX) with no luck.
Thanks guys!
Thanks guys!
 Jun 6, 2010, 10:09 PM
#2
I did mine with red color. but i'm not buying the vinyl from somewhere. There are 2 ways to do that.
1. Take the badge off, buy a red paint, paint it then put it back.
2. Go to a shop that doing vinyl, 3M, headlights tint kind of stuffs. i think they do have a red film. i'm doing this way..spent $10 on my front and rear badge.
1. Take the badge off, buy a red paint, paint it then put it back.
2. Go to a shop that doing vinyl, 3M, headlights tint kind of stuffs. i think they do have a red film. i'm doing this way..spent $10 on my front and rear badge.

 Jun 7, 2010, 03:22 PM
#7
Evolving Member
iTrader: (1)

Join Date: Aug 2007
Location: TX
Posts: 167
Likes: 0
Received 0 Likes
on
0 Posts
Before applying the paint I would recommend you roughen up the surface with either sandpaper or the easiest would be a scotch brite. Make sure the surface is clean, either by using wax/grease remover or acetone.
This will ensure the paint has something to "grab" onto, so the paint wont' come off down the road.
This will ensure the paint has something to "grab" onto, so the paint wont' come off down the road.
Trending Topics
Jun 7, 2010, 03:39 PM
#9
Evolving Member
iTrader: (1)
Join Date: Aug 2007
Location: TX
Posts: 167
Likes: 0
Received 0 Likes
on
0 Posts
It removes any last contaminants prior to applying the paint.
Might not seem like a big deal, but it's small steps like this that make a huge difference.
Jun 7, 2010, 05:53 PM
#12
Evolving Member
iTrader: (1)
Join Date: Aug 2007
Location: TX
Posts: 167
Likes: 0
Received 0 Likes
on
0 Posts
This is wax and grease remover:
http://images.solidcactus.com/autoba...ax-remover.jpg
Spray it on, wipe it off, then you spray your paint.
Don't think you'll have any issues, just remember it's better to do a couple light layers. If you have any issues you can always just sand it off and start over
 Jun 7, 2010, 06:18 PM
#13
Evolving Member
iTrader: (4)
Join Date: Dec 2007
Location: Los Angeles CA
Posts: 119
Likes: 0
Received 0 Likes
on
0 Posts
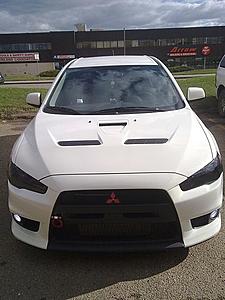
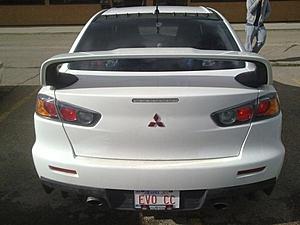
Here is how I painted my emblem.
Krylon Red Clearcoat Paint
Self-Etching Primer (This is important) Rustoleum I think
Some 600 grit paper
Some latex gloves
Some newspaper to soak excess paint
Use a well ventilated area,
1. Use heatgun to heat the emblem, then use dental floss to remove the badge.
2. Begin scratching the surface of the emblem with the grit paper.
3. Wash the emblem with soap, then dry. At this point you should be using latex gloves to avoid putting hand oil on emblem.
4. Lay the newspaper down on the surface in which you plan to paint the emblem to absorb any paint that doesn't land on the emblem.
5. Spray the emblem with the self etching primer. If you use normal primer it will NOT adhere to the surface. The self-etching primer is the key ingredient that bonds to the chrome.
6. Do two coats, and wait about an hour between coats.
7. Use sandpaper to scuff primer, then wash the surface to remove debris.
8. Finish by using 2 layers of red clearcoat, and optionally finishing with one layer of clearcoat.
Here is how my badge looks:
There is a reflection in the pic, but trust me, no scratches, no chips after one year.
Older pic:
Last edited by Poondoggs; Jun 7, 2010 at 06:21 PM.


Thread
Thread Starter
Forum
Replies
Last Post
churchja
Evo Show / Shine
9
Jan 28, 2011 07:42 PM
drewcuano
08+ Lancer Show / Shine
5
Oct 25, 2010 02:41 PM

