Lancer Oz 2006 M/T Turbo
 Feb 8, 2014, 11:48 AM
#1
Evolved Member
Thread Starter
Marcouxa1 M/T turbo thread
It's now time for me to start a thread on my Lancer Oz 2006 M/T turbo build. I have seen alot of people wondering how they could make their 2.0l (4g94) lancer faster. Well this probably the cheapest and most efficient way to make your lancer much faster than stock and even be able to make as much as two times the stock hp depending on your setup and tune. This build will work for any 2004-2006 lancers with both M/T or A/T. The differences between the M/T and A/T will be explained when needed during the thread. I would recommend doing an engine compression and leak test before starting this to make sure your engine is in good condition. This setup is for 10 psi and over, i am using the stock wastegate which is set at +- 10 psi. Now do not expect for your vehicle to run right after the install, your car will not run under load if you do not have a tune. If you're planning on getting your car tuned by a professional make sure you do not get into boost to get there. Stay below 3000 rpm at all times with a light foot on gas not to damage the engine.
Here is a list of the latest turbo threads for those who are still learning on how to turbo your lancer: https://www.evolutionm.net/forums/la...oobs-read.html
So lets begin with a parts list: (I'm in Canada so prices will vary from the US)
Evo 9 td05hr 16g6 10.5t turbo $400
Custom made twin scroll turbo manifold (RD Turbo Productions) 1000$
Evo 8 aftermarket stainless dump pipe w/O2 housing $50
Evo 8 aftermarket stainless 3'' downpipe $100
Evo 9 j pipe (35$)
Evo 9 maf w/maf adapter $150
Evo 8 oil feed/return lines and fittings $65
Evo 8 water feed/return lines and fittings $30
Cp forged pistons 82mm (3.228'') 0.50mm (0.020'') oversize 800$
K1 forged connecting rods 500$
Arp head studs (part#203-4204) 200$
ID 850cc injectors $650$
Walbro 255 lph fuel pump $100
NGK BKR7E spark plugs 20$
Spal 12'' radiator push slim fan $100
Kia sportage 2001 clutch slave cylinder (M/T only) $20
ACT 6 puck sprung clutch disc with Xtreme pressure plate (rated at 420 ft/lbs of torque)(M/T only) $519
K&N cone air filter $45
Greedy type rz bov $250
Aftermarket Intercooler/intercooler piping/couplers $325
Spring bolts $8
3'' custom exhaust $275
Amsoil 10w30 dominator racing oil and honda oem coolant $75
Vacuum lines and fitings $20
AEMTuner $free
AEMData $free
USB to serial cable $free
Total cost yet: WAY too much!!!
Other mods:
EVO 9 AEM EMS Series 2 standalone
Aem 52mm wideband eugo afr gauge w/single pod
Glowshift psi/oil temperature/oil pressure gauges w/ custom radio pod
MAC valves boost solenoid
Carbon creations carbon fiber hood w/ Aerocatch hood pins
16'' Skyline R32 GTR 16x8 +30 forged wheels
Spec D front and rear strut bar
Evo 8 JDM recaro seats
Hybrid racing black shift knob
Custom made surge tank
Custom made baffled oil catch can w/K&N breather
Wilwood front big brake kit w/Hawk DTC60 pads
5 Bolt/Rear disc brake conversion w/EBC Yellowstuff pads
Autopower Rollcage
Sparco R325 steering wheel w/NRG short hub
Ksport gt pro coilovers w/12k Front and 10k Rear 65mm Swift springs
Toyo R888r tires 245/45R16 & 225/45R16
Progress 19mm rear sway bar
Mishimoto oil cooler
Mishimoto oil sandwitch plate w/ thermostatic switch
Sparco 3" 4 point harness
Evo 8 jdm cluster
Kaaz DBM2050 1.5 way Super Q LSD (60% lock)
Megan Racing rear camber arms
Engine block build:
https://www.evolutionm.net/forums/la...tep-guide.html
Lancer oz rear disc conversion:
https://www.evolutionm.net/forums/la...onversion.html
Lancer turbo noobs click here:
https://www.evolutionm.net/forums/la...oobs-read.html
Last edited by marcouxa1; Feb 28, 2020 at 06:35 PM.
 Feb 8, 2014, 12:47 PM
#2
Evolved Member
Thread Starter
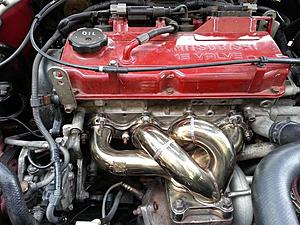
Exhaust manifold
First off if you're going to use an evo 8 manifold you're gonna need to modify it quite a bit. The reason why i ended up using the evo 8 manifold is because i wanted to keep my slim fan behind the radiator and not in front of it. I don't know if the Speedcorp manifold give you enough space for a slim fan on the back side of the radiator. If someone has done it let me know because buying a speedcorp manifold would save this headache of a modification.
The next steps are needed only if you're going for an evo 8-9 manifold.
You need to grind off the right side of the flange to fit under the coolant pipe coming out of the head. Be careful not to grind too close to the runner or your gasket will burn and create an exhaust leak.
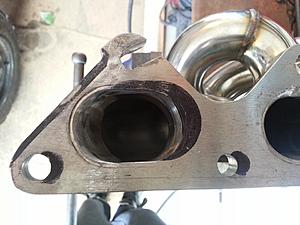
Then you need to redrill/grind/cut off the manifold's holes to bolt onto the head because the studs won't align. I used the old stock manifold gasket to mark where i had to redrill/grind/cut onto the evo 8 manifold to align its holes with the studs on the head.
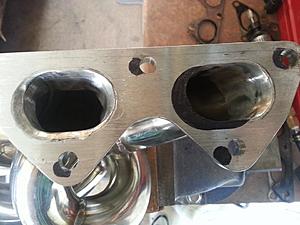
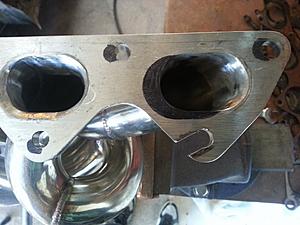
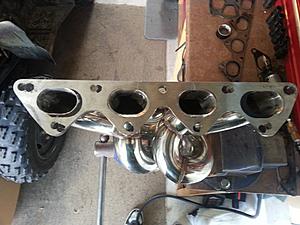
Finaly you have to port the evo 8 manifold runners to create a better flow/less restrictive exhaust and to align with the head's exhaust ports. Once again i used the old stock manifold gasket to mark where i had to port the flange of the evo 8 manifold.
First off if you're going to use an evo 8 manifold you're gonna need to modify it quite a bit. The reason why i ended up using the evo 8 manifold is because i wanted to keep my slim fan behind the radiator and not in front of it. I don't know if the Speedcorp manifold give you enough space for a slim fan on the back side of the radiator. If someone has done it let me know because buying a speedcorp manifold would save this headache of a modification.
The next steps are needed only if you're going for an evo 8-9 manifold.
You need to grind off the right side of the flange to fit under the coolant pipe coming out of the head. Be careful not to grind too close to the runner or your gasket will burn and create an exhaust leak.

Then you need to redrill/grind/cut off the manifold's holes to bolt onto the head because the studs won't align. I used the old stock manifold gasket to mark where i had to redrill/grind/cut onto the evo 8 manifold to align its holes with the studs on the head.


Finaly you have to port the evo 8 manifold runners to create a better flow/less restrictive exhaust and to align with the head's exhaust ports. Once again i used the old stock manifold gasket to mark where i had to port the flange of the evo 8 manifold.


Last edited by marcouxa1; Jun 17, 2014 at 03:47 PM.
Feb 8, 2014, 01:13 PM
#3
Evolved Member
Thread Starter
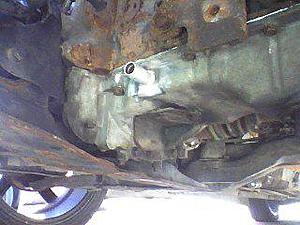
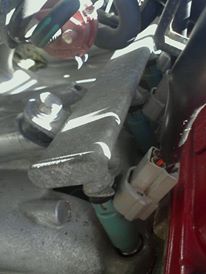
Oil pan
Now before you install any exhaust components you need to make an oil return fitting for the oil return line in your oil pan. You must flush the engine oil before doing this or you will end up with a huge mess. You can either drill and tap the hole to screw a fitting in or you can get a fitting welded directly on the pan. I knew a professional welder back when i was at school so i took an old A/C aluminum line and got it welded. Make sure you get an aluminum fitting if you're going to get the fitting welded. You can use any hydrolic rubber/braided return line for this, no pressure is going through the return line. Just make sure the fitting you chose for the oil pan is the same size as your turbo return fitting. This is probably the best and only place you can drill safely in your oil pan. While you're there you can install your oil sandwich adapter plate for your oil feed line.
For more specific details on removing and installing the oil pan go to the Prepping the pan section (post#3) of the link below:
https://www.evolutionm.net/forums/la...turbo-kit.html
Now before you install any exhaust components you need to make an oil return fitting for the oil return line in your oil pan. You must flush the engine oil before doing this or you will end up with a huge mess. You can either drill and tap the hole to screw a fitting in or you can get a fitting welded directly on the pan. I knew a professional welder back when i was at school so i took an old A/C aluminum line and got it welded. Make sure you get an aluminum fitting if you're going to get the fitting welded. You can use any hydrolic rubber/braided return line for this, no pressure is going through the return line. Just make sure the fitting you chose for the oil pan is the same size as your turbo return fitting. This is probably the best and only place you can drill safely in your oil pan. While you're there you can install your oil sandwich adapter plate for your oil feed line.

For more specific details on removing and installing the oil pan go to the Prepping the pan section (post#3) of the link below:
https://www.evolutionm.net/forums/la...turbo-kit.html
Last edited by marcouxa1; Feb 9, 2014 at 11:35 AM.
Feb 8, 2014, 01:39 PM
#4
Evolved Member
Thread Starter
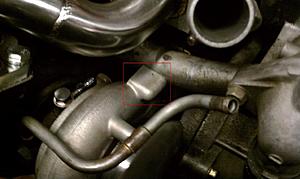
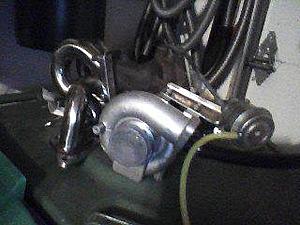
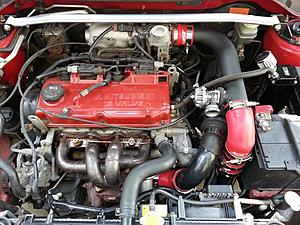
Turbo
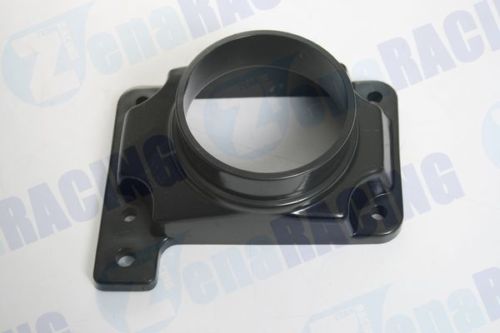
It's now time to install that evo 8 turbo onto the manifold. First off you need to grind off a piece of the turbo inlet housing for the turbo to fit right in front of the metal coolant line coming out in front of the engine block.
This is the piece you have to grind off
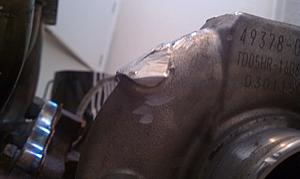
This is how it should look like after you grind it off. Make sure you don't grind too much to the point of damaging the turbo inlet.
Always install the turbo onto the manifold with all the oil/water feed/return lines, j pipe and dump pipe attached to the turbo before installing the exhaust manifold on. This will save you alot of time and headaches. Once all your oil and water feed/return lines are hooked up you can add your new 10w40 oil into the engine. It is always best to prime the turbo's oil feed line before starting the engine.
For more info on the oil/water feed/return lines go to the end of post#4 of the link below
https://www.evolutionm.net/forums/la...turbo-kit.html
It's now time to install that evo 8 turbo onto the manifold. First off you need to grind off a piece of the turbo inlet housing for the turbo to fit right in front of the metal coolant line coming out in front of the engine block.
This is the piece you have to grind off

This is how it should look like after you grind it off. Make sure you don't grind too much to the point of damaging the turbo inlet.

Always install the turbo onto the manifold with all the oil/water feed/return lines, j pipe and dump pipe attached to the turbo before installing the exhaust manifold on. This will save you alot of time and headaches. Once all your oil and water feed/return lines are hooked up you can add your new 10w40 oil into the engine. It is always best to prime the turbo's oil feed line before starting the engine.

For more info on the oil/water feed/return lines go to the end of post#4 of the link below
https://www.evolutionm.net/forums/la...turbo-kit.html
Last edited by marcouxa1; Feb 9, 2014 at 03:07 PM.
Feb 8, 2014, 01:53 PM
#5
Evolved Member
Thread Starter
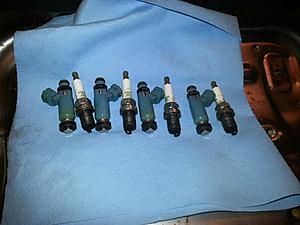
Injectors
Replace your old lancer injectors with your new wrx 440cc light blue injectors. This step is pretty straight forward, all you need to do is remove the fuel rail to access the injectors on the intake manifold. Before you install your new wrx injectors, make sure all your injector seals and gaskets are not damaged, cracked or kinked or they will leak.
Spark plugs
While you're there you can go ahead and change your spark plugs with your new BKR7E plugs, those have a higher resistance to heat, which is best to reduce the chances of pre detonation due to a hot spark plug igniting the air/fuel inside the combustion chamber. Although you need to measure the gap of the spark plug and adjust them to 0.025'' if i remember right. If you do not change the spark plug gap your engine is going to missfire under load.
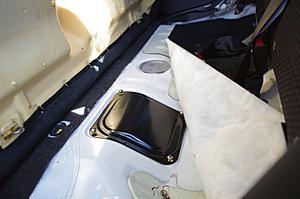
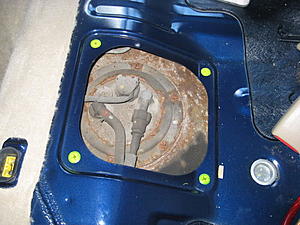
Fuel pump
The fuel pump is pretty easy to access but can be a pita. All you have to do is remove the back seat cushion and there will be a metal plate with 4 screws, remove that and the fuel pump retaining plate will be right under there. Now this is the hard part, the bolts on the retaining plate are probably going to be rusty and break. Do not heat or cut them with a cutting disc!!! We're talking about fuel here, any spark could cause catastrophic damage. Of course first try removing them with a socket wrench. A nut extractor socket or wrench can help you either break the studs or remove the bolts if they are really rusty. Once you've removed all of the bolts, simply disconnect the electrical connector and the fuel line off of the fuel pump assembly and get it out of the fuel tank. Now you can replace the fuel pump. If the retaining plate bolts are broken due to heavy rust when removing them, you can use some self taping screws to get it back in place. Just make sure you don't have excess metal in the fuel tank when you do this. Using a greasy rag inside the fuel tank when drilling with the self taping screws can help reduce contaminating the bottom of the fuel tank.
Replace your old lancer injectors with your new wrx 440cc light blue injectors. This step is pretty straight forward, all you need to do is remove the fuel rail to access the injectors on the intake manifold. Before you install your new wrx injectors, make sure all your injector seals and gaskets are not damaged, cracked or kinked or they will leak.
Spark plugs
While you're there you can go ahead and change your spark plugs with your new BKR7E plugs, those have a higher resistance to heat, which is best to reduce the chances of pre detonation due to a hot spark plug igniting the air/fuel inside the combustion chamber. Although you need to measure the gap of the spark plug and adjust them to 0.025'' if i remember right. If you do not change the spark plug gap your engine is going to missfire under load.

Fuel pump
The fuel pump is pretty easy to access but can be a pita. All you have to do is remove the back seat cushion and there will be a metal plate with 4 screws, remove that and the fuel pump retaining plate will be right under there. Now this is the hard part, the bolts on the retaining plate are probably going to be rusty and break. Do not heat or cut them with a cutting disc!!! We're talking about fuel here, any spark could cause catastrophic damage. Of course first try removing them with a socket wrench. A nut extractor socket or wrench can help you either break the studs or remove the bolts if they are really rusty. Once you've removed all of the bolts, simply disconnect the electrical connector and the fuel line off of the fuel pump assembly and get it out of the fuel tank. Now you can replace the fuel pump. If the retaining plate bolts are broken due to heavy rust when removing them, you can use some self taping screws to get it back in place. Just make sure you don't have excess metal in the fuel tank when you do this. Using a greasy rag inside the fuel tank when drilling with the self taping screws can help reduce contaminating the bottom of the fuel tank.


Last edited by marcouxa1; Feb 9, 2014 at 03:10 PM.
Feb 8, 2014, 02:21 PM
#6
Evolved Member
Thread Starter
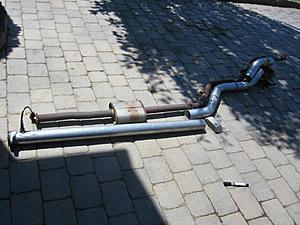
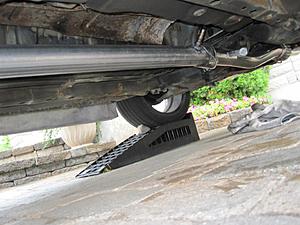
Exhaust system
Its now time to install your exhaust system if you baught one. You're going to need 2 spring bolts and a donut gasket in between the dump pipe and the downpipe. You can use the stock rubber hangers to support the new 3'' downpipe under the vehicule.The rest of the exhaust system is the exact same steps you did to remove your stock exhaust but backwards.
If you're like me and you have access to a welding machine and you know how to weld you need the following to make a full 3'' exhaust system:
4x 45 degree 3'' pipes
1x 10 ft long 3'' pipe
3x 3'' flanges
2x 3'' exhaust flange gaskets
1x 3'' muffler
1x 3'' catalytic converter (if you want one, which i don't)
1x O2 sensor bung (only if you have a catalytic converter or an AFR gauge)
I used my stock exhaust system as a template to have the right angles in my exhaust
Then you need to drill a hole on the upper half of the exhaust to weld the O2 bung in place. Make sure your bung is on the upper half of the pipe to avoid residues, water, etc to damage the sensor when the car is stopped.
Make sure you have another junction with flanges before the muffler or you won't be able to remove your exhaust without cutting it. You have to be patient if you're going to do this yourself. All the angles can be hard to overcome and the exhaust could hit some of the suspension parts if you do not do this correctly. If you are not experienced with welding and exhaust systems you might as well pay a little more and get the job done right the first time.
Its now time to install your exhaust system if you baught one. You're going to need 2 spring bolts and a donut gasket in between the dump pipe and the downpipe. You can use the stock rubber hangers to support the new 3'' downpipe under the vehicule.The rest of the exhaust system is the exact same steps you did to remove your stock exhaust but backwards.

If you're like me and you have access to a welding machine and you know how to weld you need the following to make a full 3'' exhaust system:
4x 45 degree 3'' pipes
1x 10 ft long 3'' pipe
3x 3'' flanges
2x 3'' exhaust flange gaskets
1x 3'' muffler
1x 3'' catalytic converter (if you want one, which i don't)
1x O2 sensor bung (only if you have a catalytic converter or an AFR gauge)
I used my stock exhaust system as a template to have the right angles in my exhaust

Then you need to drill a hole on the upper half of the exhaust to weld the O2 bung in place. Make sure your bung is on the upper half of the pipe to avoid residues, water, etc to damage the sensor when the car is stopped.

Make sure you have another junction with flanges before the muffler or you won't be able to remove your exhaust without cutting it. You have to be patient if you're going to do this yourself. All the angles can be hard to overcome and the exhaust could hit some of the suspension parts if you do not do this correctly. If you are not experienced with welding and exhaust systems you might as well pay a little more and get the job done right the first time.
Last edited by marcouxa1; Feb 9, 2014 at 11:33 AM.
Feb 8, 2014, 02:51 PM
#7
Evolved Member
Thread Starter
Radiator fans
If you're using the evo 8 manifold like me because you wanted the 2nd radiator fan on the back side of the radiator, you're going to have to cut the stock radiator fan shroud in half to keep the driver side fan with its shroud. From there you can install your new spall slim fan where the old stock shrould was. I used the spall fan because it was very slim, i cannot tell if any other fan fits in because it has very limited space in between the fan and the wastegate rod. Make sure you connect the new fan to the old passenger side fan connector/wiring.
Clutch slave cylinder (m/t guys only)
If you're a M/T you're going to replace your stock clutch slave cylinder with a 2001 kia sportage slave cylinder or there will be no place for a coupler to fit on your turbo inlet. The kia slave fits with little modifications. All you need to do is redrill the mounting holes a little bigger to fit your stock slave bolts. You can always grind off the mounting surface in an angle for the rod of the cylinder to come out straight but if you don't it will still work fine. Don't forget to bleed your clutch system. To do so, you need to overfill your brake fluid reservoir because the clutch master cylinder's reservoir takes its fluid from the top of the brake reservoir. If you do not overfill the brake reservoir the clutch master cylinder won't have any oil going through its system.
This is how the new slave cylinder should look like when installed
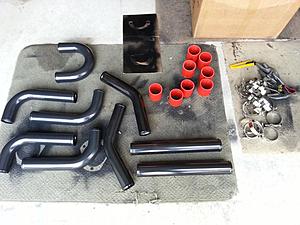
Intercooler
My intercooler came from an aftermarket universal kit. I had to cut the front crash bar to make it fit well without being lower than the bottom of my front bumper. You only need 2 bolts to secure the intercooler solidly in place.

Intercooler piping
The rest of the piping is alot of trial and error. If you buy an universal kit make sure you have a pipe with a bov flange welded in. You might need to buy additional angled couplers to accommodate your setup with an universal kit. I'm using the greddy type rz bov so this setup does not recirculate the BOV. You can always buy recirculating adapters for your aftermarket bov but if you do you're going to need the stock evo 8-9 turbo inlet pipe. If you buy the stock evo 8-9 piping and couplers this install will be straight forward but that way you have recirculate the stock evo 8-9 BOV. Also don't forget to swap your stock maf with your new evo 8-9 maf while you're there. A maf adapter is required if you're going to use a cone air filter.

If you're using the evo 8 manifold like me because you wanted the 2nd radiator fan on the back side of the radiator, you're going to have to cut the stock radiator fan shroud in half to keep the driver side fan with its shroud. From there you can install your new spall slim fan where the old stock shrould was. I used the spall fan because it was very slim, i cannot tell if any other fan fits in because it has very limited space in between the fan and the wastegate rod. Make sure you connect the new fan to the old passenger side fan connector/wiring.

Clutch slave cylinder (m/t guys only)
If you're a M/T you're going to replace your stock clutch slave cylinder with a 2001 kia sportage slave cylinder or there will be no place for a coupler to fit on your turbo inlet. The kia slave fits with little modifications. All you need to do is redrill the mounting holes a little bigger to fit your stock slave bolts. You can always grind off the mounting surface in an angle for the rod of the cylinder to come out straight but if you don't it will still work fine. Don't forget to bleed your clutch system. To do so, you need to overfill your brake fluid reservoir because the clutch master cylinder's reservoir takes its fluid from the top of the brake reservoir. If you do not overfill the brake reservoir the clutch master cylinder won't have any oil going through its system.
This is how the new slave cylinder should look like when installed
Intercooler
My intercooler came from an aftermarket universal kit. I had to cut the front crash bar to make it fit well without being lower than the bottom of my front bumper. You only need 2 bolts to secure the intercooler solidly in place.

Intercooler piping
The rest of the piping is alot of trial and error. If you buy an universal kit make sure you have a pipe with a bov flange welded in. You might need to buy additional angled couplers to accommodate your setup with an universal kit. I'm using the greddy type rz bov so this setup does not recirculate the BOV. You can always buy recirculating adapters for your aftermarket bov but if you do you're going to need the stock evo 8-9 turbo inlet pipe. If you buy the stock evo 8-9 piping and couplers this install will be straight forward but that way you have recirculate the stock evo 8-9 BOV. Also don't forget to swap your stock maf with your new evo 8-9 maf while you're there. A maf adapter is required if you're going to use a cone air filter.

Last edited by marcouxa1; Feb 9, 2014 at 11:45 AM.
Trending Topics
Feb 18, 2014, 07:18 AM
#8
Exhaust manifold
First off if you're going to use an evo 8 manifold you're gonna need to modify it quite a bit. The reason why i ended up using the evo 8 manifold is because i wanted to keep my slim fan behind the radiator and not in front of it. I don't know if the Speedcorp manifold give you enough space for a slim fan on the back side of the radiator. If someone has done it let me know because buying a speedcorp manifold would save this headache of a modification.
First off if you're going to use an evo 8 manifold you're gonna need to modify it quite a bit. The reason why i ended up using the evo 8 manifold is because i wanted to keep my slim fan behind the radiator and not in front of it. I don't know if the Speedcorp manifold give you enough space for a slim fan on the back side of the radiator. If someone has done it let me know because buying a speedcorp manifold would save this headache of a modification.
 Feb 18, 2014, 05:53 PM
#10
Evolved Member
Thread Starter
I don't think the rrm manifold is for the evo 8-9 16g turbo though is it?
Last edited by marcouxa1; Mar 5, 2014 at 03:09 PM.
May 28, 2014, 04:02 PM
#11
Evolved Member
Thread Starter
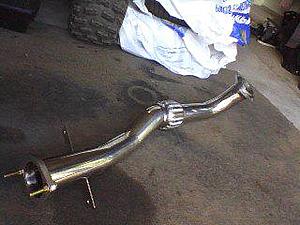
Well yesterday my manifold decided to let me down at the track after 2 sessions of lapping...does anyone know where to buy a manifold with the 4g94 flange for the evo 8-9 turbo besides speedcorps? If not i will just buy a better manifold instead of that cheap ebay i have right now and modify it like i did for my old one.
Here is how it looked before i welded it :
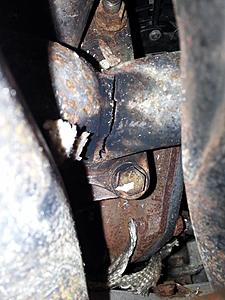
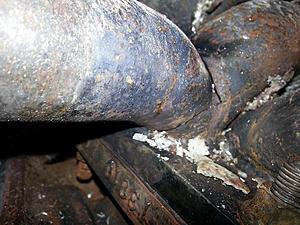
Here is how it looked before i welded it :


Last edited by marcouxa1; Jun 24, 2014 at 08:24 AM.
Jun 24, 2014, 08:26 AM
#12
Evolved Member
Thread Starter
Finaly got my car back on the road with a brand new DCsports evo 8-9 manifold. The quality of the manifold is ALOT better than the ebay manifold.If someone else is doing lapping send me the link to your videos i would be happy to see them. Here is a link to see me at the track with my lancer:
Sep 17, 2014, 10:51 PM
#13
Newbie
Join Date: Jul 2009
Location: Australia
Posts: 6
Likes: 0
Received 0 Likes
on
0 Posts
Hey man awesome write up and your car looks quick on the track! Im in the process of turboing my lancer but i have a problem fitting the 255hp fuel pump as the pump body is too long to fit in the bracket. how did you overcome this?
Sep 18, 2014, 06:14 PM
#15
Evolved Member
Thread Starter
Thanks man! The car is having a couple issues now though...lapping is really hard on the car and last time my oil temp went pretty high (260 farenheit) and its now burning oil on deceleration and a little bit at idle so i might of burned my valve stem seals....i also rebuilded my turbo because it was blown haha but its still smoking -.- as for the fuel pump i think you can simply clip it if you use the oem screen at the bottom of your pump if i remeber right but someone would have to confirm that!