How To: Oil change (with pictures)
 Jun 28, 2007, 06:47 PM
#1
EvoM Staff Alumni
Thread Starter
iTrader: (88)
Join Date: Aug 2003
Location: Concord Township, Ohio
Posts: 8,733
Likes: 0
Received 3 Likes
on
3 Posts
How To: Oil change (with pictures)
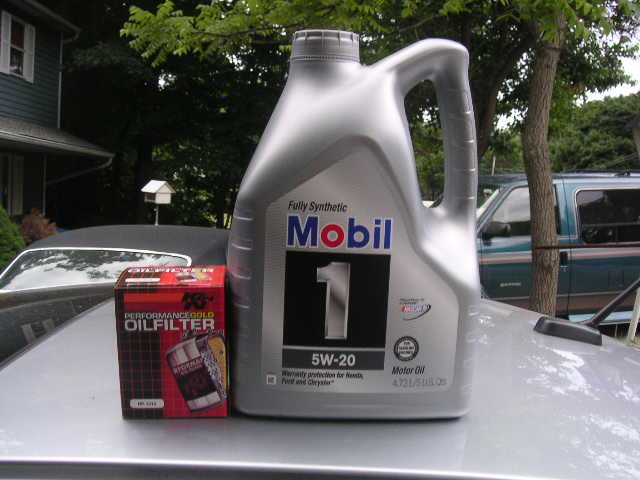
1. Go shopping; 5w20 and an oil filter (you can tell the brands I chose)
2. Manual or auto, you want to pull the e-brake. It's a FWD car, so you want those rear wheels locked so you don't get killed.

3. If you have a floorjack, you want to raise the car from the front middle. The main crossmember is a perfect choice. If you're using the car's minijack, just put it at the jack points behind each front wheel (check the manual if you don't know where that is).

4. Time to keep the car in the air. Hopefully you have a pair of jackstands. If not, do what you gotta do.

5. OK, finally on to the dirty work. Crawl under the car with a 17mm wrench and a drain pan. Remove the stock bolt and let it drain. Grab a beer, because this is going to take a while. When it finally stops coming out, put the bolt back in and gently tighten it. Don't overdo this. (Torque spec unknown at the moment; will update when I find out.)

6. And oil filter wrench would be good, but I ended up just using a huge pair of pliers. In any case, just get this sucker off however you can. Keep the pan under it, because oil WILL drip out.

7. Now you want to install your new filter. Put a little bit of oil on it's rubber gasket (so it doesn't seize on the car). Just screw it on. Again, don't overdo it; 3,000 miles is plenty of time for it to tighten up (and it will).

8. OK, you're done under the car. You can let it down now.
(Do you really need a picture for this?)
9. Time to add some oil. Open the oil cap (on top of the motor) and gently pour in 4.2 qts. of oil.

10. Give the oil time to settle and then check the yellow dipstick to make sure you didn't over/under fill it.

11. Repeat about 3,000 miles later.
Discuss oil changes on the 4B11 here.
2. Manual or auto, you want to pull the e-brake. It's a FWD car, so you want those rear wheels locked so you don't get killed.
3. If you have a floorjack, you want to raise the car from the front middle. The main crossmember is a perfect choice. If you're using the car's minijack, just put it at the jack points behind each front wheel (check the manual if you don't know where that is).
4. Time to keep the car in the air. Hopefully you have a pair of jackstands. If not, do what you gotta do.
5. OK, finally on to the dirty work. Crawl under the car with a 17mm wrench and a drain pan. Remove the stock bolt and let it drain. Grab a beer, because this is going to take a while. When it finally stops coming out, put the bolt back in and gently tighten it. Don't overdo this. (Torque spec unknown at the moment; will update when I find out.)
6. And oil filter wrench would be good, but I ended up just using a huge pair of pliers. In any case, just get this sucker off however you can. Keep the pan under it, because oil WILL drip out.
7. Now you want to install your new filter. Put a little bit of oil on it's rubber gasket (so it doesn't seize on the car). Just screw it on. Again, don't overdo it; 3,000 miles is plenty of time for it to tighten up (and it will).
8. OK, you're done under the car. You can let it down now.
(Do you really need a picture for this?)
9. Time to add some oil. Open the oil cap (on top of the motor) and gently pour in 4.2 qts. of oil.
10. Give the oil time to settle and then check the yellow dipstick to make sure you didn't over/under fill it.
11. Repeat about 3,000 miles later.
Discuss oil changes on the 4B11 here.
Last edited by Blacksheepdj; Jun 28, 2007 at 07:08 PM.

The following users liked this post:
bulletsponge (Oct 9, 2017)

Thread
Thread Starter
Forum
Replies
Last Post