How to: Install Electromagnetic Horn for Lancer
 Jun 18, 2008, 01:26 AM
#1
Newbie
Thread Starter

Join Date: Dec 2002
Posts: 14
Likes: 0
Received 0 Likes
on
0 Posts
How to: Install Electromagnetic Horn for Lancer
DIY: Electromagnetic Horn for Lancer EX
I will show u all step by step to remove the stock horns and add in your new horns. Thanks to Nos's advice for telling me that electric horn needs grounding, unlike the stock horns, dunstop's horn setup and kenyee's help on how to fix up the horn and what to buy to fix the horn the neatest way.
Sound of horn: http://www.youtube.com/watch?v=UL8ItELY51g
Total time needed: 1 hour.
Items and tools needed
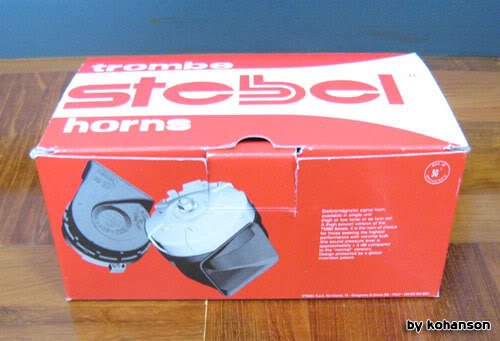
1 set of Stebel Horns, TM80/2 Magnum.
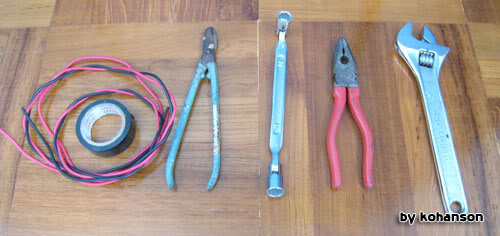
1 red wire for negative and 1 black wire for positive, 2m each in case you do it wrongly.
1 roll black sticky tape. to wrap the exposed wires and also to secure the connectors tighter
1 wire cutter.
1 spannar size 10 and another universal spannar. not too big as some of the space quite cramp
1 plier. to combine the wire's end to the connectors.[/size]
4 female wire connectors.
2 male wire connectors.
Instructions
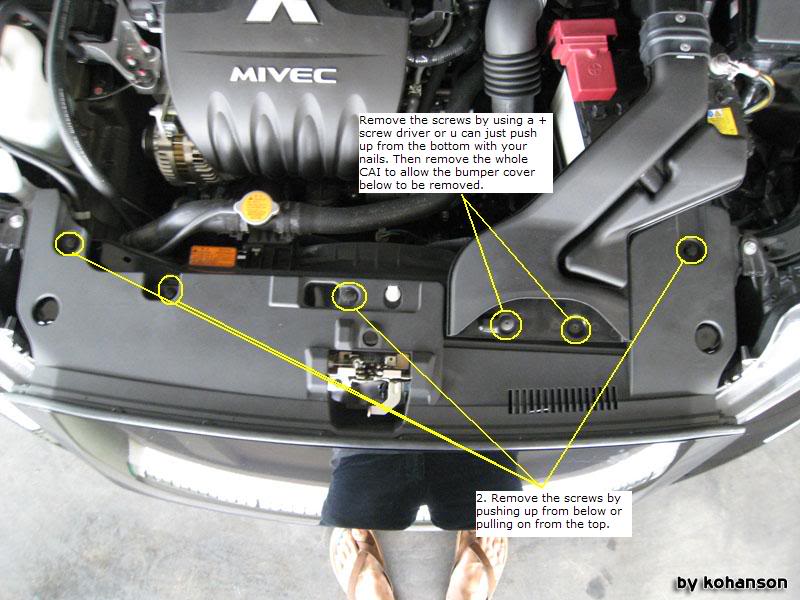
1. Remove the front cold air intake pipe. 2 screws. These can be push up from below. Then you can pull up from the air intake box slowly.
2. Remove the big plate which is below the cold air intake pipe. 4 screws. These can be either pull up from top or push up from below.
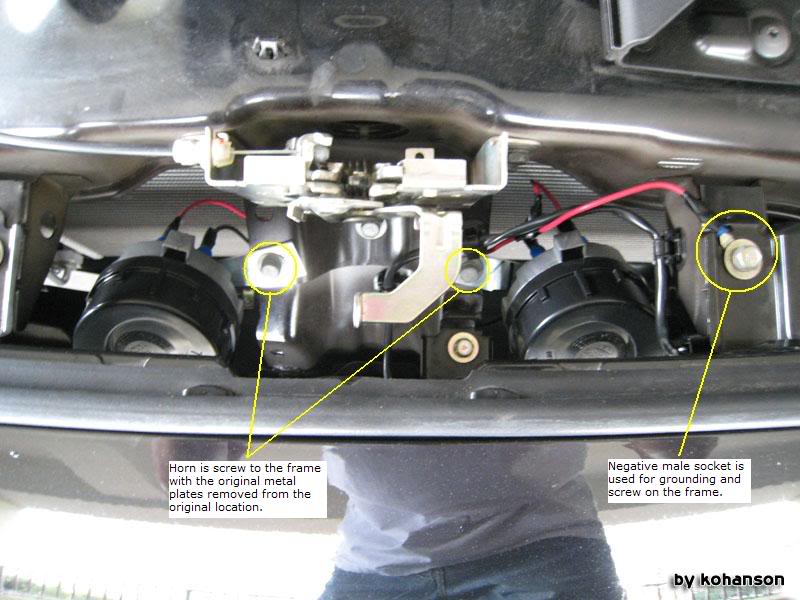
3. Remove the first horn which is at the front grill.
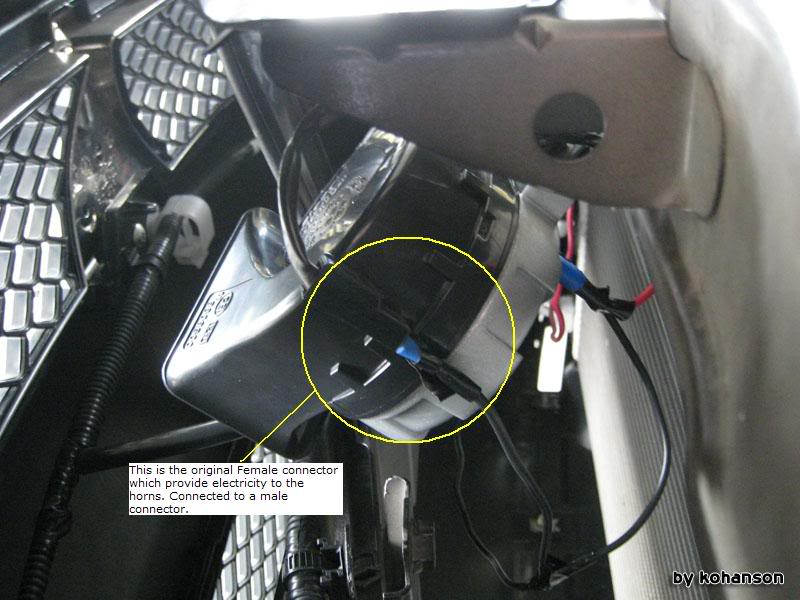
Plug out the female socket which is connected to the horn.
Size 10 spannar should be able to remove the horn while a universal spannar can remove the metal plate holding the horn.
This metal plate should be kept and used for the new horns, if not, you can use the plates provided by the horns you bought.
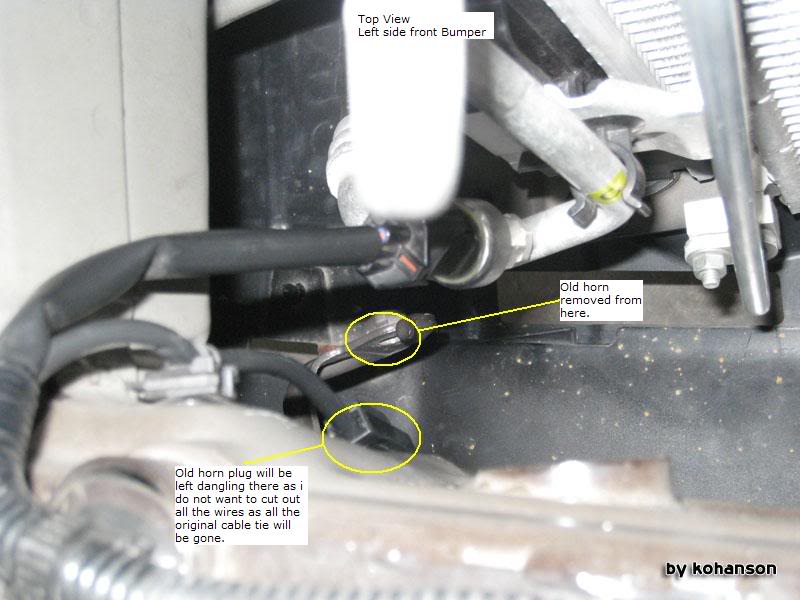
4. Remove the second horn which is at the bottom left of the front bumper if you are facing your car.
Plug out the female socket and you will not use this socket anymore.
This will be quite tedious as you need to stretch your hand in to unscrew the horn.
I took out the radiator plug and this make my job easier. The screw holding the metal plate will be much harder to be removed. You can don't remove the horn and leave it there if you are having a hard time trying to remove it.
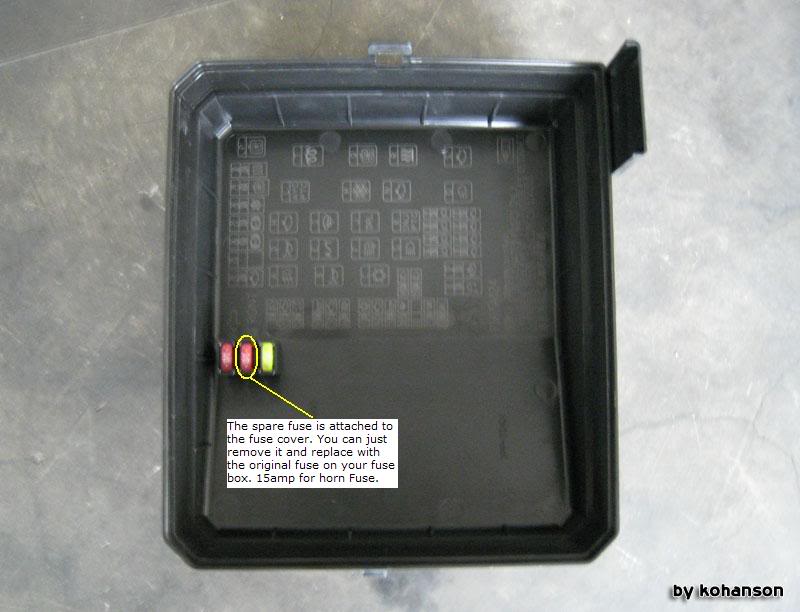
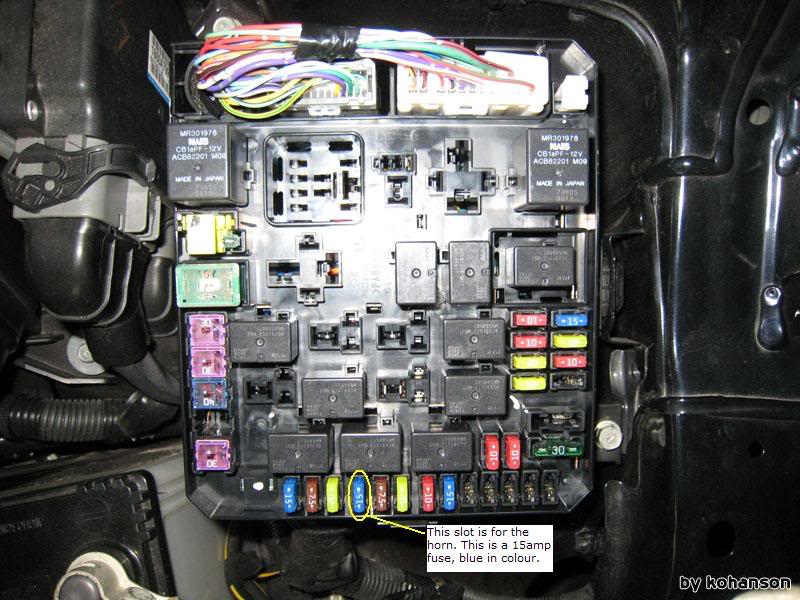
5. Take note: Replace the horn fuse with 15amp fuse. If you use 10amp fuse, the fuse will blow.
The Fuse cover comes with spare fuse, 10amp, 15amp, 20amp. The horn fuse is 4th from the left.
Thanks to dunstop.
6. Place the 2 metal plates at the center frame, so you can have both horns side by side.
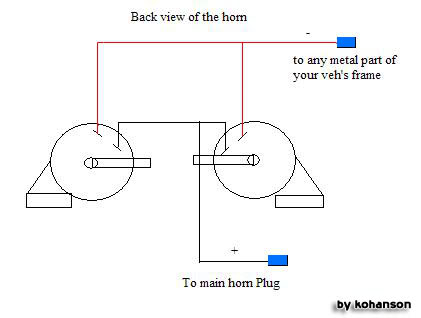
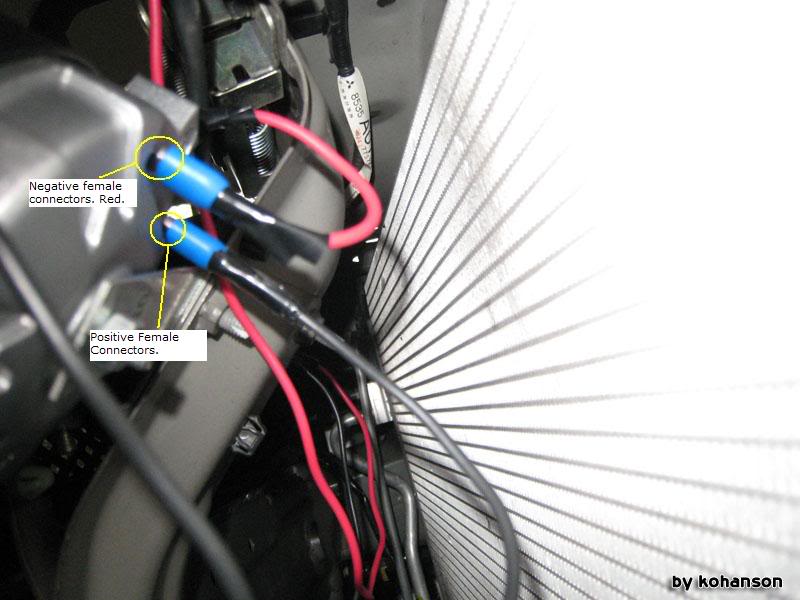
7. Refer to the wiring diagram below. The 4 wires connected to the horn are female connectors while the other 2 which is connected to the power and the grounding are using male connectors. The negative male connector is screwed to the vehicle's frame. The positive is plugged into the female connector that supply the power to the horn. The relay is not used.
If you do not want to use the male and female connectors, you can just wrap the wires around the connectors and the grounding and wrap with black sticky tape.
8. After all the horns are wired, test the horn. If it is working, you can close back the car front plate and the cold air intake pipe. 6 nuts total. If it is not working, check that your wires are all in working condition and it is not damaged. That is all!
Congratulations on fixing your horn!
I will show u all step by step to remove the stock horns and add in your new horns. Thanks to Nos's advice for telling me that electric horn needs grounding, unlike the stock horns, dunstop's horn setup and kenyee's help on how to fix up the horn and what to buy to fix the horn the neatest way.
Sound of horn: http://www.youtube.com/watch?v=UL8ItELY51g
Total time needed: 1 hour.
Items and tools needed
1 set of Stebel Horns, TM80/2 Magnum.
1 red wire for negative and 1 black wire for positive, 2m each in case you do it wrongly.
1 roll black sticky tape. to wrap the exposed wires and also to secure the connectors tighter
1 wire cutter.
1 spannar size 10 and another universal spannar. not too big as some of the space quite cramp
1 plier. to combine the wire's end to the connectors.[/size]
4 female wire connectors.
2 male wire connectors.
Instructions
1. Remove the front cold air intake pipe. 2 screws. These can be push up from below. Then you can pull up from the air intake box slowly.
2. Remove the big plate which is below the cold air intake pipe. 4 screws. These can be either pull up from top or push up from below.
3. Remove the first horn which is at the front grill.
Plug out the female socket which is connected to the horn.
Size 10 spannar should be able to remove the horn while a universal spannar can remove the metal plate holding the horn.
This metal plate should be kept and used for the new horns, if not, you can use the plates provided by the horns you bought.
4. Remove the second horn which is at the bottom left of the front bumper if you are facing your car.
Plug out the female socket and you will not use this socket anymore.
This will be quite tedious as you need to stretch your hand in to unscrew the horn.
I took out the radiator plug and this make my job easier. The screw holding the metal plate will be much harder to be removed. You can don't remove the horn and leave it there if you are having a hard time trying to remove it.
5. Take note: Replace the horn fuse with 15amp fuse. If you use 10amp fuse, the fuse will blow.
The Fuse cover comes with spare fuse, 10amp, 15amp, 20amp. The horn fuse is 4th from the left.
Thanks to dunstop.
6. Place the 2 metal plates at the center frame, so you can have both horns side by side.
7. Refer to the wiring diagram below. The 4 wires connected to the horn are female connectors while the other 2 which is connected to the power and the grounding are using male connectors. The negative male connector is screwed to the vehicle's frame. The positive is plugged into the female connector that supply the power to the horn. The relay is not used.
If you do not want to use the male and female connectors, you can just wrap the wires around the connectors and the grounding and wrap with black sticky tape.
8. After all the horns are wired, test the horn. If it is working, you can close back the car front plate and the cold air intake pipe. 6 nuts total. If it is not working, check that your wires are all in working condition and it is not damaged. That is all!
Congratulations on fixing your horn!
Last edited by kohanson; Jun 18, 2008 at 01:28 AM.


Thread
Thread Starter
Forum
Replies
Last Post
VRSF Tiago
Evo Electrical / Audio / Security
7
Oct 13, 2008 05:11 PM
05ah8james
Northeast Region
2
Jul 4, 2008 08:13 AM