[How-To] Door Panel Removal : Outlander Sport (ASX / RVR)
 Mar 16, 2014, 12:58 AM
#1
Evolved Member
Thread Starter
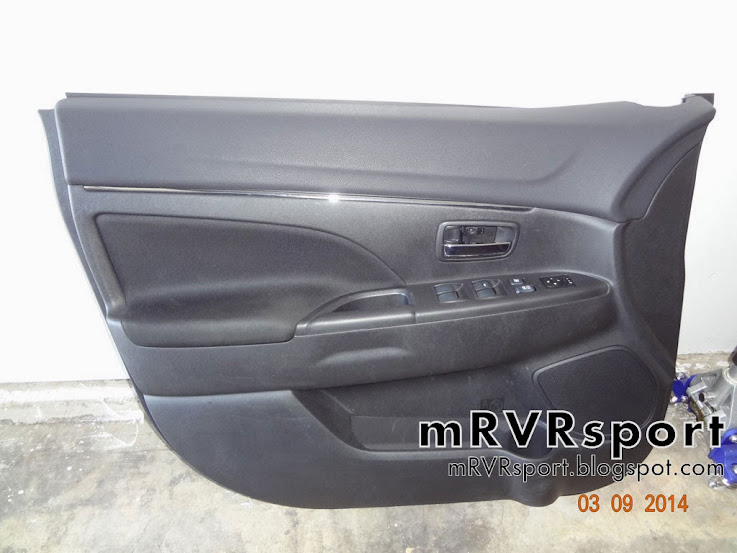
OEM Door Panel : Front Driver Side
Should be the same for 2011 thru 2014+ models.
Tools Needed:
Philips Screwdriver
Door Panel Remover Tool
-Optional:
Cover Popper (aka HomeDepot paint can opener)
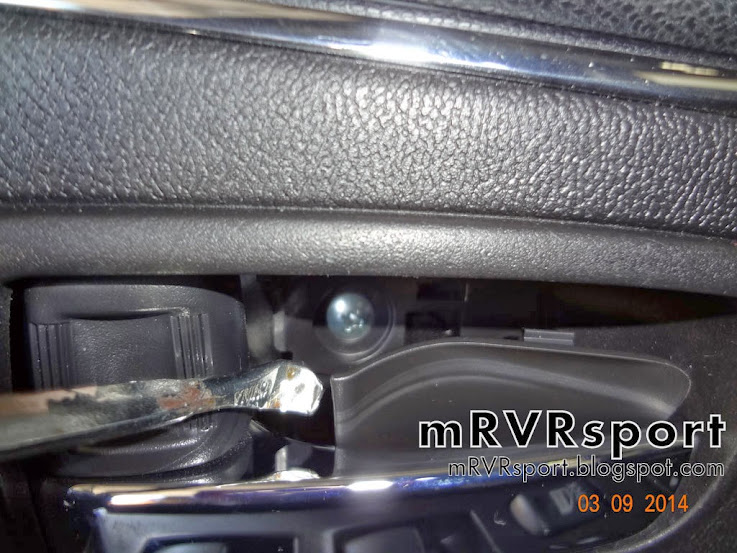
Step 1:
Using the Cover Popper Tool, remove the cover from the bottom of the door hand grip.
Then, using the philips screwdriver to undo the screw.
(Notice its length.)

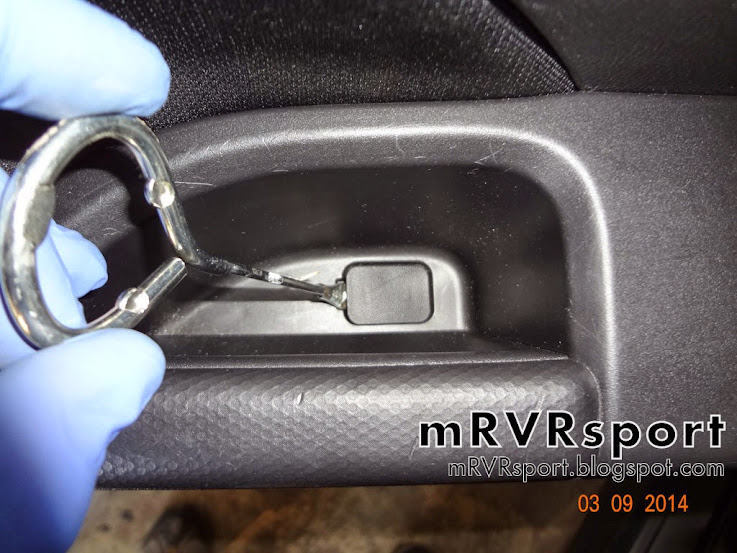
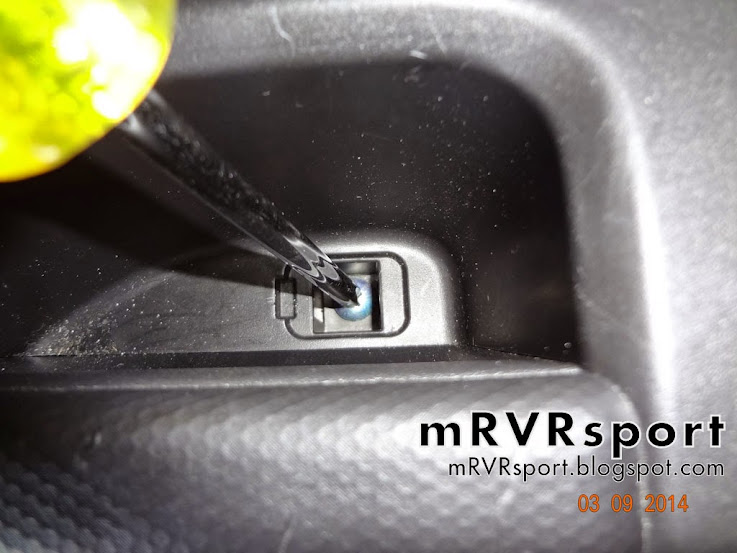
Step 2:
Use the Cover popper on the door release recess to remove its plastic cover.
Then, unscrew (Notice it's a slightly longer screw.)

Step 3:
Using the Door Panel Remover Tool, pop the Tweeter Pod. It's held in by only one plastic retainer.

Just let it hang. It doesn't weigh all that much.
Step 4:
Now using the Door Panel Remover tool again, start at the bottom edge of the door work your way around the panel to release each of the plastic retainers...

There are (9) nine plastic retainers, but two of them are different than the rest -(blue)
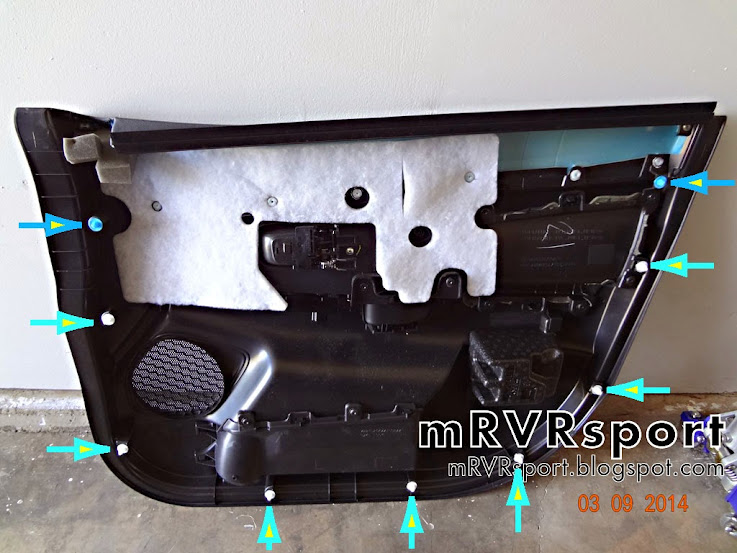
If you take your time, you should be able to remove all of them without breaking any.
Once all the retainers are released, it's a simple matter of lifting up the door panel and out towards you.
NOTE: I would suggest you shimmy it starting either from the tweeter pod or the door handle and work your way up and out.


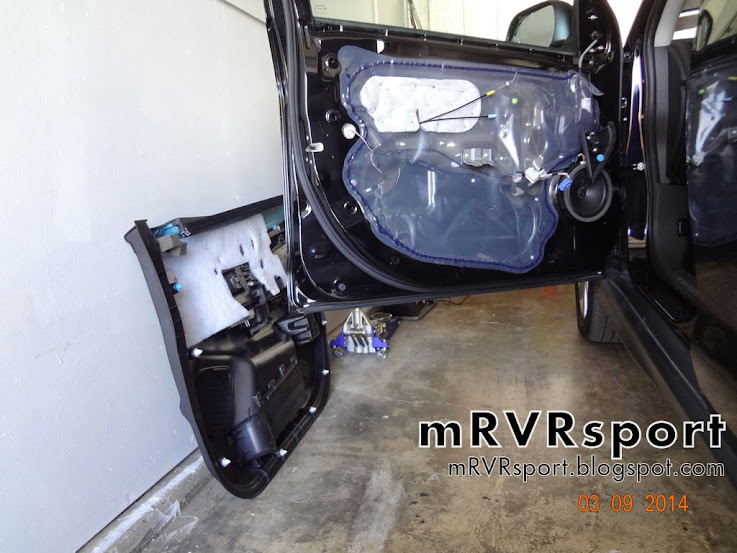
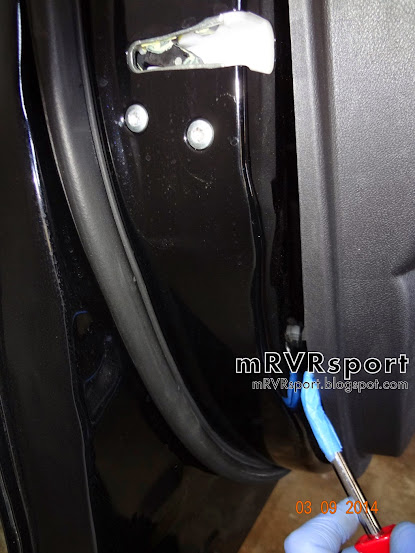
Step 5:
Almost done.
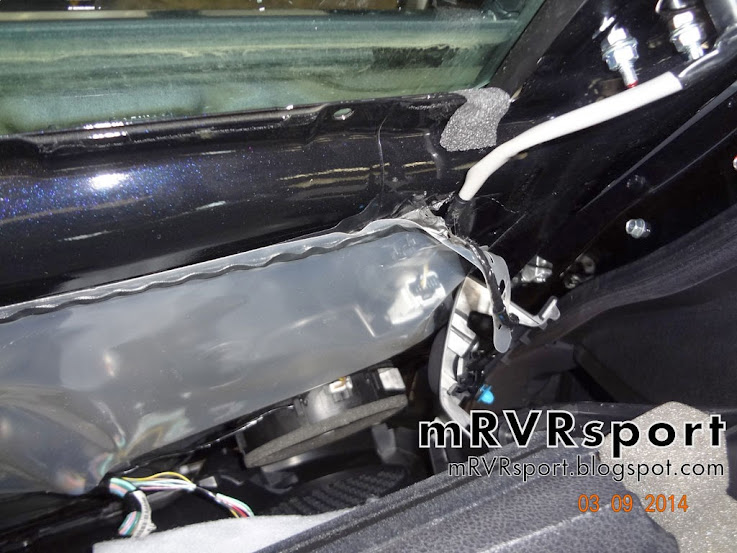
You still have some cables and wiring harness holding the door panel...
- Door Lock / Door handle assembly.

- Power Window switches & Power Side Mirror Control.

Should be the same for 2011 thru 2014+ models.
Tools Needed:
Philips Screwdriver
Door Panel Remover Tool
-Optional:
Cover Popper (aka HomeDepot paint can opener)
Step 1:
Using the Cover Popper Tool, remove the cover from the bottom of the door hand grip.
Then, using the philips screwdriver to undo the screw.
(Notice its length.)
Step 2:
Use the Cover popper on the door release recess to remove its plastic cover.
Then, unscrew (Notice it's a slightly longer screw.)
Step 3:
Using the Door Panel Remover Tool, pop the Tweeter Pod. It's held in by only one plastic retainer.
Just let it hang. It doesn't weigh all that much.
Step 4:
Now using the Door Panel Remover tool again, start at the bottom edge of the door work your way around the panel to release each of the plastic retainers...
There are (9) nine plastic retainers, but two of them are different than the rest -(blue)
If you take your time, you should be able to remove all of them without breaking any.
Once all the retainers are released, it's a simple matter of lifting up the door panel and out towards you.
NOTE: I would suggest you shimmy it starting either from the tweeter pod or the door handle and work your way up and out.
Step 5:
Almost done.
You still have some cables and wiring harness holding the door panel...
- Door Lock / Door handle assembly.
- Power Window switches & Power Side Mirror Control.
Last edited by mRVRsport; Mar 25, 2014 at 10:02 PM.

The following users liked this post:
rkmulgrew (Sep 14, 2020)
Oct 10, 2014, 03:43 PM
#3
Evolved Member
Thread Starter
I'm glad You asked..
As of now, no. (Due to so many other top priority wife To-Do's)
BUT, I have everything I need to start the installation.
> I'm going to use a combination of what YOU used (which I'm calling TTSDM**) and some Dynomat.
And, I'm wanting to custom cut the mats in a certain way to have it nicely overlap within the door, so that it's not a bunch of random bits of matting.
In fact I've already designed an outline of the vapor-lining so I can cut myself an additional custom liner to better dampen the plastic door panel too.
** Texas Travisty's Sound Dampening Method
Oct 12, 2014, 06:12 AM
#5
Evolved Member
Thread Starter
Haven't bothered with dismantling the rear doors.. But I'm very certain it's as thinly insulated as the fronts! 
Oct 19, 2014, 07:40 AM
#7
Newbie
Join Date: Jul 2014
Location: Edmonton
Posts: 35
Likes: 0
Received 0 Likes
on
0 Posts
How did you get the door handle assembly removed? Need to do some in depth cleaning of the door panel due to some foreign matter getting itself lodged in it.
Edit: Nvm, honestly did not realize that the lone screw would be all that was holding that in. Door panel has been removed.
Fun fact: The 2012 RVR ES does not have tweeters. Or at least mine doesn't. I'll make sure to get a pic once the cleanup has been completed.
Edit: Nvm, honestly did not realize that the lone screw would be all that was holding that in. Door panel has been removed.
Fun fact: The 2012 RVR ES does not have tweeters. Or at least mine doesn't. I'll make sure to get a pic once the cleanup has been completed.
Last edited by jwark16; Oct 19, 2014 at 07:48 AM.
Trending Topics
Dec 19, 2014, 06:33 AM
#8
Evolved Member
I need to do this on the rears to see why there is a slight rattle between 1200 and 2200 rpm coming from the door handles... it is driving me nuts cause that is driving rpm range....ugh want to dyno mat it all as well why they are off...thing to do things to do...just no time at all.
Dec 19, 2014, 08:13 AM
#9
Evolved Member
Thread Starter
I need to do this on the rears to see why there is a slight rattle between 1200 and 2200 rpm coming from the door handles... it is driving me nuts cause that is driving rpm range....ugh want to dyno mat it all as well why they are off...thing to do things to do...just no time at all.
Brother.. you're telling me!
I've been sitting on top of all this sound dampening material and my custom designed liner but No time to install any of it.
Well, I could slap them on *****-nilly, But that just won't do.. it would drive me nuts knowing they weren't put on precisely AND I wouldn't be able to take decent photos/vids of the install...)
That would suck!
You want to swing up to Dallas.. our wives can watch the kiddos and we can gang up on this project (or any other projects)?
 May 12, 2015, 07:42 AM
#10
Evolved Member
I ordered 2 different types of dynomat the aluminum type for the rear door panels and the thick black foam type for the rear hatch. Awhile back I stuffed pillow batting in the hatch and all the rear of the hatch when I dynomated it, but now that I used a whole roll of the thick foam type on the lift gate and on the inside of the plastic cover as well... it has dramatically lowered the exhaust noise! I would say as much as 25% or more! I could not be happier and I have not even done the rear door yet.
I have to say my exhaust it might loud, thanks to the performance upgrades, which I like, but not so much filling up the cab of the O.S.. I cant wait to get the rear door panels off and slap the dynomat on them to see how much more the level of exhaust noise drops inside the cab.
thanks again for this write up, will make it quite easy to take the panels off and get the job done.
May 14, 2015, 07:24 AM
#11
Newbie

Join Date: Apr 2015
Location: se ohio
Posts: 88
Likes: 0
Received 0 Likes
on
0 Posts
Just wondering. ive removed my door panels a few times. But For the life of me I have not been able to find a way to remove the door handle. Im wanting to paint my handles inside and out but cant get them off. Any help?
 Mar 26, 2017, 09:44 PM
#13
Evolved Member
Thread Starter
^
Glad to see & know this thread is still helping someone!
(click that 'Thanks' button, if you will. Much appreciate it.)
Glad to see & know this thread is still helping someone!
(click that 'Thanks' button, if you will. Much appreciate it.)
Apr 1, 2018, 07:30 AM
#14


New to this huge forum so not sure how to use the search function, sorry if this was answered before - it it was, please kindly point me to the answer. Thx in advance.
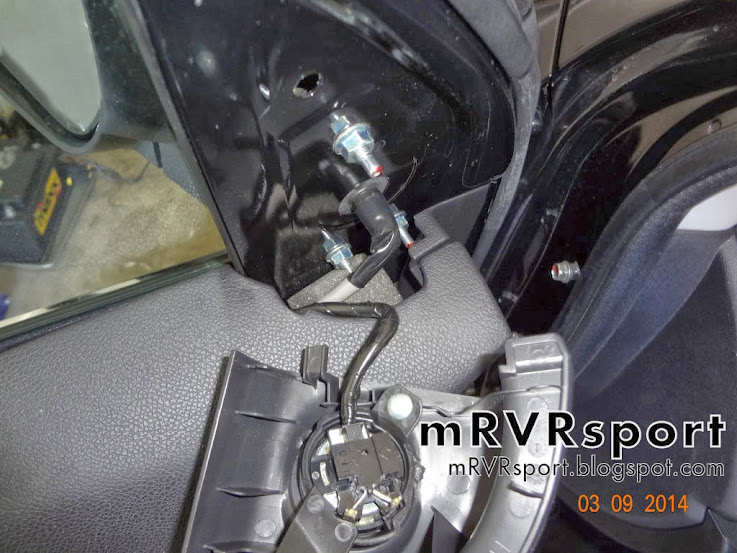
I am trying to install a side view camera on the passenger-side , but not sure which 2 to tap on, so the will be turned on when the driver activated the right-turn signal. I have the 2016 outlander GT model with fold-able, heated and signal flasher on the mirrow. So experts, could you please point to me which 2 out of the 9 wires (see attached photo - right beside the mirror but inside the car) are controlling the right turn signal flasher on this passenger-side mirror.
Much appreciated!
John
Apr 4, 2018, 07:06 AM
#15
Evolved Member
New to this huge forum so not sure how to use the search function, sorry if this was answered before - it it was, please kindly point me to the answer. Thx in advance.
I am trying to install a side view camera on the passenger-side mirror, but not sure which 2 wires to tap on, so the camera will be turned on when the driver activated the right-turn signal. I have the 2016 outlander GT model with fold-able, heated and signal flasher on the mirrow. So experts, could you please point to me which 2 out of the 9 wires (see attached photo - right beside the mirror but inside the car) are controlling the right turn signal flasher on this passenger-side mirror.
Much appreciated!
John
Since you have not received an answer that would give you the exact answer I am suggesting some experimentation. You want to do something that has not been done so far, hence some creative experimentation might be necessary.
Here are my suggestions/comments:
1. You did not specify, where the pictured bunch of wires are exactly located but I suspect you can eliminate a few wires by looking into the mirror cables only. I am attaching the image of the wiring harness of a NON-foldable mirror that has integrated turn signal (taken from an ebay ad) and another from two conventional (from my own RVR/OS and from a generation II Outlander) nonfoldable mirrors. As you can see the wiring is conservative between the OS and the Outlander as judged by the color coding and the pin layout and the folding mechanism + integrated turn signal adds only two additional new wires. This means that the harness must have a common ground and your + wire for the turn signal is either the purple one or the black with white stripe.
2. I would use two small sewing needles and would probe subsequently the purple and the black/white wire using a multimeter and probe the other five wires with the other needle while turning on and off the turn signal. My guess is that one of the solid black wires would be your ground.
3. I suspect you already have a back-up camera. You will have to set a switch to select the image in case the car is in reverse and your right turn signal is on simultaneously.
Good luck and good experimentation.
CORRECTION! My image labeling below is incorrect. The harness shown right below belongs to a non-foldable mirror with integrated turn signals. This does not change the recommended experimentation but rather helps to eliminate the wires that control the folding.


Last edited by AWCAWD; Apr 4, 2018 at 01:16 PM. Reason: CORRECTION
The following users liked this post:
jllmoe (Apr 4, 2018)

