"Tramp" - Rzrxn's 2004 Lancer Ralliart
 Oct 11, 2013, 08:07 AM
#1
Evolved Member
Thread Starter
iTrader: (1)
Join Date: Mar 2012
Location: Toronto, Ontario
Posts: 600
Likes: 0
Received 0 Likes
on
0 Posts
Tramp -- Rzrxn's 2004 Lancer Ralliart
Hi all,
I've been an active member here on EvoM for quite some time now and I still haven't created a thread here in the "Show & Shine" section. I guess it's about time?
I don't really have much to show and not much shine either but here are some pics of my Ralliart from when I just got it. Enjoy!
I will continue to update this thread with any progress on my car.
My girl named my Ralliart, "Tramp", since he's a silver-ish color just like the dog in the classic Disney movie, "Lady and the Tramp".
Ladies and gentlemen, here's Tramp...
***
NOVEMBER 2015 UPDATE
So, more than a year has passed since my last post on Tramp's thread...
Good news is that I'm having a pretty good year this time around in regards to Tramp's progress!
Here are a bunch of things that I have been able to take care of in this year...
- Front & rear, rotors & brake pads. This was one of the most horrific things I have ever seen. I could not believe that my rotors and pads were that bad.
- Rear calipers (L/R). My calipers were destroyed as well due to a long overdue service. Brackets were literally bonded together and I could not even get them to loosen up. Had to be replaced.
- Front lower control arms (L/R). There is a REALLY BAD story (that I will cover soon) as to WHY I had to replace these and another REALLY BAD story during the replacement process.
- Front stabilizer bar links (L/R). Also had to be replaced as the links were welded together by rust and it became ONE piece. I had to torch and chisel them off. Bad bad bad experience yet again.
- Now running FULL SYNTHETIC motor oil. Finally...
- Removed most rust in engine bay & from underbody. Planning to use rust converter, paint with primer then apply rubberized coating for extra protection.
- Sun roof is now fully-functional. It was a pretty funny adventure trying to reset the motor to relearn the distance of the opening and closing points lol.
- HID lamps have been re-installed and I have adjusted the headlight height to be lower so they point downwards (low beam) as the HID kit that I got is single beam only.
- STILL WINGLESS!!! And I'm loving it, even though my girlfriend hates it lol...
That's all I can remember from the top of my head as I am currently at work. I still have a lot of things that are yet to be done but I am so happy with the progress
that I've reached so far.
Ongoing/future plans are...
- REBUILD MY TRANSMISSION!!!
- Replace front & rear springs. Hopefully I can grab the OEM springs that I was offered by EvoM Cranswick.
- Replace front & rear, struts. Parts from RockAuto.
- Replace front, inner & outer tie rods. Parts from RockAuto.
- Replace oil pan & gasket. Parts from EvoM doncarbone.
- Clean/replace valve cover & gasket. Parts from EvoM doncarbone.
- Clean/replace intake manifold & gasket. Parts from EvoM doncarbone.
- Adjust valve lash.
- Clean throttle body & MAF sensor...again.
- Clean exhaust manifold + EGR.
- Replace timing belt & water pump. Parts from RockAuto.
- Replace clutch. EXEDY. Parts from RockAuto.
- Coolant flush.
- Flush transmission oil and replace with OEM Mitsubishi manual transmission oil. Any suggestions/advice?
- Need to fix my A/C as it is still out-of-service...my girlfriend hates me for not having A/C lol...
I gotta leave my work now so I will continue this LOOOOOOONG post when I get home.
SO HAPPY TO BE BACK!!! MORE PHOTOS OF MY RALLIART TO COME!!! SO STAY TUNED!!!
Talk to you guys soon! Cheers!
Last edited by rzrxn; Nov 23, 2015 at 10:06 PM.
 Oct 11, 2013, 08:09 AM
#2
Evolved Member
Thread Starter
iTrader: (1)
Join Date: Mar 2012
Location: Toronto, Ontario
Posts: 600
Likes: 0
Received 0 Likes
on
0 Posts
I have done a few things to Tramp since I got him. The most recent thing I've done is dip my emblems using black PlastiDip. I took some shots and it looks pretty bad ***. Will be posting pics as soon as I get home.
Oct 11, 2013, 08:28 AM
#3
Evolved Member
Thread Starter
iTrader: (1)
Join Date: Mar 2012
Location: Toronto, Ontario
Posts: 600
Likes: 0
Received 0 Likes
on
0 Posts
I recently dipped my emblems in matte black PlastiDip and I think they look pretty awesome to match my black and silver theme. I'm also planning to dip my wheel caps (the ones with the Mitsu symbol on them) since the red paint that I put on is now peeling and it looks like crap, lol.
I also started a thread in the "Show & Shine" section just to get feedback and advice from everyone regarding my "Tramp-a-roo" (my girl named my car so I had no say in that, if you know what I mean, LOL!)
Hopefully, I get everything up to par with my RA. This car will always be with me no matter what and I'm willing to spend as much time and energy on it as I can to get him back on track.
My short-term goal is to get him back in shape and get all the old/rotted parts replaced. Long-term goal is to have him ready for some rallying on an off-road, dirt track. That's my dream for my RA. It WILL come true...someday. Guess we just gotta start off in baby steps like me replacing my front driver, outer tie rod end, lol. Got a good deal on the part: MOOG, $25, lifetime warranty!
Thanks for the encouragement, man! I'm going to need A LOT of help when I start working on Tramp. I can't wait!!!
Oct 11, 2013, 08:40 AM
#5
Evolved Member
Thread Starter
iTrader: (1)
Join Date: Mar 2012
Location: Toronto, Ontario
Posts: 600
Likes: 0
Received 0 Likes
on
0 Posts
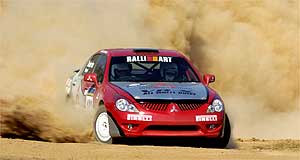
This is a VR-X rally car. Looks exactly like our cars but sports a 4G94 instead of our Ralliart's 4G69.
http://www.webwombat.com.au/motoring...lancer-vrx.htm
*sigh*

http://www.webwombat.com.au/motoring...lancer-vrx.htm
*sigh*
Last edited by rzrxn; Oct 11, 2013 at 08:44 AM.
Trending Topics
") Oct 14, 2013, 09:11 PM
Oct 14, 2013, 09:11 PM
#10
Evolved Member
Thread Starter
iTrader: (1)
Join Date: Mar 2012
Location: Toronto, Ontario
Posts: 600
Likes: 0
Received 0 Likes
on
0 Posts
talking about suspension...
i was going to replace my front driver outer tie rod but i cant remove my old one. its stuck there and ive tried hammering it and nothing seems to make it budge. any help would be appreciated...
thanks again!
Oct 14, 2013, 11:02 PM
#11
thanks man! well im thinking of working on my suspension first then the rest comes after.
talking about suspension...
i was going to replace my front driver outer tie rod but i cant remove my old one. its stuck there and ive tried hammering it and nothing seems to make it budge. any help would be appreciated...
thanks again!
talking about suspension...
i was going to replace my front driver outer tie rod but i cant remove my old one. its stuck there and ive tried hammering it and nothing seems to make it budge. any help would be appreciated...
thanks again!
Oct 15, 2013, 06:30 AM
#12
Evolved Member
Thread Starter
iTrader: (1)
Join Date: Mar 2012
Location: Toronto, Ontario
Posts: 600
Likes: 0
Received 0 Likes
on
0 Posts
they're stuck on there...if at first you can't get it off, using the hex pattern on the inner rod...use a long wrench on the jam nut with the tie rod end still in the knuckle...with any luck you'll break the tie rod end loose,and not the jam nut itself...once you break it, return it to its normal position...remove the tie rod end from the knuckle again and remove it...don't spin the inner tie rod, that will throw out your toe-in angle...
i already loosened up the jam nut but the outer rod won't budge at all. i've hammered it, tried to pry it, etc and it won't even move an inch. i will try it again when i get home and we'll see how it goes

thanks Garrett!
Oct 17, 2013, 09:48 AM
#13
what's the issue..?
outter tierod stuck on the knuckle, or threads seized to the inner tierod..?
hit the knuckle right on that tab where the tierod goes HARD with a hammer and it'll pop off after a few hits...if the problem is it's stuck there...careful you don't hit the tierods, you may bens the inner and throw the aligment off
if it's stuck on the inner tierod/seized threads then the best way is to use some heat(torch)....carefull not to catch anything on fire nor to melt the inner or outter tierod OR the jamut(should have a new one anyway if you got a moog outter)
also after you're done...be sure to get an alignment...
no matter how much you saved the position where the old one was, it's highly likely the new one is different and it'll be out of alignment...
plus, when was the last alignment..?
you should get one a year just to verify everything is ok, more if you hit lots of bumps/potholes/curbs...
Oct 17, 2013, 05:03 PM
#14
Evolved Member
Thread Starter
iTrader: (1)
Join Date: Mar 2012
Location: Toronto, Ontario
Posts: 600
Likes: 0
Received 0 Likes
on
0 Posts
what's the issue..?
outter tierod stuck on the knuckle, or threads seized to the inner tierod..?
hit the knuckle right on that tab where the tierod goes HARD with a hammer and it'll pop off after a few hits...if the problem is it's stuck there...careful you don't hit the tierods, you may bens the inner and throw the aligment off
if it's stuck on the inner tierod/seized threads then the best way is to use some heat(torch)....carefull not to catch anything on fire nor to melt the inner or outter tierod OR the jamut(should have a new one anyway if you got a moog outter)
also after you're done...be sure to get an alignment...
no matter how much you saved the position where the old one was, it's highly likely the new one is different and it'll be out of alignment...
plus, when was the last alignment..?
you should get one a year just to verify everything is ok, more if you hit lots of bumps/potholes/curbs...
outter tierod stuck on the knuckle, or threads seized to the inner tierod..?
hit the knuckle right on that tab where the tierod goes HARD with a hammer and it'll pop off after a few hits...if the problem is it's stuck there...careful you don't hit the tierods, you may bens the inner and throw the aligment off
if it's stuck on the inner tierod/seized threads then the best way is to use some heat(torch)....carefull not to catch anything on fire nor to melt the inner or outter tierod OR the jamut(should have a new one anyway if you got a moog outter)
also after you're done...be sure to get an alignment...
no matter how much you saved the position where the old one was, it's highly likely the new one is different and it'll be out of alignment...
plus, when was the last alignment..?
you should get one a year just to verify everything is ok, more if you hit lots of bumps/potholes/curbs...
another issue i am having is when i tried adjusting my passenger front outer rod, i had to use a 12mm wrench on the inner rod to rotate it instead of the 13mm wrench that i used on my driver front outer rod. also, the 12mm keeps slipping so i'm thinking of having to get those "clamping wrenches" to try and adjust it some more. my jam nut on the outer rod on the front passenger is also STUCK so every time i loosen the jam nut, the whole jam nut and inner tie rod loosens up with it. problems after problems...but at least i'm getting the hang of these things! i'm so happy that i was actually able to replace the driver outer rod myself. i felt so proud!
one small step for man...a giant step for mankind

woohooo!!!