Inner Tie Rod How To
 Jul 7, 2011, 04:35 PM
#1
Newbie
Thread Starter

Join Date: Jun 2009
Location: Ohio
Posts: 52
Likes: 0
Received 0 Likes
on
0 Posts
Inner Tie Rod How To
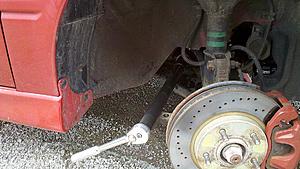
Ok so i finally got my inner tie rods replaced. Im no professional but i do most of my own work like this. Im makin this how to for others who may want to do this themselfs so they can see how i did it. Its pretty easy and straightforward.There were a couple things i needed before i did it including 2 2" hose clamps for the boots and an inner tie rod tool i rented from a local oreillys store. This is the passengers side but both are identical. So get the vehicle off the ground and the tire off. Use jack stands for saftey! then you'll be here.
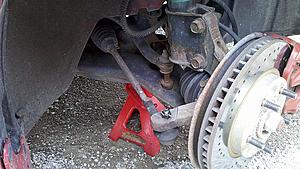
Remove the castle nut and pin from the outer tie rod and loosen up the jam nut on the shaft.Mark everything including where the old jam nut is on your old tie rod and which direction was up. I used a paint marker and drew a line down the top of the rod so i knew how everything ligned up. Tap the outer tie rod out of the steering knuckle without damaging its threads unless your replacing it anyways. Mine were new so i kept them. Once everythings marked remove the outer tie rod.
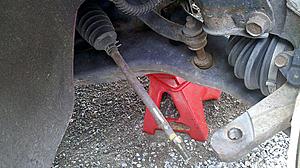
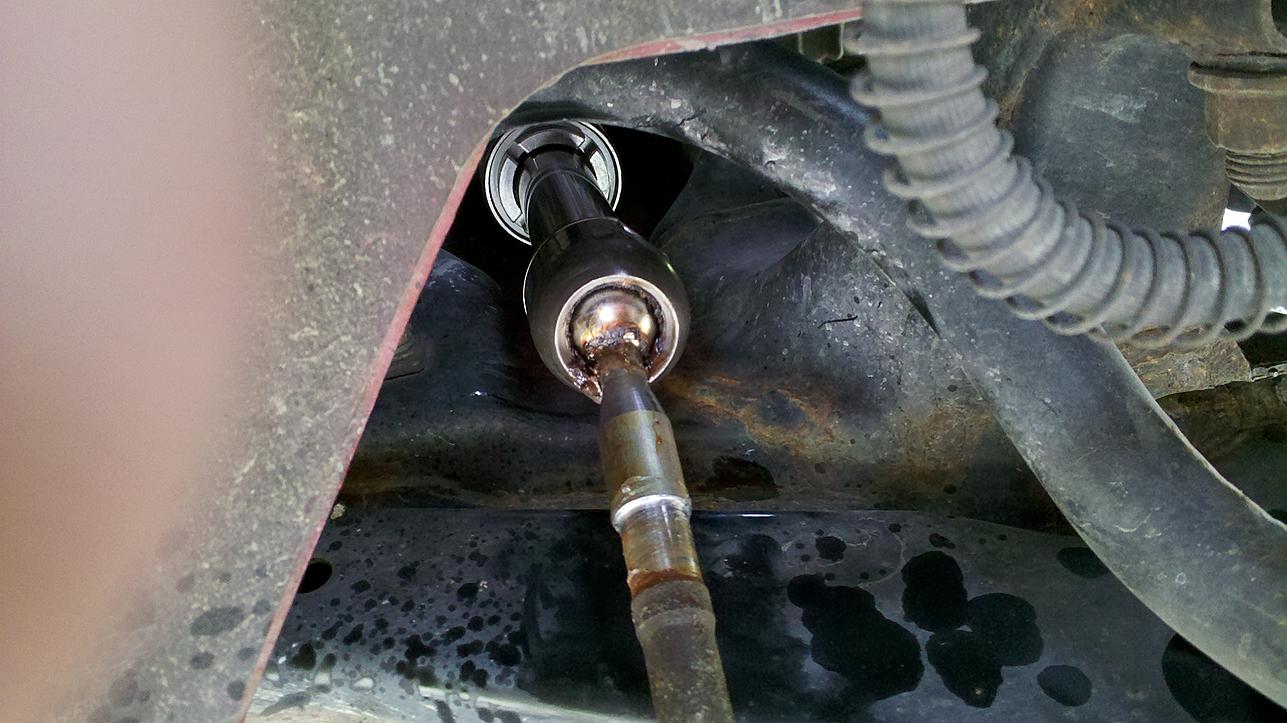
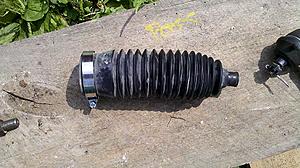
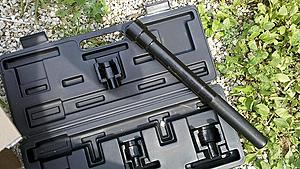
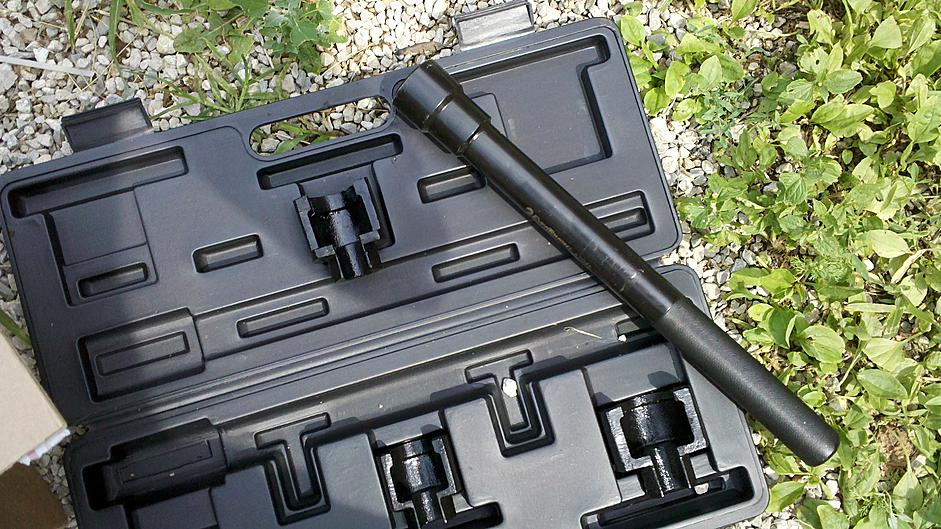
Now you will need to remove the boot covering the inner joint. It uses a one time clamp so once its opened it will have to be replaced with a standard 2" hose clamp worked perfect for me. The outer clamp is re-usable. Next i got out the inner tie rod tool i rented and turned it right off. This is almost a must have tool because the control arm is completly blocking all access with a wrench.
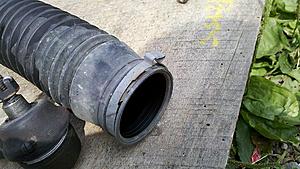
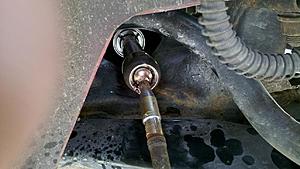
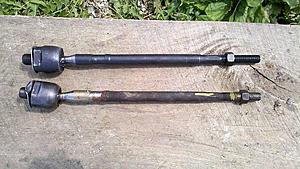
Once you have it off compare the new and old ones. It is very important that you get these as close as possible so that its aligned enough to drive to your local alignment shop. Even after i did this my alignment was off quite a bit. You cant just count rotations on your outer tie rod because the shaft legnths can even vary like in the pic below. It only takes a 1/4" to throw ur alignment for a loop. So i cant stress taking your time marking everything enough. Installation is the exact reverse of disassembly with the exception of replacing the old boot clamp. I just used a hose clamp on mine but honestly getting the boot back on was the hardest part. Lubing the inside of the boot helped alot though FYI.

Remove the castle nut and pin from the outer tie rod and loosen up the jam nut on the shaft.Mark everything including where the old jam nut is on your old tie rod and which direction was up. I used a paint marker and drew a line down the top of the rod so i knew how everything ligned up. Tap the outer tie rod out of the steering knuckle without damaging its threads unless your replacing it anyways. Mine were new so i kept them. Once everythings marked remove the outer tie rod.

Now you will need to remove the boot covering the inner joint. It uses a one time clamp so once its opened it will have to be replaced with a standard 2" hose clamp worked perfect for me. The outer clamp is re-usable. Next i got out the inner tie rod tool i rented and turned it right off. This is almost a must have tool because the control arm is completly blocking all access with a wrench.


Once you have it off compare the new and old ones. It is very important that you get these as close as possible so that its aligned enough to drive to your local alignment shop. Even after i did this my alignment was off quite a bit. You cant just count rotations on your outer tie rod because the shaft legnths can even vary like in the pic below. It only takes a 1/4" to throw ur alignment for a loop. So i cant stress taking your time marking everything enough. Installation is the exact reverse of disassembly with the exception of replacing the old boot clamp. I just used a hose clamp on mine but honestly getting the boot back on was the hardest part. Lubing the inside of the boot helped alot though FYI.
 Jul 7, 2011, 04:39 PM
#2
Newbie
Thread Starter
Join Date: Jun 2009
Location: Ohio
Posts: 52
Likes: 0
Received 0 Likes
on
0 Posts
continued....
So thats about it only took me 45 mins once i knew what i was doing. IDK how helpfull this was but i guess i did my best huh lol. Heres a pic of that alignment tool theres alot of youtube vids on them so look them up if your intrested first.


So thats about it only took me 45 mins once i knew what i was doing. IDK how helpfull this was but i guess i did my best huh lol. Heres a pic of that alignment tool theres alot of youtube vids on them so look them up if your intrested first.
 Jul 7, 2011, 06:51 PM
#3
Excellent work man, good to see other's taking care of their car the real man's way, lol. We talked about this before i think, so the rod just threads onto the rack then?
Good write-up and pics too...And i try to tell people all the time, if you can't borrow a tool, you can rent it.
Little hint:
the tie rod end is tapered where it mates with the sterring knuckle, so it gets pressed into the steering knuckle, the easiest way to remove it, is to use a pry bar or large common screwdriver, and pry between the tie rod and knuckle and a gentle tap with a hammer on the tie rob end bolt, will pop it out. And when you reinstall the end into the steering knuckle, it has to be under pressure, to tighten the nut, for this i use a C-Clamp. And for alignment, if you measure the distance from the joint to the jam nut on the old rod, and take that measurement to the new one, you should be close enough that it won't make much of a difference. But it's a good idea to have it aligned. nice job.
Last edited by CrAnSwIcK; Sep 22, 2012 at 11:08 PM.
Jul 8, 2011, 06:48 AM
#4
Newbie
Thread Starter
Join Date: Jun 2009
Location: Ohio
Posts: 52
Likes: 0
Received 0 Likes
on
0 Posts
yep it threads into the rack and has a washer that you bend down over the flats of the rod to keep it from backing back out. You can kinda see it in the side by side pic.
Jul 19, 2011, 10:20 PM
#5
Evolving Member
iTrader: (4)

Join Date: May 2010
Location: Regina, SK
Posts: 433
Likes: 0
Received 0 Likes
on
0 Posts
Thanks for writing this up, I've got both tie rods/ends to do this weekend (if possible) and was wondering about the procedure.. with luck I can get the tools from a mechanic friend and make that portion of life a little easier, he likes the car so much he might do them himself haha which I wouldn't deny him the pleasure of doing :P
Last edited by nerdbotSKRA; Jul 19, 2011 at 10:22 PM.

Trending Topics
Jul 23, 2013, 07:02 PM
#9
 Jul 23, 2013, 08:44 PM
#10
Newbie

Join Date: Jul 2013
Location: Barrie ON
Posts: 18
Likes: 0
Received 0 Likes
on
0 Posts
Excellent work man, good to see other's taking care of their car the real man's way, lol. We talked about this before i think, so the rod just threads onto the rack then?
Good write-up and pics too...And i try to tell people all the time, if you can't borrow a tool, you can rent it.
Little hint:
the tie rod end is tapered where it mates with the sterring knuckle, so it gets pressed into the steering knuckle, the easiest way to remove it, is to use a pry bar or large common screwdriver, and pry between the tie rod and knuckle and a gentle tap with a hammer on the tie rob end bolt, will pop it out. And when you reinstall the end into the steering knuckle, it has to be under pressure, to tighten the nut, for this i use a C-Clamp. And for alignment, if you measure the distance from the joint to the jam nut on the old rod, and take that measurement to the new one, you should be close enough that it won't make much of a difference. But it's a good idea to have it aligned. nice job.
Good write-up and pics too...And i try to tell people all the time, if you can't borrow a tool, you can rent it.
Little hint:
the tie rod end is tapered where it mates with the sterring knuckle, so it gets pressed into the steering knuckle, the easiest way to remove it, is to use a pry bar or large common screwdriver, and pry between the tie rod and knuckle and a gentle tap with a hammer on the tie rob end bolt, will pop it out. And when you reinstall the end into the steering knuckle, it has to be under pressure, to tighten the nut, for this i use a C-Clamp. And for alignment, if you measure the distance from the joint to the jam nut on the old rod, and take that measurement to the new one, you should be close enough that it won't make much of a difference. But it's a good idea to have it aligned. nice job.
Jul 23, 2013, 10:15 PM
#11
There is no room there is bearly enough room to put a zip tie around the boot when reinstalling.. If there's a autozone they should have a loaner http://m.autozone.com/autozone-mobil...-Tool/_/N-264v
Jul 24, 2013, 12:05 PM
#12
if there's a harbor freight near you, they ussually have them...(IIRC ~$30-50)
here's a link ot they're tool on their site
http://www.harborfreight.com/inner-t...set-69619.html
or like me...buy one off amazon and wait a few days for your new tool
(it was a few years ago...bought a lisle brand one and i spent ~$43 including shipping)
just looked on amazon and the prices have gone up...but they start ~$60 and go up depending on brand and accesories..here's a link to the one i bought
Last edited by nekkidlad; Jul 24, 2013 at 12:09 PM.
Jul 24, 2013, 08:03 PM
#13
Damn sorry to hear that when I didn't know about the tool I was thinking of dropping the sub frame down didn't really look into it but it might be welded so that can't be a option( can someone confirm this?) if you want I'll buy one for you if you pay me back and pay shipping

Thread
Thread Starter
Forum
Replies
Last Post
240Z TwinTurbo
Evo Tires / Wheels / Brakes / Suspension
4
Sep 2, 2018 11:28 AM
ak47in
Lancer Troubleshooting
1
Feb 17, 2017 05:38 AM
OZ_kidd
Lancer How Tos / Installations
0
Feb 2, 2011 05:23 PM
hennessey01
Evo Tires / Wheels / Brakes / Suspension
5
Nov 2, 2010 06:10 AM