Rear Diff clutch plates installed incorrectly from factory


 Jun 23, 2011, 01:23 PM
#17
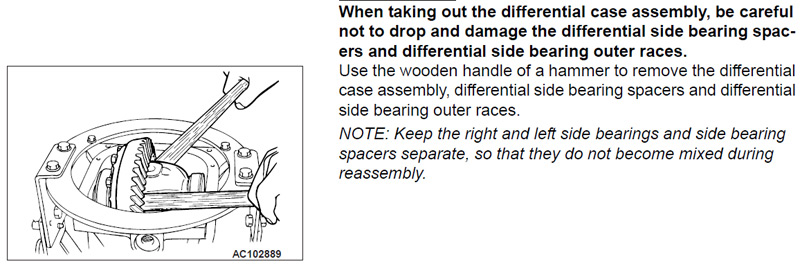
You can always ping me if you have questions from the install since I've already done it. Hardest part of the disassembly is removing the diff carrier from the diff case. The manual tells you to use two hammer ends (the wood part). There's no way you can lever the diff out at the angle you stick the hammer in. I used the rubber coated ends of 2 large pliers, poked into the diff carrier's openings to crank it out. You gotta use quite a bit of muscle power for that step too, unless you got a long lever.
 Jun 23, 2011, 07:43 PM
#21
I took a bunch of pics and can do a 'how-to' eventually. For now, I'll just answer specific install questions.
Last edited by Thoe99; Jun 23, 2011 at 08:29 PM.


 Jun 23, 2011, 08:58 PM
#27
 . It must have some tight tolerances for a reason.
Jun 23, 2011, 09:08 PM
. It must have some tight tolerances for a reason.
Jun 23, 2011, 09:08 PM
#28
Sometimes a spreader is a hassle, I've had to use one several times to do ring & pinions. They won't hurt anything since you are only spreading a few thousanths to relieve pressure, when removed everything just goes back to where it was.
Just a thought, I guess I'll find out when I pull mine apart
Nice find
Just a thought, I guess I'll find out when I pull mine apart
Nice find
Jun 23, 2011, 10:02 PM
#29
Evolved Member
"Unbolted the final gear and opened the carrier. Sure enough the plates were assembled wrong from factory. You can see that the factory stacked the plates as follows, top to bottom: plate, plate, disc, disc, plate---plate, disc, disc, plate, plate"
The drawing shows four plates and two discs on each side. If there was a plate between the discs in your list it would be the same as the factory drawing. So, are you missing a plate?
EDIT.....
Nevermind: in the photograph I see the correct number of plates and discs.
The drawing shows four plates and two discs on each side. If there was a plate between the discs in your list it would be the same as the factory drawing. So, are you missing a plate?
EDIT.....
Nevermind: in the photograph I see the correct number of plates and discs.
Last edited by barneyb; Jun 23, 2011 at 10:08 PM.
Jun 23, 2011, 10:35 PM
#30
Newbie

Join Date: Jun 2011
Location: California
Posts: 3
Likes: 0
Received 0 Likes
on
0 Posts
When the plates are installed correctly, you will definitely have to change the LSD fluid at 15k or less, depending on how you drive your car, no different than a upgraded/modified diff. I'm guessing they didn't set it up this way because of service intervals, and noise. Which it isn't really noisy, BTW.
I truly think they set it up this way to reduce customer complaints.
I truly think they set it up this way to reduce customer complaints.
I am glad to see that this info has finally been posted on the forums. The LSD itself was not set up incorrectly from the factory, it was done this way on purpose. As EVO8emUp said above the clutches were arranged this way to eliminate any clutch chatter (noise) from the LSD. It would cost Mitsubishi a fortune in warranty repairs for customers who complain about differential noise. Also, this is not done only by Mitsubishi, other OEMs do the same thing to reduce the noise from clutch type LSD units. This is a big reason a lot of OEMs have gone to Torsen style LSD units in IRS applications, which are nearly silent.
The 8 plate LSD mod, as some people call it, can easily be done by someone who has mechanical skill following the service manual in their garage at home. It�s great info for people who want a better locking LSD without having to spend a bunch of $$. One thing that is important to note that I am not sure if the service manual covers clearly; The OEM LSD unit is a 1 way unit. It is important that the pressure rings or cams are installed exactly as they came out of the LSD. If you get them reversed your LSD will lock on deceleration and not on acceleration, as it should.