
Removing the rear differential (diff)


Diff came out easy, literally less than an hour for one person including jacking it up onto jack stands, etc. First time I've done it. The 4 bolts to the driveshaft are simple, I used a 12mm box wrench on one end, 12mm gearwrench on the other end. Be sure the car is in neutral so you can rotate the drive shaft to reach all four, I put another jack stand under the drive shaft so it was supported as well.
The 3 17mm bolts on the rear of the diff were a piece of cake to get out with a 17mm gearwrench as well (no angle or offset on mine). jack snug to the bottom, ran out the two 19mm bolts for the forward mount, and lowered the jack slowly, and it was a smooth operation.
Just getting mine refreshed before hitting 100k.
Last edited by Bassicfun; Aug 19, 2010 at 04:35 AM.


Thought I might outline the steps to remove the rear diff for those who want to do this on their own. Did this by myself with no assistance. This differs from the shop manual in that you do not have to remove the nuts on the ball joints that connect to the hub assembly. Having done it the way in the shop manual and this way, the following is much easier!
1. Jack up car and place on jack stands. Be safe. I always get the creeps when my face is 4 or so inches from the bottom of the car. Put the car in neutral to allow the spinning of the driveshaft. Better to do this now than having to do it after you have removed two of the drive shaft bolts!
2. Remove rear wheels and drain the gear oil from diff
3. Remove bolt holding shock to arm
4. Remove bolt on arm holding same arm to the hub assembly
5. Remove the front bolt to the trailing arm
6. Gently pry axles from diff while pulling wheel hub out and up
7. If you do not have an assistant, use jacks to hold the rotors up and out of the way for clearance. If you have ideally two assistants, they can pull the rotors up and out of the way when you drop the diff. Better yet get someone else to go under the car while you supervise and pull on the rotor. Free beer helps this negotiation
8. Zip tie the axle ends closest to the diff to the sway bar. Angle the ends toward the rear to allow clearance to drop the diff
9. Remove drive shaft bolts. Put something under the drive shaft to support it.
10. Remove bolts at the back of diff that connect to the mustache bar. Be careful to use closed end wrench to remove. The one on driver's side is tight and at an awkward angle for most wrenches. When I did this the first time I used an open end wrench and rounded the bolt head (sucks). This time I used a swivel head ratcheting wrench to get that one out. Most wrenches have too much angle on the closed end.
11. Put jack under diff and remove the remaining two bolts to the chassis. Be ready for the diff to move around on the jack as it is hard to balance
Good Luck!

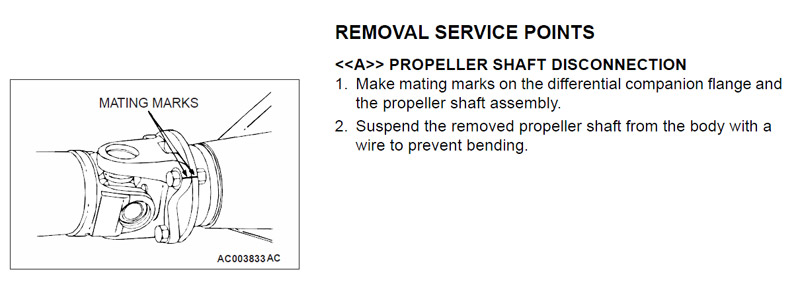
Also, is there a reason you need to re-install it in the exact driveshaft rotation? The manual says to make mating marks.
Hey Thoe,
The labels you put in the first picture are correct, those 3 will let you push the hub assembly out. ACTUALLY, if I recall correctly you do not even need to remove the shock bolt, but it only takes a second so might as well.
And I WOULD mate the drive shaft just as it is, think of the RPMs that it turns, if it was mated properly from the factory, and you in essence rotate it, there is a chance it can pick up a vibration from being out of balance. I would make the mating mark as well, there seems to be a LITTLE bit of slop in the bolt holes, so start all 4, then ensure mating marks are dead on and then tighten each bolt down.
My free .02 cents.
Last edited by Bassicfun; Jun 19, 2011 at 06:14 AM. Reason: more 411
Thanks. I'm opening up the diff, but now I'm stuck at the step where you need a special tool to pry off the side bearing inner race. Anyone have any tips? I went to a couple autoparts stores and a tool store, and no one seems to have a puller that's good enough for this job.


Thought I might outline the steps to remove the rear diff for those who want to do this on their own. Did this by myself with no assistance. This differs from the shop manual in that you do not have to remove the nuts on the ball joints that connect to the hub assembly. Having done it the way in the shop manual and this way, the following is much easier!
1. Jack up car and place on jack stands. Be safe. I always get the creeps when my face is 4 or so inches from the bottom of the car. Put the car in neutral to allow the spinning of the driveshaft. Better to do this now than having to do it after you have removed two of the drive shaft bolts!
2. Remove rear wheels and drain the gear oil from diff
3. Remove bolt holding shock to arm
4. Remove bolt on arm holding same arm to the hub assembly
5. Remove the front bolt to the trailing arm
6. Gently pry axles from diff while pulling wheel hub out and up
7. If you do not have an assistant, use jacks to hold the rotors up and out of the way for clearance. If you have ideally two assistants, they can pull the rotors up and out of the way when you drop the diff. Better yet get someone else to go under the car while you supervise and pull on the rotor. Free beer helps this negotiation
8. Zip tie the axle ends closest to the diff to the sway bar. Angle the ends toward the rear to allow clearance to drop the diff
9. Remove drive shaft bolts. Put something under the drive shaft to support it.
10. Remove bolts at the back of diff that connect to the mustache bar. Be careful to use closed end wrench to remove. The one on driver's side is tight and at an awkward angle for most wrenches. When I did this the first time I used an open end wrench and rounded the bolt head (sucks). This time I used a swivel head ratcheting wrench to get that one out. Most wrenches have too much angle on the closed end.
11. Put jack under diff and remove the remaining two bolts to the chassis. Be ready for the diff to move around on the jack as it is hard to balance
Good Luck!
1. Jack up car and place on jack stands. Be safe. I always get the creeps when my face is 4 or so inches from the bottom of the car. Put the car in neutral to allow the spinning of the driveshaft. Better to do this now than having to do it after you have removed two of the drive shaft bolts!
2. Remove rear wheels and drain the gear oil from diff
3. Remove bolt holding shock to arm
4. Remove bolt on arm holding same arm to the hub assembly
5. Remove the front bolt to the trailing arm
6. Gently pry axles from diff while pulling wheel hub out and up
7. If you do not have an assistant, use jacks to hold the rotors up and out of the way for clearance. If you have ideally two assistants, they can pull the rotors up and out of the way when you drop the diff. Better yet get someone else to go under the car while you supervise and pull on the rotor. Free beer helps this negotiation
8. Zip tie the axle ends closest to the diff to the sway bar. Angle the ends toward the rear to allow clearance to drop the diff
9. Remove drive shaft bolts. Put something under the drive shaft to support it.
10. Remove bolts at the back of diff that connect to the mustache bar. Be careful to use closed end wrench to remove. The one on driver's side is tight and at an awkward angle for most wrenches. When I did this the first time I used an open end wrench and rounded the bolt head (sucks). This time I used a swivel head ratcheting wrench to get that one out. Most wrenches have too much angle on the closed end.
11. Put jack under diff and remove the remaining two bolts to the chassis. Be ready for the diff to move around on the jack as it is hard to balance
Good Luck!

Thanks. I'm opening up the diff, but now I'm stuck at the step where you need a special tool to pry off the side bearing inner race. Anyone have any tips? I went to a couple autoparts stores and a tool store, and no one seems to have a puller that's good enough for this job.


Just in case anyone references this thread again, researching how to pull their rear diff, it is certainly possible to remove the rear diff without having to perform steps 3, 4, and 5 as described below (disassemblying the rear suspension). This might be preferable, let's say on an older Evo that's been exposed to winters where the salt the roads, and one of the suspension fixing bolts is frozen solid.
Alternatively, you can simply disconnect the swaybar endlinks from the rear swaybar (both ends) by removing the 14mm nuts (if the stud spins, there's a thin, 14mm hex just under the boot so you can hold the shaft still), and rotate the bar downward to move it out of the way of the axles; and remove the rearmost section of the exhaust.
This allows you to drop the diff straight downwards with the axle stubs still in it. Then once it's lowered enough, you'll have enough room/play to pop out the axles with a prybar.
Be careful not to damage the rubber axle stub seals as you pull the axles out.
If you're pretty fast at wrenching, you can drop a rear diff in about 30 to 45 minutes (assuming everything does smoothly, all the tools you need are readily available, etc).
Putting it back in might take a little longer, because reinserting the axles fully until the clips seat is little harder than popping them out; and refilling the diff takes longer than draining it.
Thought I might outline the steps to remove the rear diff for those who want to do this on their own. Did this by myself with no assistance. This differs from the shop manual in that you do not have to remove the nuts on the ball joints that connect to the hub assembly. Having done it the way in the shop manual and this way, the following is much easier!
1. Jack up car and place on jack stands. Be safe. I always get the creeps when my face is 4 or so inches from the bottom of the car. Put the car in neutral to allow the spinning of the driveshaft. Better to do this now than having to do it after you have removed two of the drive shaft bolts!
2. Remove rear wheels and drain the gear oil from diff
3. Remove bolt holding shock to arm
4. Remove bolt on arm holding same arm to the hub assembly
5. Remove the front bolt to the trailing arm
6. Gently pry axles from diff while pulling wheel hub out and up
7. If you do not have an assistant, use jacks to hold the rotors up and out of the way for clearance. If you have ideally two assistants, they can pull the rotors up and out of the way when you drop the diff. Better yet get someone else to go under the car while you supervise and pull on the rotor. Free beer helps this negotiation
8. Zip tie the axle ends closest to the diff to the sway bar. Angle the ends toward the rear to allow clearance to drop the diff
9. Remove drive shaft bolts. Put something under the drive shaft to support it.
10. Remove bolts at the back of diff that connect to the mustache bar. Be careful to use closed end wrench to remove. The one on driver's side is tight and at an awkward angle for most wrenches. When I did this the first time I used an open end wrench and rounded the bolt head (sucks). This time I used a swivel head ratcheting wrench to get that one out. Most wrenches have too much angle on the closed end.
11. Put jack under diff and remove the remaining two bolts to the chassis. Be ready for the diff to move around on the jack as it is hard to balance