How-to: Replace Throttle Body shaft seals
 Aug 15, 2006, 11:52 PM
#1
This is just for the removal of the throttle body off the intake manifold. This would be all you need if you were just planning on sending your throttle body out to WORKS or another company for a ported/modified one. I will finish up this write up once I receive the shaft seals in the mail as this is the ultimate reason I am doing this write up.
Tools you will need:
3/8" ratchet
12mm socket
14mm deep socket
Extension
Needle-nose pliers
Flathead screwdriver
Step 1: Disconnect the battery
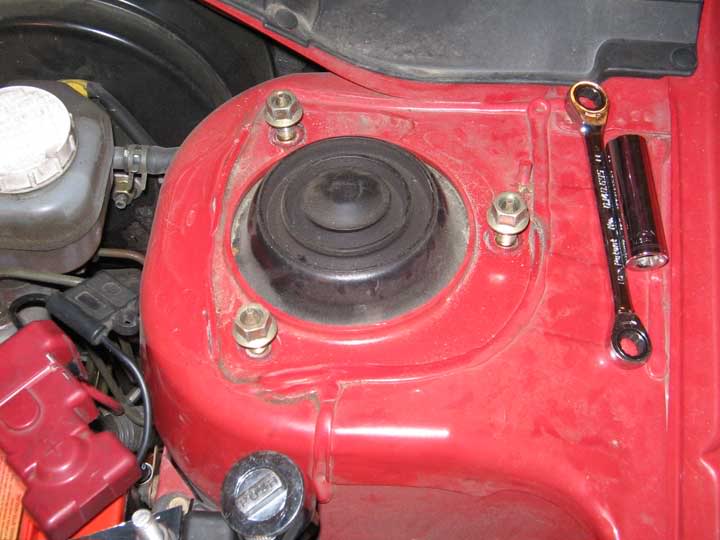
Step 2: Remove the strut tower brace. You will get annoyed with it being in the way so might as well just take it off. You will need a 14mm deep socket for the strut bolts for the two center bolts on the brace.
Step 3: Remove the UICP.
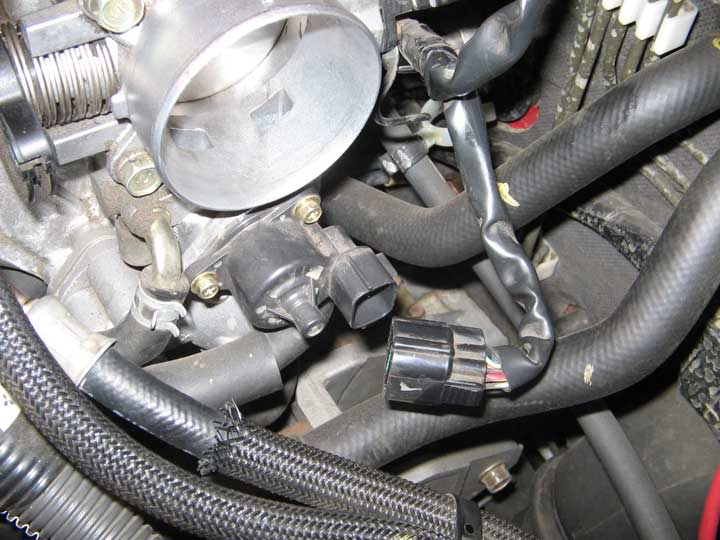
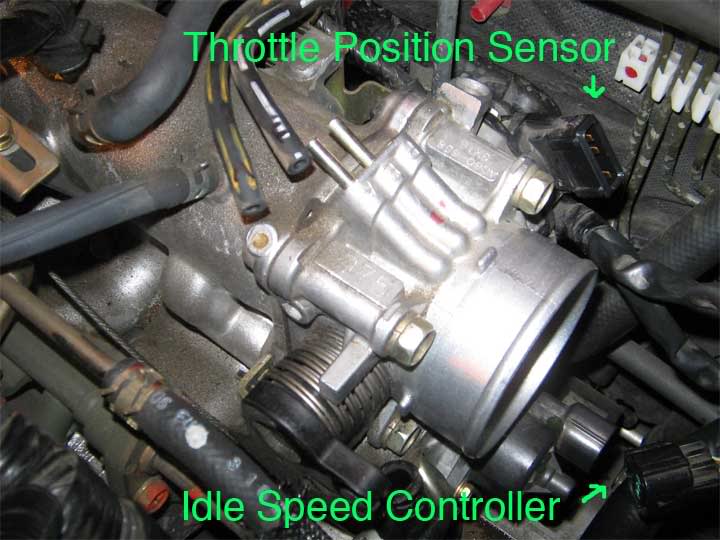
Step 4: Unplug the Idle Speed Controller (ISC). This is on the bottom of the throttle body. It simply unplugs. There is a little clip you have to press in however to release the catch.
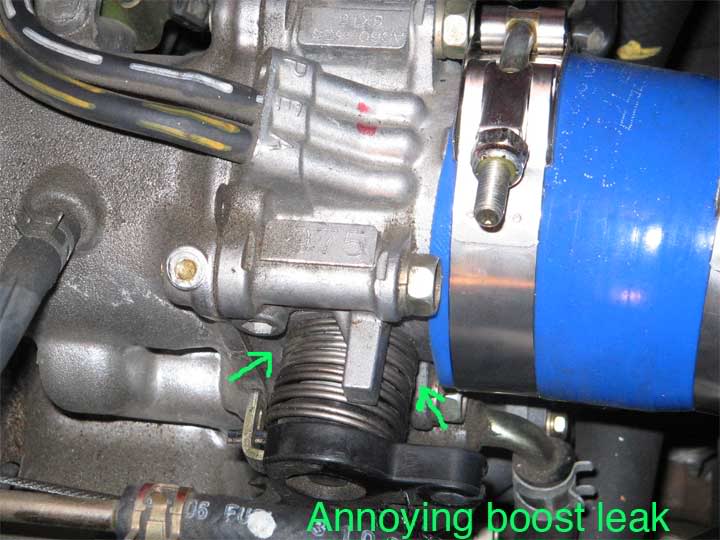
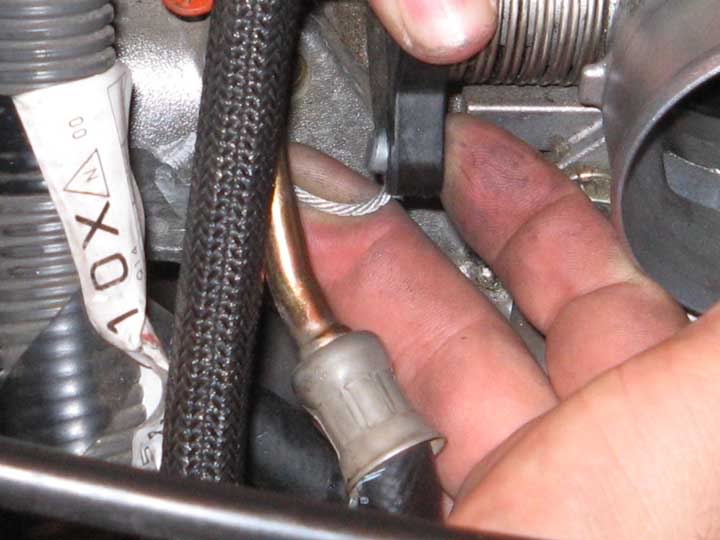
Step 5: Remove the two coolant hoses to the throttle body. They are both under the TB. One is in plain view, the other one is tucked behind and is a little more difficult to get to. Use the needle nose pliers to squeeze the hose clamps together to move them down the hose so you can pull it off the nipple to the throttle body. This is a picture of the back coolant hose. You are going to spill some coolant when you remove these, but its not much. Tuck the hoses up and away as best as possible once you get them off. Now, remove the top two vacuum hoses, one marked A, one marked E.
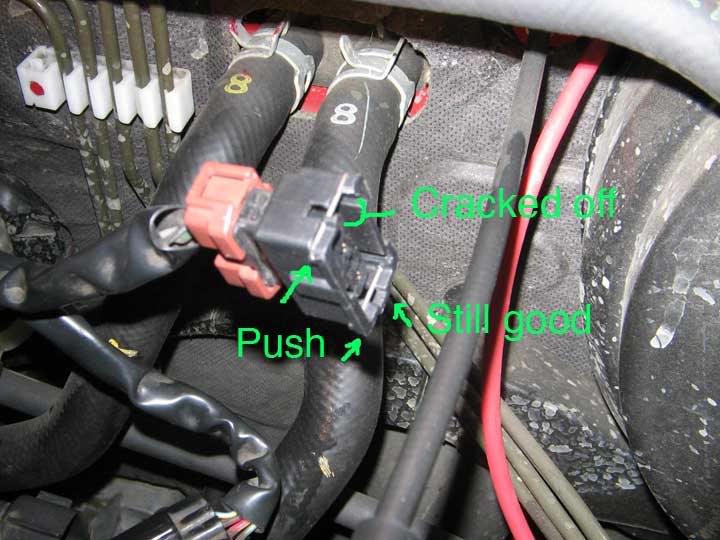
Step 5: Remove the Throttle Position Sensor (TPS). It has a metal clip surronding three sides of the plug. You can take it off a couple ways. 1) You can crack one of the ends to pull it off, or 2) You can pull the metal clip off. To do this, you will need to push the clip toward you from the backside. You can't see behind the plug, but the clip doesn't surround it entirely. Only on the three sides you can actually see. So use a flathead screwdriver and push the pin towards you little by little on each side, enough to give yourself enough room to jam the flathead in the front side of clip to pry it away from the plug.
If you opted for version 1 like I did, don't worry, the metal clip provides enough clamping that the plug won't pop off on its own. Its actually easier to crack the one end and pull it off with the metal clip still attached than it is to get the clip back on once you pulled it off the plug.
Step 6: Remove the Throttle Cable. Pull the cable away from the guide. Then bring the cable up to the very top part where the pin is. There is a notch where the cable will sit while pushing the pin through the hole, releasing the cable.

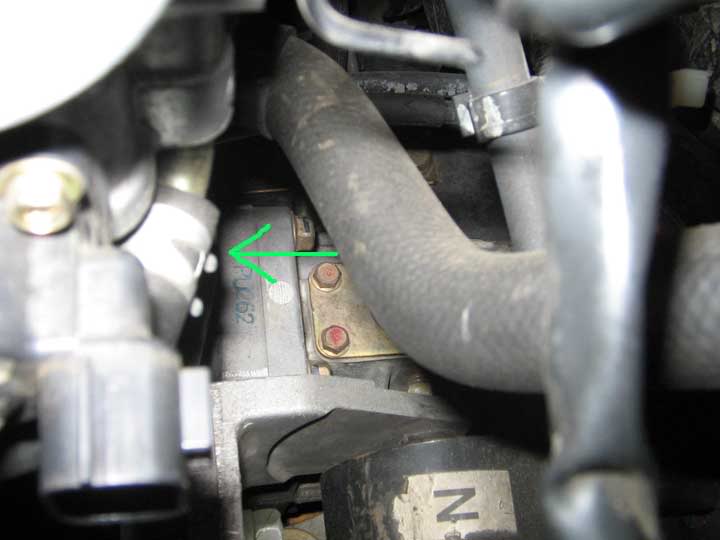
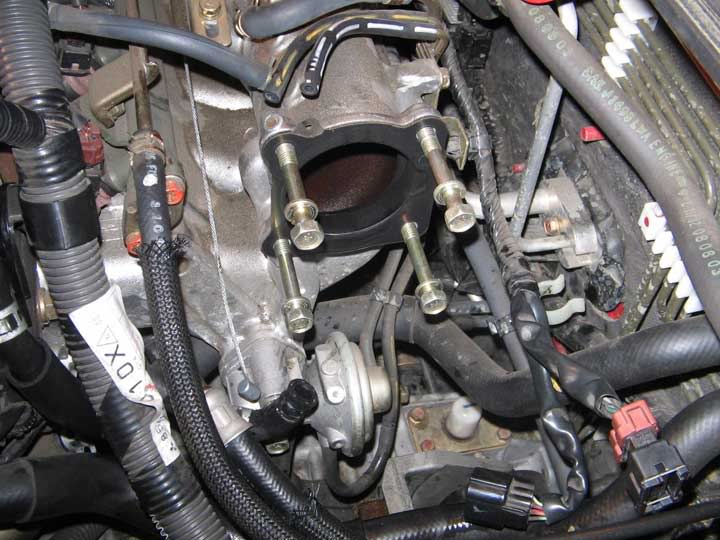
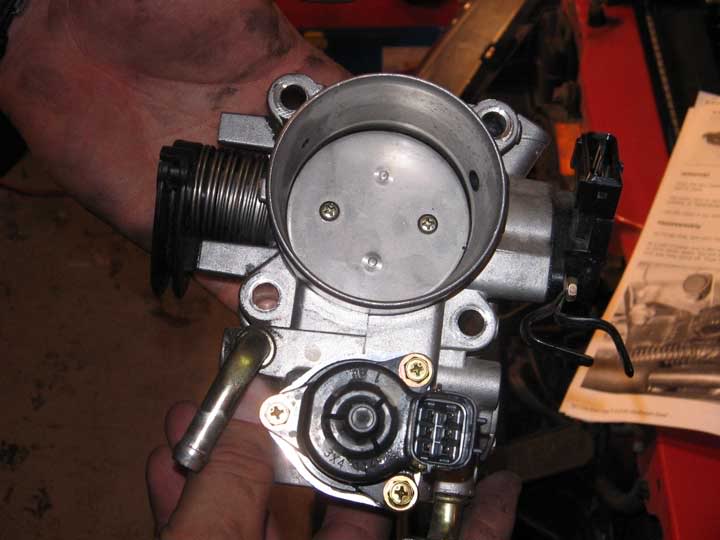
Step 7: Remove the 4 bolts holding the Throttle Body onto the Intake Manifold. Its easy to remove them with 12mm socket with an extension. I removed them, then took this picture because its easier to see where they are this way.
So now you should have the complete TB removed from the car. At this point, you can ship it off to have it rebuilt, or if you are going to be replacing the seals for it, you can follow up with part 2 of this write-up once I have finished documenting it.
Tools you will need:
3/8" ratchet
12mm socket
14mm deep socket
Extension
Needle-nose pliers
Flathead screwdriver
Step 1: Disconnect the battery
Step 2: Remove the strut tower brace. You will get annoyed with it being in the way so might as well just take it off. You will need a 14mm deep socket for the strut bolts for the two center bolts on the brace.
Step 3: Remove the UICP.
Step 4: Unplug the Idle Speed Controller (ISC). This is on the bottom of the throttle body. It simply unplugs. There is a little clip you have to press in however to release the catch.
Step 5: Remove the two coolant hoses to the throttle body. They are both under the TB. One is in plain view, the other one is tucked behind and is a little more difficult to get to. Use the needle nose pliers to squeeze the hose clamps together to move them down the hose so you can pull it off the nipple to the throttle body. This is a picture of the back coolant hose. You are going to spill some coolant when you remove these, but its not much. Tuck the hoses up and away as best as possible once you get them off. Now, remove the top two vacuum hoses, one marked A, one marked E.
Step 5: Remove the Throttle Position Sensor (TPS). It has a metal clip surronding three sides of the plug. You can take it off a couple ways. 1) You can crack one of the ends to pull it off, or 2) You can pull the metal clip off. To do this, you will need to push the clip toward you from the backside. You can't see behind the plug, but the clip doesn't surround it entirely. Only on the three sides you can actually see. So use a flathead screwdriver and push the pin towards you little by little on each side, enough to give yourself enough room to jam the flathead in the front side of clip to pry it away from the plug.
If you opted for version 1 like I did, don't worry, the metal clip provides enough clamping that the plug won't pop off on its own. Its actually easier to crack the one end and pull it off with the metal clip still attached than it is to get the clip back on once you pulled it off the plug.
Step 6: Remove the Throttle Cable. Pull the cable away from the guide. Then bring the cable up to the very top part where the pin is. There is a notch where the cable will sit while pushing the pin through the hole, releasing the cable.
Step 7: Remove the 4 bolts holding the Throttle Body onto the Intake Manifold. Its easy to remove them with 12mm socket with an extension. I removed them, then took this picture because its easier to see where they are this way.
So now you should have the complete TB removed from the car. At this point, you can ship it off to have it rebuilt, or if you are going to be replacing the seals for it, you can follow up with part 2 of this write-up once I have finished documenting it.
Last edited by nigletsyz; Aug 21, 2006 at 08:19 PM.

The following 2 users liked this post by nigletsyz:
EGbeater (Dec 12, 2023),
t3Turbo9.8 (Jun 8, 2019)
Aug 18, 2006, 11:46 PM
#2
**Part 2 of 2 on Dissecting the Throttle Body**
Ok, this is part 2 of the how-to on how to remove the troublesome leaky seals in the throttle body.
Tools you will need:
-10mm socket
-Flathead screwdriver
-Phillips screwdriver
-Needle-nose pliers
-Sharpie
-Locktite Blue
-Dielectric Silicone Grease
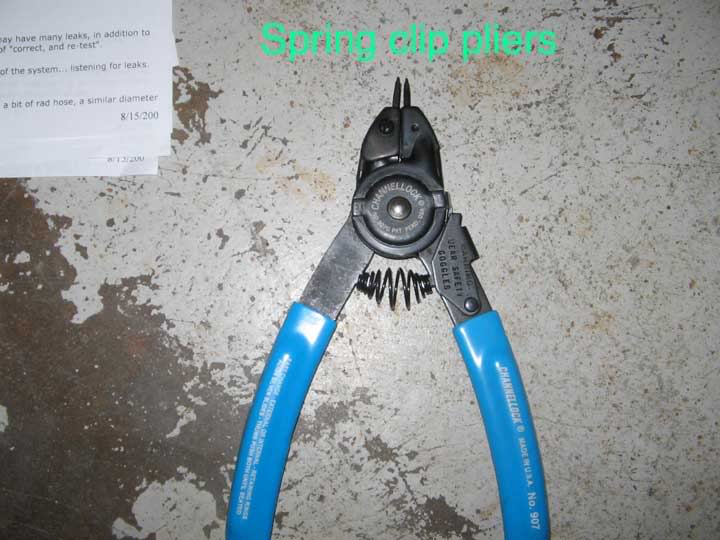
-Spring clip pliers with very small tips. If you don't have a pair, you should be able to buy them at most hardware or auto part stores. I bought this pair at Home Depot
Ok now that you have the tools, lets get started
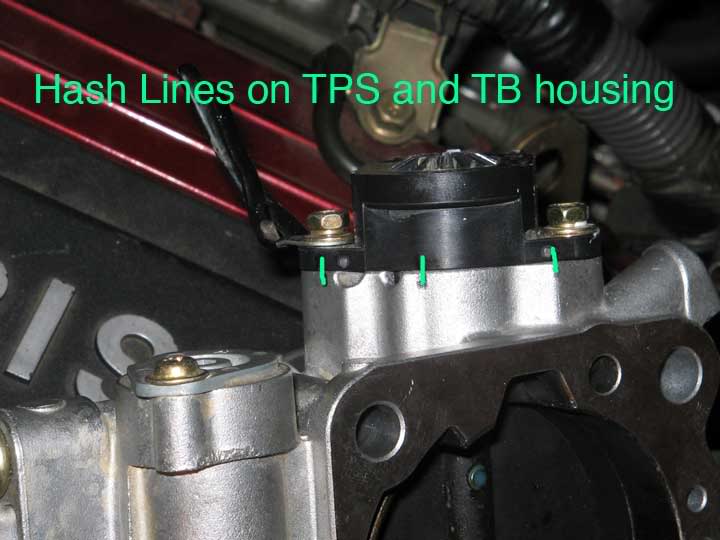
1. Mark the TPS/TB housing with little hash marks so you get it lined up when you re-intall it. The reason for doing this is that there is a preload on the spring inside the TPS and if you dont put the same preload back on the spring when you reinstall it the ECU could be interpreting incorret information and/or your idle may be a little off. Remove the TPS using the 10mm socket on the two bolts.
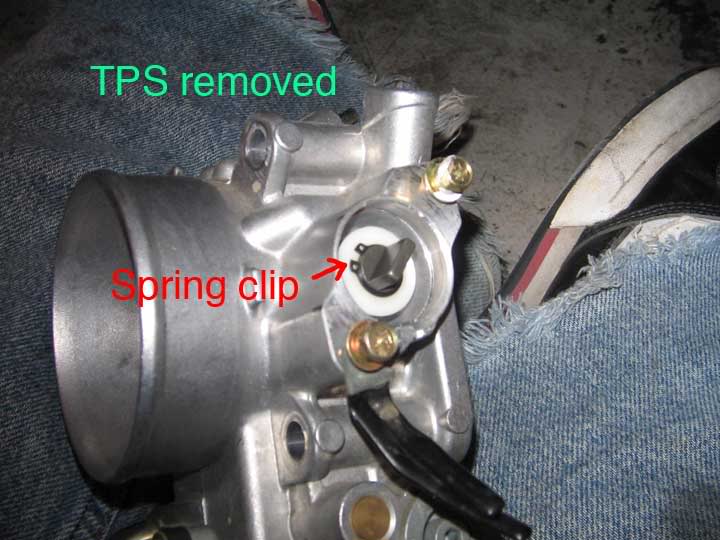
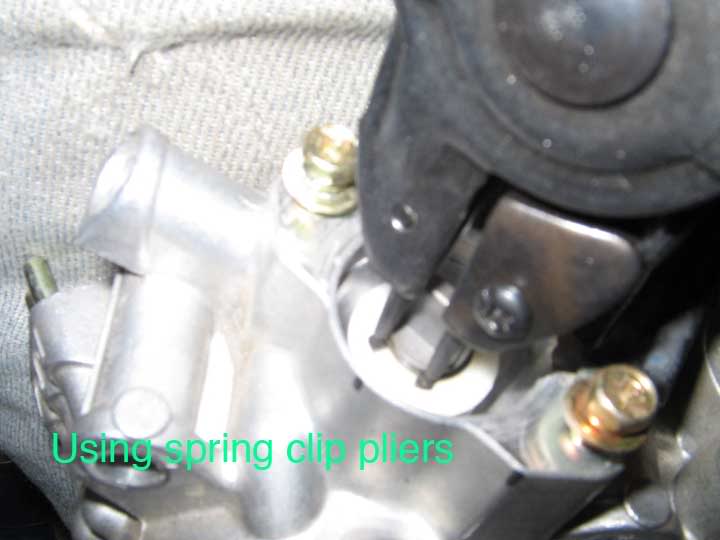
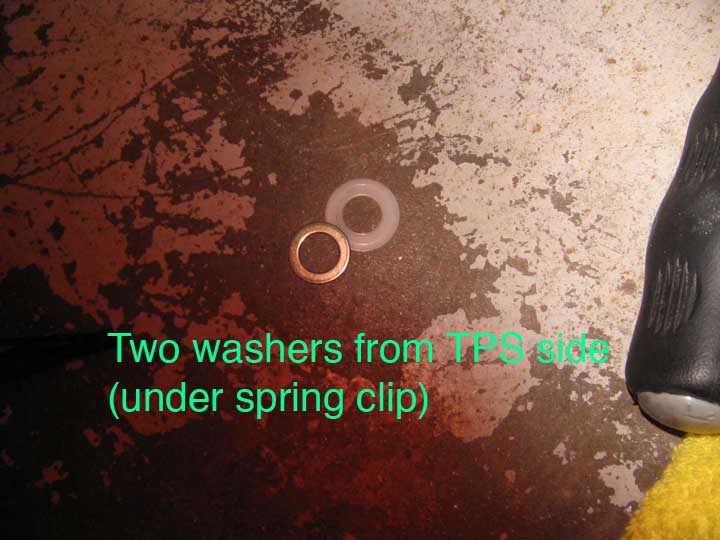
2. Use the spring clip pliers to remove the spring clip on the end of the shaft once the TPS is removed. There is a plastic washer and then a metal washer under it. Set these somewhere safe.
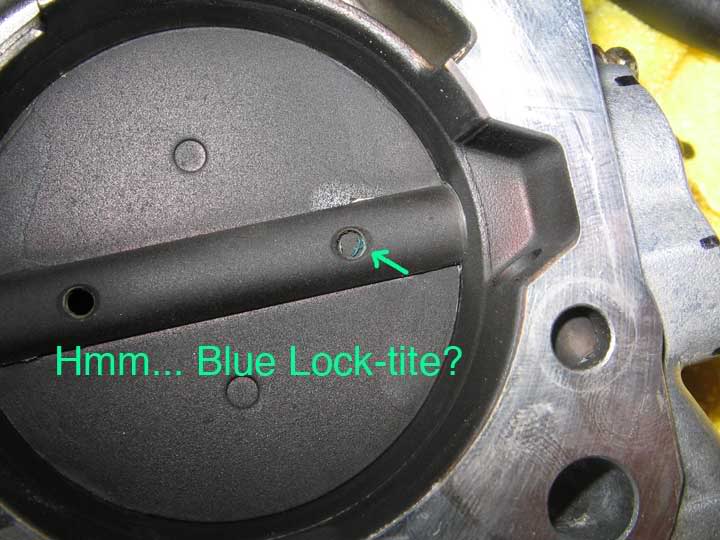
3. Take off the butterfly valve (circular plate in the TB) If you look really closely, you will see that it looks like Mitsu used Blue lock-tite on these bolts. Use the phillips screwdriver.
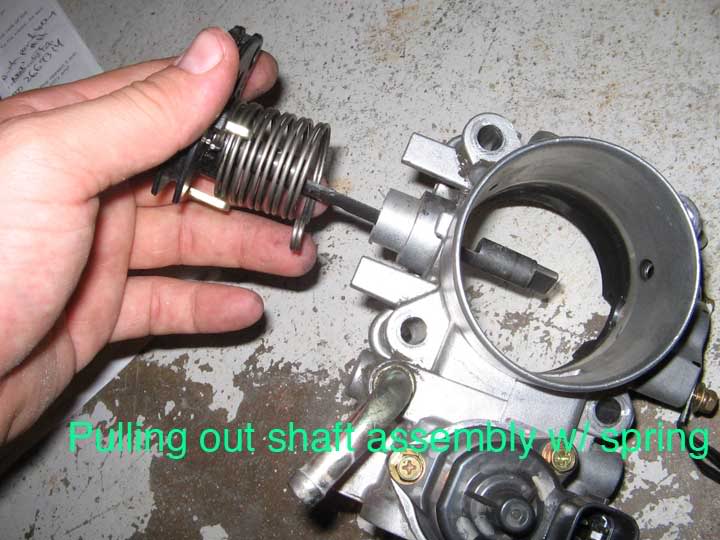
4. Slide out the shaft assembly with the throttle spring still attatched. The spring will unravel some.
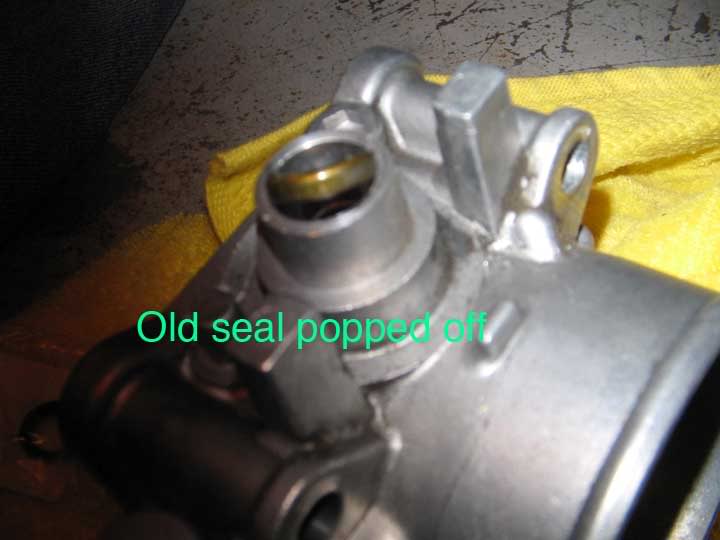
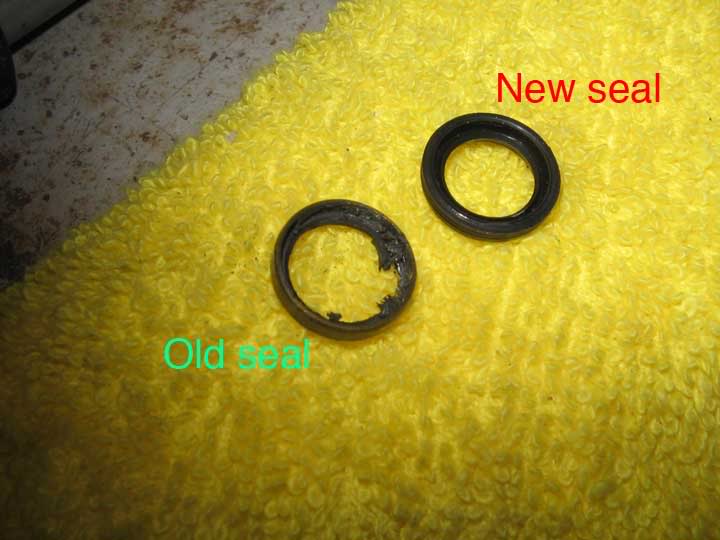
5. Use a flathead to pop out the seals. You will see that it is a metal ring that is pressed into each side of the TB, the seal/oring is bonded to this metal ring on the inside. Pop them out. This wasn't easy and be careful not to score the inside of the TB cylinder where the new seal will be. I tried to get as much of the rubber seal out before prying off the metal ring. This allowed for a better "bite" into the ring to pop it off.

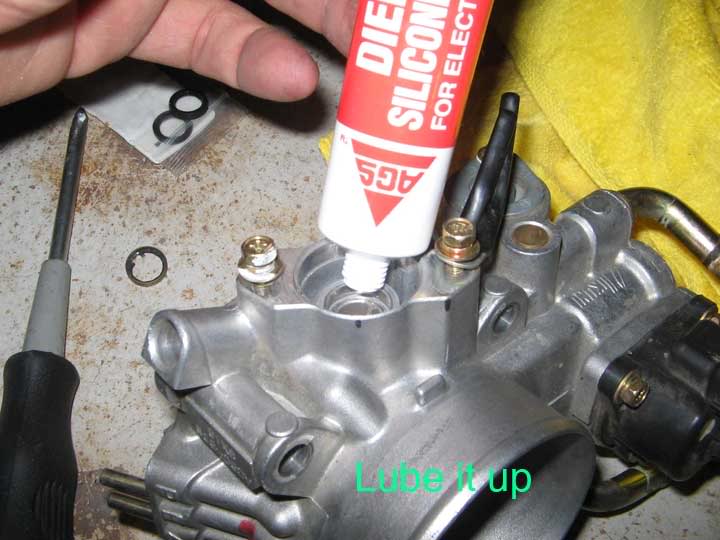
6. Once they're out, put the new ones in. The "open" end of the seal goes inward. Lube them up with the dielectric silicone grease or something similar. Press them in really well.
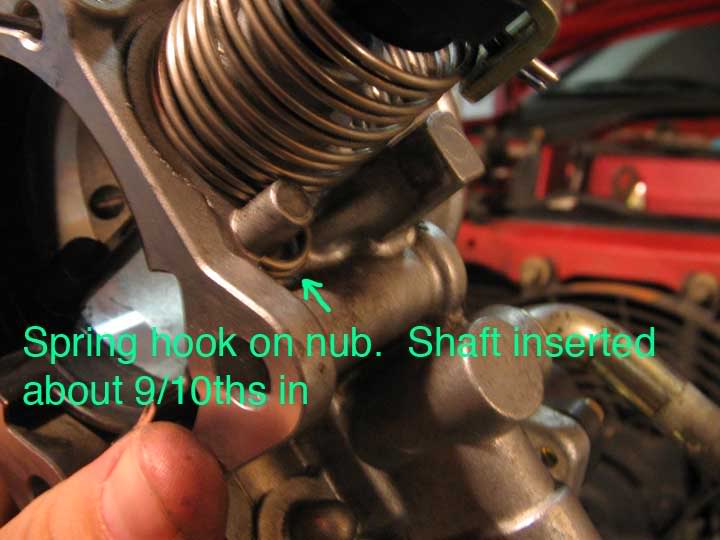
7. Install the shaft back in with the spring attatched. Best bet is to install it about 9-tenths of the way in, then twist the throttle spring so it sets on its catch, then push the rest of the way in. You will need to twist it about a good half turn for it to set on its catch. Make sure the tension is correct.


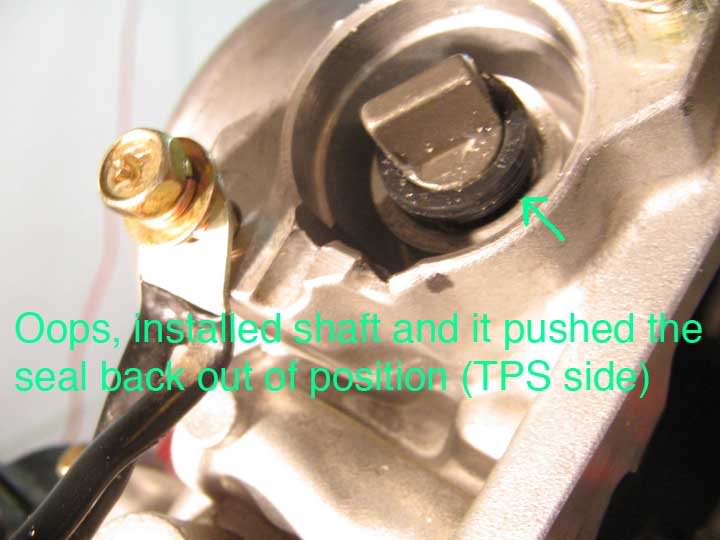
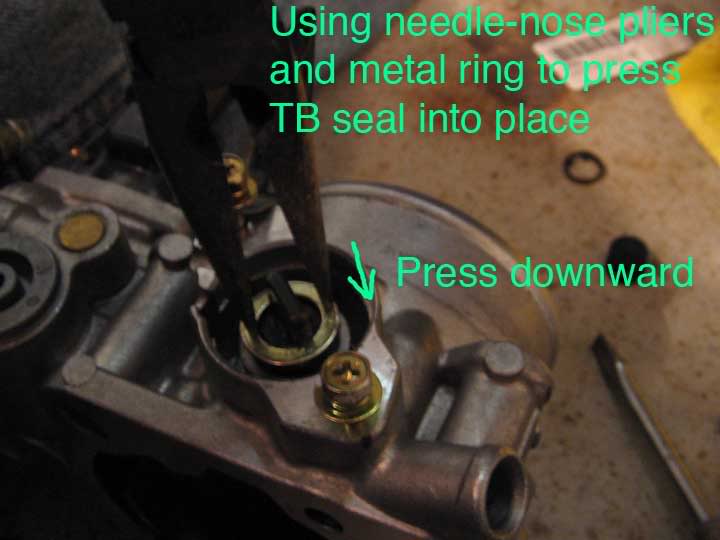
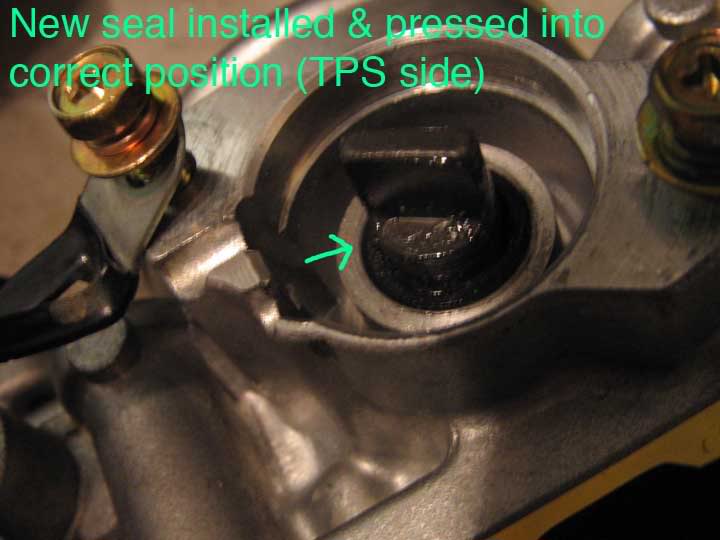
8. Look at the TPS side. Did the seal pop back out when you put the shaft through? No biggie if it did... use the copper washer as a "press" and used some needle-nose pliers to press it back in place where it should be. You can pull the copper washer off to inspect that it is seated properly after you feel its on there correctly.
9. Reinstall the copper washer then the plastic one then the spring clip then your TPS. Make sure your hash marks line up before you tighten it down.
10. Put a little blue locktite on the thread of the Butterfly valve screws. Screw in the plate and you're done. If you installed it correctly, the top of the butterfly valve should open inward to the Intake Manifold side.
Follow the directions backwards of Part One on Removal of the Throttle Body to install it back on your intake manifold.
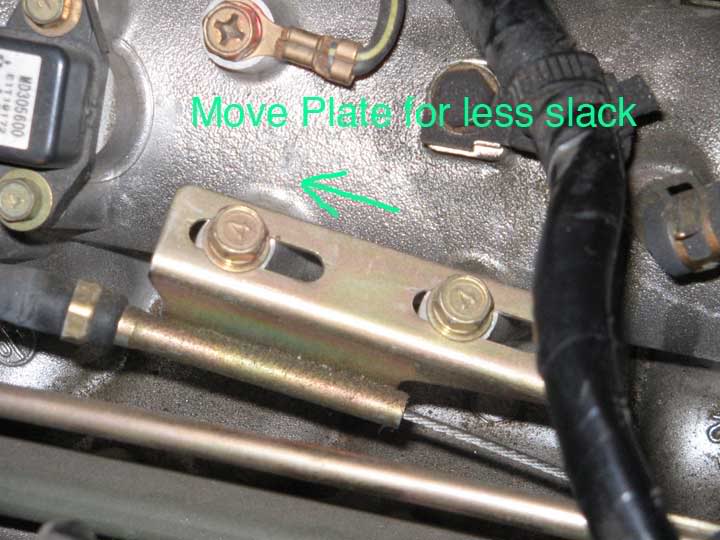
Check the tension of the throttle cable once everything is bolted back on. If you think the cable has a little too much slack in it before it opens the butterfly valve, you can adjust the "free play" i.e. slack in the throttle cable line by shifting the cable mount to the left.
After you have it all dialed in, you can be happy with the fact you have one less boost leak to worry about for awhile. Grab yourself a beer, you deserve it.
Thanks to everyone who posted up info regarding this problem and solution!
Tools you will need:
-10mm socket
-Flathead screwdriver
-Phillips screwdriver
-Needle-nose pliers
-Sharpie
-Locktite Blue
-Dielectric Silicone Grease
-Spring clip pliers with very small tips. If you don't have a pair, you should be able to buy them at most hardware or auto part stores. I bought this pair at Home Depot
Ok now that you have the tools, lets get started
1. Mark the TPS/TB housing with little hash marks so you get it lined up when you re-intall it. The reason for doing this is that there is a preload on the spring inside the TPS and if you dont put the same preload back on the spring when you reinstall it the ECU could be interpreting incorret information and/or your idle may be a little off. Remove the TPS using the 10mm socket on the two bolts.
2. Use the spring clip pliers to remove the spring clip on the end of the shaft once the TPS is removed. There is a plastic washer and then a metal washer under it. Set these somewhere safe.
3. Take off the butterfly valve (circular plate in the TB) If you look really closely, you will see that it looks like Mitsu used Blue lock-tite on these bolts. Use the phillips screwdriver.
4. Slide out the shaft assembly with the throttle spring still attatched. The spring will unravel some.
5. Use a flathead to pop out the seals. You will see that it is a metal ring that is pressed into each side of the TB, the seal/oring is bonded to this metal ring on the inside. Pop them out. This wasn't easy and be careful not to score the inside of the TB cylinder where the new seal will be. I tried to get as much of the rubber seal out before prying off the metal ring. This allowed for a better "bite" into the ring to pop it off.
6. Once they're out, put the new ones in. The "open" end of the seal goes inward. Lube them up with the dielectric silicone grease or something similar. Press them in really well.
7. Install the shaft back in with the spring attatched. Best bet is to install it about 9-tenths of the way in, then twist the throttle spring so it sets on its catch, then push the rest of the way in. You will need to twist it about a good half turn for it to set on its catch. Make sure the tension is correct.
8. Look at the TPS side. Did the seal pop back out when you put the shaft through? No biggie if it did... use the copper washer as a "press" and used some needle-nose pliers to press it back in place where it should be. You can pull the copper washer off to inspect that it is seated properly after you feel its on there correctly.
9. Reinstall the copper washer then the plastic one then the spring clip then your TPS. Make sure your hash marks line up before you tighten it down.
10. Put a little blue locktite on the thread of the Butterfly valve screws. Screw in the plate and you're done. If you installed it correctly, the top of the butterfly valve should open inward to the Intake Manifold side.
Follow the directions backwards of Part One on Removal of the Throttle Body to install it back on your intake manifold.
Check the tension of the throttle cable once everything is bolted back on. If you think the cable has a little too much slack in it before it opens the butterfly valve, you can adjust the "free play" i.e. slack in the throttle cable line by shifting the cable mount to the left.
After you have it all dialed in, you can be happy with the fact you have one less boost leak to worry about for awhile. Grab yourself a beer, you deserve it.
Thanks to everyone who posted up info regarding this problem and solution!
Last edited by nigletsyz; Aug 19, 2006 at 12:17 AM.
The following 2 users liked this post by nigletsyz:
EGbeater (Dec 12, 2023),
t3Turbo9.8 (Jun 8, 2019)
The following users liked this post:
t3Turbo9.8 (Jun 8, 2019)

Thread
Thread Starter
Forum
Replies
Last Post
kohanson
Lancer How Tos / Installations
1
Jun 18, 2008 01:21 PM
Mitchubishievo
Evo Show / Shine
128
Mar 1, 2008 06:30 PM