How To Repair Evo VIII Cloth Recaro
 Oct 30, 2011, 07:19 PM
#1
Newbie
Thread Starter

Join Date: Jun 2011
Location: Cullman, Alabama
Posts: 38
Likes: 0
Received 0 Likes
on
0 Posts
How To Repair Evo VIII Cloth Recaro
Ever since I have owned my car the side bolster on the driver seat has been broken. After doing some reading on here I discovered that it was a common problem among the cloth Recaro seats. So I found some posts on here about repairing them using epoxy but I couldn't find any info about how to take the seat apart. So I just winged it and decided to take some pics that could possibly help others.
The tools you will need (this also covers the repair method that I used).
Flat Head Screw Driver
Philips Head Screw Driver
Rivet Gun w/ 3/16" blind rivets
22ga sheet metal
Dremel w/ cut off wheel
Tin Snips
Sharpie Marker
14mm deep well socket and ratchet
The first thing you want to do is get the seat out of the car, it is held in place by 2 14mm nuts in the front and 2 14mm bolts in the back.
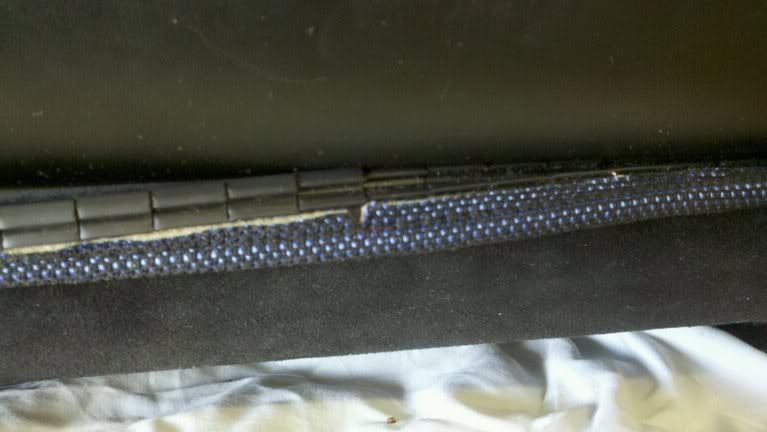
After the seat is out of the car you want to start removing the cloth portion of it. The cloth/ suede material is held in place by some plastic clips. These clips run the length of the bottom of the seat and around the length of the plastic backing on the seat. The pic below shows where they are located along the bottom of the seat. (facing the back of the seat, looking at the lower edge.
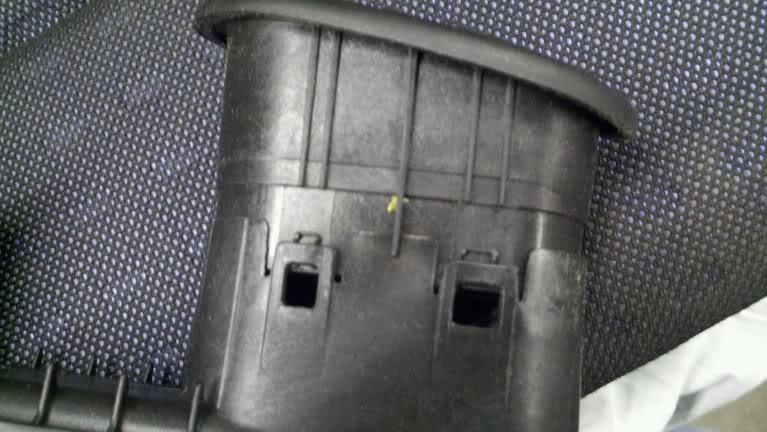
After all the clips have been pulled away from the plastic backing of the seat the next thing to do is to remove the plastic harness openings in the upper part of the seat. These openings snap together and can be pried apart with a screw driver, or maybe just pull them apart like I did. The pic below shows how they go together.
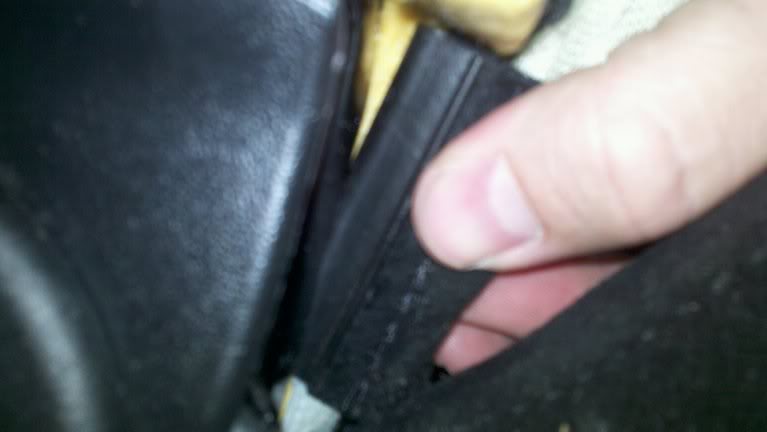
Once those are removed the next thing you will want to pull out will be some more plastic clips on the lower sides of the seat. These are a little different than the ones mentioned before. Pictured below is the removal of these clips. If you are facing the right hand side of the seat, just to the left of the seat belt latch, right where the upper and lower part of the seat meets is where you will find these. They are on each side of the seat. There is a metal frame that they snap to.
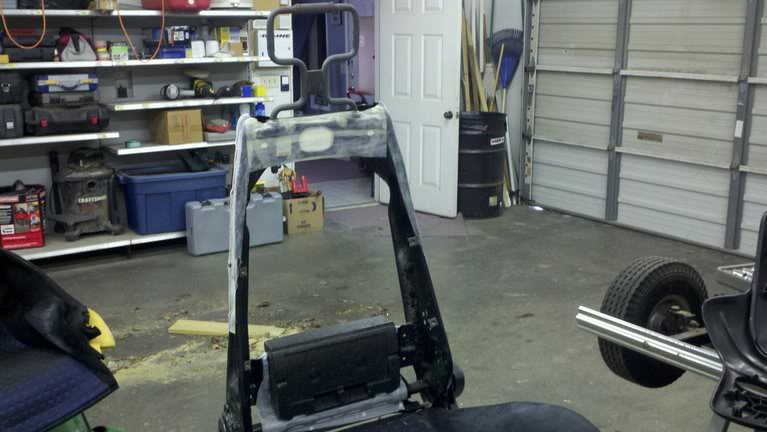
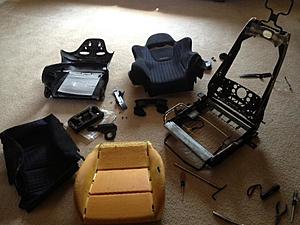
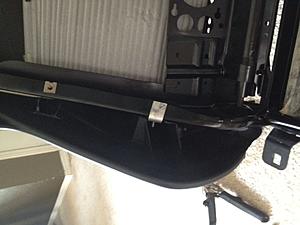
Now that those are off you should be able to slide the foam and cloth off of the plastic seat back. It may take a little work but it will slide straight up and off. Then after the foam is off all you have to do is remove four screws on the front that hold the plastic back to the metal frame. Then unhook the upper part of the plastic back from the metal frame. You should end up with a picture like below.
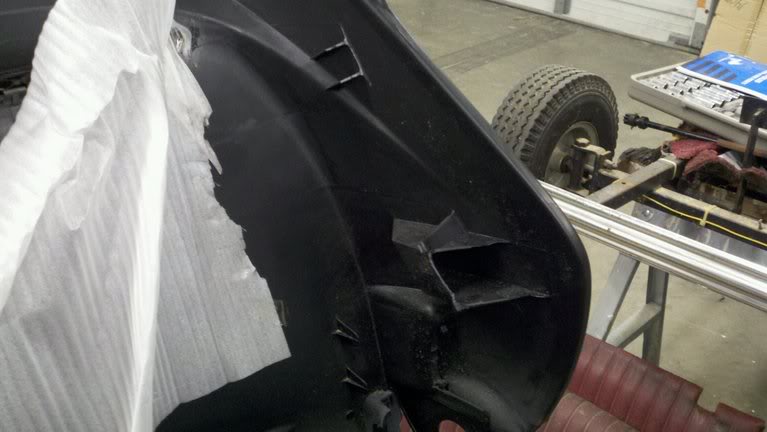
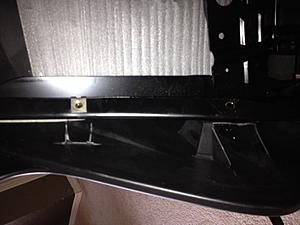
That's it as far as taking the seat apart goes. Now on to the repair. I was going to go the epoxy route but decided to use sheet metal and rivets instead. Mainly because I didn't have any epoxy but I did have the other stuff. If you look at the pic below you will see where the seat is actually broken at. The four plastic arms that you removed the screws from break away from the plastic backing.
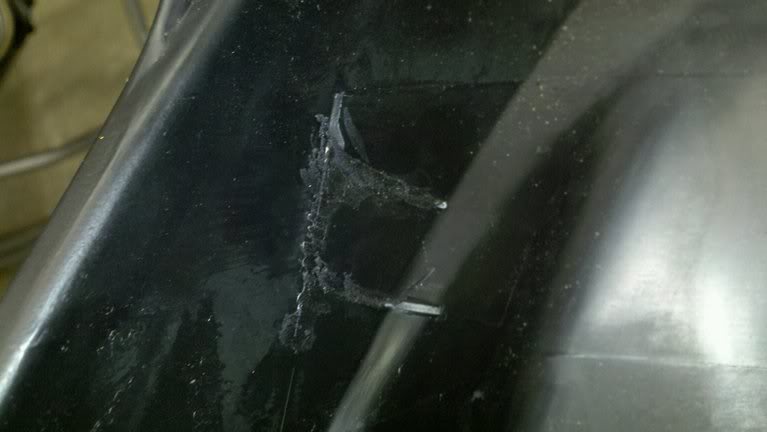
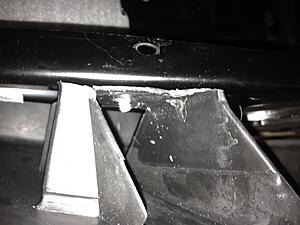
I decided to grind the two upper mount points down and create some new mounts out of the sheet metal. The pic below shows what section I ground flush with the dremel.
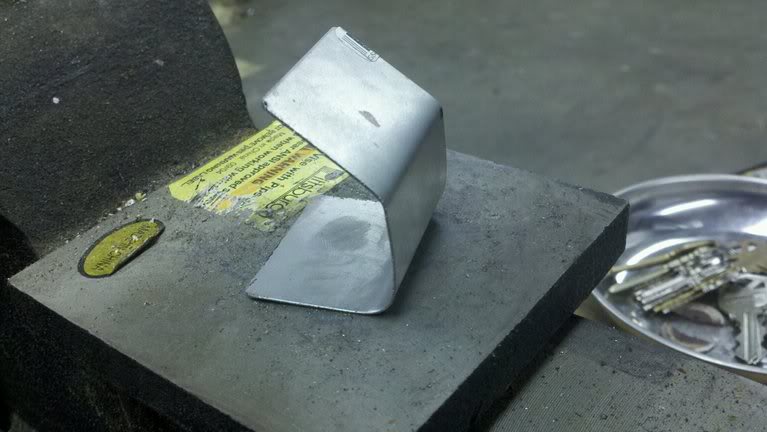
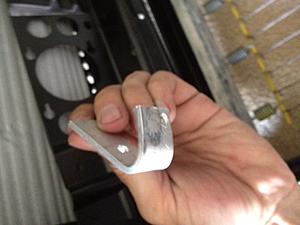
Once you do that on both edges you can go ahead and fab up some metal brackets like below.
Since both side bolsters was broken on my seat i had to make up two of these brackets. On the surface that the bracket is sitting on is where i drilled for my rivets. The other surface is where you will drill for the screw hole. For the lower brackets I made up some simple L shaped brackets that was also drilled for rivets. I used a total of 2 rivets for each bracket, uppers and lowers. The next pic shows the brackets installed.
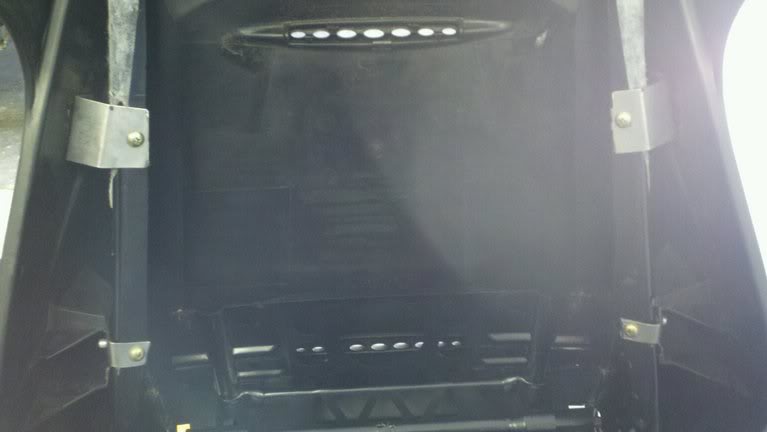
Notice that the top 2 brackets are rivited to the outside surface of the plastic backing and the lower brackets are rivited to the internal structure. So keep in mind if you do decide to go this route with the rivets you will have at least 4 of them exposed on the outside surface of the seat.
After all that you basically put the seat back together reversing the steps used to take it apart. Then you can kick back and relax in your repaired seat lol.
After getting it back in the car and driving around for a little bit it felt really solid. Like a new seat. I also want to point out that I am in no way responsible for what you may damage in doing this procedure. Just take your time, go slow, and be cautious of what you are doing.
The tools you will need (this also covers the repair method that I used).
Flat Head Screw Driver
Philips Head Screw Driver
Rivet Gun w/ 3/16" blind rivets
22ga sheet metal
Dremel w/ cut off wheel
Tin Snips
Sharpie Marker
14mm deep well socket and ratchet
The first thing you want to do is get the seat out of the car, it is held in place by 2 14mm nuts in the front and 2 14mm bolts in the back.
After the seat is out of the car you want to start removing the cloth portion of it. The cloth/ suede material is held in place by some plastic clips. These clips run the length of the bottom of the seat and around the length of the plastic backing on the seat. The pic below shows where they are located along the bottom of the seat. (facing the back of the seat, looking at the lower edge.
After all the clips have been pulled away from the plastic backing of the seat the next thing to do is to remove the plastic harness openings in the upper part of the seat. These openings snap together and can be pried apart with a screw driver, or maybe just pull them apart like I did. The pic below shows how they go together.
Once those are removed the next thing you will want to pull out will be some more plastic clips on the lower sides of the seat. These are a little different than the ones mentioned before. Pictured below is the removal of these clips. If you are facing the right hand side of the seat, just to the left of the seat belt latch, right where the upper and lower part of the seat meets is where you will find these. They are on each side of the seat. There is a metal frame that they snap to.
Now that those are off you should be able to slide the foam and cloth off of the plastic seat back. It may take a little work but it will slide straight up and off. Then after the foam is off all you have to do is remove four screws on the front that hold the plastic back to the metal frame. Then unhook the upper part of the plastic back from the metal frame. You should end up with a picture like below.
That's it as far as taking the seat apart goes. Now on to the repair. I was going to go the epoxy route but decided to use sheet metal and rivets instead. Mainly because I didn't have any epoxy but I did have the other stuff. If you look at the pic below you will see where the seat is actually broken at. The four plastic arms that you removed the screws from break away from the plastic backing.
I decided to grind the two upper mount points down and create some new mounts out of the sheet metal. The pic below shows what section I ground flush with the dremel.
Once you do that on both edges you can go ahead and fab up some metal brackets like below.
Since both side bolsters was broken on my seat i had to make up two of these brackets. On the surface that the bracket is sitting on is where i drilled for my rivets. The other surface is where you will drill for the screw hole. For the lower brackets I made up some simple L shaped brackets that was also drilled for rivets. I used a total of 2 rivets for each bracket, uppers and lowers. The next pic shows the brackets installed.
Notice that the top 2 brackets are rivited to the outside surface of the plastic backing and the lower brackets are rivited to the internal structure. So keep in mind if you do decide to go this route with the rivets you will have at least 4 of them exposed on the outside surface of the seat.
After all that you basically put the seat back together reversing the steps used to take it apart. Then you can kick back and relax in your repaired seat lol.
After getting it back in the car and driving around for a little bit it felt really solid. Like a new seat. I also want to point out that I am in no way responsible for what you may damage in doing this procedure. Just take your time, go slow, and be cautious of what you are doing.
Last edited by WS111; Apr 30, 2013 at 07:20 AM.


 You look great in that seat by the way, aren't you too tall for an EVO though
Trending Topics
Dec 7, 2011, 09:15 PM
#8
Newbie
iTrader: (8)

Join Date: Jun 2011
Location: Buffalo, NY
Posts: 39
Likes: 0
Received 0 Likes
on
0 Posts
do they sell replacement Recaro covers that slide over the seat? i see a lot of the suede ones are pretty beat looking and it doesn't seem like you can do much to bring the suede back to life

 Aug 10, 2012, 11:35 AM
#12
I came up with a new way to fix the broken side bolsters today. I like it better then using epoxy because it is stronger and will last longer, and I like it better then using rivets because this fix can't be seen from the outside.
This was a very simple and easy to make with a few hand tools, metal saw, drill, 1/8" thick flat aluminum bar, and 2 bolts and nuts per bolster.
The first step is to disassemble the seats. This is covered well in the opening post. I took mine apart a little more because I will also be fixing a hole in the seat bottom foam along with two worn out panels of Alcantara.
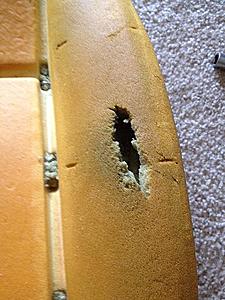
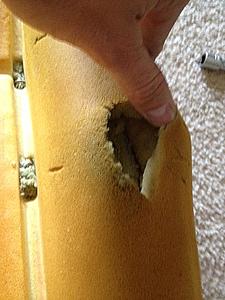
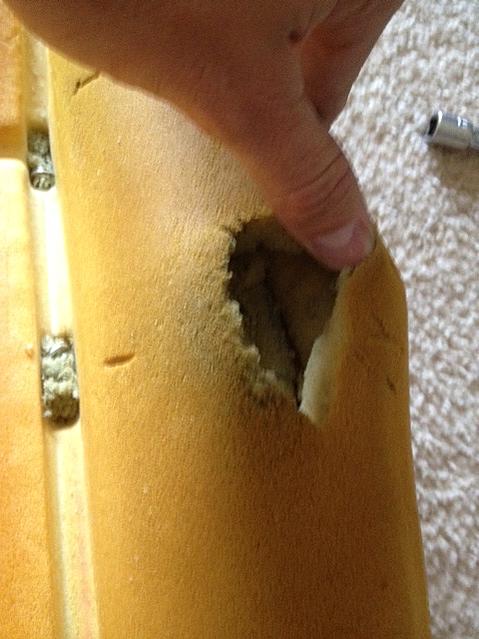
As you can see here, both of the bolster attachment points on the right side of the seat are completely broken. This is a very common problem with the seats. The bolsters are made entirely of plastic which was a very poor design on Recaro's part.
The first thing I did was drill a hole through the metal frame and the plastic bolster. I used a 3/16" drill bit to fit some bolts I had laying around. At first my plan was just to bolt it down right here but after thinking it through I decided to beef it up a bit.
Next I made a simple bracket out of some 1/8" flat aluminum. I bolted it to the hole I had already drilled and bent it around the metal frame with a hammer and then drilled a second hole to bolt it to the frame. With just this one attachment point this side feels stronger then the other side with both original attachment points.
Here is is bolted down. I was also able to reinstall the other plastic piece the screwed on top of the bolsters over my new bracket. I put it back on in case it is needed to keep the foam lined up properly.
I will be posting more pictures as I continue this project including how to repair the foam and how to replace the Alcantara fabric in the seats. I will also be posting up the actual Alcantara part number and the USA distributor (since the fabric is made in Italy).
This was a very simple and easy to make with a few hand tools, metal saw, drill, 1/8" thick flat aluminum bar, and 2 bolts and nuts per bolster.

The first step is to disassemble the seats. This is covered well in the opening post. I took mine apart a little more because I will also be fixing a hole in the seat bottom foam along with two worn out panels of Alcantara.

As you can see here, both of the bolster attachment points on the right side of the seat are completely broken. This is a very common problem with the seats. The bolsters are made entirely of plastic which was a very poor design on Recaro's part.

The first thing I did was drill a hole through the metal frame and the plastic bolster. I used a 3/16" drill bit to fit some bolts I had laying around. At first my plan was just to bolt it down right here but after thinking it through I decided to beef it up a bit.

Next I made a simple bracket out of some 1/8" flat aluminum. I bolted it to the hole I had already drilled and bent it around the metal frame with a hammer and then drilled a second hole to bolt it to the frame. With just this one attachment point this side feels stronger then the other side with both original attachment points.

Here is is bolted down. I was also able to reinstall the other plastic piece the screwed on top of the bolsters over my new bracket. I put it back on in case it is needed to keep the foam lined up properly.
I will be posting more pictures as I continue this project including how to repair the foam and how to replace the Alcantara fabric in the seats. I will also be posting up the actual Alcantara part number and the USA distributor (since the fabric is made in Italy).
Last edited by 9!'clipseDOHC; Aug 10, 2012 at 11:37 AM.
The following users liked this post:
PlanetX (Aug 10, 2023)
Aug 10, 2012, 03:27 PM
#14
The second part for me after fixing the bolster was filling in the hole in the seat bottom foam. I bought a 1" x 12" x 12" square of poly foam from Hobby Lobby for about $2. You should be able to get this at any fabric or arts and craft store. I cut out a section about the same size as my hole and shoved it in. I then cut a few smaller pieces to pack everything in nice and tight. Once I had a good fit I sprayed it with 3M general trim adhesive to hold everything together.
The hole in my seat bottom.

The foam I used to fill the hole.

All filled.
The last step will be cutting out the two damaged panels and replacing them with the new Alcantara. Alcantara's US distributer is Gulf Fabrics, INC in Tampa, Florida. The color code to match the Evo 8 Recaro seats is 9040 which is Jet Black. It comes in two different weights, panel weight and seat cover weight. Obviously seat cover weight is what is needed for this project. The fabric is not cheap though, it comes out to a little over $100 a yard.
The following users liked this post:
PlanetX (Aug 10, 2023)
