
How to Install "The Big 3" to your Lancer / Evo


Thread Starter
Account Disabled
Joined: Jun 2012
Posts: 22
Likes: 0
From: Australia , QLD , Bundaberg
Hello, i have noticed that a few people have asked about "The Big 3", and that even more people have no idea about what it is. So Ive decided to post a guide on what you will need and how to install "The Big 3"
"The Big 3" are wires in your engine bay, your Alternator +ve, Engine to Chassis ground and your Battery to chassis ground.
The reason these cables are upgraded is to allow more current to pass through them, this is an upgrade normally performed if you have an aftermarket sound system in your car. By doing this you can help to eliminate that humming noise that your alternator makes and also improve the flow of volts through to your audio system.
First off I am in no way a professional Audio installer or at engine wiring, therefore i am in no way responsible for any damage you may cause while doing this upgrade.
What you'll need to get started; 2 meters of 0gauge, 6 ring terminals, an in-line fuss case & fuse (between 80-100amps), Blow torch / soldering ion and solider.
Step 1: Remove the battery from the car. Remember to always disconnect the -ve cable first.
Step 2: Take the 2m of 0gauge and on one end attach and solider 1 of the ring terminals ( Ive chosen to use battery ring terminals as they are stronger).
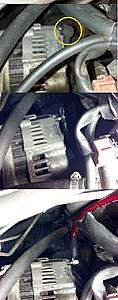
Step 3: Remove the +ve cable from the alternator, this will be easy to find as it is the cable encased in rubber.
Once you have found that unbolt and remove it. Tape off the end of the cable you just removed and secure it to another cable.
Now Attach your 0gauge ring terminal and tighten it up in the position you want it to face.
Step 4: Run the rest off the 0gauge up against the firewall to wards to battery location. ( i found an A/C pipe and ran it along that). Once at the battery location pull tight and secure the cable where need be.
You should now have something that looks like this,
Step 5: Now you will need to cut your 0gauge cable so it meets up where your +ve terminal on your battery would be. (its OK to cut it abit short here as you will need to add an in-line fuse to this cable). Once you have cut it to size measure down 8-12 inches. cut the 0gauge there(this is where you fuse will go). Install your fuse to the end still in the car, and solider on the ring terminal to the other part of the cable.
LIKE THIS;
finish putting the fuse together and you have now finished that alternator upgrade.
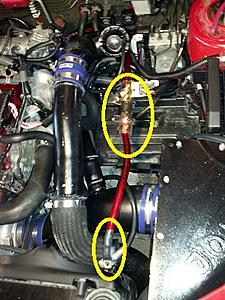
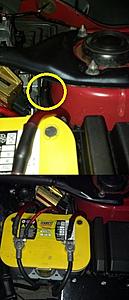
Step 6: The Engine ground, Again take your 0gauge and measure up how much you will need, the engine runs to a bolt just near your fuse box (look for a black cable with yellow dashes on it. ( Remember you want to make this as short as you can).
Once you have the right length cut solider a ring terminal to each end.
Now bolt the cable to the engine and run your cable to the location of your choice ( i chose just to use the factory ground it already had)
That is now your engine ground upgraded.
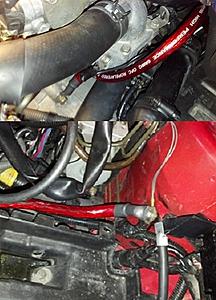
Step 7: The battery ground, this one is the easiest of them all. you only want to use between 8-12 inches of cable for this one ( which is how much you should have left over from the 2m's). Simply solider a ring terminal at each end, and fins a suitable location. ( i used a spot just on the side of the strut tower.
Step 8: Tidy up any wires you need to and place the battery back into the car. Remember this time you connect to +ve before the -ve.
Congrats you have just finish 'The Big 3" wire upgrade to your car.
Please feel free to leave comments/questions.
"The Big 3" are wires in your engine bay, your Alternator +ve, Engine to Chassis ground and your Battery to chassis ground.
The reason these cables are upgraded is to allow more current to pass through them, this is an upgrade normally performed if you have an aftermarket sound system in your car. By doing this you can help to eliminate that humming noise that your alternator makes and also improve the flow of volts through to your audio system.
First off I am in no way a professional Audio installer or at engine wiring, therefore i am in no way responsible for any damage you may cause while doing this upgrade.
What you'll need to get started; 2 meters of 0gauge, 6 ring terminals, an in-line fuss case & fuse (between 80-100amps), Blow torch / soldering ion and solider.
Step 1: Remove the battery from the car. Remember to always disconnect the -ve cable first.
Step 2: Take the 2m of 0gauge and on one end attach and solider 1 of the ring terminals ( Ive chosen to use battery ring terminals as they are stronger).
Step 3: Remove the +ve cable from the alternator, this will be easy to find as it is the cable encased in rubber.
Once you have found that unbolt and remove it. Tape off the end of the cable you just removed and secure it to another cable.
Now Attach your 0gauge ring terminal and tighten it up in the position you want it to face.

Step 4: Run the rest off the 0gauge up against the firewall to wards to battery location. ( i found an A/C pipe and ran it along that). Once at the battery location pull tight and secure the cable where need be.
You should now have something that looks like this,
Step 5: Now you will need to cut your 0gauge cable so it meets up where your +ve terminal on your battery would be. (its OK to cut it abit short here as you will need to add an in-line fuse to this cable). Once you have cut it to size measure down 8-12 inches. cut the 0gauge there(this is where you fuse will go). Install your fuse to the end still in the car, and solider on the ring terminal to the other part of the cable.
LIKE THIS;

finish putting the fuse together and you have now finished that alternator upgrade.
Step 6: The Engine ground, Again take your 0gauge and measure up how much you will need, the engine runs to a bolt just near your fuse box (look for a black cable with yellow dashes on it. ( Remember you want to make this as short as you can).

Once you have the right length cut solider a ring terminal to each end.
Now bolt the cable to the engine and run your cable to the location of your choice ( i chose just to use the factory ground it already had)

That is now your engine ground upgraded.
Step 7: The battery ground, this one is the easiest of them all. you only want to use between 8-12 inches of cable for this one ( which is how much you should have left over from the 2m's). Simply solider a ring terminal at each end, and fins a suitable location. ( i used a spot just on the side of the strut tower.

Step 8: Tidy up any wires you need to and place the battery back into the car. Remember this time you connect to +ve before the -ve.
Congrats you have just finish 'The Big 3" wire upgrade to your car.
Please feel free to leave comments/questions.

Newbie
Joined: Jun 2012
Posts: 9
Likes: 0
From: 63oh
Step 3: Remove the +ve cable from the alternator, this will be easy to find as it is the cable encased in rubber.
Once you have found that unbolt and remove it. Tape off the end of the cable you just removed and secure it to another cable.
Now Attach your 0gauge ring terminal and tighten it up in the position you want it to face.
NO HORRIBLE ADVICE!!!!!!!!!
Never remove factory wiring. The point of the big 3 is to upgrade the wiring, not replace it. Never just cut wires and tie them off and leave them there, you dont know what else that could be connected to (in this case, its probably fine, but its not a habit to get into) and what happens if that loose wire comes uncovered and hits something? BAD NEWS....leave the original alt to batt, then bolt the 1/0 and run that as well. you arent supposed to replace the wire, youre adding to it. Also, the fuse should be closer to the alternator, not the battery.
Thread Starter
Account Disabled
Joined: Jun 2012
Posts: 22
Likes: 0
From: Australia , QLD , Bundaberg
If you are going to do 0gauge to the alternator it would be best to to make them all 0gauge. the rule of thumb keep them all the same. i was running just a 4gauge batt ground b4 the upgrade ( only because of the 4gauge power cable for my amps).
Thread Starter
Account Disabled
Joined: Jun 2012
Posts: 22
Likes: 0
From: Australia , QLD , Bundaberg
Step 3: Remove the +ve cable from the alternator, this will be easy to find as it is the cable encased in rubber.
Once you have found that unbolt and remove it. Tape off the end of the cable you just removed and secure it to another cable.
Now Attach your 0gauge ring terminal and tighten it up in the position you want it to face.
NO HORRIBLE ADVICE!!!!!!!!!
Never remove factory wiring. The point of the big 3 is to upgrade the wiring, not replace it. Never just cut wires and tie them off and leave them there, you dont know what else that could be connected to (in this case, its probably fine, but its not a habit to get into) and what happens if that loose wire comes uncovered and hits something? BAD NEWS....leave the original alt to batt, then bolt the 1/0 and run that as well. you arent supposed to replace the wire, youre adding to it. Also, the fuse should be closer to the alternator, not the battery.
Once you have found that unbolt and remove it. Tape off the end of the cable you just removed and secure it to another cable.
Now Attach your 0gauge ring terminal and tighten it up in the position you want it to face.
NO HORRIBLE ADVICE!!!!!!!!!
Never remove factory wiring. The point of the big 3 is to upgrade the wiring, not replace it. Never just cut wires and tie them off and leave them there, you dont know what else that could be connected to (in this case, its probably fine, but its not a habit to get into) and what happens if that loose wire comes uncovered and hits something? BAD NEWS....leave the original alt to batt, then bolt the 1/0 and run that as well. you arent supposed to replace the wire, youre adding to it. Also, the fuse should be closer to the alternator, not the battery.
To start off with u are correct DONT cut the terminal off, but the whole point of the upgrade to to give the alternator more power... hence y u remove the factory cable from it... at no time did i say to remove the cable from the fuse terminal on the factory setup. the reason u cant c mine is that i have hidden n lengthened the cable.
Also removing the terminal has nothing to do with nething else connected to it, so that statement is wrong as well.
Im not sure sure on what you know about the subject but so far what u are stating about this upgrade is wrong. there is alot of crap info about this out there and confused ppl thinking they are right. Im not saying im 100% right but ive done alot of research on this topic because ppl get it wrong so often.
The whole point of this is to add more current to the alt, Once u put the 0gauge to it your factory is no longer needed, u can keep it they but there is no point what so ever. and if ur that worried about it touching something else heat shrink it a few times wrap it in extra elec tape, trust me it wont touch a think.
and as for the fuse i hope u dont apply that think to ur sound system. the whole reason the fuse is closer to the batt is to cut of the current as far away from the alt so there will b no damage.
everything i have done i have researched and talked to my friends that work in the car audio industry, i would not have done anything to my car if i was not 100% on what i was doing nor would i tell others.
Newbie
Joined: Jun 2012
Posts: 9
Likes: 0
From: 63oh
To start off with u are correct DONT cut the terminal off, but the whole point of the upgrade to to give the alternator more power... hence y u remove the factory cable from it... at no time did i say to remove the cable from the fuse terminal on the factory setup. the reason u cant c mine is that i have hidden n lengthened the cable.
Also removing the terminal has nothing to do with nething else connected to it, so that statement is wrong as well.
Im not sure sure on what you know about the subject but so far what u are stating about this upgrade is wrong. there is alot of crap info about this out there and confused ppl thinking they are right. Im not saying im 100% right but ive done alot of research on this topic because ppl get it wrong so often.
The whole point of this is to add more current to the alt, Once u put the 0gauge to it your factory is no longer needed, u can keep it they but there is no point what so ever. and if ur that worried about it touching something else heat shrink it a few times wrap it in extra elec tape, trust me it wont touch a think.
and as for the fuse i hope u dont apply that think to ur sound system. the whole reason the fuse is closer to the batt is to cut of the current as far away from the alt so there will b no damage.
everything i have done i have researched and talked to my friends that work in the car audio industry, i would not have done anything to my car if i was not 100% on what i was doing nor would i tell others.
this doesnt add amperage anywhere. It lowers resistance and allows for better electrical flow from the alt to battery, etc... and the fuse should be closer to the power source, your fuse for your system is close to the battery. DO you know why you fuse? It is to protect the wire carrying all that current. You dont put your fuse for your stereo in back do you? No. The point of the fuse is the fuse blows before the wire shorts and catches on fire from overheating. Thats why you fuse within 18 in of the power source. Since in this case, its the alternator, you would fuse within 18 in of the alt. For your main run (i ran 1/0) to the trunk, you fuse within 18" of the battery there as well. Ive been doing car audio for years, and have worked in it, and researched the **** out of it. Do some more research. You had most of the details right, but some things you couldnt be more wrong.
Last edited by siucsaluki11; Jun 17, 2012 at 05:34 AM.
Newbie
Joined: Jun 2012
Posts: 9
Likes: 0
From: 63oh
http://www.stevemeadedesigns.com/boa...ig-3-tutorial/
this is a great tutorial, notice at the start, he says add NOT replace. Every place I've ever looked up info on the big 3, and every class i took, book i read, shop I've worked for/talked to, says add DONT replace. unless you plan on replacing the whole run of wire. you don't just disconnect and run a new one and call it done. if you zoom in on the pic of when his is finished, you'll notice that he still has the factory alt + still connected.
Trending Topics

Newbie
Joined: Feb 2012
Posts: 57
Likes: 0
From: Staten Island, NY
Thanks not gonna be able to install the alternator yet i just realized i only have a 30amp fuse so i have to either order some or im gonna go to the store in a few to see if they have it but i doubt they will  / kinda bites i had everything prepped and ready to go
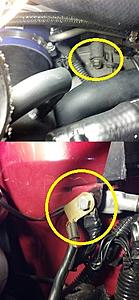
  dah well ive heard of people not fusing it but its not a must situation so i will just wait.. BTW on the engine block to chassis whats the screw on the chassis for? any idea its just a screw thats left unused lol
/ kinda bites i had everything prepped and ready to go dah well ive heard of people not fusing it but its not a must situation so i will just wait.. BTW on the engine block to chassis whats the screw on the chassis for? any idea its just a screw thats left unused lol
Thread Starter
Account Disabled
Joined: Jun 2012
Posts: 22
Likes: 0
From: Australia , QLD , Bundaberg
Newbie
Joined: Feb 2012
Posts: 57
Likes: 0
From: Staten Island, NY
I have a pic with the screw circled in red on the first post but if you need a better picture let me know.. BTW I'm done! I'm kinda upset i don't notice any difference with it really i mean the only one i really noticed a difference with is the battery to chassis.. Although i did notice when you start the car you know the computer has to relearn and last time it was and i had the AC on id come to a complete stop and the voltage would drop to like 13.1 then slowly climb up to 14.1ish now since the alternator to positive it doesn't do that might drop to 13.8/9 then right back to 14.2 all and all it is semi useful and looks awesome! and gives you a reason to work on your car 