How to: swap front sway bar on Evo 8/9 without disconnecting the steering rack
 Sep 19, 2013, 12:17 PM
#1
How to: swap front sway bar on Evo 8/9 without disconnecting the steering rack
10 steps to remove the front sway bar WITHOUT messing with the steering rack
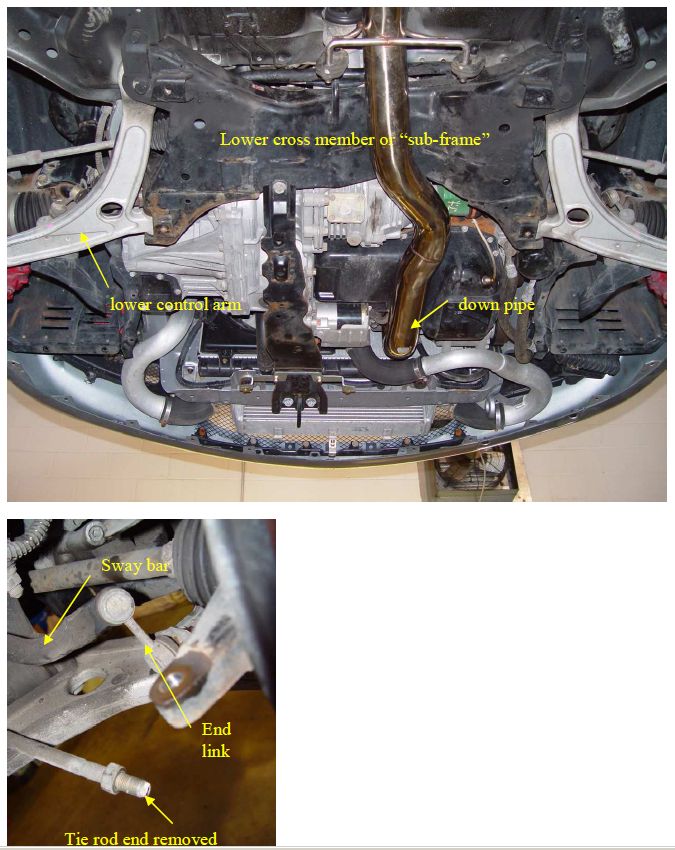
1. Jack up front end of car; support with jackstands. Make sure the e-brake is on. Remove both front wheels (optional, but it'll make everything easier; and it takes all of two minutes).
2. Take a picture of the end of the swaybar (where it connects to the end link) before you start removing it. This sounds stupid, but it will likely be helpful later.
3. Remove the fixing bolts of swaybar end links to front swaybar.
4. Remove the long bolt/nut that attaches the rear transmission mount to the connector-bushing-thing that goes down to the subframe crossmember for the front suspension. You'll need two 14mm box wrenches (or a 14mm box wrench and a 14mm socket/ratchet). You can do this from either the top (i.e., through the engine compartment, reaching down and back below the IM and the intake piping), or from underneath the car. Either way the access is difficult and annoying. Taking the time to remove the intake piping to the throttle body might make this task a lot easier to do from the top, but I didn't bother.
5. Remove the downpipe (two 14mm headed bolts to the O2 housing, two bolts from the downpipe to the cat or test pipe, plus two 12mm headed bolts for the rear downpipe hangers). Have something ready to prop up the rest of the exhaust system with, like a jack stand, the OEM scissor jack, a block of wood, or even a cardboard box. If you still have the OEM cross braces, I believe you'll need to remove those before pulling the downpipe.
6. Remove the lower engine cross member (the brace that is mounted parallel with the chassis direction and has a tow loop at the front). If you have an upgraded/polyurethane passenger side engine mount, the engine won't drop or move at all when you remove the lower crossmember.
7. Remove the two 14mm headed bolts at the very back of the subframe crossmember, one per side.
8. Remove the two long 19mm headed bolts and two 19mm nuts that attach the subframe crossmember to the unibody. You'll need an extension to get to the nuts (access is through round holes in the lower control arms). Since you didn't disconnect any of the steering rack components, the crossmember will not fall down more than about 3" or so. In fact, you might have to pull on it a little to get it to shift downwards after you'll pulled all the mounting bolts.
9. After you've pulled the subframe crossmember down as far as it will drop, remove the two 12mm headed bolts that attach each of the swaybar bushing brackets to the top of the crossmember. You can get the rearward bolt easily from the back of the crossmember, but the best access to the front bolt is from the SIDE (i.e., towards the hub assembly). I used a long 12mm box wrench for breaking loose both bolts, then a deep 12mm socket (the socket alone, no ratchet wrench) to spin the front bolts out once I had them loosened.
10. Once you have the four 12mm headed swaybar bushing attachment bolts removed, you can pull the swaybar out. Push one end of the swaybar out to the side (towards the wheel area) and work to get the other end out from between the unibody and the crossmember. Once you've done that, it's easy to get the rest of the bar out. I did it by myself and without using any pry bars (although I have them) just to prove it could be done. I'm not a particularly experienced mechanic nor am I really strong, so if I can do it, anyone can!
Step 4 kinda sucks. Other than that, the job is pretty straightforward and easy. Does take some time, and if you've had catchcan overflow issues in the past like I have, your crossmember/steering rack is likely to be coated in black oil and dirt and sand/pebbles, so it might be a dirty job too.
Still, no reason anyone who's done simple DIY tasks like swapping out the OEM suspension for coilovers, or even installed a rear swaybar, should have any major problems swapping the front sway bar on an Evo 8/9.
Reinstallation of the front bar (aftermarket or OEM) is pretty much the reverse of the removal steps, with a few important notes:
1. Refer to the cell phone pic you took of the end of the swaybar installed earlier to make sure you don't try to install the new bar upsidedown. It happens.
2. Once you've got the bar positioned correctly and the four 12mm headed bolts that attach the bushing brackets to the subframe crossmember fully tightened, you can push the crossmember back up and get the 19mm crossmember bolts and nuts started. The OEM scissor jack I mentioned earlier will be useful for lifting/holding the crossmember up. Tighten the crossmember bolts and nuts about 80% of the way, then STOP!
3. Before you finish tightening the fasteners that attach the crossmember to the car, put the rear transmission mount bolt/nut back in. You'll need the movement of the crossmember still being loose in order to get the bolt to line up with the holes in the bracket with the center hole in the bushing.
Once you've got that rear mount bolt through and tighten it to the nut, you can go back to reassemblying the rest of the car... the other steps are not critical in terms of the order of reassembly.
NOTE: your alignment will likely be changed a little from R&R-ing the cross member, as there's enough play in the mounting holes to affect the toe and camber slightly. Plan on having the car re-aligned after swapping the front swaybar, although it'll probably be perfectly driveable and not be off very much.
Last edited by EGbeater; Jul 17, 2014 at 04:59 PM. Reason: revised wording for clarity

The following users liked this post:
sducharme (Sep 11, 2022)

 Sep 27, 2013, 02:33 PM
#4

10 steps to remove the front sway bar WITHOUT messing with the steering rack
1. Jack up front end of car; support with jackstands. Make sure the e-brake is on. Remove both front wheels (optional, but it'll make everything easier; and it takes all of two minutes).
2. Take a picture of the end of the swaybar (where it connects to the end link) before you start removing it. This sounds stupid, but it will likely be helpful later.
3. Remove the fixing bolts of swaybar end links to front swaybar.
4. Remove the long bolt/nut that attaches the rear transmission mount to the connector-bushing-thing that goes down to the crossmember. You'll need two 14mm box wrenches (or a 14mm box wrench and a 14mm socket/ratchet). You can do this from either the top (i.e., through the engine compartment, reaching down and back below the IM and the intake piping), or from underneath the car. Either way the access is difficult and annoying. Taking the time to remove the intake piping to the throttle body might make this task a lot easier to do from the top, but I didn't bother.
5. Remove the downpipe (two 14mm headed bolts to the O2 housing, two bolts from the downpipe to the cat or test pipe, plus two 12mm headed bolts for the rear downpipe hangers). Have something ready to prop up the rest of the exhaust system with, like a jack stand, the OEM scissor jack, a block of wood, or even a cardboard box. If you still have the OEM cross braces, I believe you'll need to remove those before pulling the downpipe.
6. Remove the lower engine cross member (mounted parallel with the chassis direction). If you have an upgraded/polyurethane passenger side engine mount, the engine won't drop or move at all when you remove the lower crossmember.
7. Remove the two 14mm headed bolts at the very back of the crossmember, one per side.
8. Remove the two long 19mm headed bolts and two 19mm nuts that attach the crossmember to the unibody. You'll need an extension to get to the nuts (access is through round holes in the lower control arms). Since you didn't disconnect any of the steering rack components, the crossmember will not fall down more than about 3" or so. In fact, you might have to pull on it a little to get it to shift downwards after you'll pulled all the mounting bolts.
9. After you've pulled the crossmember down as far as it will drop, remove the two 12mm headed bolts that attach each of the swaybar bushing brackets to the top of the crossmember. You can get the rearward bolt easily from the back of the crossmember, but the best access to the front bolt is from the SIDE (i.e., towards the hub assembly). I used a long 12mm box wrench for breaking loose both bolts, then a deep 12mm socket (the socket alone, no ratchet wrench) to spin the front bolts out once I had them loosened.
10. Once you have the four 12mm headed swaybar bushing attachment bolts removed, you can pull the swaybar out. Push one end of the swaybar out to the side (towards the wheel area) and work to get the other end out from between the unibody and the crossmember. Once you've done that, it's easy to get the rest of the bar out. I did it by myself and without using any pry bars (although I have them) just to prove it could be done. I'm not a particularly experienced mechanic nor am I really strong, so if I can do it, anyone can!
Step 5 kinda sucks. Other than that, the job is pretty straightforward and easy. Does take some time, and if you've had catchcan overflow issues in the past like I have, your crossmember/steering rack is likely to be coated in black oil and dirt and sand/pebbles, so it might be a dirty job too.
Still, no reason anyone who's done simple DIY tasks like swapping out the OEM suspension for coilovers, or even installed a rear swaybar, should have any major problems swapping the front sway bar on an Evo 8/9.
Reinstallation of the front bar (aftermarket or OEM) is pretty much the reverse of the removal steps, with a few important notes:
1. Refer to the cell phone pic you took of the end of the swaybar installed earlier to make sure you don't try to install the new bar upsidedown. It happens.
2. Once you've got the bar positioned correctly and the four 12mm headed bolts that attach the bushing brackets to the crossmember fully tightened, you can push the crossmember back up and get the 19mm crossmember bolts and nuts started. The OEM scissor jack I mentioned earlier will be useful for lifting/holding the crossmember up. Tighten the crossmember bolts and nuts about 80% of the way, then STOP!
3. Before you finish tightening the fasteners that attach the crossmember to the car, put the rear transmission mount bolt/nut back in. You'll need the movement of the crossmember still being loose in order to get the bolt to line up with the holes in the bracket with the center hole in the bushing.
Once you've got that rear mount bolt through and tighten it to the nut, you can go back to reassemblying the rest of the car... the other steps are not critical in terms of the order of reassembly.
NOTE: your alignment will likely be changed a little from R&R-ing the cross member, as there's enough play in the mounting holes to affect the toe and camber slightly. Plan on having the car re-aligned after swapping the front swaybar, although it'll probably be perfectly driveable and not be off very much.
I am thankful and now the swaybar that was waiting for the clutch to go out before installation can go in.
Sep 29, 2013, 11:45 AM
#7
ok so I bit,
The dis-assembly went smoothly..the sway bar was a bit of a pain but things went ok and took a lot longer then anticipated--say closer to 4-5hrs. But I did a little extra-- however, I was fortunate to have the steering shaft come apart-- yep in the interest of not having to do this step, I ended up having to deal with it anyway. That took another 1hr to drop the steering column and get everything back together. Just sharing for those interested in the job. Now I have been around the block and have worked on cars 20yrs and have the rt tools and know how-- Just haven't drop the subframe on the evo before---thinking it would go quicker the next time around...but there wont be a next time if I can avoid it.. getting to old for this sh**.
The dis-assembly went smoothly..the sway bar was a bit of a pain but things went ok and took a lot longer then anticipated--say closer to 4-5hrs. But I did a little extra-- however, I was fortunate to have the steering shaft come apart-- yep in the interest of not having to do this step, I ended up having to deal with it anyway. That took another 1hr to drop the steering column and get everything back together. Just sharing for those interested in the job. Now I have been around the block and have worked on cars 20yrs and have the rt tools and know how-- Just haven't drop the subframe on the evo before---thinking it would go quicker the next time around...but there wont be a next time if I can avoid it.. getting to old for this sh**.
Last edited by meckert; Oct 1, 2013 at 04:13 PM.
Trending Topics
Oct 25, 2013, 12:54 PM
#8
Evolving Member
iTrader: (13)
Join Date: Jan 2010
Location: Seattle
Posts: 485
Likes: 0
Received 0 Likes
on
0 Posts
This was pretty quick and fast for me! Couple hours and I left 1 bolt with 3-4 threads in for the sub frame and I disconnected the rear motor mount from the trans bracket. I didn't have to line anything up really. I just threw the jack under it and I was good to go. You're def gonna scratch up your sway bar a tad though, but if you don't care about that, this is by far the best route to take! Thanks again dude! You made my life 10x easier and I'm very grateful of this write up.
Feb 11, 2014, 09:03 PM
#9
4. Remove the long bolt/nut that attaches the rear transmission mount to the connector-bushing-thing that goes down to the crossmember. You'll need two 14mm box wrenches (or a 14mm box wrench and a 14mm socket/ratchet). You can do this from either the top (i.e., through the engine compartment, reaching down and back below the IM and the intake piping), or from underneath the car. Either way the access is difficult and annoying. Taking the time to remove the intake piping to the throttle body might make this task a lot easier to do from the top, but I didn't bother.
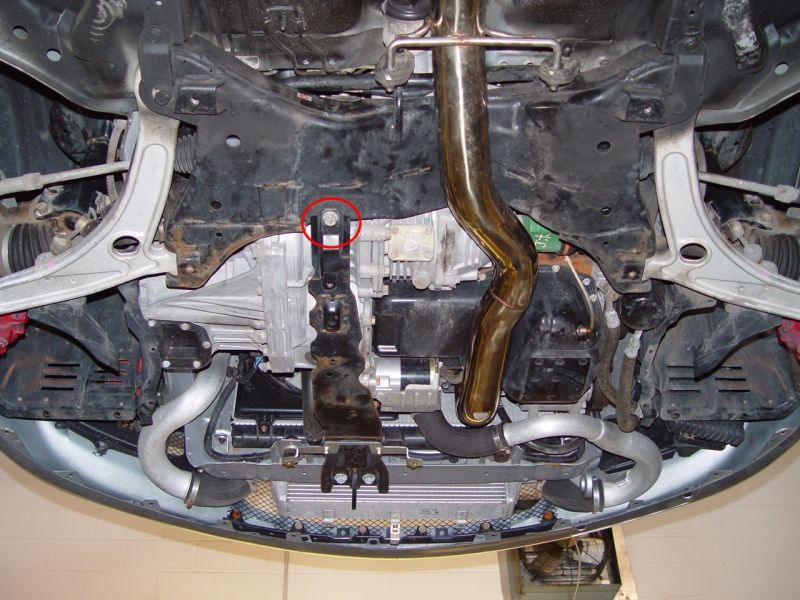
I'm thinking this is the bolt:
 Feb 12, 2014, 08:51 AM
#10
Step 4 is the rear trans to subrame mount bolt, crossmember was a misnomer. I can't tell if your picture is the rear bolt on the subframe or a bolt on the crossmember with the front roll stop engine mount on it.
Last edited by Terror Rising; Feb 12, 2014 at 08:54 AM.

 Feb 12, 2014, 01:42 PM
#12
Yeah, that's not the bolt that step 4 is talking about. There's a dogbone link connecting the subframe to the transmission. It's behind the shift linkage, almost center of the car, and above the subframe. I'll take a picture of it tonight when I get home if you still need it.

 Feb 12, 2014, 02:01 PM
#14
Revised text in first post to better clarify between the "subframe crossmember for the front suspension" (part #17 below) and "lower engine crossmember."
Note that Mitsubishi refers to the subframe crossmember as simply "crossmember" so technically it's the right term:
[ 17 ] FRONT SUSPENSION / CROSSMEMBER
crossmember Lancer; w/Turbo
http://www.oemmitsubishiparts.com/pa...iagram=F706050

Note that Mitsubishi refers to the subframe crossmember as simply "crossmember" so technically it's the right term:
[ 17 ] FRONT SUSPENSION / CROSSMEMBER
crossmember Lancer; w/Turbo
http://www.oemmitsubishiparts.com/pa...iagram=F706050

