Evo X Boost Gauge Install ,No splicing, No firewall drilling,Pics+Vid= Clean As Hell

 May 10, 2011, 07:15 PM
#167
Newbie

Join Date: Aug 2010
Location: Nueva York
Posts: 20
Likes: 0
Received 0 Likes
on
0 Posts
Funny I did the samw but now my phone charger wont work. What could be the issue?
I used the Cig lighter fuse for both my UEGO and AEM Digital Boost Gauge.
I bought 2 from Autozone for like $3 each but you only need one since the AEM gauges only use a switched power and ground
If you use the cigarette lighter fuse you can wire both into it. I left the OEM size fuse (15amp if I remember correctly) and have had no issues when plugging in my V1 or charging an iphone or Motorola Atrix
Yup plenty of space....
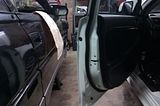
one thing to remember if you are using AEM gauges and an AMI pod.... the wires are too short to follow this how to... you will need to find another way into the car. I went through a grommet in the firewall that I believe held the HVAC wiring with no issues. Hope that helps, best of luck!
I bought 2 from Autozone for like $3 each but you only need one since the AEM gauges only use a switched power and ground
If you use the cigarette lighter fuse you can wire both into it. I left the OEM size fuse (15amp if I remember correctly) and have had no issues when plugging in my V1 or charging an iphone or Motorola Atrix
Yup plenty of space....
one thing to remember if you are using AEM gauges and an AMI pod.... the wires are too short to follow this how to... you will need to find another way into the car. I went through a grommet in the firewall that I believe held the HVAC wiring with no issues. Hope that helps, best of luck!
 Jun 25, 2011, 05:18 AM
#169
Newbie

Join Date: Jul 2010
Location: Australia
Posts: 38
Likes: 0
Received 0 Likes
on
0 Posts
I've done exactly as the guide. Thanks alot! Only problem is that my control unit lights up even when I shut the car and lock the doors but gauges are off. I have tried disconnecting the white wire. This fixes the problem but now after initial gauge start after the beep. The control units light turns off. I have also tried tapping into all the 15a fuses, all the same.
Any suggestions?
Any suggestions?
Aug 9, 2011, 08:53 PM
#170
Newbie
iTrader: (7)

Join Date: Aug 2011
Location: EVERYWHERE
Posts: 92
Likes: 0
Received 0 Likes
on
0 Posts
Thank you so much for the write up! i went the poor man route with the STRI electronic gauge instead of DEFI. All the wiring is the same, i just tap booth the IGN and ILL wires to the CIG fuse and it works great!
Sep 16, 2011, 12:45 PM
#171
Newbie
Join Date: Apr 2008
Location: Chicago, IL
Posts: 16
Likes: 0
Received 0 Likes
on
0 Posts
Mind if I add some "Options" to this thread?
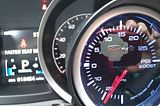
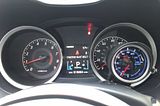
Ralliart Install with Depo/Option electric boost gauge. This gauge design is seriously like Ferbies and Gizmo when it comes to likeness to Defi.
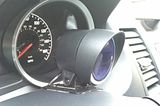
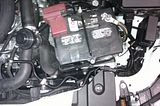
Thanks OP for the write up, it honestly is very straight forward once the wiring is route through the fenderwall. My only beef is with the mount, or my abilities to make it look cheap. Otherwise, I am very happy.
I'm very **** about wiring, only used soldering, heat shrink tubing, and pigtail fuses. Seriously, it's like 15 bucks for a butane torch, 4 bucks for heat shrink, and 5-30 bucks for a ****load of various fuses. Invest the money.
P.S. Invest in bubble wrap to keep that mean ol' 1G DSM from hitting your Ego-Friendly lightweight door with RISE construction.
Ralliart Install with Depo/Option electric boost gauge. This gauge design is seriously like Ferbies and Gizmo when it comes to likeness to Defi.
Thanks OP for the write up, it honestly is very straight forward once the wiring is route through the fenderwall. My only beef is with the mount, or my abilities to make it look cheap. Otherwise, I am very happy.
I'm very **** about wiring, only used soldering, heat shrink tubing, and pigtail fuses. Seriously, it's like 15 bucks for a butane torch, 4 bucks for heat shrink, and 5-30 bucks for a ****load of various fuses. Invest the money.


P.S. Invest in bubble wrap to keep that mean ol' 1G DSM from hitting your Ego-Friendly lightweight door with RISE construction.
Last edited by tetsuo12333; Sep 16, 2011 at 12:47 PM.


