HOW TO: ETS Intake and ETS UICP Detailed Install Guide
 Dec 1, 2015, 04:59 PM
#106
Evolving Member
I don't see why it would as long as you have no air leaks. Mine is pretty much solid and not going anywhere. I'll still install it properly (didnt have time this evening) though.
 Dec 5, 2015, 01:46 PM
#107
Evolving Member
So I took the air filter off to install the heat shield properly and found another possible issue.
The bracket you want us to take off holds the lower intercooler pipe to the body of the car.
ETS: Will the lower intercooler pipe be okay not braced by this mount?
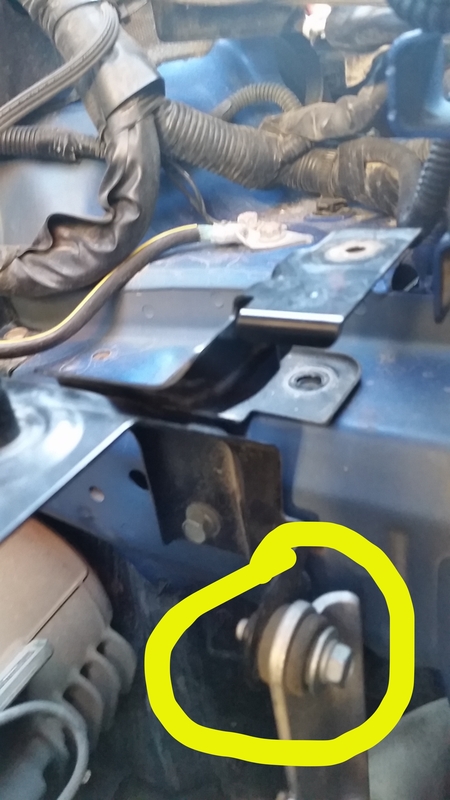
I did mate the heat shield to the spot you want us to mount it and it does fit. The entire intake will mount lower because of this and the filter should point downwards a little more, probably drawing in some cooler air.
I didn't complete the install as I am a little concerned of the lower intercooler mount being removed :|
The bracket you want us to take off holds the lower intercooler pipe to the body of the car.
ETS: Will the lower intercooler pipe be okay not braced by this mount?
I did mate the heat shield to the spot you want us to mount it and it does fit. The entire intake will mount lower because of this and the filter should point downwards a little more, probably drawing in some cooler air.
I didn't complete the install as I am a little concerned of the lower intercooler mount being removed :|
Last edited by .Adam; Dec 5, 2015 at 01:56 PM.
Dec 5, 2015, 02:05 PM
#109
Evolving Member
The mount is one piece. I have a Canadian 2008 gsr.
Basically if I want to take that bracket off I have to unbolt that mount that you see in the pic. That aluminum piece with the rubber bushing is attached to the lower intercooler pipe.
The backed does look like a two piece but I'm pretty sure they are welded together.
Basically if I want to take that bracket off I have to unbolt that mount that you see in the pic. That aluminum piece with the rubber bushing is attached to the lower intercooler pipe.
The backed does look like a two piece but I'm pretty sure they are welded together.
Jan 6, 2016, 04:31 PM
#110
Newbie
Join Date: Jan 2011
Location: Pittsburgh, PA
Posts: 21
Likes: 0
Received 0 Likes
on
0 Posts
The mount is one piece. I have a Canadian 2008 gsr.
Basically if I want to take that bracket off I have to unbolt that mount that you see in the pic. That aluminum piece with the rubber bushing is attached to the lower intercooler pipe.
The backed does look like a two piece but I'm pretty sure they are welded together.
Basically if I want to take that bracket off I have to unbolt that mount that you see in the pic. That aluminum piece with the rubber bushing is attached to the lower intercooler pipe.
The backed does look like a two piece but I'm pretty sure they are welded together.
It is cool to remove the bracket even though it is attached to the stock LICP. If you think about it, the stock LICP has a second secure point under the bumper which should sufficiently secure the LICP. If you look at the design of aftermarket LICPs; they do not use the bracket and are only secured under the bumper.
Jan 7, 2016, 05:00 AM
#111
Evolving Member
I recently checked my intake and yea its rubbing the plastic right off the battery terminal vocer lol.
It's been cold here and I don't have a heated garage (Yet) so I've been lazy with reinstalling the intke :|
I'll most likely wait till spring as there is no harm with keeping it installed this way other than wearing down that terminal cover but it's not that bad.
It's been cold here and I don't have a heated garage (Yet) so I've been lazy with reinstalling the intke :|
I'll most likely wait till spring as there is no harm with keeping it installed this way other than wearing down that terminal cover but it's not that bad.
Jan 17, 2016, 12:56 PM
#113
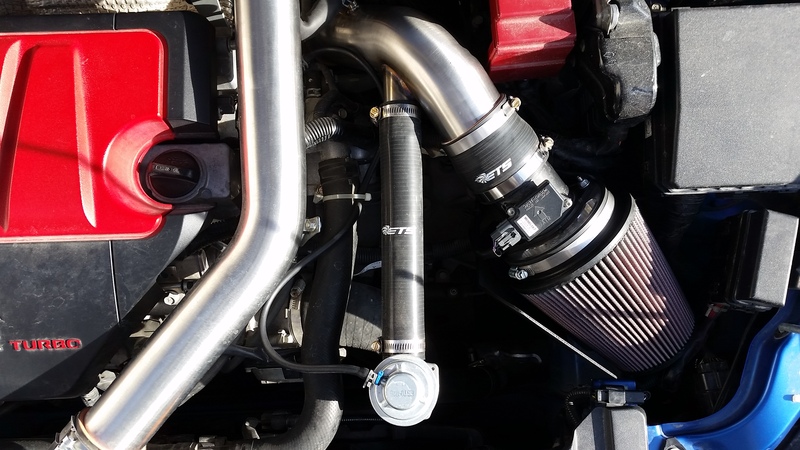
Is this the case when running an ETS turbo kit and 3.5" intake? I ask as intake fitment just does not seem correct and the shield was a PITA to get it aligned enough to somewhat fit. I dont think the bottom bolt hole is even close to anything to secure to the frame, is there a different shield for stock turbo intakes and turbo kit with 3.5" MAF intakes? I have all ETS parts (turbo kit, lower ic piping, 3.5"MAF intake, etc).
Also does the supplied curved blow off valve hose go to the intake or come from the lower intercooler piping? Some pictures would be very helpful.
Also does the supplied curved blow off valve hose go to the intake or come from the lower intercooler piping? Some pictures would be very helpful.

Last edited by itzwolf; Jan 17, 2016 at 01:01 PM.
Jan 18, 2016, 08:54 AM
#114

Can you send pictures of fitment to sales@extremeturbosystems.com ? We can look at them and advise on fitment.
The supplied 30* bending hose should go from the lower intercooler pipe to the bottom of the BOV.
The supplied 30* bending hose should go from the lower intercooler pipe to the bottom of the BOV.
Jan 18, 2016, 03:45 PM
#115
Email sent!
Can you send pictures of fitment to sales@extremeturbosystems.com ? We can look at them and advise on fitment.
The supplied 30* bending hose should go from the lower intercooler pipe to the bottom of the BOV.
The supplied 30* bending hose should go from the lower intercooler pipe to the bottom of the BOV.

 Mar 28, 2016, 09:30 AM
#118
Evolving Member
So it was finally warm enough to reinstall the intake to the proper mounting location Michael from ETS identified above. The filter now sits lower and pointed downwards towards the headlight. The other thing is the stainless pipe doesn't rub against the battery terminal cover 
 Jul 25, 2017, 12:49 PM
#120

Photos are not visible I just see that the photobucket account needs to be upgraded to enable third party hosting. I can't find a how to on this subject anywhere else. Any help?