DIY: ProSport Halo Series Gauges, AEM Wideband, ATI triple dash mount
 Jan 18, 2014, 09:09 PM
#1
Newbie
Thread Starter

Join Date: Apr 2010
Location: PHX, AZ
Posts: 22
Likes: 0
Received 0 Likes
on
0 Posts
DIY: ProSport Halo Series Gauges, AEM Wideband, ATI triple dash mount
Hey guys, There are many excellent DIY's already out for these gauges, my mounting location along with gauge choice makes this a bit different because of some alterations you will have to make to the harnesses. So if anyone likes this style versus using the a-pillar or steering column this may be useful!
Before you even get the gauges into the car, if you plan on going this route YOU MUST EXTEND THE HARNESS FOR THE PROSPORT GAUGES. I extended the three power wires and one ground wire by about three feet to be safe. Remember the wires must run through the dash and to the fuse box by the drivers side door, directly under your traction control button.
The next prep step is drilling an opening in the bottom of the ATI pod so the wires can run directly downwards thru the dash. I made a rectangular opening that was about three inches wide.
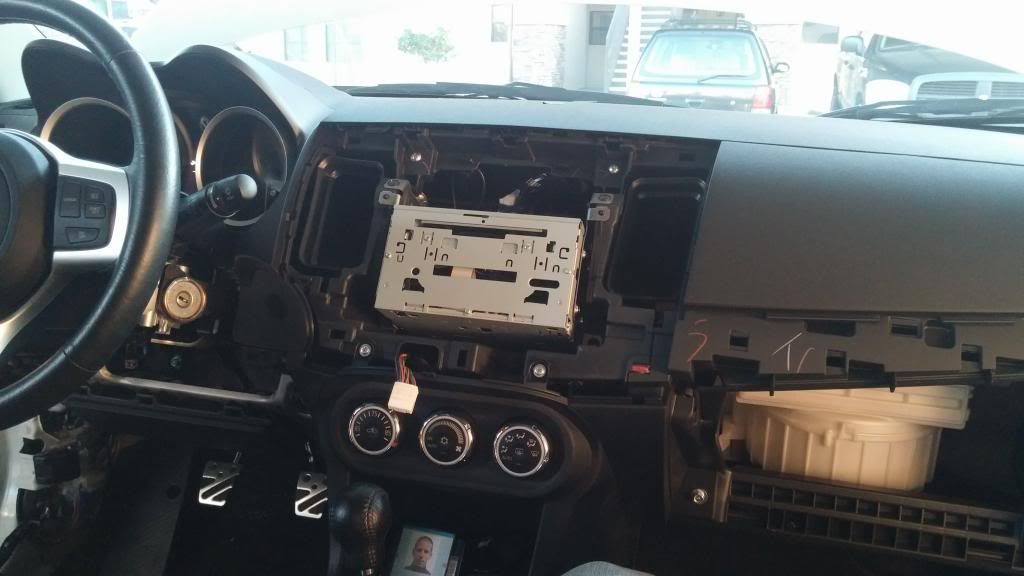
My first step in the actual car was removing interior trim pieces as you will see in the pictures.
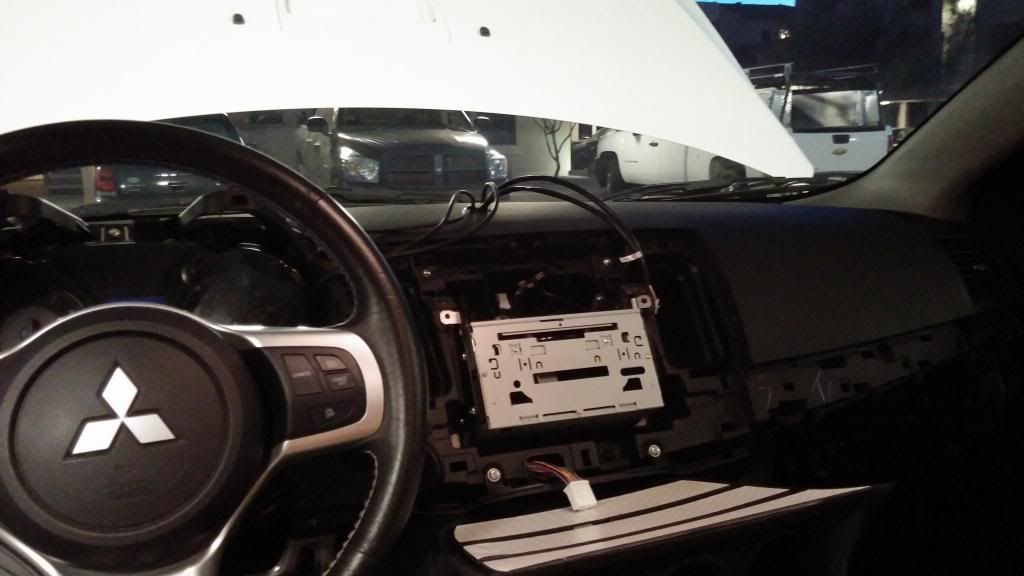
I went with an ATI Triple dash mount, now you could run the wires straight out the back of the pod and then thru a vent or something but I prefer a cleaner look so decided to make an opening in the dash board. Don't let this intimidate you as there is plenty of clearance between the dash and the radio head unit and other electronics under the dash for you to drill through and run wires. I used a drill with a 90 degree adapter since it is tough to get a full size drill back on the dash with the windshield clearance. ALSO it is important to measure and compare the opening you drilled in the bottom of the ATI pod with the opening you made in the dash. These need to be very close to lining up if you want the gauge pod to sit flush on the dash.
Once you have the opening in the dash drilled out I recommend running the harnesses in reverse, meaning leave the sensors on the respective floor mats and then run the wires up and out the dash since the plugs for the backs of the gauges are much smaller than the sensors and easier to thread thru the tight places behind the dash. I left my oxygen sensor for the wideband, the boost sensor, and the oil pressure sensors on the passenger side since there is easy firewall access there (I opt to push thru the rubber grommet versus running outside the drivers side and up the fender well). The power and grounds all start on the drivers side and go up and out the dash.
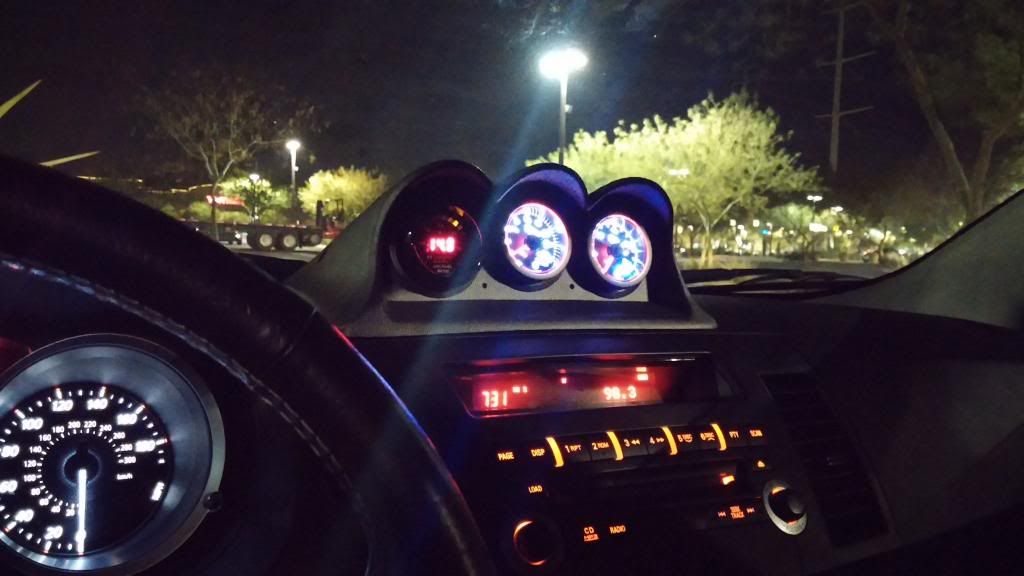
After you have all the wiring hanging out of the top of the dash through the opening you made you then do the same thing into the ATI pod, simply thread the wires through the bottom of the pod in the opening you cut and out the respective mounting point for each gauge. For example; my order (from left to right) was wideband, boost, oil pressure. In the first opening I had all the wiring that plugs into the wideband hanging out, second opening boost wiring, third opening oil pressure wiring. Simple. At this point I secured the ATI pod to the dash utilizing the same 90 degree attachment for a drill and two self taping screws.
Plug everything into the backs of the gauges and mount the gauges in the ATI pod.
Ground the gauges.
For power I used three fuses in a row in the box. I utilized the cigarette lighter/accessory fuse, the hazard lights fuse directly above that, and the power locks fuse above that. (this is in a 2013 model year, check the fuse box cover plate for the layout of your fuses) The key is finding a fuse that is constant for the red wire (this lets your peak and warning settings remain the same after shutting the car off), the white wire is on a power source that is only one when the key is on accessory or further, I used the cigarette lighter fuse, and the orange wire goes to a fuse that is altered by light settings I used my hazards.
From there test the power to the gauges by turning the key to accessory, if they turn on keep going, if not go back to the previous step and check your connections and fuse choices.
After this I moved onto the engine bay work, as I said before I used the grommet on the passenger side in the upper right behind the glove box for firewall access. I recommend keeping the boost sensor and filter inside the cabin as they don't always agree with water exposure. from there run the vacuum line thru the rubber grommet (I used a small screwdriver as a puncture guide to make an opening). I ran this line zip tied to the wiring harness across the firewall BEHIND the exhaust manifold heat shield. Do it this way if you do not want a melted line. Then connected the T into the vacuum line coming from the BOV (I have the ETS intake installed so the exact location may vary for your set up).
This is where I left off as I am waiting on the Oil filter adapter plate from Prosport to connect the oil pressure gauge under my oil filter, and I am also waiting on a turbo back exhaust with a wideband bung welded in. Will update once I have those parts! Hope this helps!
Before you even get the gauges into the car, if you plan on going this route YOU MUST EXTEND THE HARNESS FOR THE PROSPORT GAUGES. I extended the three power wires and one ground wire by about three feet to be safe. Remember the wires must run through the dash and to the fuse box by the drivers side door, directly under your traction control button.
The next prep step is drilling an opening in the bottom of the ATI pod so the wires can run directly downwards thru the dash. I made a rectangular opening that was about three inches wide.
My first step in the actual car was removing interior trim pieces as you will see in the pictures.

I went with an ATI Triple dash mount, now you could run the wires straight out the back of the pod and then thru a vent or something but I prefer a cleaner look so decided to make an opening in the dash board. Don't let this intimidate you as there is plenty of clearance between the dash and the radio head unit and other electronics under the dash for you to drill through and run wires. I used a drill with a 90 degree adapter since it is tough to get a full size drill back on the dash with the windshield clearance. ALSO it is important to measure and compare the opening you drilled in the bottom of the ATI pod with the opening you made in the dash. These need to be very close to lining up if you want the gauge pod to sit flush on the dash.
Once you have the opening in the dash drilled out I recommend running the harnesses in reverse, meaning leave the sensors on the respective floor mats and then run the wires up and out the dash since the plugs for the backs of the gauges are much smaller than the sensors and easier to thread thru the tight places behind the dash. I left my oxygen sensor for the wideband, the boost sensor, and the oil pressure sensors on the passenger side since there is easy firewall access there (I opt to push thru the rubber grommet versus running outside the drivers side and up the fender well). The power and grounds all start on the drivers side and go up and out the dash.

After you have all the wiring hanging out of the top of the dash through the opening you made you then do the same thing into the ATI pod, simply thread the wires through the bottom of the pod in the opening you cut and out the respective mounting point for each gauge. For example; my order (from left to right) was wideband, boost, oil pressure. In the first opening I had all the wiring that plugs into the wideband hanging out, second opening boost wiring, third opening oil pressure wiring. Simple. At this point I secured the ATI pod to the dash utilizing the same 90 degree attachment for a drill and two self taping screws.
Plug everything into the backs of the gauges and mount the gauges in the ATI pod.
Ground the gauges.
For power I used three fuses in a row in the box. I utilized the cigarette lighter/accessory fuse, the hazard lights fuse directly above that, and the power locks fuse above that. (this is in a 2013 model year, check the fuse box cover plate for the layout of your fuses) The key is finding a fuse that is constant for the red wire (this lets your peak and warning settings remain the same after shutting the car off), the white wire is on a power source that is only one when the key is on accessory or further, I used the cigarette lighter fuse, and the orange wire goes to a fuse that is altered by light settings I used my hazards.
From there test the power to the gauges by turning the key to accessory, if they turn on keep going, if not go back to the previous step and check your connections and fuse choices.

After this I moved onto the engine bay work, as I said before I used the grommet on the passenger side in the upper right behind the glove box for firewall access. I recommend keeping the boost sensor and filter inside the cabin as they don't always agree with water exposure. from there run the vacuum line thru the rubber grommet (I used a small screwdriver as a puncture guide to make an opening). I ran this line zip tied to the wiring harness across the firewall BEHIND the exhaust manifold heat shield. Do it this way if you do not want a melted line. Then connected the T into the vacuum line coming from the BOV (I have the ETS intake installed so the exact location may vary for your set up).
This is where I left off as I am waiting on the Oil filter adapter plate from Prosport to connect the oil pressure gauge under my oil filter, and I am also waiting on a turbo back exhaust with a wideband bung welded in. Will update once I have those parts! Hope this helps!


Thread
Thread Starter
Forum
Replies
Last Post
cij911
Evo How To Requests / Questions / Tips
139
Mar 19, 2021 04:19 AM
mrwickd123
Evo X How Tos / Installations
11
Nov 2, 2016 10:19 PM
Andrew@AMS
Automotosports - Illinois
7
Sep 18, 2012 07:01 AM
03Evo_8
Evo How To Requests / Questions / Tips
6
Apr 1, 2009 05:42 PM