Homemade Dibond Splitter
 Jun 24, 2014, 10:37 AM
#1
Evolved Member
Thread Starter
Join Date: Jan 2012
Location: Irvine, Ca
Posts: 806
Likes: 0
Received 0 Likes
on
0 Posts
Homemade Dibond Splitter
I started the process of making my own splitter last weekend. It's a "figure it out as I go" project. I figured I would post my progress in case somebody else was doing the same. Maybe they could get some ideas like I do reading other threads on this.
Since I'm not done yet I haven't made a parts list or prices. Some parts will likely change at this point as I figure better ways to do it.
Until I can get a list made of the complete procedure I used I'll just throw up some photos of where I am at this point and my plans.
Feel free to post any ideas and/or the splitter you made or are planning to make. No worries about thread jacking. I find great bits of info from others that have tried it.
I'm no expert in either customization or aerodynamics. What I do and write about is all from info I get studying the subjects online and trial as well as error.
Ok so first thing is:
Why I chose Dibond and not Alumilite or plywood?
This came down really to personal preference. I have seen great splitters built from all three materials. All my planning and research originally led me to Alumilite. Then before I was about to purchase a sheet I found out about Dibond. I liked the fact it was thinner and solid core. No need to cover the edge with moulding and thinner to me meant sleaker. I also read in a sign forum that Dibond doesn't dimple like Alumilite when tightening down the fasteners. BUT I'm not opposed to going Alumilite for my next splitter should the Dibond flex too much. Both materials are awsome. I never knew they existed until recently and glad I found them.
You can find them at places that sell sign material. If you are in So. Cal. Area and need to find a place, PM me. I'm not sure if I'm
allowed to post the name here.
For the more cost sensitive people, Dibond is $80 for a 4x8 3mm sheet and Alumilite is $130 for a 4x8 6mm sheet. These are Southern California prices.
Dibond came with one side painted and the other unpainted (just the aluminum color). I used the unpainted side for the bottom.
For my first attempt at making a splitter I copied the shape of an ARP splitter. I was able to get two splitters out of one sheet. One for myself and the other for a friend. So basically 40$ per splitter.
I did realize after test fitting that the ARP size doesn't cover enough of the underbody for my liking so I will be designing one soon that goes back to about the center line of the front wheels.
How it's mounted?
My first attenpt was mounting it straight to the bumper. I used flat aluminum 1.5 in by 1/8 inch as a backing plate on the inside bottom lip of the bumper. I basically ran a bolt through the splitter, through the bumper then through the aluminum bar. I used 2" fender washers on the splitter side to spread the force of the bolt head.
Aluminum backing flat bar

image by Uscbryan, on Flickr
Too many bolts and washers? Lol

image by Uscbryan, on Flickr
I realized once I got the bumper on that the sides of the bumper close to the wheels are lower than the front causing the splitter to aim up. Since I'm trying to make it as functional as possible to balance out my new Aeromotions wing, I need it parallel to the ground or a very slight downward angle for the front.

image by Uscbryan, on Flickr
My next idea to get it level was to use a 1"x1" x1/8" aluminum channel along the front portion of the bumper.

image by Uscbryan, on Flickr
I ended up using it just down the center of the bumper (over the black part) Yea, there is a mess back there. I have limited space and work better with my tools everywhere. Organized chaos.

image by Uscbryan, on Flickr
The channel Aluminum made it about perfect. Maybe a slight downward angle now but I can adjust that once I get the support rods on.
Here is where I'm at so far:

image by Uscbryan, on Flickr

image by Uscbryan, on Flickr
Nylon spacers for the sides since it's not even. I purchasd longer ones I'll put in the rest of the gap.

image by Uscbryan, on Flickr
What's next?
I purchased a sheet of 4x8 1/16 abs plastic from the sign store. I'm going to cut a strip to use for an air dam and fill that space between the bumper and splitter. I also need to make brackets to support the rear portion of the splitter. Last but not least I bought 4 Swedged Rods (AKA turn buckles, support rods) which I will mount 2 of them to the splitter and the crash beam and the other two through the fog light holes and mounted to a solid structure yet to be determined.
I got 6.5" rods for the center 2 and 11" rods for the outer.
You can add about 3" to the total length from the heim joints on each end.

image by Uscbryan, on Flickr
Aluminum Rods were $10.99 x 4
http://www.speedwaymotors.com/Alumin...eads,5891.html
Left threaded Heim joint ends were $5.99 x 4
http://www.speedwaymotors.com/Precis...nch,29515.html
Right thread carbon steel heims 5.99 x 4
http://www.speedwaymotors.com/Precis...nch,29594.html
Aluminum jam nuts are $ 4.99 and come in packs of 6. 8 are needed. 4 left thread and 4 right thread so total was 2 bags.
Right thread jam nuts
http://www.speedwaymotors.com/Alumin...k-6,35539.html
Left thread jam nuts
http://www.speedwaymotors.com/Alumin...k-6,35540.html
And here is the clevises that will be mounted to the splitter and crash bar to mount the rods:
Clevice 6 x $4.84
http://www.midwestcontrol.com/part.php?id=3072

image by Uscbryan, on Flickr
BTW I searched the Internet for at least a total of 5 hours over a week looking for the perfect clevice but couldn't find one that was the right size, price and something I really liked so these were my second choice.
That's all for now. I'll update once I finish.
Since I'm not done yet I haven't made a parts list or prices. Some parts will likely change at this point as I figure better ways to do it.
Until I can get a list made of the complete procedure I used I'll just throw up some photos of where I am at this point and my plans.
Feel free to post any ideas and/or the splitter you made or are planning to make. No worries about thread jacking. I find great bits of info from others that have tried it.
I'm no expert in either customization or aerodynamics. What I do and write about is all from info I get studying the subjects online and trial as well as error.
Ok so first thing is:
Why I chose Dibond and not Alumilite or plywood?
This came down really to personal preference. I have seen great splitters built from all three materials. All my planning and research originally led me to Alumilite. Then before I was about to purchase a sheet I found out about Dibond. I liked the fact it was thinner and solid core. No need to cover the edge with moulding and thinner to me meant sleaker. I also read in a sign forum that Dibond doesn't dimple like Alumilite when tightening down the fasteners. BUT I'm not opposed to going Alumilite for my next splitter should the Dibond flex too much. Both materials are awsome. I never knew they existed until recently and glad I found them.
You can find them at places that sell sign material. If you are in So. Cal. Area and need to find a place, PM me. I'm not sure if I'm
allowed to post the name here.
For the more cost sensitive people, Dibond is $80 for a 4x8 3mm sheet and Alumilite is $130 for a 4x8 6mm sheet. These are Southern California prices.
Dibond came with one side painted and the other unpainted (just the aluminum color). I used the unpainted side for the bottom.
For my first attempt at making a splitter I copied the shape of an ARP splitter. I was able to get two splitters out of one sheet. One for myself and the other for a friend. So basically 40$ per splitter.
I did realize after test fitting that the ARP size doesn't cover enough of the underbody for my liking so I will be designing one soon that goes back to about the center line of the front wheels.
How it's mounted?
My first attenpt was mounting it straight to the bumper. I used flat aluminum 1.5 in by 1/8 inch as a backing plate on the inside bottom lip of the bumper. I basically ran a bolt through the splitter, through the bumper then through the aluminum bar. I used 2" fender washers on the splitter side to spread the force of the bolt head.
Aluminum backing flat bar
image by Uscbryan, on Flickr
Too many bolts and washers? Lol
image by Uscbryan, on Flickr
I realized once I got the bumper on that the sides of the bumper close to the wheels are lower than the front causing the splitter to aim up. Since I'm trying to make it as functional as possible to balance out my new Aeromotions wing, I need it parallel to the ground or a very slight downward angle for the front.
image by Uscbryan, on Flickr
My next idea to get it level was to use a 1"x1" x1/8" aluminum channel along the front portion of the bumper.
image by Uscbryan, on Flickr
I ended up using it just down the center of the bumper (over the black part) Yea, there is a mess back there. I have limited space and work better with my tools everywhere. Organized chaos.
image by Uscbryan, on Flickr
The channel Aluminum made it about perfect. Maybe a slight downward angle now but I can adjust that once I get the support rods on.
Here is where I'm at so far:
image by Uscbryan, on Flickr
image by Uscbryan, on Flickr
Nylon spacers for the sides since it's not even. I purchasd longer ones I'll put in the rest of the gap.
image by Uscbryan, on Flickr
What's next?
I purchased a sheet of 4x8 1/16 abs plastic from the sign store. I'm going to cut a strip to use for an air dam and fill that space between the bumper and splitter. I also need to make brackets to support the rear portion of the splitter. Last but not least I bought 4 Swedged Rods (AKA turn buckles, support rods) which I will mount 2 of them to the splitter and the crash beam and the other two through the fog light holes and mounted to a solid structure yet to be determined.
I got 6.5" rods for the center 2 and 11" rods for the outer.
You can add about 3" to the total length from the heim joints on each end.
image by Uscbryan, on Flickr
Aluminum Rods were $10.99 x 4
http://www.speedwaymotors.com/Alumin...eads,5891.html
Left threaded Heim joint ends were $5.99 x 4
http://www.speedwaymotors.com/Precis...nch,29515.html
Right thread carbon steel heims 5.99 x 4
http://www.speedwaymotors.com/Precis...nch,29594.html
Aluminum jam nuts are $ 4.99 and come in packs of 6. 8 are needed. 4 left thread and 4 right thread so total was 2 bags.
Right thread jam nuts
http://www.speedwaymotors.com/Alumin...k-6,35539.html
Left thread jam nuts
http://www.speedwaymotors.com/Alumin...k-6,35540.html
And here is the clevises that will be mounted to the splitter and crash bar to mount the rods:
Clevice 6 x $4.84
http://www.midwestcontrol.com/part.php?id=3072
image by Uscbryan, on Flickr
BTW I searched the Internet for at least a total of 5 hours over a week looking for the perfect clevice but couldn't find one that was the right size, price and something I really liked so these were my second choice.
That's all for now. I'll update once I finish.
Last edited by Uscbryan; Jun 24, 2014 at 12:48 PM.
 Jun 24, 2014, 10:37 AM
#2
Evolved Member
Thread Starter
Join Date: Jan 2012
Location: Irvine, Ca
Posts: 806
Likes: 0
Received 0 Likes
on
0 Posts
This is still a work in progress. I found a place to make me custom clevises so they are rounded and a lot less bulky.
I also realized it was too low for the street and with the support rods it just bends instead of flexing. I'm doing a little redesign as far as mounting. I'm going to try and avoid mounting to the bumper altogether and instead mount to core support with 5" X 3/8 rounded head threaded bolts that can be turned to raise and lower the splitter for road/track conditions.
I did a little work on it on the 4th but realized I'm wasting time finding mounting locations for the rear part of the splitter since it's not as long as I want it. Next weekend I'll cut a new one that goes back to the axels. This will also help with mounting since it will be at the subframe. The current ARP size is about 6 inches forward of the subframe.
I will perfect this if it kills me but I got a little burned out after working on it on the 4th so took a break.
It's a lot more work than I thought to do it right but once done it should be easy to duplicate.
Thanks for reading.
Any ideas are appreciated.
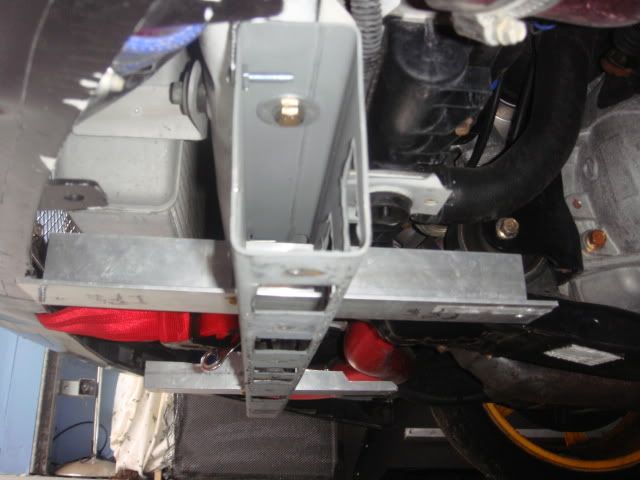
Actually for those looking for ideas on mounting the ARP size splitter this is what I came up with for the rear section. I'm not going with this since I'm making a splitter that covers more of the bottom.
Used some scrap 1x 1/4" 6061 aluminum mounted to a hole in the subframe that I could access the back side to put a bolt on it. Then ran 2 more prices of aluminum from the cross brace to the splitter.
I also ran a piece of 1" x 1/8" right angle aluminum stock accross the splitter just for a little extra strength.

image by Uscbryan, on Flickr

image by Uscbryan, on Flickr
You could even use right angle stock or channel stock to make the support stronger.

image by Uscbryan, on Flickr
I also realized it was too low for the street and with the support rods it just bends instead of flexing. I'm doing a little redesign as far as mounting. I'm going to try and avoid mounting to the bumper altogether and instead mount to core support with 5" X 3/8 rounded head threaded bolts that can be turned to raise and lower the splitter for road/track conditions.
I did a little work on it on the 4th but realized I'm wasting time finding mounting locations for the rear part of the splitter since it's not as long as I want it. Next weekend I'll cut a new one that goes back to the axels. This will also help with mounting since it will be at the subframe. The current ARP size is about 6 inches forward of the subframe.
I will perfect this if it kills me but I got a little burned out after working on it on the 4th so took a break.
It's a lot more work than I thought to do it right but once done it should be easy to duplicate.
Thanks for reading.
Any ideas are appreciated.
Actually for those looking for ideas on mounting the ARP size splitter this is what I came up with for the rear section. I'm not going with this since I'm making a splitter that covers more of the bottom.
Used some scrap 1x 1/4" 6061 aluminum mounted to a hole in the subframe that I could access the back side to put a bolt on it. Then ran 2 more prices of aluminum from the cross brace to the splitter.
I also ran a piece of 1" x 1/8" right angle aluminum stock accross the splitter just for a little extra strength.
image by Uscbryan, on Flickr
image by Uscbryan, on Flickr
You could even use right angle stock or channel stock to make the support stronger.
image by Uscbryan, on Flickr
Last edited by Uscbryan; Jul 8, 2014 at 10:38 AM.
Jul 8, 2014, 10:42 AM
#4

This is still a work in progress. I found a place to make me custom clevises so they are rounded and a lot less bulky.
I also realized it was too low for the street and with the support rods it just bends instead of flexing. I'm doing a little redesign as far as mounting. I'm going to try and avoid mounting to the bumper altogether and instead mount to core support with 5" X 3/8 rounded head threaded bolts that can be turned to raise and lower the splitter for road/track conditions.
...
not sure if you came across this in your research:
Just throwing out some ideas since I know your splitter is for a X and this example i have is for a IX.
You might be able to reuse the aluminum channel and use that to mount to the frame.
I was contemplating doing something like this with my IX but i haven't had the time.
The only thing you'd loose out from this kind of mounting method is the height adjustability.
Jul 8, 2014, 10:45 AM
#5
Evolved Member
Thread Starter
Join Date: Jan 2012
Location: Irvine, Ca
Posts: 806
Likes: 0
Received 0 Likes
on
0 Posts
Thanks. Do you have the link for that build? Even if I don't do it exactly it helps with generating ideas.
I even went so far as to think about little electric lifters that could raise and lower it from inside the car. Lol
I even went so far as to think about little electric lifters that could raise and lower it from inside the car. Lol
Jul 8, 2014, 10:49 AM
#6

Thread
Thread Starter
Forum
Replies
Last Post