How-To-Change Non- ABS Brakes, Rotors, and bleed the system for 02-03 Lancer OZ-Rally
 Feb 2, 2011, 04:15 PM
#1
Newbie
Thread Starter
Join Date: Jan 2007
Location: Houston
Posts: 51
Likes: 0
Received 0 Likes
on
0 Posts
How-To-Change Non- ABS Brakes, Rotors, and bleed the system for 02-03 Lancer OZ-Rally
This is How to change Brakes, rotors and change brake fluids for 02-03 Lancer OZ Rally for Non-ABS brakes. The process is about the same for other models, like ES, but the parts are different. If you have ABS, then your bleeding procedure would be different.
Parts List:
(2) Rotors
Set of Brake Pads
Brake Lubes---for the caliper boots and back of brake pads
Anti-seize lube for the re-installation of wheel
Jack
Rubber Mallet
(4) Floor Jack Stands
(2) Brake Cleaner Spray
(1) Liquid Wrench
Brake Bleeder Kit
Caliper Spreader
Catch Basin
Break fluid DOT 3 or 4
Funnel
Wrench
Socket Wrench---17mm----15mm
Open wrench--8mm
Mechanic Gloves
Rubber gloves
Safety Glasses
Safety---Wear proper safety gear before doing any mechanical work. Don�t lose an eye!
Step 1: Loosen the lug nuts of your car. Then raise the car using the car jack and place the stands stabilizing the points of the car. Then remove the wheels of the car.


Step 2: Place the catch basin on the bottom. Clean the caliper with the Brake Cleanser Spray thoroughly. Then spray the bolts with the Liquid Wrench soaking them for a couple of minutes to ease the removal of the caliper bolts.


Step 3: After the Caliper bolts has been soaked, use the 17mm socket wrench on two of the caliper support and one top of the caliper. The 15mm socket wrench is used on the lower bolt of the caliper. (Tip: If you have air tools this process would be faster, but if you don�t have one I used the rubber mallet to give it some power. Breaker bar would be ideal but a small work space is not suitable for this.)

This picture shows the top and bottom of the caliper bolt pin. 17mm is at top and 15mm at the bottom.

This picture shows the bottom of the caliper. The far left is the bolt for the support and the right shows another picture of the lower caliper pin bolt.


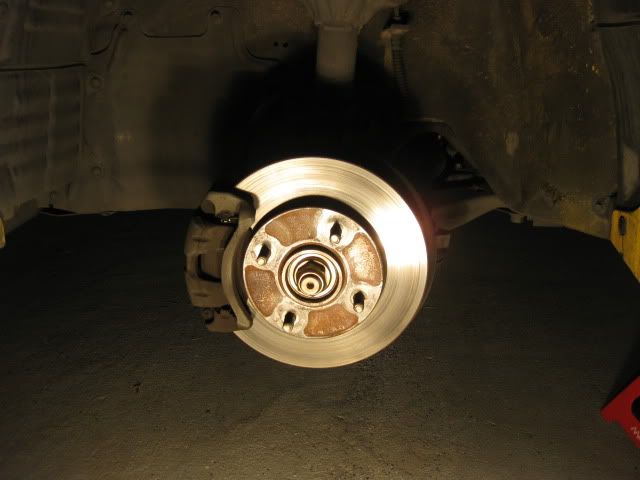
Step 4: Hang the caliper on the springs of the car or use a hanger to support the caliper in a safe manner. Remove all the pieces and the old brake pads. Remove the old rotors also. If you difficulty removing the rotors, just use the mallet. Clean the hub with more brake cleaner. (Tip: Soak all of the bolts and caliper support in the basin to remove excess dust and grime so you can re-install cleaner parts.


Step 5: Inspect the pads, caliper support, boots and the bolts. For the most part, the pieces are intact and no damages. The pads are down to the metal, thus needing for a replacement.
Here is the comparison of the old and new brake pads.
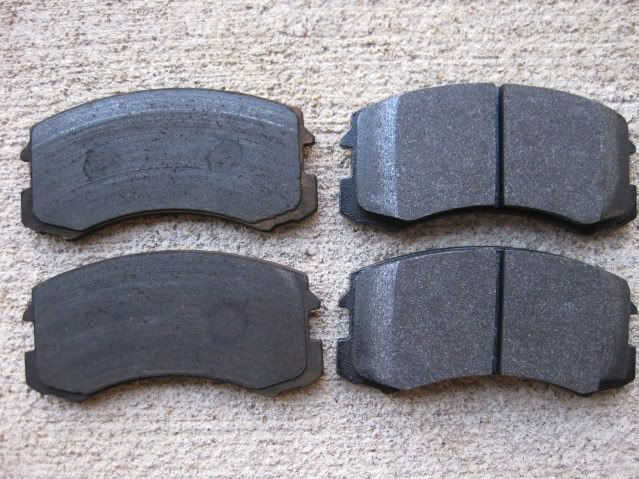
Here is the comparison of the brake pads left vs. right. As you can see the driver side pads are worn to the bare metal while the passenger side has some substantial pads left.

Step 6: Spray the new rotors with the cleaner at the basin. Install the new rotor into the clean hub. (Tip: Rotor companies leave an oily residue on the rotors to protect them from rusting, so cleaning them off is a must)

Step 7: Lube inside the boots with the caliper lube. Install the caliper support back using the 17mm socket with the bolts.


Step 8: Re-install the caliper back to the support. Using the 17mm socket, install the top pin bolt of the caliper to the caliper support. Do not install the bottom caliper pin bolt yet. At this point we are ready to push the caliper back to position with the caliper spreader. (Tip: Make sure the boots line up well when you do this. You can tear the boots if you are not careful. Replacement is necessary if they tear.)


Step 9: Set your caliper spreader and push the caliper all the way down. (Tip: Even though is not shown, I opened the bleeder screw while I pushed the caliper back to reduce the chances of putting air back to the system. We will eventually bleed the system anyway, but I would rather do this than push air to the system. Brake fluid will destroy paints, so be careful)


Step 10: Spread the caliper lube thin on the back of the pads. Use gloves to spread it evenly. Insert the pads matching the caliper support. Lower the caliper back to position. Then use the 15mm socket wrench to install the lower caliper pin bolt.


Step 11: Locate your brake reservoir and open it. You can fill it with your brake fluid using the funnel. (Tip: have a rag with you just in case the fluid spills in the body of the car.)

Step 12: Locate the brake nipple. Remove the brake nipple cover. Use the 8mm open wrench and insert the brake bleeding kit for bleeding procedure. Slowly turn the wrench counter-clockwise to release the brake fluid out of the caliper. According to the manual, start at the driver side front first, then the passenger side rear, then go back to the driver side front again. Then proceed to the passenger side front, then to the driver side rear and finally go back to the passenger side front again. This procedure is to ensure that the system is air free. (Tip: Bleed the brakes until the color turns to the desired color. If your brake fluid is blue then bleed until its clear blue. Fortunately, mine was not as dark and cloudy.)
Picture of the nipple of the front caliper

Picture of the nipple of the back of the drum.


Step 13: Go inside the car and pump the brakes several times to the desired feel. Then re-assemble the wheel back to the car. (Tip: Apply anti-seize lube on the lug bolts to prevent seizing in the future.)
You are done! I will do a How- To replace rear drum brakes in the future. I wish I had bought a torque wrench so I could have properly torque all of the bolts. This took me longer to do because I had to document every step and I did not have air tools.
Parts List:
(2) Rotors
Set of Brake Pads
Brake Lubes---for the caliper boots and back of brake pads
Anti-seize lube for the re-installation of wheel
Jack
Rubber Mallet
(4) Floor Jack Stands
(2) Brake Cleaner Spray
(1) Liquid Wrench
Brake Bleeder Kit
Caliper Spreader
Catch Basin
Break fluid DOT 3 or 4
Funnel
Wrench
Socket Wrench---17mm----15mm
Open wrench--8mm
Mechanic Gloves
Rubber gloves
Safety Glasses
Safety---Wear proper safety gear before doing any mechanical work. Don�t lose an eye!
Step 1: Loosen the lug nuts of your car. Then raise the car using the car jack and place the stands stabilizing the points of the car. Then remove the wheels of the car.
Step 2: Place the catch basin on the bottom. Clean the caliper with the Brake Cleanser Spray thoroughly. Then spray the bolts with the Liquid Wrench soaking them for a couple of minutes to ease the removal of the caliper bolts.
Step 3: After the Caliper bolts has been soaked, use the 17mm socket wrench on two of the caliper support and one top of the caliper. The 15mm socket wrench is used on the lower bolt of the caliper. (Tip: If you have air tools this process would be faster, but if you don�t have one I used the rubber mallet to give it some power. Breaker bar would be ideal but a small work space is not suitable for this.)
This picture shows the top and bottom of the caliper bolt pin. 17mm is at top and 15mm at the bottom.
This picture shows the bottom of the caliper. The far left is the bolt for the support and the right shows another picture of the lower caliper pin bolt.
Step 4: Hang the caliper on the springs of the car or use a hanger to support the caliper in a safe manner. Remove all the pieces and the old brake pads. Remove the old rotors also. If you difficulty removing the rotors, just use the mallet. Clean the hub with more brake cleaner. (Tip: Soak all of the bolts and caliper support in the basin to remove excess dust and grime so you can re-install cleaner parts.
Step 5: Inspect the pads, caliper support, boots and the bolts. For the most part, the pieces are intact and no damages. The pads are down to the metal, thus needing for a replacement.
Here is the comparison of the old and new brake pads.
Here is the comparison of the brake pads left vs. right. As you can see the driver side pads are worn to the bare metal while the passenger side has some substantial pads left.
Step 6: Spray the new rotors with the cleaner at the basin. Install the new rotor into the clean hub. (Tip: Rotor companies leave an oily residue on the rotors to protect them from rusting, so cleaning them off is a must)
Step 7: Lube inside the boots with the caliper lube. Install the caliper support back using the 17mm socket with the bolts.
Step 8: Re-install the caliper back to the support. Using the 17mm socket, install the top pin bolt of the caliper to the caliper support. Do not install the bottom caliper pin bolt yet. At this point we are ready to push the caliper back to position with the caliper spreader. (Tip: Make sure the boots line up well when you do this. You can tear the boots if you are not careful. Replacement is necessary if they tear.)
Step 9: Set your caliper spreader and push the caliper all the way down. (Tip: Even though is not shown, I opened the bleeder screw while I pushed the caliper back to reduce the chances of putting air back to the system. We will eventually bleed the system anyway, but I would rather do this than push air to the system. Brake fluid will destroy paints, so be careful)
Step 10: Spread the caliper lube thin on the back of the pads. Use gloves to spread it evenly. Insert the pads matching the caliper support. Lower the caliper back to position. Then use the 15mm socket wrench to install the lower caliper pin bolt.
Step 11: Locate your brake reservoir and open it. You can fill it with your brake fluid using the funnel. (Tip: have a rag with you just in case the fluid spills in the body of the car.)
Step 12: Locate the brake nipple. Remove the brake nipple cover. Use the 8mm open wrench and insert the brake bleeding kit for bleeding procedure. Slowly turn the wrench counter-clockwise to release the brake fluid out of the caliper. According to the manual, start at the driver side front first, then the passenger side rear, then go back to the driver side front again. Then proceed to the passenger side front, then to the driver side rear and finally go back to the passenger side front again. This procedure is to ensure that the system is air free. (Tip: Bleed the brakes until the color turns to the desired color. If your brake fluid is blue then bleed until its clear blue. Fortunately, mine was not as dark and cloudy.)
Picture of the nipple of the front caliper
Picture of the nipple of the back of the drum.
Step 13: Go inside the car and pump the brakes several times to the desired feel. Then re-assemble the wheel back to the car. (Tip: Apply anti-seize lube on the lug bolts to prevent seizing in the future.)
You are done! I will do a How- To replace rear drum brakes in the future. I wish I had bought a torque wrench so I could have properly torque all of the bolts. This took me longer to do because I had to document every step and I did not have air tools.
 Jul 24, 2012, 12:19 AM
#2
Newbie

Join Date: Jul 2012
Location: STL
Posts: 2
Likes: 0
Received 0 Likes
on
0 Posts
how screwed am i?
Thanks for the great write-up. (With pictures! [even if they do seem out of order]). I just finished replacing rotors and pads today. First off- When I pulled out my old pads, I saw that I only had 3 of the metal clips that hold the pads in place per side. Based on your pictures, it looks like you're in the same boat. Is this normal?
More importantly, though, when I was re-installing the bottom slider pin, I was torquing it up to spec (83 NM, I believe), when it suddenly gave way. I spun it back out, and it looked like The outermost few threads on the caliper had come separated from the caliper. I spun it back in, torqued it up, made it to about 70 NM, and then it gave way again. At this point, I could spin it in more, but it felt as though it wasn't tightening anymore. I feel as though the threads on the caliper are about stripped, though there is still some hold, since I couldn't slide the pin out.
So. How critical is the torque on the bottom slider pin? Will this shorten brake life? Lessen brake performance? Why is the spec'd torque for the bottom slider so much higher than it is for the top (only 49 NM) in the first place?
 Jul 3, 2013, 09:35 PM
#5

 Jul 10, 2013, 09:28 AM
#10
Newbie

Join Date: Jul 2013
Location: Boston
Posts: 1
Likes: 0
Received 0 Likes
on
0 Posts
I don't know why theres only 3 clips per side but I have the Mitsu service manual and it shows 2 clips per pad for all 4 front pads.
Thanks for the great write-up. (With pictures! [even if they do seem out of order]). I just finished replacing rotors and pads today. First off- When I pulled out my old pads, I saw that I only had 3 of the metal clips that hold the pads in place per side. Based on your pictures, it looks like you're in the same boat. Is this normal?
More importantly, though, when I was re-installing the bottom slider pin, I was torquing it up to spec (83 NM, I believe), when it suddenly gave way. I spun it back out, and it looked like The outermost few threads on the caliper had come separated from the caliper. I spun it back in, torqued it up, made it to about 70 NM, and then it gave way again. At this point, I could spin it in more, but it felt as though it wasn't tightening anymore. I feel as though the threads on the caliper are about stripped, though there is still some hold, since I couldn't slide the pin out.
So. How critical is the torque on the bottom slider pin? Will this shorten brake life? Lessen brake performance? Why is the spec'd torque for the bottom slider so much higher than it is for the top (only 49 NM) in the first place?
More importantly, though, when I was re-installing the bottom slider pin, I was torquing it up to spec (83 NM, I believe), when it suddenly gave way. I spun it back out, and it looked like The outermost few threads on the caliper had come separated from the caliper. I spun it back in, torqued it up, made it to about 70 NM, and then it gave way again. At this point, I could spin it in more, but it felt as though it wasn't tightening anymore. I feel as though the threads on the caliper are about stripped, though there is still some hold, since I couldn't slide the pin out.
So. How critical is the torque on the bottom slider pin? Will this shorten brake life? Lessen brake performance? Why is the spec'd torque for the bottom slider so much higher than it is for the top (only 49 NM) in the first place?
Last edited by 2wEntEe; Jul 10, 2013 at 07:07 PM.

Thread
Thread Starter
Forum
Replies
Last Post
Green_Bandit
Lancer Tires, Wheels, Brakes & Suspension - Sponsored by The Tire Rack
21
Sep 9, 2019 02:14 PM
o-townFLA
Evo How To Requests / Questions / Tips
27
Dec 19, 2016 03:54 AM
OZ_kidd
Lancer How Tos / Installations
21
Jul 7, 2014 01:50 PM
OZ_kidd
Lancer Tires, Wheels, Brakes & Suspension - Sponsored by The Tire Rack
14
Mar 7, 2011 08:33 PM
OZ_kidd
Lancer How Tos / Installations
0
Feb 2, 2011 05:23 PM

