Hot Lap Motorsports Brake Duct Kit Installation
 Jun 18, 2007, 04:35 AM
#1
Hot Lap Motorsports Brake Duct Kit Installation
Hot Lap Motorsports Brake Duct Kit Installation
Kyle (KingKyle) of Hot Lap Motorsports bringing you another great product – Hot Lap Brake Duct Cooling Kit! Ask yourself these questions: Do you find yourself late apexing shopping isles with your kart? Do you know the braking zone of most streets in your town? Do you look for passing lines when following cars on freeway on-ramps? If you said yes, then this is just the product for you.
The Hot Lap Kit comes with everything you need to keep your brakes cool on the track and it is affordable! Unlike other kits that may cost a few internal organs - Kyle has kept his kit simple, straightforward, and priced for road-courser in mind. Cost is $239 for the whole kit.
Kyle track tested these and has seen lower rotor surface temperatures 20-30% lower than without a duct kit!
Hot Lap Motorsports – Kyle (KingKyle) Website: http://www.hotlapmotorsports.com/ Phone number: 973-997-9016.
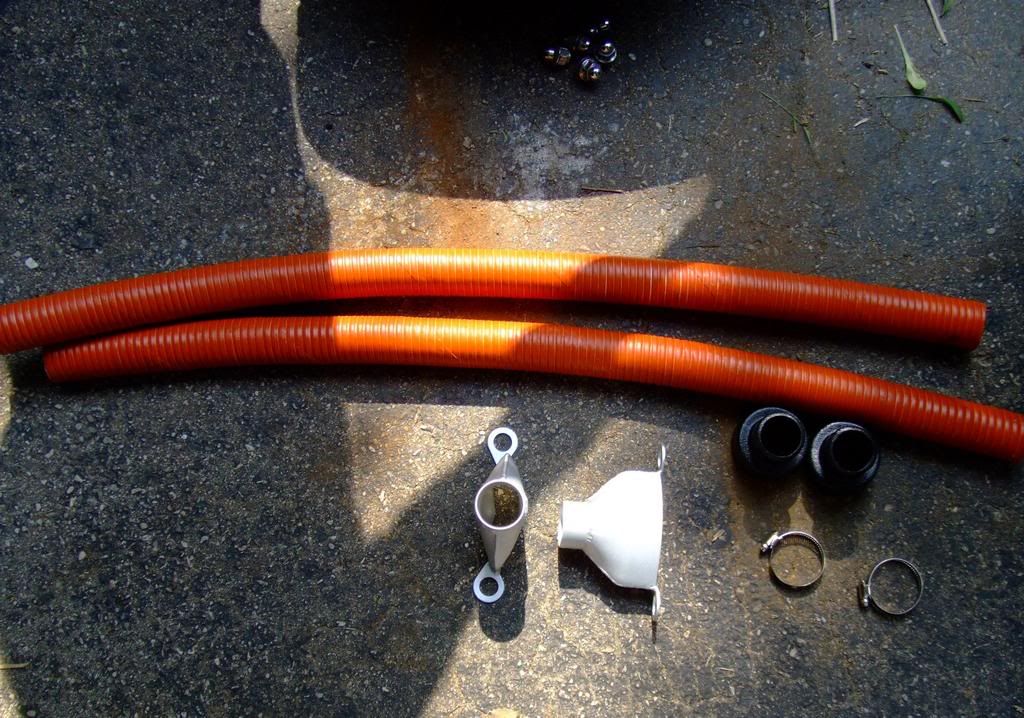
The Kit
Specs:
2 – Brake Caliper Brackets
2 – 3ft 8in High-Temp Tubing Sections
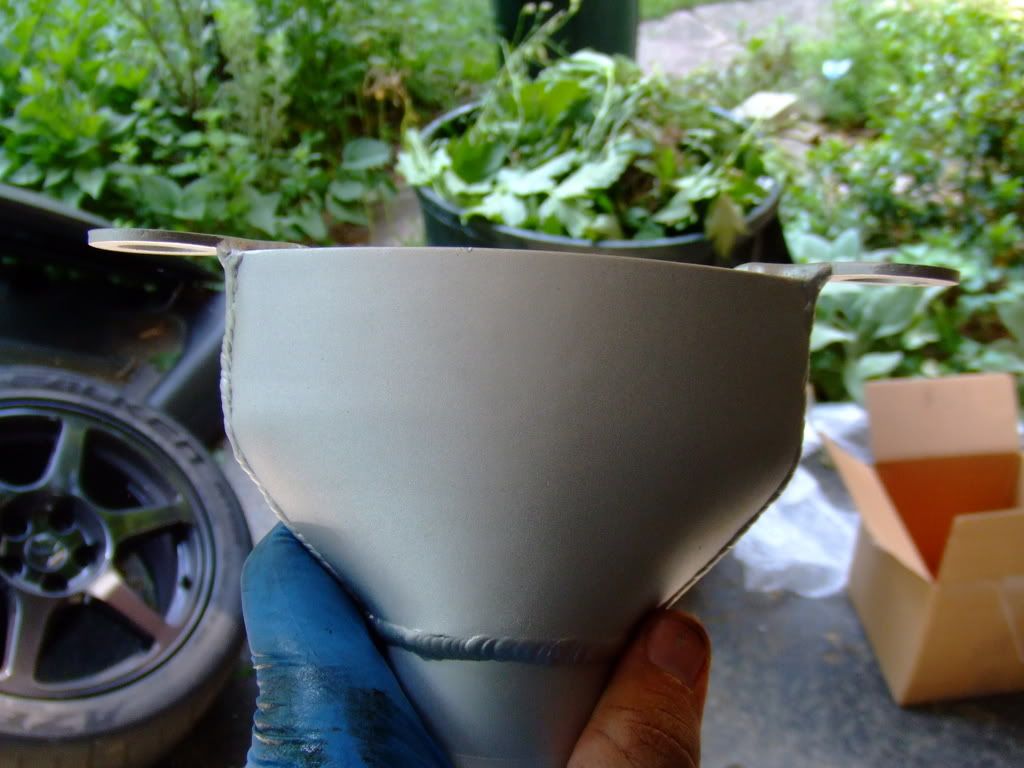
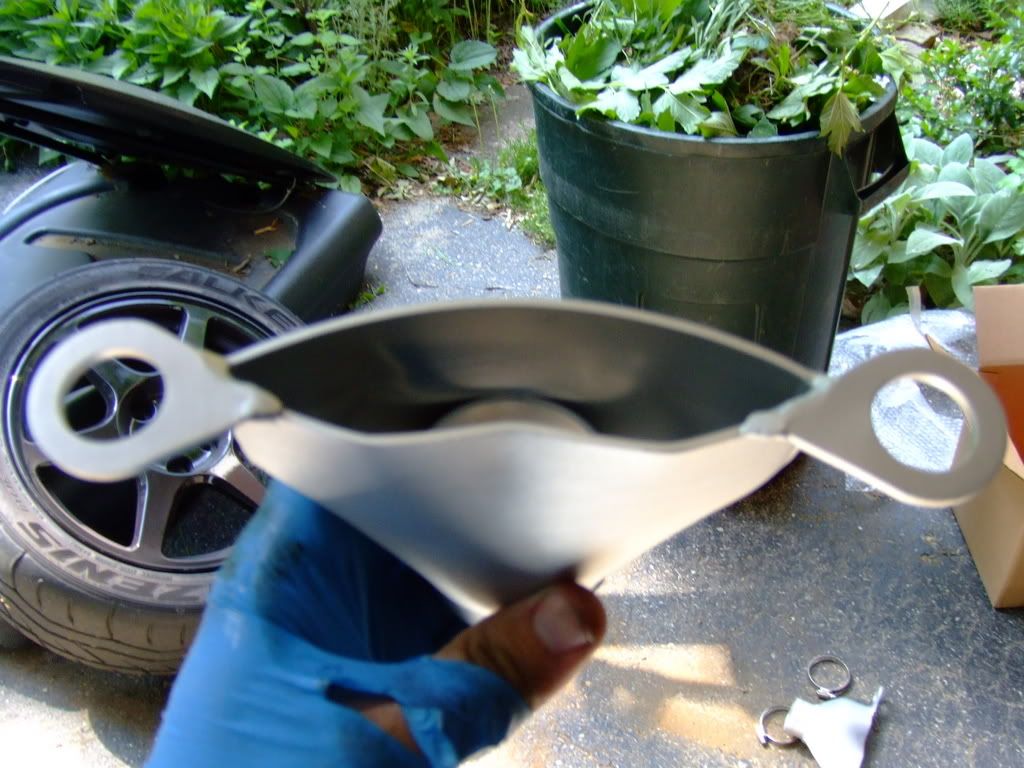
2 – Velocity Stacks
2 – 2in Worm Clamps
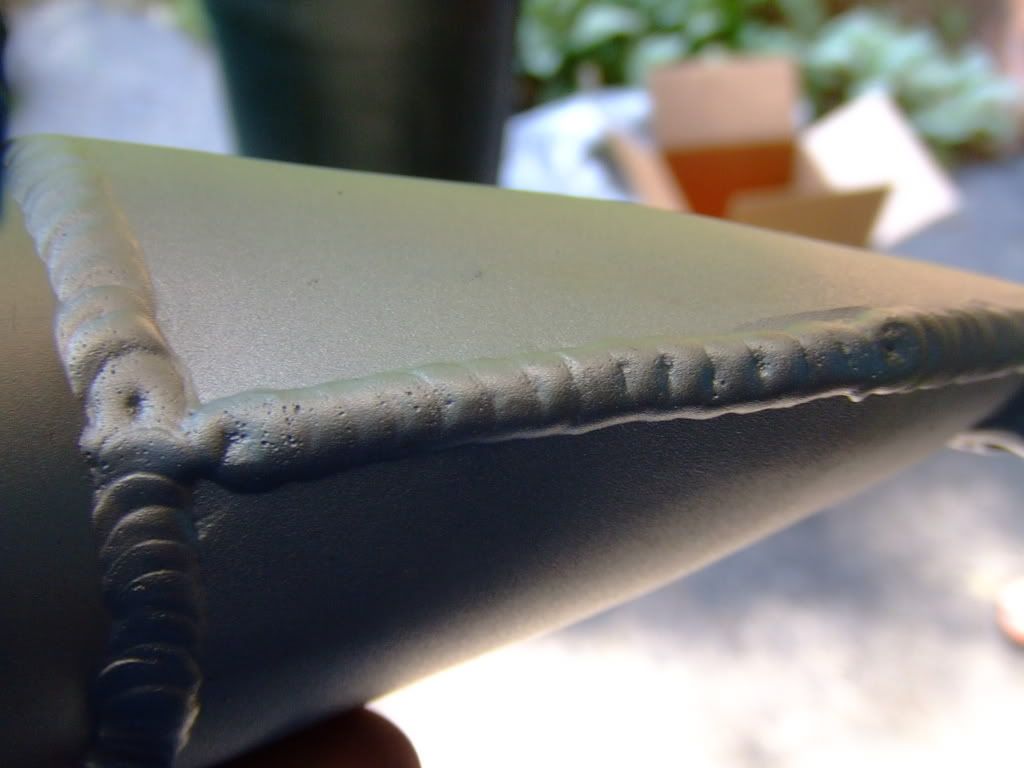
Constructed from only the finest materials – the cooling brackets are made from aluminum, hand welded, then anodized in a matte silver for scratch resistance. The ducting is aircraft quality, 2 inch, 600 degree rated tubing. And the supplied worm clamps and velocity stacks are of the best quality.

http://www.hotlapmotorsports.com/pro...8&idproduct=77
Installation
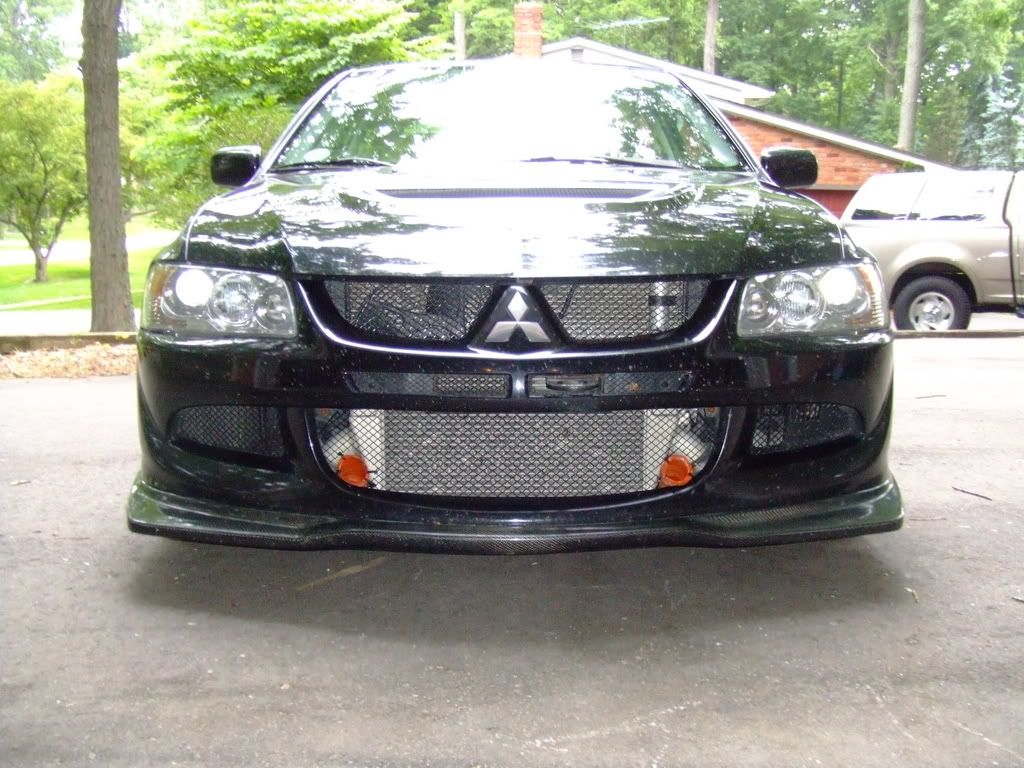
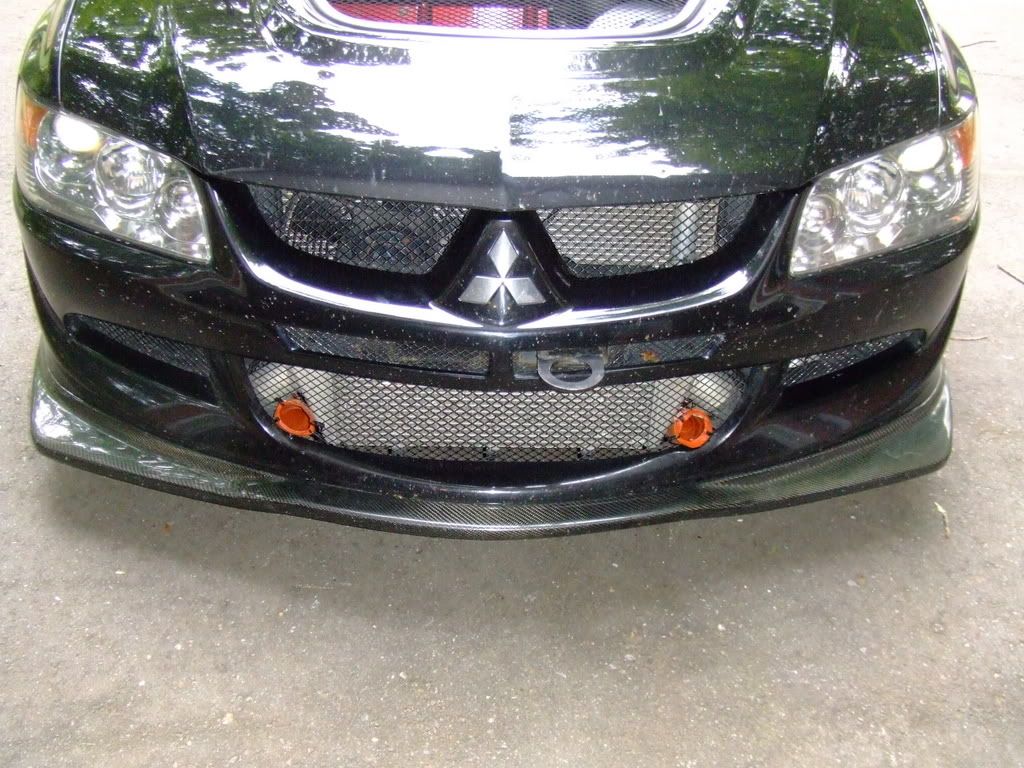
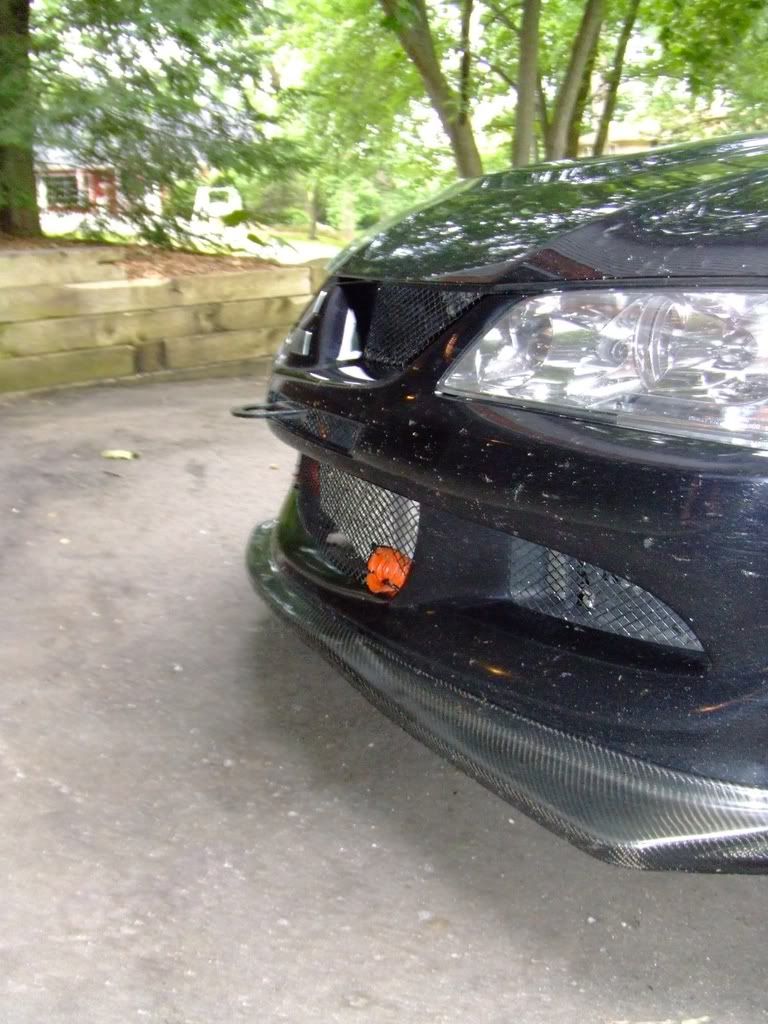
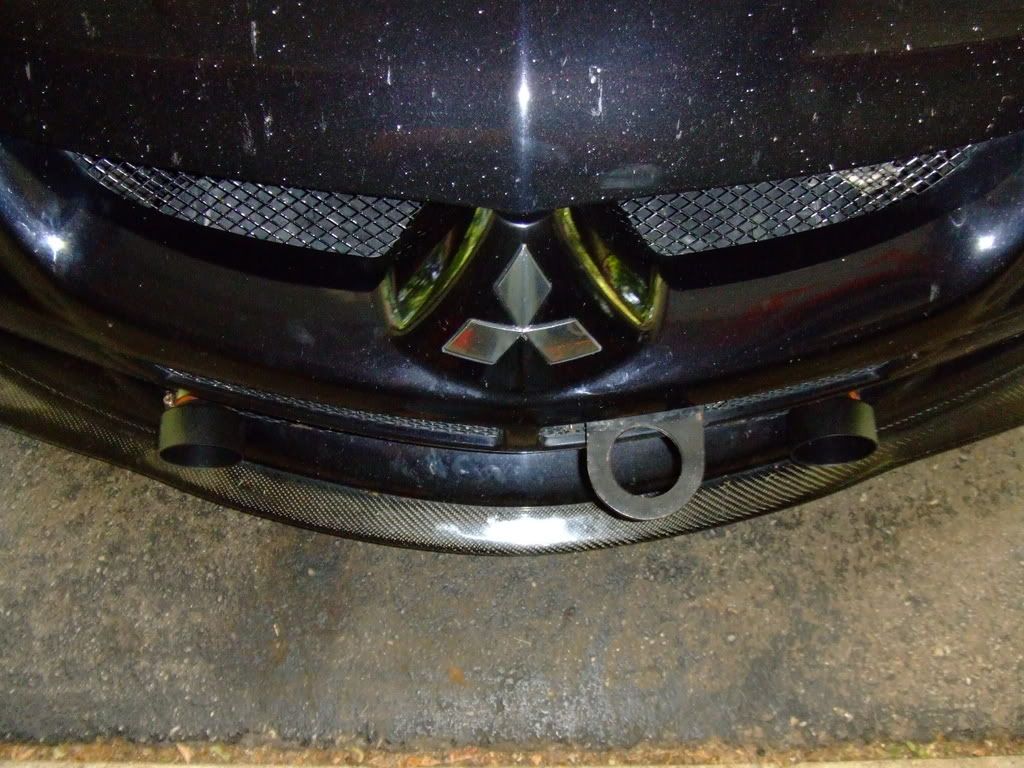
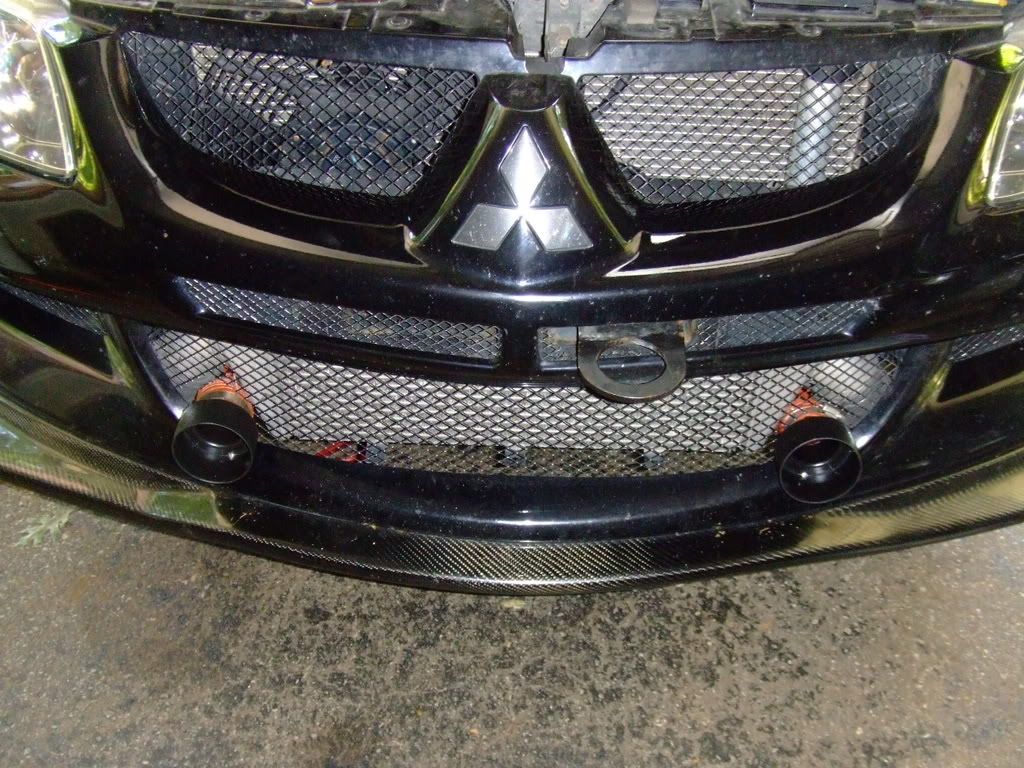
For this install there are a few options of placement for the velocity stacks in the front of your car. I have a 05 with the ACD – so I had to work around the ACD pump and reservoir. Others without the ACD or with the IX bumper may be able to mount them in a different location.
First things first though – find some level ground, 2 jack stands, a jack, a friend or two (big thanks to my brother Devin and my friend Bill), bit of shade, and about 2-3 hours. Mostly general tools needed for this installation. Some other tools/parts you may wish to have available are a torque wrench, cutting clippers, handsaw, 2 extra 2-inch worm clamps (optional), 2 3/32in self-tapping screws, and a bunch of zip-ties.
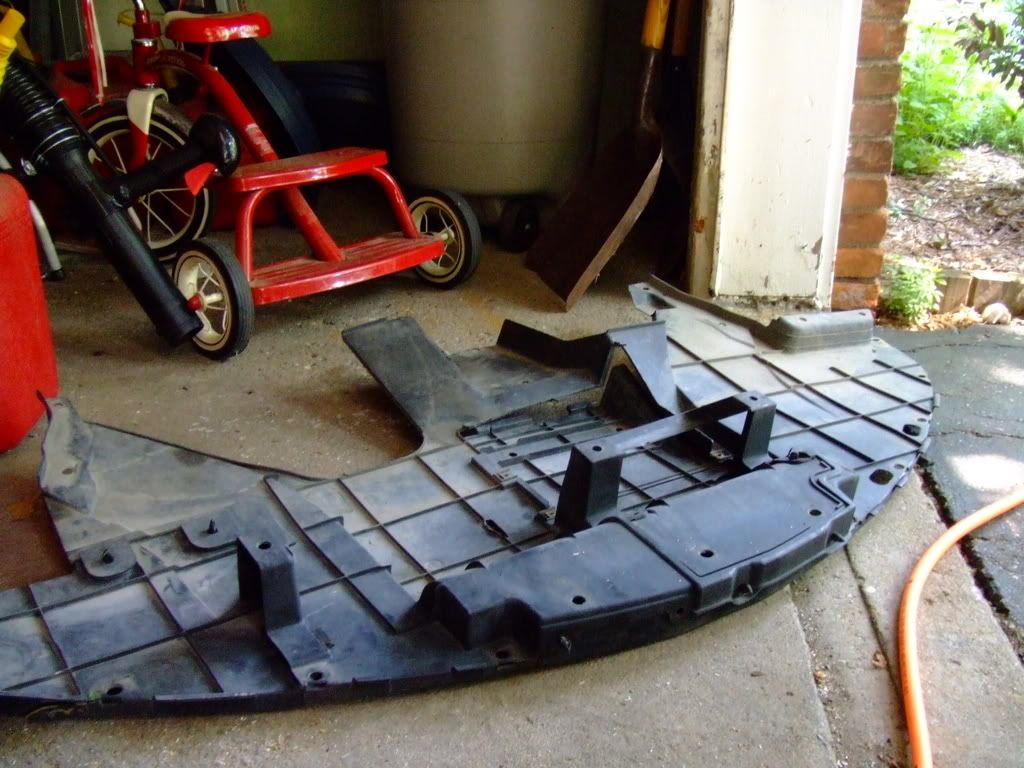
Start off by safely jacking up the car and putting her onto the jack stands. Take off both front wheels and the undertray.
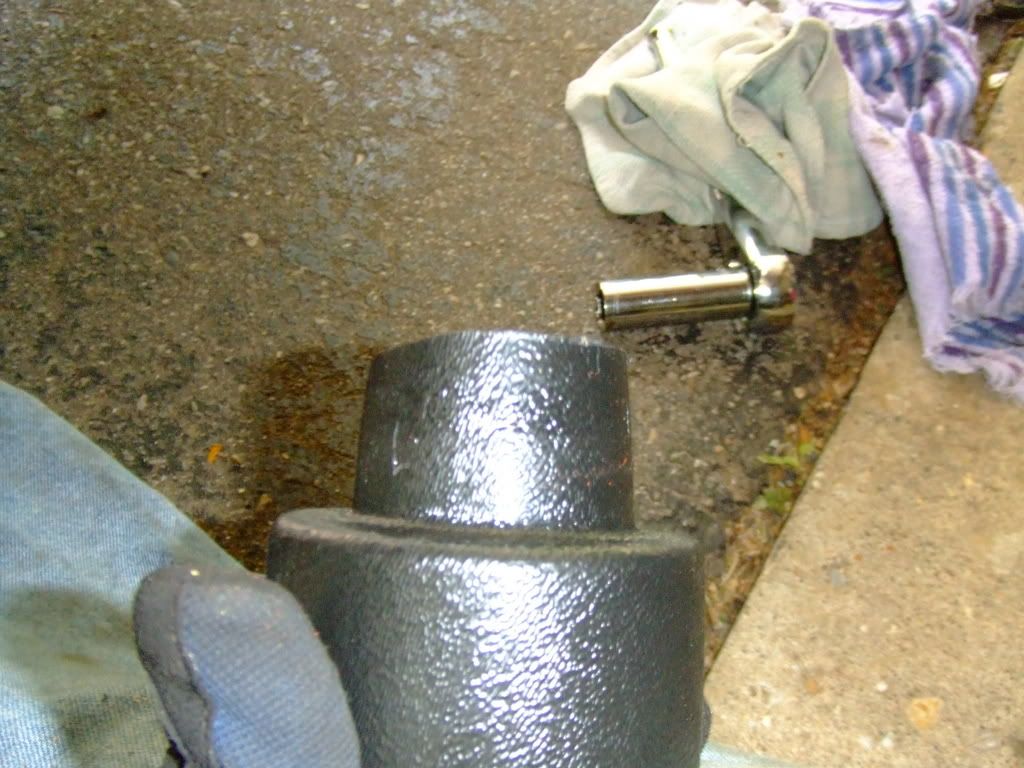
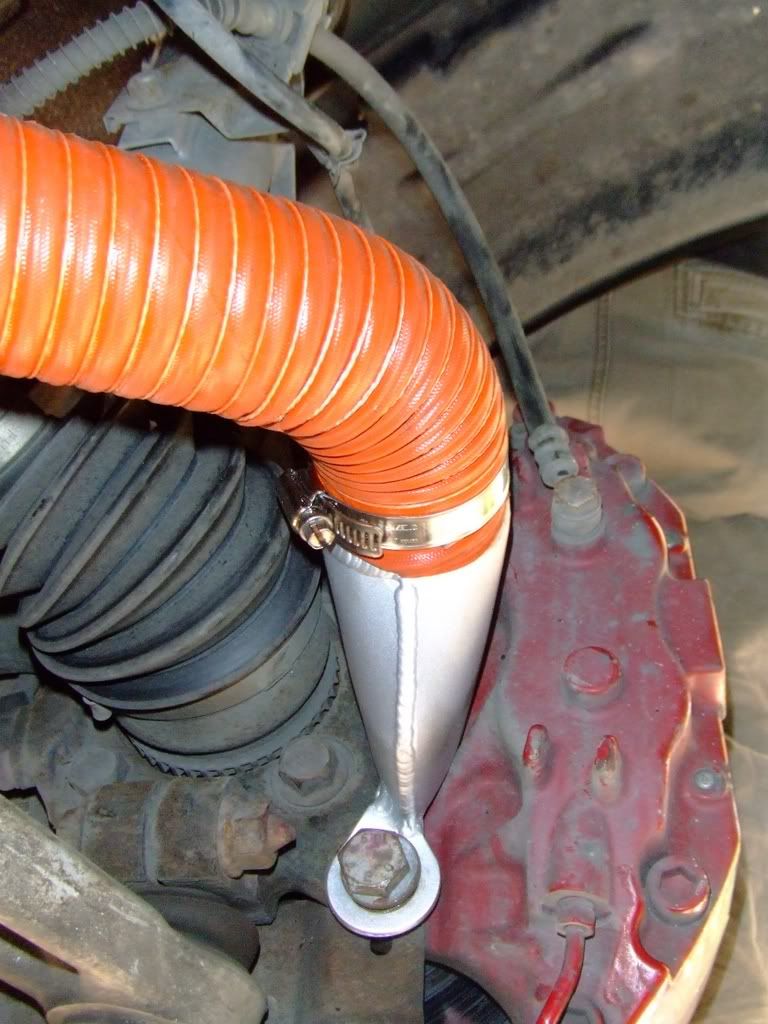
The brake brackets are identical – so it is not important which one you grab; however the orientation is important!
Locate the 2 – 19mm bolts that hold the caliper to the axle. Carefully remove these bolts and be sure that the washer comes with the bolt when taking it off. The caliper should stay secure to the rotor – but do not move it too much around.
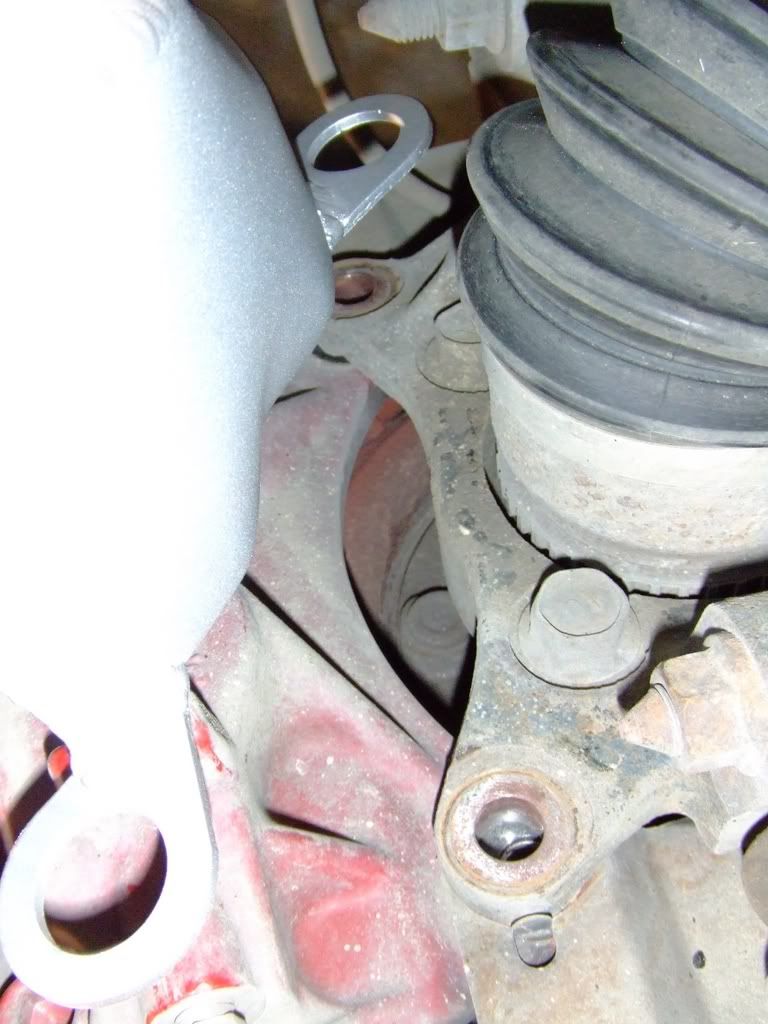
The bracket is designed to have the depressed side facing the EBJ boot.
One at a time bolt the bracket to the caliper with the washer on the outside of the bracket (between the bolt head and bracket). Tighten both bolts to 80+/-7 ft/lbs. You may need to adjust the bracket if there is not enough clearance between it and the EBJ. To do so just lightly pull the mounted bracket away gently from the EBJ.
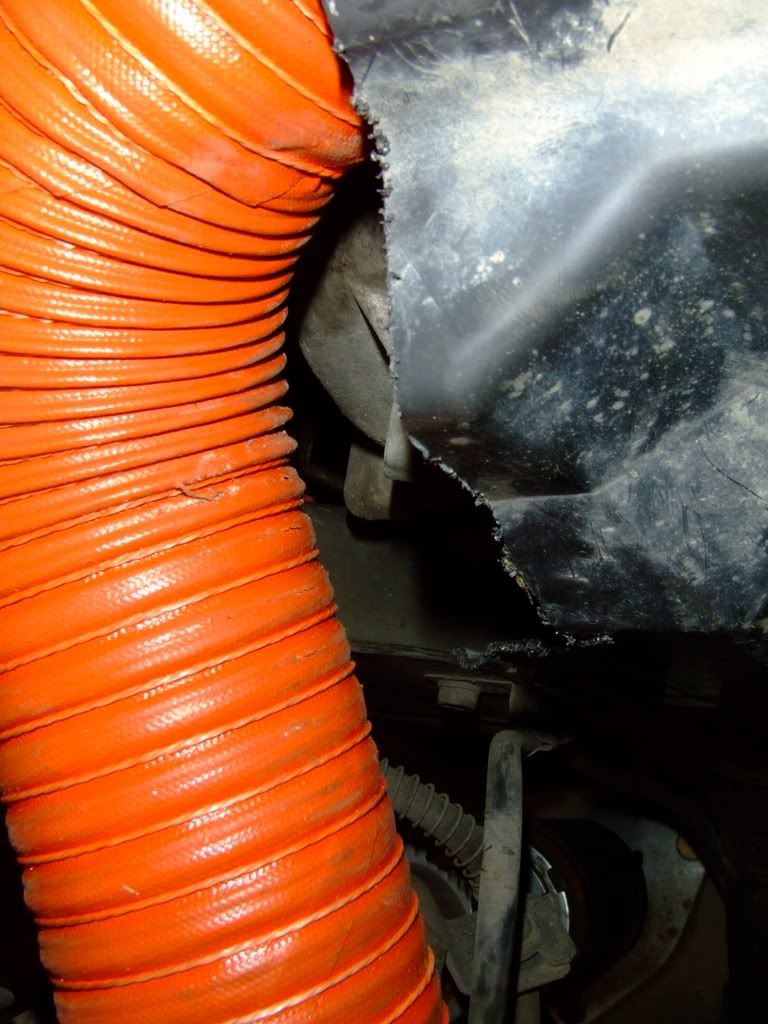
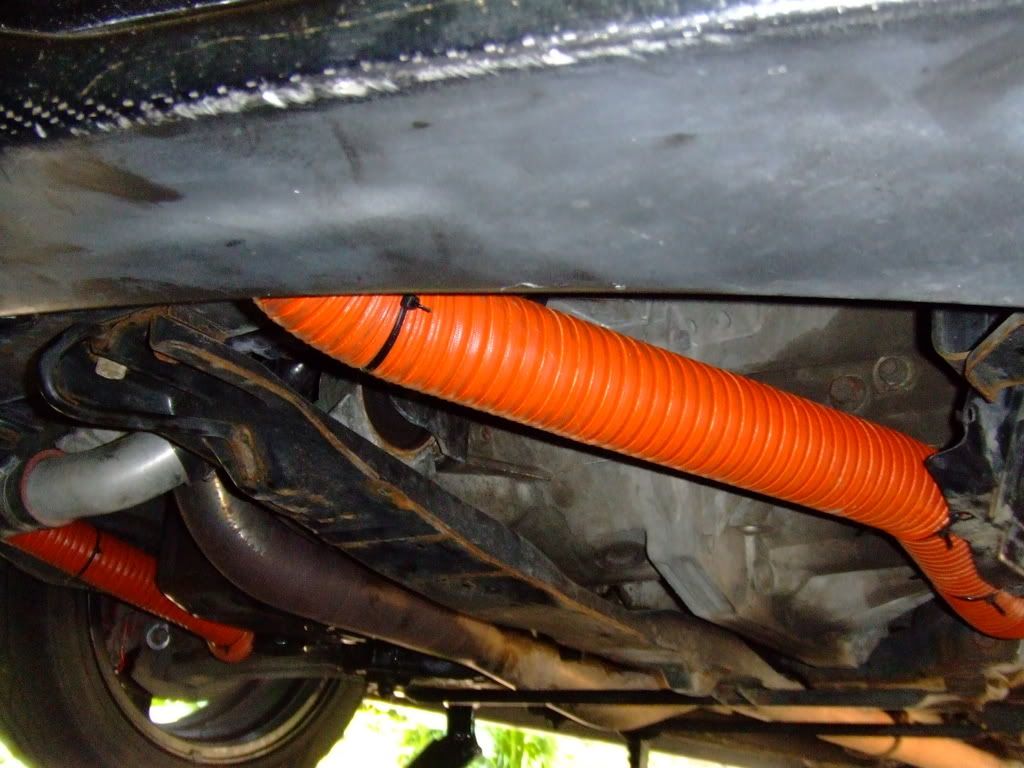
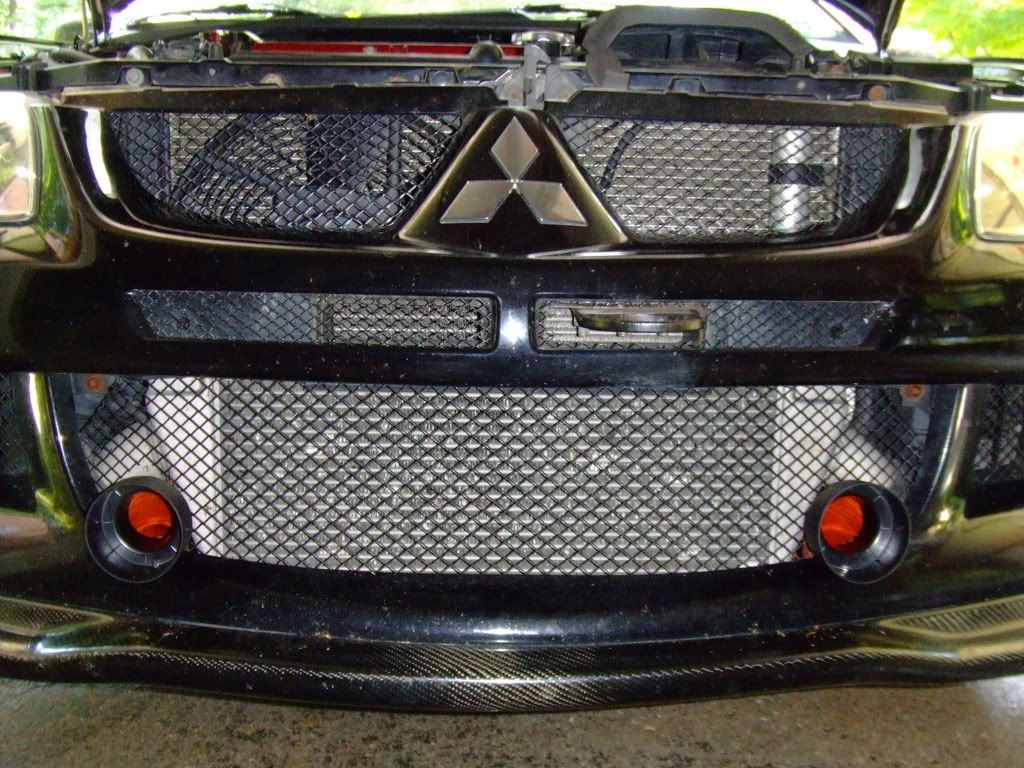
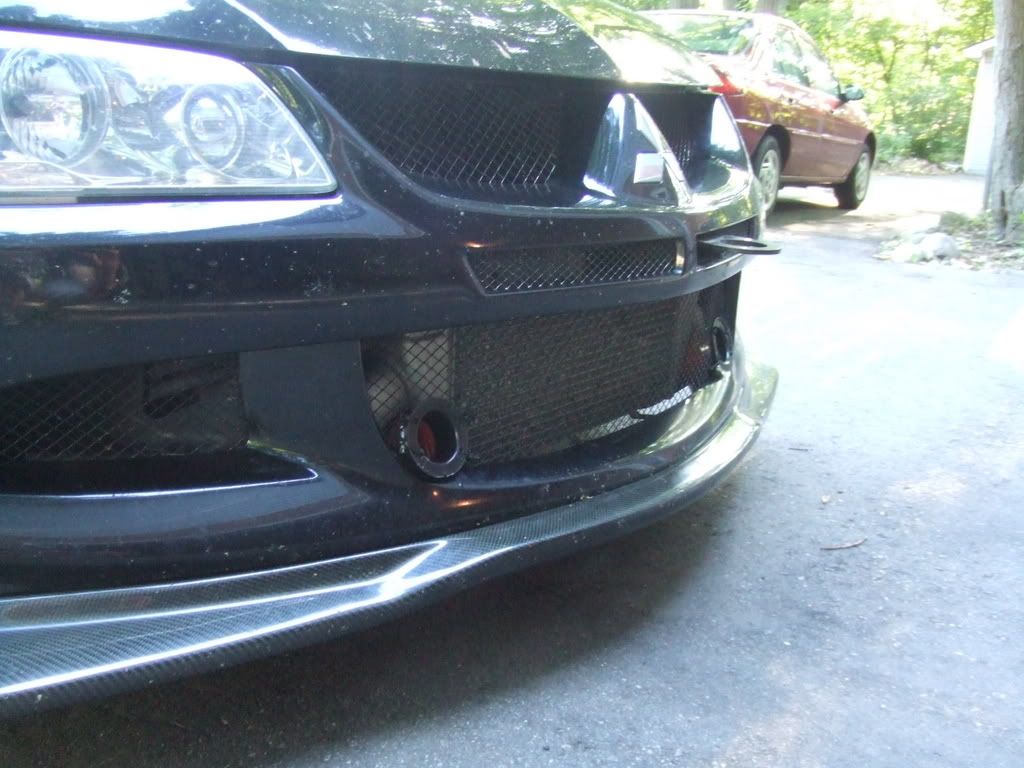
For the mounting of the cooling ducts I decided to go front to brake. In the front of an Eight there is a small area that is in-between the intercooler and the intercooler piping that is unused.
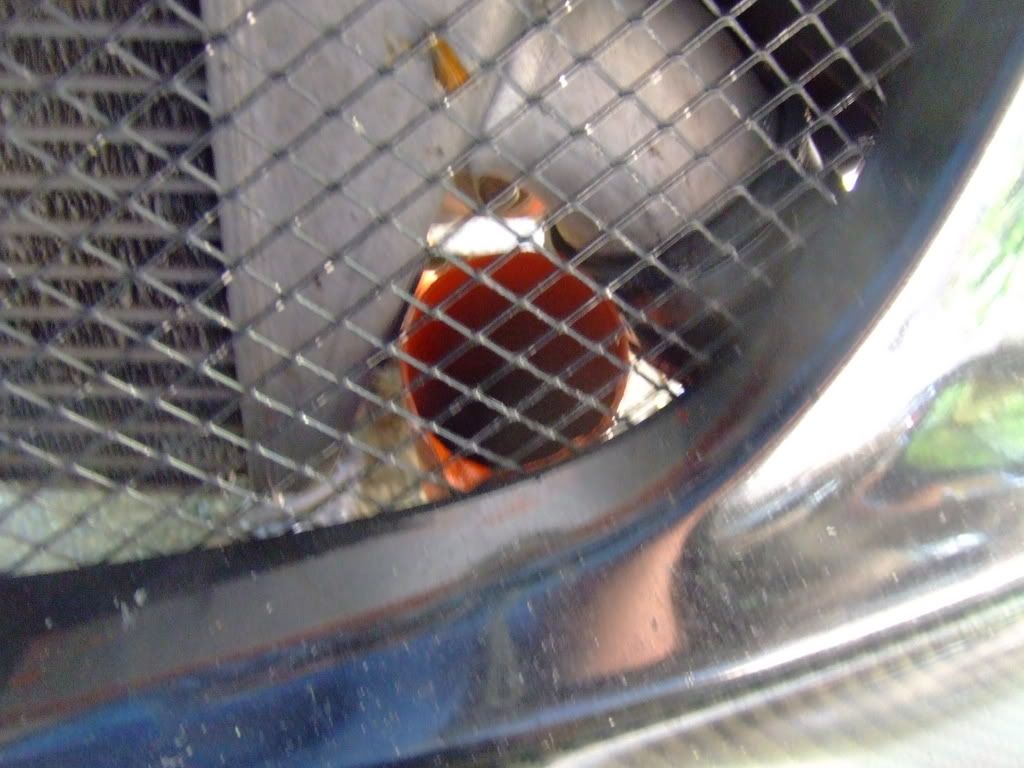
Using a pair of hand clippers, trim back just enough mesh to get the tubing through this opening. You may have to cut, try, and trim more if needed.
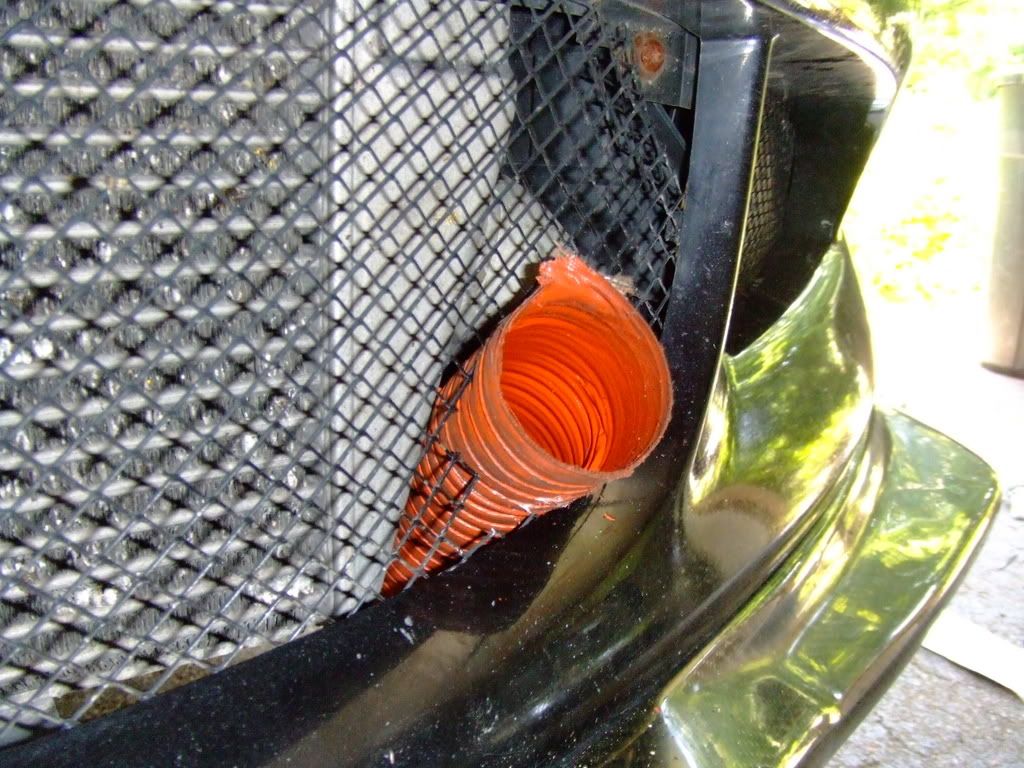
Here is how I mounted the kit. Punch 3-4 holes into the tubing and zip-tie the tubing to the meshing. The other option is that you also could get away without cutting the meshing - if you so choose.

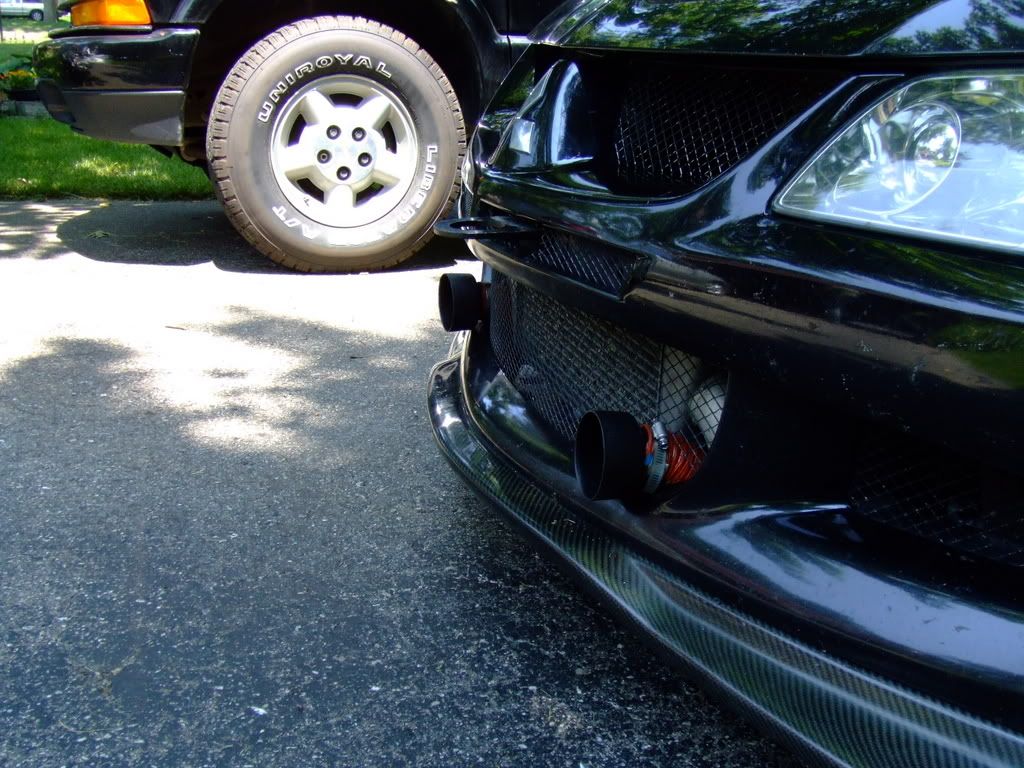
Optional Install: For the velocity stack I found that trimming back the lip to it made it easier to mount in these location.
Using a extra 2in worm clamps attach the stack to the cooling duct. Then using a 3/32in drill bit drill a small hole in the bottom of the stack into the front bumper. With a self-taping screw mount the stack into the bumper to make it secure.
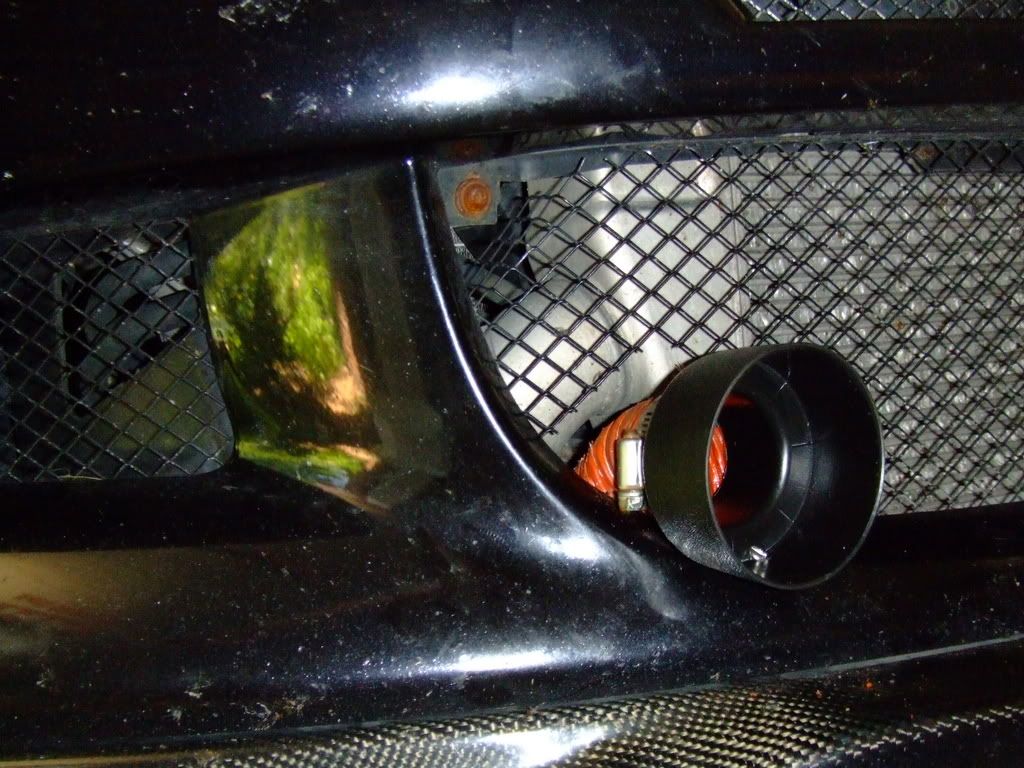

Repeat for the other side.
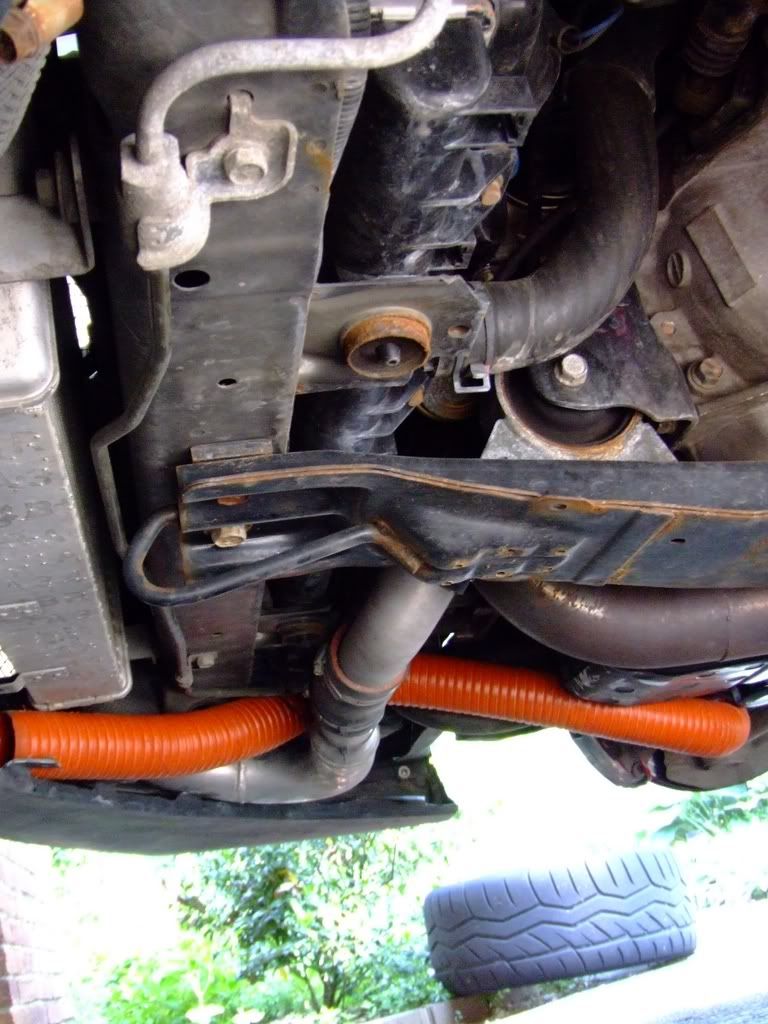
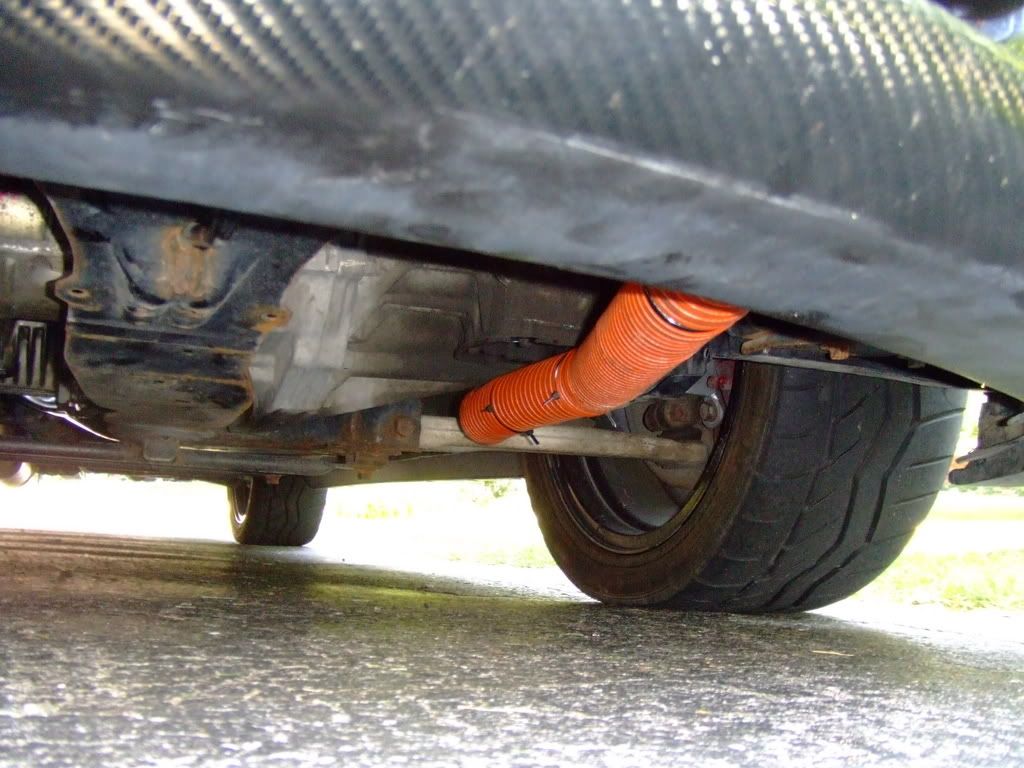
Now comes the time to test and see where you locate the tubing to the brackets under the car. It may be a bit trial and error – be sure that you do not locate the tubing anywhere near moving, excessively hot, or sharp parts.
For the passenger side I found that go over the LICP, hugging the AC condenser lines, and around the oil filter worked the best. For the driver side I went around/under the transmission.
Next up is trimming both side-wheel well panels from the car. Roughly hold the tubing where you wish to have it run and mark off areas of the panels that will be in the way.
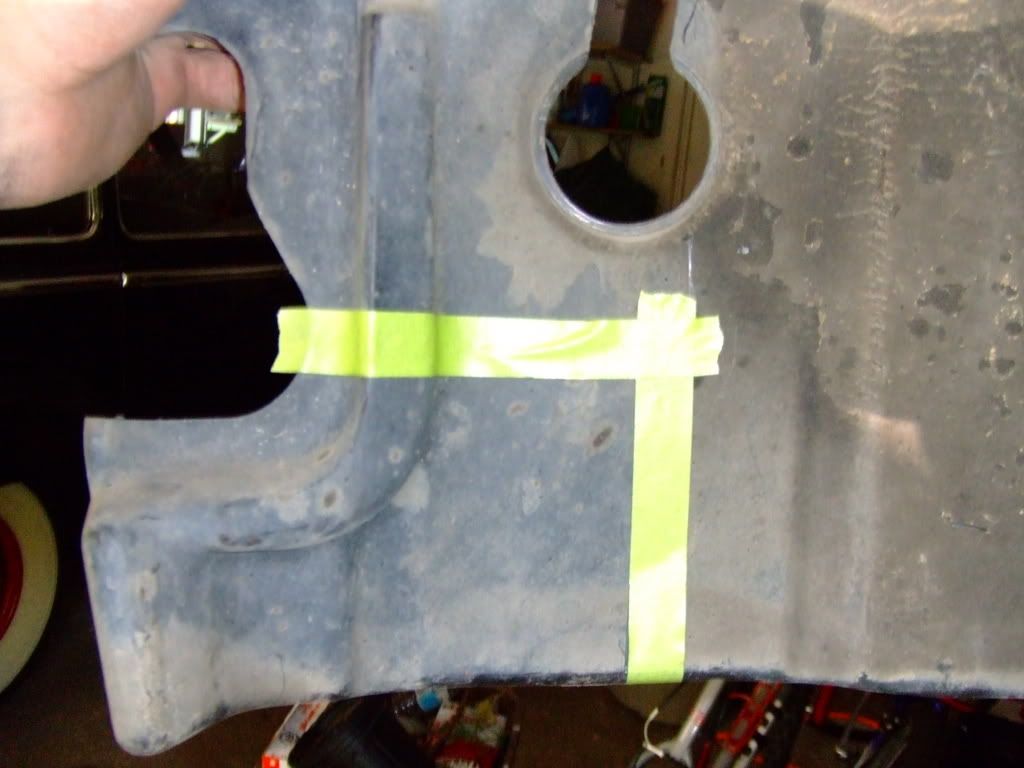
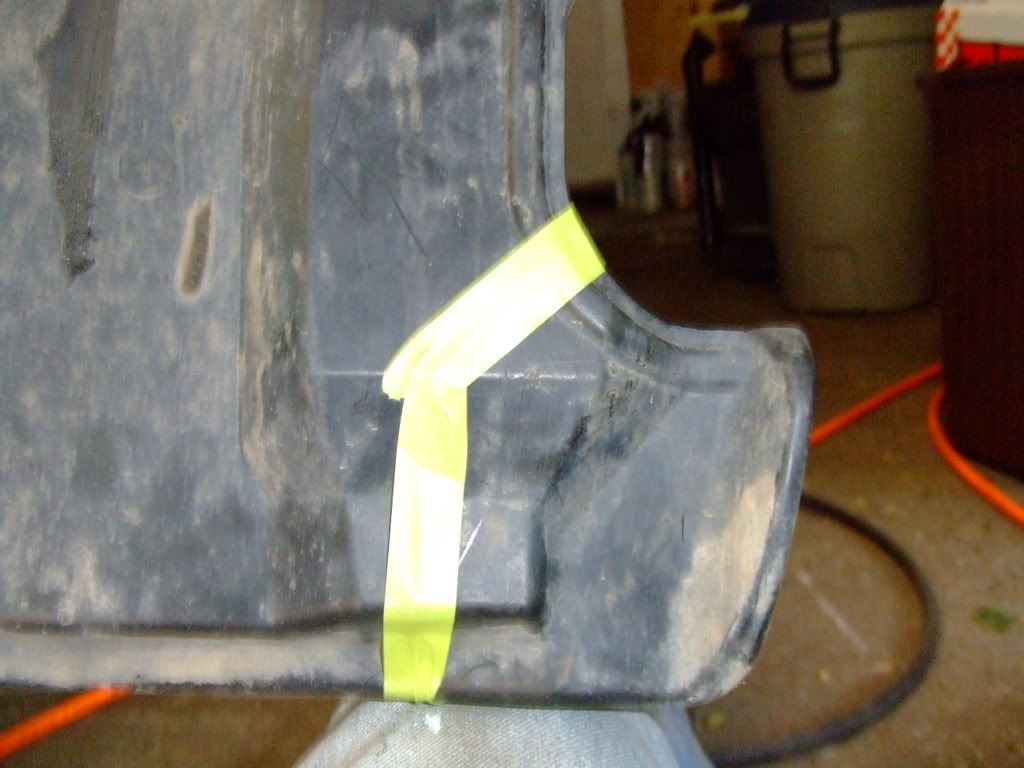
Take off both panels and cut the plastic back to fit in the tubing. And but them back on.
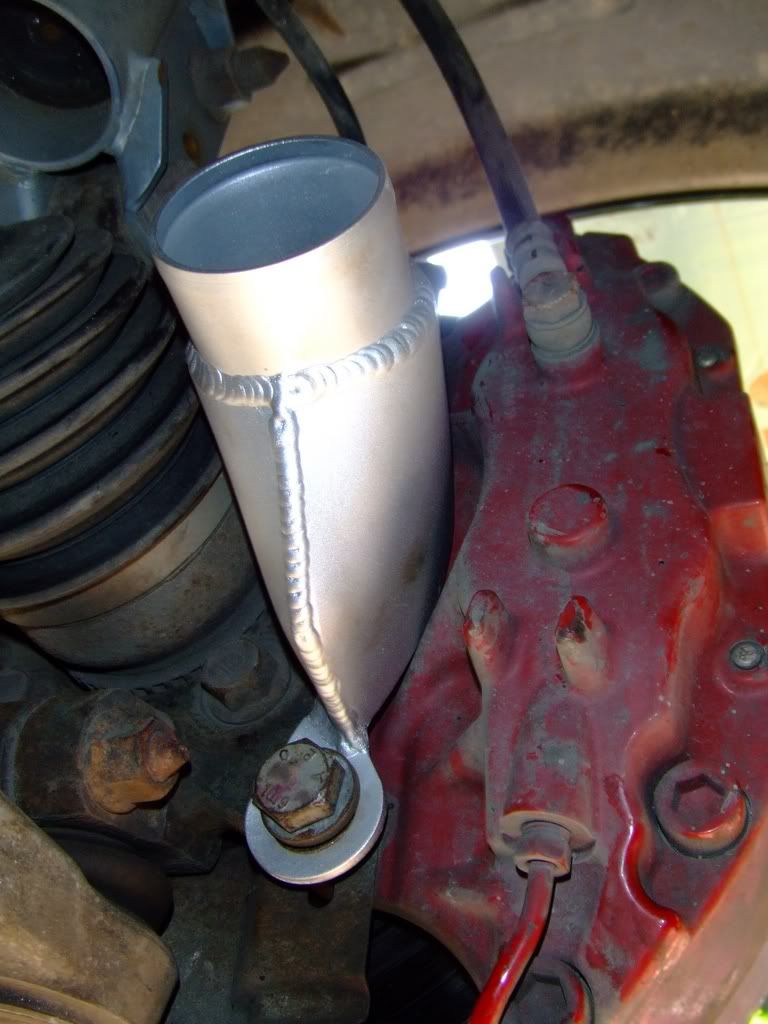
Using the two supplied worm clamps – attach the tubing to the brackets. Note: Do this before you zip-tie anything! Also be sure to watch were you put the screw part of the clamp – you could rub the EBJ if this part is too close. I recommend having in the bottom area.
Here is where having a friend or two over makes this easier. Have one friend in the car and turn the key to accessory. Do not start the engine! Be under the car and have him (or her) turn the wheel lock-to-lock. Hold it in both full locks and hold with your hand where you think you may want to zip-tie. Then have them turn the wheels a few times. You are looking for enough slack in the tubing so the tubing doesn’t bind or pull and for areas that rub or may rub the wheels. Make take a few minutes. Also look again for sharp areas that are sharp or could cause damage to the tubing.
Next zip-tying! I will not be reusing the OEM undertray. I honestly have not felt a difference at the track with or without it. I think my TC/Trans would get more cool air without it there anyway – so off it is. But without the undertray there are some great areas/holes that could be used for the tubing. For the driver side I used the 2 wheel well undertray holes.
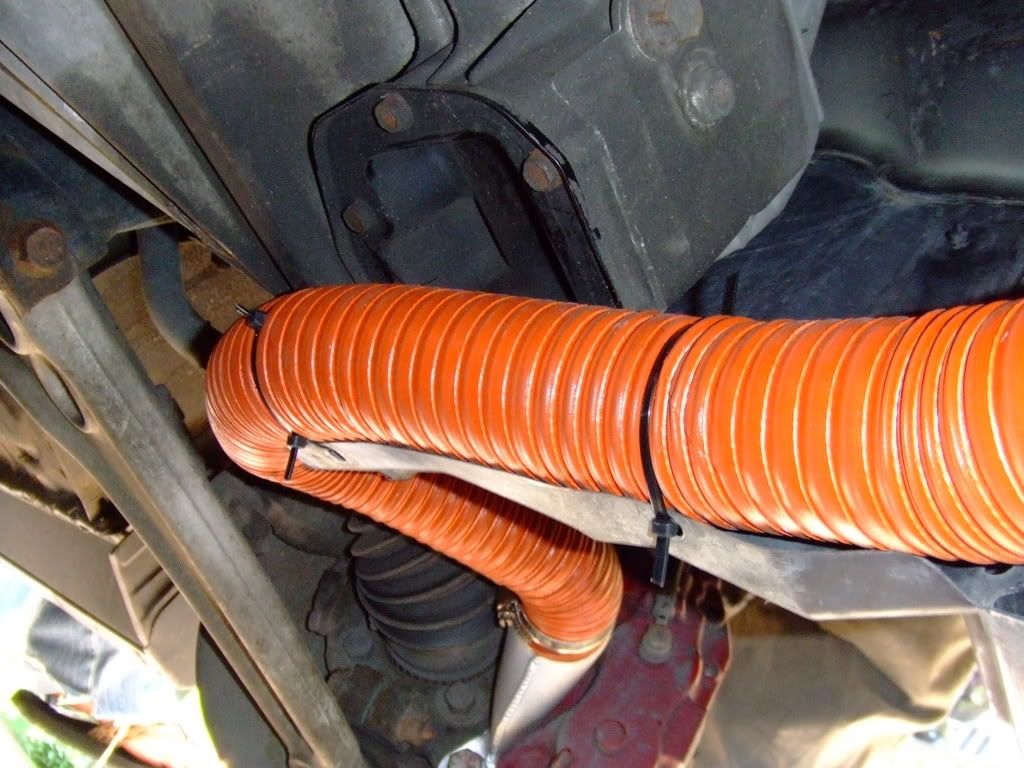
For the passenger side I zip-tied to the AC lines and zip-tied it across to support the tubing.
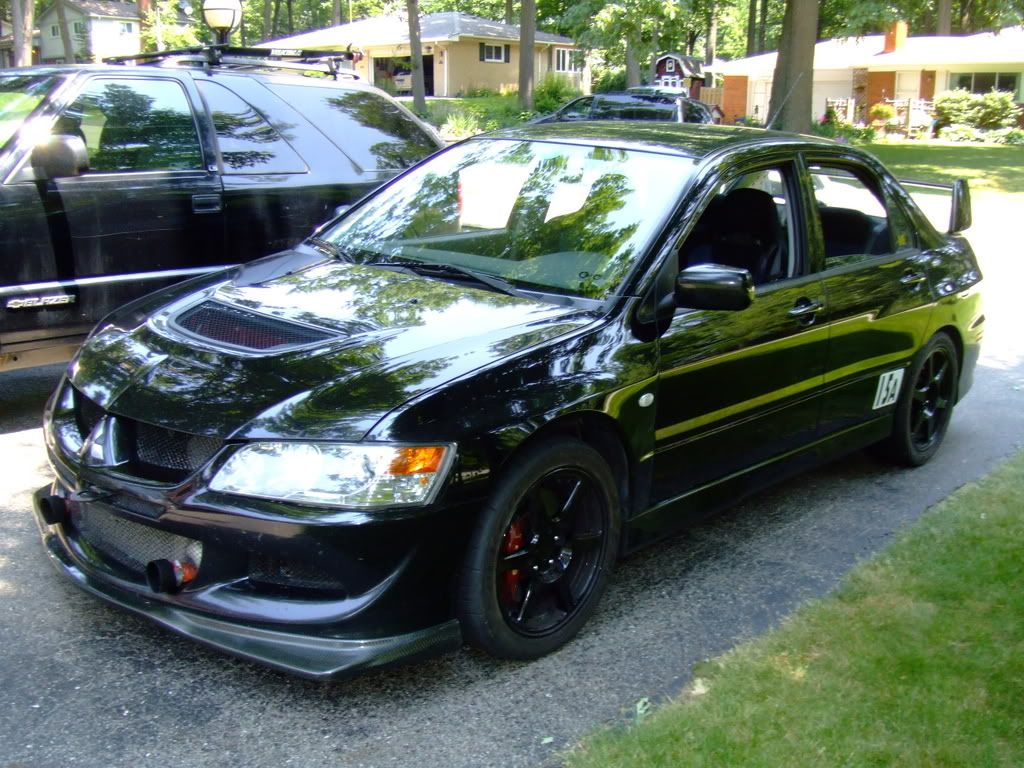
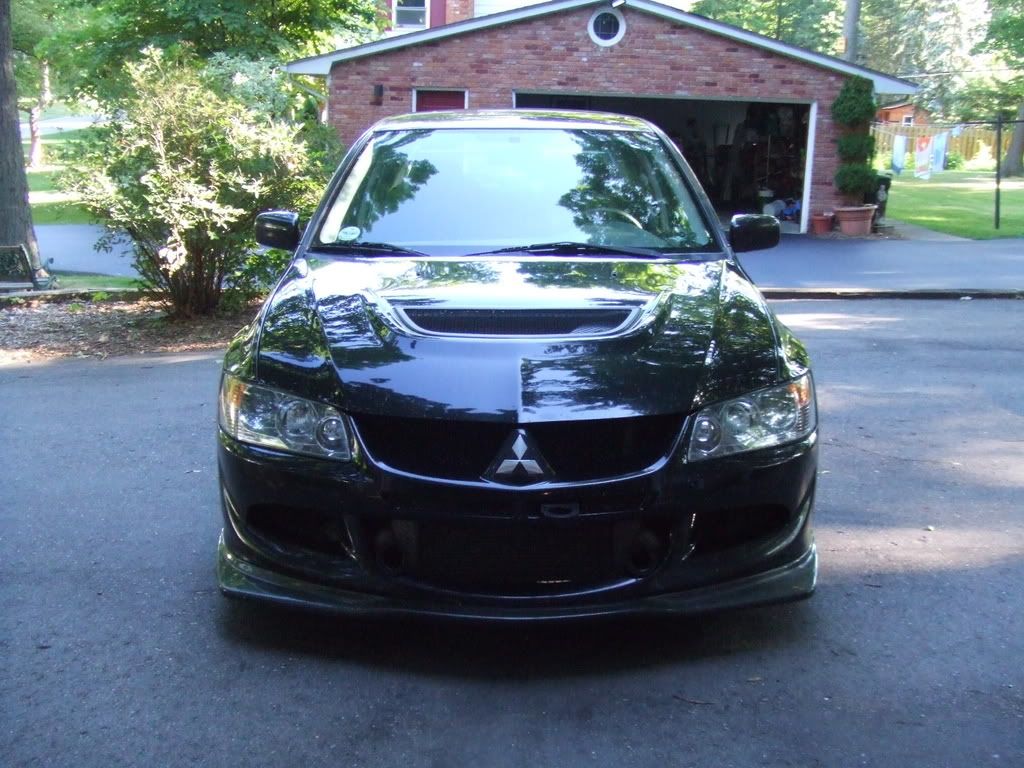
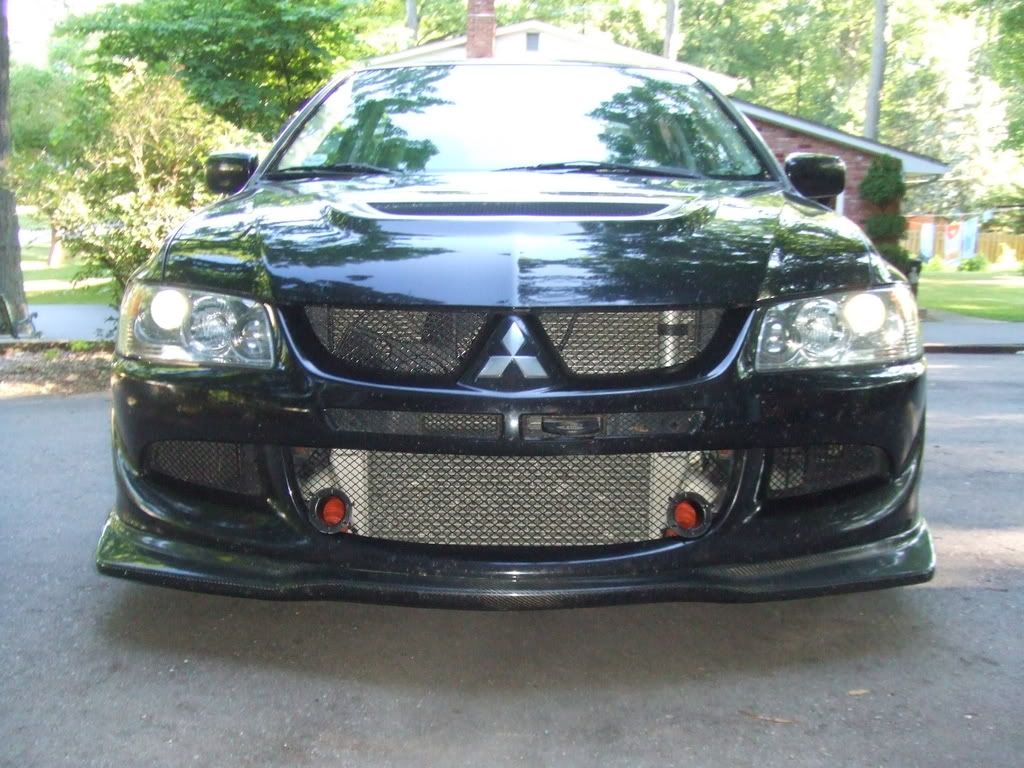
Final product!
Wrap Up
Very straightforward job, for the average Joe home mechanic I don’t think this would be tough to do on a weekend day.
Overall I’d say this is 4.5 out of 10 for the home mechanic to do. Most of the labor is in testing and fitting. As long as you have the correct tools and a few good friends this is a very doable job.
---
So for those in need of an affordable brake duct kit – contact Kyle at Hot Lap Motorsports today!
Kyle (KingKyle) Website: http://www.hotlapmotorsports.com/ Phone number: 973-997-9016
Happy Racing,
MG (SmikeEvo)
Kyle (KingKyle) of Hot Lap Motorsports bringing you another great product – Hot Lap Brake Duct Cooling Kit! Ask yourself these questions: Do you find yourself late apexing shopping isles with your kart? Do you know the braking zone of most streets in your town? Do you look for passing lines when following cars on freeway on-ramps? If you said yes, then this is just the product for you.
The Hot Lap Kit comes with everything you need to keep your brakes cool on the track and it is affordable! Unlike other kits that may cost a few internal organs - Kyle has kept his kit simple, straightforward, and priced for road-courser in mind. Cost is $239 for the whole kit.
Kyle track tested these and has seen lower rotor surface temperatures 20-30% lower than without a duct kit!
Hot Lap Motorsports – Kyle (KingKyle) Website: http://www.hotlapmotorsports.com/ Phone number: 973-997-9016.
The Kit
Specs:
2 – Brake Caliper Brackets
2 – 3ft 8in High-Temp Tubing Sections
2 – Velocity Stacks
2 – 2in Worm Clamps
Constructed from only the finest materials – the cooling brackets are made from aluminum, hand welded, then anodized in a matte silver for scratch resistance. The ducting is aircraft quality, 2 inch, 600 degree rated tubing. And the supplied worm clamps and velocity stacks are of the best quality.
http://www.hotlapmotorsports.com/pro...8&idproduct=77
Installation
For this install there are a few options of placement for the velocity stacks in the front of your car. I have a 05 with the ACD – so I had to work around the ACD pump and reservoir. Others without the ACD or with the IX bumper may be able to mount them in a different location.
First things first though – find some level ground, 2 jack stands, a jack, a friend or two (big thanks to my brother Devin and my friend Bill), bit of shade, and about 2-3 hours. Mostly general tools needed for this installation. Some other tools/parts you may wish to have available are a torque wrench, cutting clippers, handsaw, 2 extra 2-inch worm clamps (optional), 2 3/32in self-tapping screws, and a bunch of zip-ties.
Start off by safely jacking up the car and putting her onto the jack stands. Take off both front wheels and the undertray.
The brake brackets are identical – so it is not important which one you grab; however the orientation is important!
Locate the 2 – 19mm bolts that hold the caliper to the axle. Carefully remove these bolts and be sure that the washer comes with the bolt when taking it off. The caliper should stay secure to the rotor – but do not move it too much around.
The bracket is designed to have the depressed side facing the EBJ boot.
One at a time bolt the bracket to the caliper with the washer on the outside of the bracket (between the bolt head and bracket). Tighten both bolts to 80+/-7 ft/lbs. You may need to adjust the bracket if there is not enough clearance between it and the EBJ. To do so just lightly pull the mounted bracket away gently from the EBJ.
For the mounting of the cooling ducts I decided to go front to brake. In the front of an Eight there is a small area that is in-between the intercooler and the intercooler piping that is unused.
Using a pair of hand clippers, trim back just enough mesh to get the tubing through this opening. You may have to cut, try, and trim more if needed.
Here is how I mounted the kit. Punch 3-4 holes into the tubing and zip-tie the tubing to the meshing. The other option is that you also could get away without cutting the meshing - if you so choose.
Optional Install: For the velocity stack I found that trimming back the lip to it made it easier to mount in these location.
Using a extra 2in worm clamps attach the stack to the cooling duct. Then using a 3/32in drill bit drill a small hole in the bottom of the stack into the front bumper. With a self-taping screw mount the stack into the bumper to make it secure.
Repeat for the other side.
Now comes the time to test and see where you locate the tubing to the brackets under the car. It may be a bit trial and error – be sure that you do not locate the tubing anywhere near moving, excessively hot, or sharp parts.
For the passenger side I found that go over the LICP, hugging the AC condenser lines, and around the oil filter worked the best. For the driver side I went around/under the transmission.
Next up is trimming both side-wheel well panels from the car. Roughly hold the tubing where you wish to have it run and mark off areas of the panels that will be in the way.
Take off both panels and cut the plastic back to fit in the tubing. And but them back on.
Using the two supplied worm clamps – attach the tubing to the brackets. Note: Do this before you zip-tie anything! Also be sure to watch were you put the screw part of the clamp – you could rub the EBJ if this part is too close. I recommend having in the bottom area.
Here is where having a friend or two over makes this easier. Have one friend in the car and turn the key to accessory. Do not start the engine! Be under the car and have him (or her) turn the wheel lock-to-lock. Hold it in both full locks and hold with your hand where you think you may want to zip-tie. Then have them turn the wheels a few times. You are looking for enough slack in the tubing so the tubing doesn’t bind or pull and for areas that rub or may rub the wheels. Make take a few minutes. Also look again for sharp areas that are sharp or could cause damage to the tubing.
Next zip-tying! I will not be reusing the OEM undertray. I honestly have not felt a difference at the track with or without it. I think my TC/Trans would get more cool air without it there anyway – so off it is. But without the undertray there are some great areas/holes that could be used for the tubing. For the driver side I used the 2 wheel well undertray holes.
For the passenger side I zip-tied to the AC lines and zip-tied it across to support the tubing.
Final product!
Wrap Up
Very straightforward job, for the average Joe home mechanic I don’t think this would be tough to do on a weekend day.
Overall I’d say this is 4.5 out of 10 for the home mechanic to do. Most of the labor is in testing and fitting. As long as you have the correct tools and a few good friends this is a very doable job.
---
So for those in need of an affordable brake duct kit – contact Kyle at Hot Lap Motorsports today!
Kyle (KingKyle) Website: http://www.hotlapmotorsports.com/ Phone number: 973-997-9016
Happy Racing,
MG (SmikeEvo)
 Jun 18, 2007, 03:20 PM
#3
I did it for 2 reasons. 1. I wanted to get the maximum amount of air to the brakes. 2. The straighter the tubing the quicker the air will move. So this was where I could put them. Other users could easily put/hide them in the grill or side vents.

Jun 18, 2007, 03:31 PM
#5
Account Disabled
iTrader: (8)

Join Date: Dec 2006
Location: santa rosa CA
Posts: 718
Likes: 0
Received 0 Likes
on
0 Posts
Its cool that it serves a purpose but imho it looks like crap, kind of reminds me of a pvc intake on a honda or something. I like the looks of warrtalons much better.
Jun 18, 2007, 03:38 PM
#7
I will jack the car up, and see if there is another way to route the ducts in a more "stealthy"manner. I think it looks good, and most importantly, it is a Functional piece! I am also going to get your tow "eye" and pop it out my hood.... I don't care what people would say about that, It is the fact I like it, that I will do it that way.
I am also going to get your tow "eye" and pop it out my hood.... I don't care what people would say about that, It is the fact I like it, that I will do it that way.
Trending Topics
Jun 18, 2007, 03:42 PM
#8
Evolved Member
iTrader: (5)
Join Date: Apr 2003
Location: Kentucky
Posts: 1,296
Likes: 0
Received 0 Likes
on
0 Posts
Looks like the Forge kit, minus the spacers and plus the velocity stacks. I would have mounted the stacks behind the mesh though. You are leaving the undertray off now I take it?
Jun 18, 2007, 03:47 PM
#9
Thanks Kev. Ya thats how I have seen other JDM race cars. The hooks always were on the hood v. the front.
No reason for spacer. There is plenty of thread on the bolts for the kit and the washer - remember to tq to 80ft/lbs. And it is priced better than the Forge kit!
My IC is in the way of putting the stacks fully behind the meshing. I might mod the stacks some and if I like it I will post it all up.
No reason for spacer. There is plenty of thread on the bolts for the kit and the washer - remember to tq to 80ft/lbs. And it is priced better than the Forge kit!
My IC is in the way of putting the stacks fully behind the meshing. I might mod the stacks some and if I like it I will post it all up.
Jun 19, 2007, 11:24 AM
#10
Evolving Member
Join Date: Jan 2006
Location: California
Posts: 166
Likes: 0
Received 0 Likes
on
0 Posts
Couple of big reasons to mount it behind the mesh.
1. rocks, track rubber and brake rotors do not mix. There is a good chance of a rock dropping in and covering up some or all of your air flow. Some mesh there would definitly be a good idea.
2. mounting it ahead of the mesh doesn't take advantage of the low pressure zones the front bumper creates. Probably not a huge deal when going at speed but if there is space behind the mesh thats the optimal aero location.
Ive asked around about a custom moulded plastic piece to replace the black plastic parts behind the side mesh area on the front bumper (for oil and ACD cooling). Basically split the air cooling between oil/ACD plus built in velocity stack with coulping for the brake duct intake. Unfortunately, to recoup the design/production costs it would need to sell ~100 units. Anyone want to start a group buy?
Jun 20, 2007, 09:52 AM
#11
Evolving Member
iTrader: (15)
Join Date: Aug 2005
Location: [North] Dallas, TX
Posts: 486
Likes: 0
Received 0 Likes
on
0 Posts
The kit looks good, but...
There is a very good reason for using those spacers supplied by the Forge kit. From an engineering standpoint, it does not sound wise to clamp the aluminum tabs under the head of the bolt that is holding calipers on under repeated braking stress cycles.
Notice the Forge kit supplies Stainless spacers, and strongly mandates the use of the OEM washers under the spacers so that no clamping force from the caliper bolts is applied to the aluminum duct tabs. Each spacer is machined to fit inside the tabs' bolt hole ID and mate directly to the surface of the washers and spindle.
I would predict that eventually the tabs under the bolts will compress and/or split apart with continued heat and stress cycles, resulting in a loose caliper or perhaps a worse failure. I'd get some steel spacers in there asap to remove the force from the duct tabs.
Best of luck with the new kit!
Regards
Ethan
Jun 24, 2007, 06:55 AM
#12
Due to popular demand more install options! I’m working for everyone here. So here is another variation on using the velocity stacks!
With the flash on you can see the orange of the tubing. The top pic is w/o flash - you cannot see the orange unless you are right on top of it.
I cut the top part of the stack so that it left me with a "hat". Then using a 1/8th in bit, I drilled out 4 holes in a rectangle pattern into the flat part of the stack. Using some worm clamps I re-attached the modified stacks to the tubing and then zip-tied the stacks to the meshing. I am pretty happy with the result. Much more stealth yet retains full functionality!
I did not mesh inside the tubing. The OE mesh still would allow for large rocks (1/4in or so) to get through. If something the size of a golf ball finds its way into the tubing then well I have bigger issues at hand - i.e. why am I driving on a golf course?
I also have not spaced out the caliper with another washer. I will keep a very close eye on this to see the effects of the kit in this set-up. Don’t worry, safety first - I will post up any findings if I come across anything.
Thanks again to Kyle for such a great product!
Cheers,
MG
 Jun 24, 2007, 08:25 PM
#15
Evolving Member
iTrader: (3)

Join Date: May 2003
Location: Idaho
Posts: 158
Likes: 0
Received 0 Likes
on
0 Posts
Could you measure the diameter of the big end of the velocity stack? I need a 3” to 2” adapter and those velocity stacks with the kit might do the trick. I was planning on using some inlet ducts from Pegasus and the ones I have in the garage have a 3” outlet thus I need a nice transition piece to the smaller 2” size.
Thank for posting the pictures BTW.
Thank for posting the pictures BTW.