Evo IX GT Wagon. a JDM car in Australia
 Sep 8, 2017, 04:18 AM
#121
Evolving Member
Thread Starter
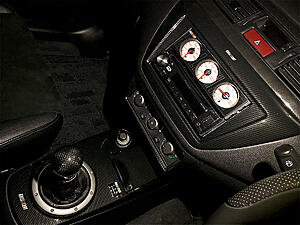
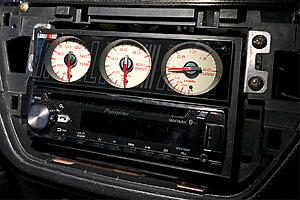
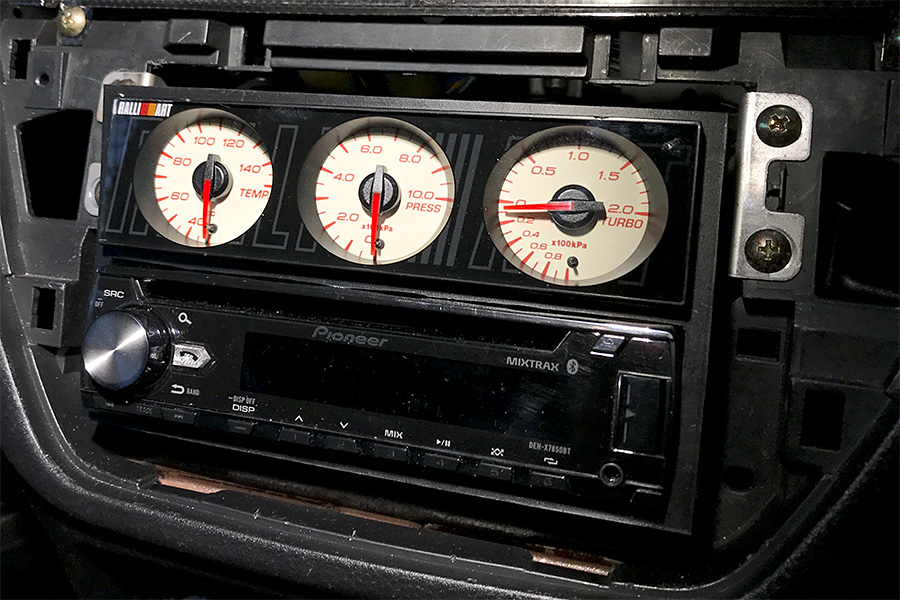
Did a couple of upgrades today including mounting my Ralliart 1 DIN triple gauge RA517925S1.
I used to have an old 2 DIN Kenwood stereo in the Evo but it wasn't much good and looked outdated. I considered getting a new 2 DIN stereo with reversing camera & GPS etc but I decided to combine a new 1 DIN stereo with a Ralliart 1 DIN triple gauge that I already had in my shed. After some shopping around looking at stereos that would look good with the Ralliart triple gauge I chose a simple Pioneer DEH-X7850BT unit with Blue Tooth and Spotify App compatibility etc etc.
I also bought the little harness kit so I could easily wire it up.
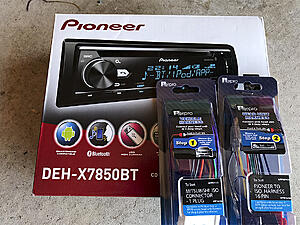
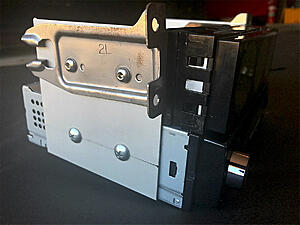
I used the old stereo mounting brackets to mount the Ralliart gauge. Then I made a bracket out of 1.6mm thick silver anodized aluminum that measures 100mm x 100mm and hung the new Pioneer stereo from this new bracket.
I downloaded the Pioneer App "ARC" to make setup and customising its look really easy. I played around with different looks and red and white colours but eventually settled for white lights that "sort of" matches the Ralliart gauge.
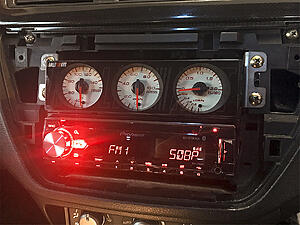
Put the Ralliart 2 DIN trim back on
Looks much better than before. I still have to finish wiring up the gauges
I used to have an old 2 DIN Kenwood stereo in the Evo but it wasn't much good and looked outdated. I considered getting a new 2 DIN stereo with reversing camera & GPS etc but I decided to combine a new 1 DIN stereo with a Ralliart 1 DIN triple gauge that I already had in my shed. After some shopping around looking at stereos that would look good with the Ralliart triple gauge I chose a simple Pioneer DEH-X7850BT unit with Blue Tooth and Spotify App compatibility etc etc.
I also bought the little harness kit so I could easily wire it up.

I used the old stereo mounting brackets to mount the Ralliart gauge. Then I made a bracket out of 1.6mm thick silver anodized aluminum that measures 100mm x 100mm and hung the new Pioneer stereo from this new bracket.

I downloaded the Pioneer App "ARC" to make setup and customising its look really easy. I played around with different looks and red and white colours but eventually settled for white lights that "sort of" matches the Ralliart gauge.

Put the Ralliart 2 DIN trim back on

Looks much better than before. I still have to finish wiring up the gauges

 Sep 11, 2017, 05:22 PM
#123
Evolving Member
Thread Starter
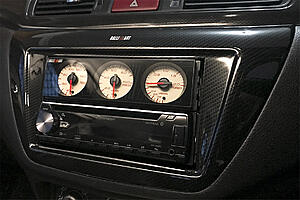
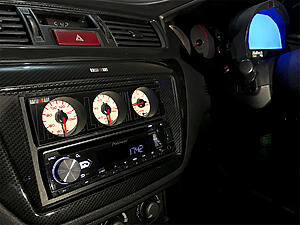
Yes I will have to do something about the gap. It looks worse in the photos than in real life but it does bug me. Both the bezel that came with the stereo and the one that came with the Ralliart gauges are too big to fit into the gap so I might ask my car stereo store friend for a suggestion.
Sep 16, 2017, 01:27 AM
#124
Evolving Member
Thread Starter
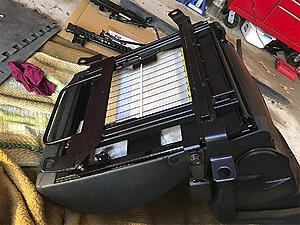
A little update from a few days ago when I installed the second HKS Kansai lowered seat rails for OEM Recaros to the LH side of the car.
Straight forward install, like the drivers side was, a few weeks ago
HKS Kansai Service "Low Position Seat Rail" for OEM Recaro.
Part number: KIM002
Navigator seat for RHD car (which I imagine would be part number for the drivers side seat on an LHD evo in the US or Europe.)
The centre console was still out from installing the other seat, so I removed the seat belt latch from the seat. Then I removed the seat from the car then removed the OEM rails from the seat bracket after I softened up the 4 x Torx head bolts that hold them together. They came out pretty easy.
Removed OEM rail and bolted up new rail and swapped over seatbelt latch from OEM rail. I used low strength loctite 222 on the new rail bolts.
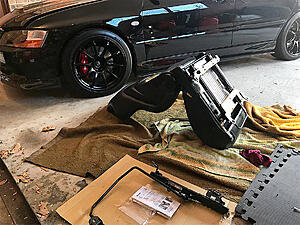
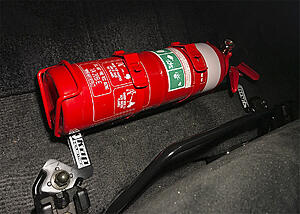
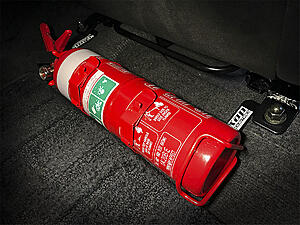
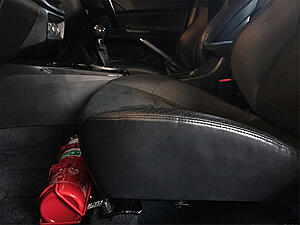
I also added a KAP Industries fire extinguisher mounting bracket and FIRE BOX extinguisher (2 strap New Zealand spec extinguisher) to the LH side footwell. Thanks Russ @KAP Industries.
It is a bit of a tight squeeze with the lowered HKS Kansai seat rails but it did fit even though the seat can't quite slide as far forward as it used to with the OEM brackets. The HKS rails don't operate as smoothly and easily as the OEM rails but I half expected that.
At the moment anyway, I much prefer this lower seat height. And my passenger can enjoy the sportier seating position now too.
Straight forward install, like the drivers side was, a few weeks ago
HKS Kansai Service "Low Position Seat Rail" for OEM Recaro.
Part number: KIM002
Navigator seat for RHD car (which I imagine would be part number for the drivers side seat on an LHD evo in the US or Europe.)
The centre console was still out from installing the other seat, so I removed the seat belt latch from the seat. Then I removed the seat from the car then removed the OEM rails from the seat bracket after I softened up the 4 x Torx head bolts that hold them together. They came out pretty easy.
Removed OEM rail and bolted up new rail and swapped over seatbelt latch from OEM rail. I used low strength loctite 222 on the new rail bolts.


I also added a KAP Industries fire extinguisher mounting bracket and FIRE BOX extinguisher (2 strap New Zealand spec extinguisher) to the LH side footwell. Thanks Russ @KAP Industries.
It is a bit of a tight squeeze with the lowered HKS Kansai seat rails but it did fit even though the seat can't quite slide as far forward as it used to with the OEM brackets. The HKS rails don't operate as smoothly and easily as the OEM rails but I half expected that.


At the moment anyway, I much prefer this lower seat height. And my passenger can enjoy the sportier seating position now too.

The following users liked this post:
NJ9MR (Sep 16, 2017)
Sep 28, 2017, 01:29 AM
#125
Evolving Member
Thread Starter
After reading a build thread on EvoOz and his link to the Jack's Transmissions website describing the best methods of re-filling the transfer case� I went shopping at ENZED today for some SpeedFlow fittings to help me easily fill my T-Case to the correct level.
Link to the Jack's Transmissions warnings and "proper way" to fill a transfer case by making sure it is not under-filled:
https://www.jackstransmissions.com/pages/t-case-filling
With the following fittings I should be able to pump oil in through the drain plug or the fill plug depending on which method I choose.
With the 414-M18-06-BLK screwed into the t-case drain plug (pictured on the left side of my pic below or,
using the other two fittings 733-06-BLK and 413-06 together to pump 700mls into the fill hole, take the car for a short drive, let it sit a while on level ground then remove fill plug to allow it to drain to the correct level.
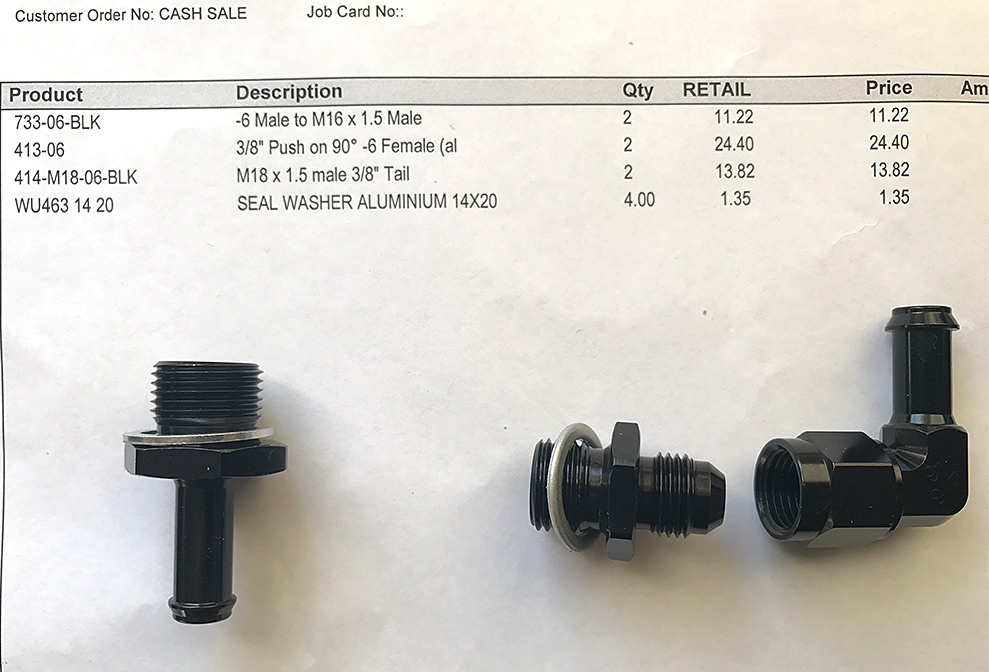
I think the part numbers and methods above are correct but you know� No Responsibility accepted. NOTE: The washers for both fittings are not the same. Salesman made an error on the Invoice.
Link to discussion on the recommended oil to run, in track cars, in the transfer case in Australian & JDM ACD transfer cases:
http://www.evolutionoz.net/forums/in...comment-463108
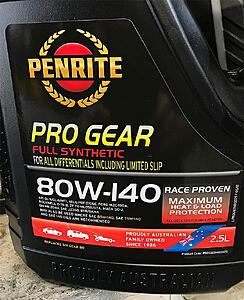
But for better or worse I'm using this Penrite, Pro Gear, Full Synthetic, 80W-140
Comments or corrections welcome.
Link to the Jack's Transmissions warnings and "proper way" to fill a transfer case by making sure it is not under-filled:
https://www.jackstransmissions.com/pages/t-case-filling
With the following fittings I should be able to pump oil in through the drain plug or the fill plug depending on which method I choose.
With the 414-M18-06-BLK screwed into the t-case drain plug (pictured on the left side of my pic below or,
using the other two fittings 733-06-BLK and 413-06 together to pump 700mls into the fill hole, take the car for a short drive, let it sit a while on level ground then remove fill plug to allow it to drain to the correct level.
I think the part numbers and methods above are correct but you know� No Responsibility accepted. NOTE: The washers for both fittings are not the same. Salesman made an error on the Invoice.
Link to discussion on the recommended oil to run, in track cars, in the transfer case in Australian & JDM ACD transfer cases:
http://www.evolutionoz.net/forums/in...comment-463108
But for better or worse I'm using this Penrite, Pro Gear, Full Synthetic, 80W-140

Comments or corrections welcome.
 Oct 1, 2017, 11:45 PM
#127
Evolving Member
Thread Starter
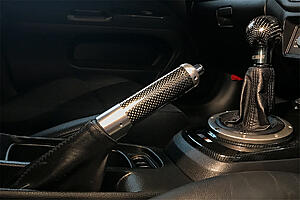
I recently found some brand new genuine Ralliart parts for sale in Japan.
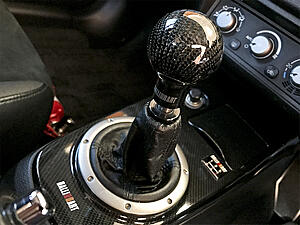
My Varis CF shift knob hasn't been on the car long at all and its only done about 20kms but when I found a genuine Ralliart CF knob I could't resist upgrading.
RA01203C54 - RALLIART Sports shift knob for 5 speed M/T
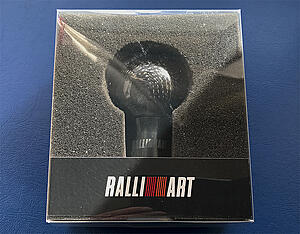
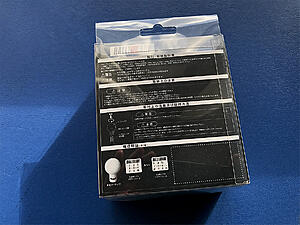
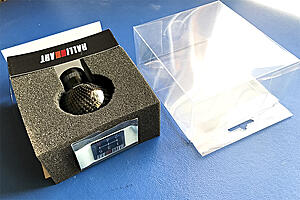
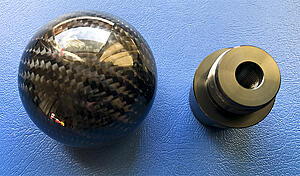
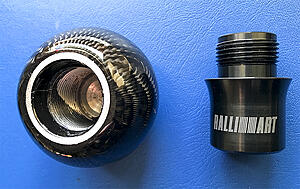
It is really nice!
My Varis CF shift knob hasn't been on the car long at all and its only done about 20kms but when I found a genuine Ralliart CF knob I could't resist upgrading.
RA01203C54 - RALLIART Sports shift knob for 5 speed M/T


It is really nice!
 Oct 1, 2017, 11:46 PM
#128
Evolving Member
Thread Starter
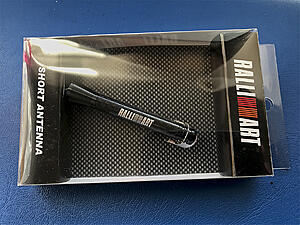
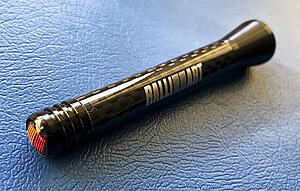
I also got a Ralliart Antenna. I had to cut some threads off the set screw to install it and it was a bit tricky getting the logos all lined up but it looks ok I think. It would've looked better if it was a bit fatter. Its a bit flimsy too…
RA01210B14 - Ralliart roof short Antenna black and carbon fibre
RA01210B14 - Ralliart roof short Antenna black and carbon fibre


 Oct 7, 2017, 08:47 PM
#129
Evolving Member
Thread Starter
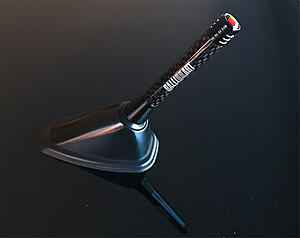
Mitsubishi Sports carbon fiber handbrake / e-brake / side brake / park brake handle
MZ525607
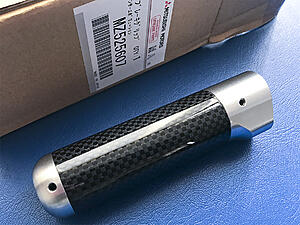
I installed a new Mitsubishi Sports handbrake lever grip today. For years I've been thinking about buying one as I was unsure if I liked them, but after installing it I think it looks good. I bought it new from Japan Parts.
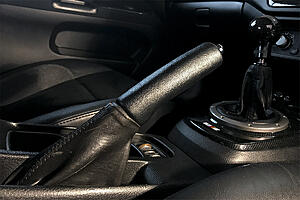
I put some low strength loctite on the grub screw that hold the new grip in place.
 Oct 11, 2017, 08:48 PM
#130
Evolving Member
Thread Starter
I knew I still had to fix that gap around the stereo and 1 DIN gauge so I finally yesterday I did it.
I had some black flat plastic in my shed that I knew would come in handy one day. After a lot of thinking & measuring & cutting I got the basic shape roughed out.
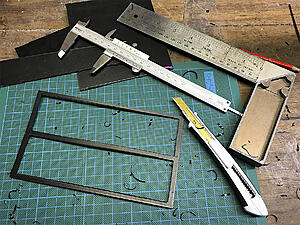
I had to test fit this home made bezel (or trim?) a few times and shaved it down gradually so now it fits pretty well.
It has a flat textured finish already but I might give it a rub down with scotchbrite and spray some Transtar 2 in 1 satin black trim paint on it.
I used a little 3M double sided tape to secure it in position.
I had some black flat plastic in my shed that I knew would come in handy one day. After a lot of thinking & measuring & cutting I got the basic shape roughed out.

I had to test fit this home made bezel (or trim?) a few times and shaved it down gradually so now it fits pretty well.
It has a flat textured finish already but I might give it a rub down with scotchbrite and spray some Transtar 2 in 1 satin black trim paint on it.

I used a little 3M double sided tape to secure it in position.
 Oct 14, 2017, 03:33 AM
#131
Evolving Member
Thread Starter
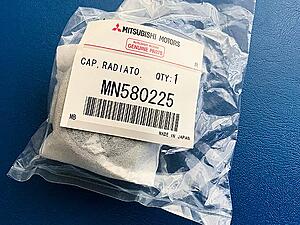
The theme for today's install is "genuine Ralliart caps". Haha
I'm sure its not only me who likes the little details???
Firstly a new Ralliart 1.3 bar radiator cap. Great quality and still available new so I replaced my old one as preventative maintenance.
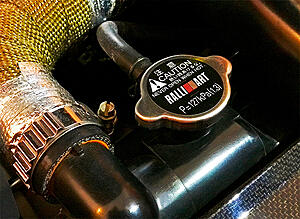
This genuine Ralliart engine oil cap is different to the fakes ones with a better locking washers on the underside and better print on the top of the cap. I've seen fake caps where the letter M is different to this one.
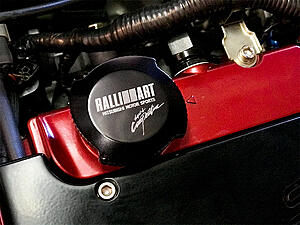
And lastly for today are some genuine Ralliart valve covers. Ralliart valve caps similar to these are being manufactured again but not in Japan. Those new style caps on ebay have the word Ralliart instead of the Ralliart stripe.

I'm sure its not only me who likes the little details???
Firstly a new Ralliart 1.3 bar radiator cap. Great quality and still available new so I replaced my old one as preventative maintenance.


This genuine Ralliart engine oil cap is different to the fakes ones with a better locking washers on the underside and better print on the top of the cap. I've seen fake caps where the letter M is different to this one.

And lastly for today are some genuine Ralliart valve covers. Ralliart valve caps similar to these are being manufactured again but not in Japan. Those new style caps on ebay have the word Ralliart instead of the Ralliart stripe.

The following users liked this post:
NJ9MR (Oct 16, 2017)
Oct 27, 2017, 08:12 PM
#132
Evolving Member
Thread Starter
My Ralliart thirst is unquenchable.
This is a real hardcopy I found on Yahoo japan auctions with the help from my mate Mischa who lives in Japan. Freshly scanned

This is a real hardcopy I found on Yahoo japan auctions with the help from my mate Mischa who lives in Japan. Freshly scanned


 Oct 31, 2017, 03:36 PM
#135
Evolving Member
Thread Starter
Thanks @4whlbst
I bought the Ralliart radiator cap new from www.japanparts.com
Do a search there using the "Japanparts parts number" 1105G-012-040 then choose if you want the red or black 1.3bar cap
I had my Ralliart oil filler cap for a few years and I don't know where you can get a genuine cap from nowadays sorry