How To: Installing the rear Evo X Brembo brakes on a Ralliart
 Apr 29, 2014, 07:42 AM
#1
How To: Installing the rear Evo X Brembo brakes on a Ralliart
OK, so I didn't get all of the pictures that I wanted to take for a very comprehensive how to because I was in a mad rush, but I think this will be adequate.
Parts needed:
Evo X rear rotors
Evo X rear calipers, pads, pin kit and caliper mounting bolts. Also, it would be VERY beneficial to have the OEM X rear brake lines already attached/uncut to them. If not, you will have to get creative with hooking up the lines, and you will need additional parts.
Tools needed:
Jack and Jack stands
Metric Socket Set
Angle Grinder
Tire Iron or large Flathead Screwdriver
Drill
1/2" Drill bit
Metric Brake Line Wrench Set
Tin Snips
Overview:
In short, this was a bigger pain in the **** to install than my BBK for the front was. Having said that, it is not that hard, and if you follow the steps, and check carefully, it isn't that bad. I will be skipping steps, because no one should need to know how to jack up a car, and remove a wheel...lol. Also, some of the pictures I will be using aren't the exact ones from my install, as I didn't get enough pictures. So don't be alarmed if things look different from picture to picture, or the picture isn't even of a RA. Just focus on the point being made in that specific step.
Prep:
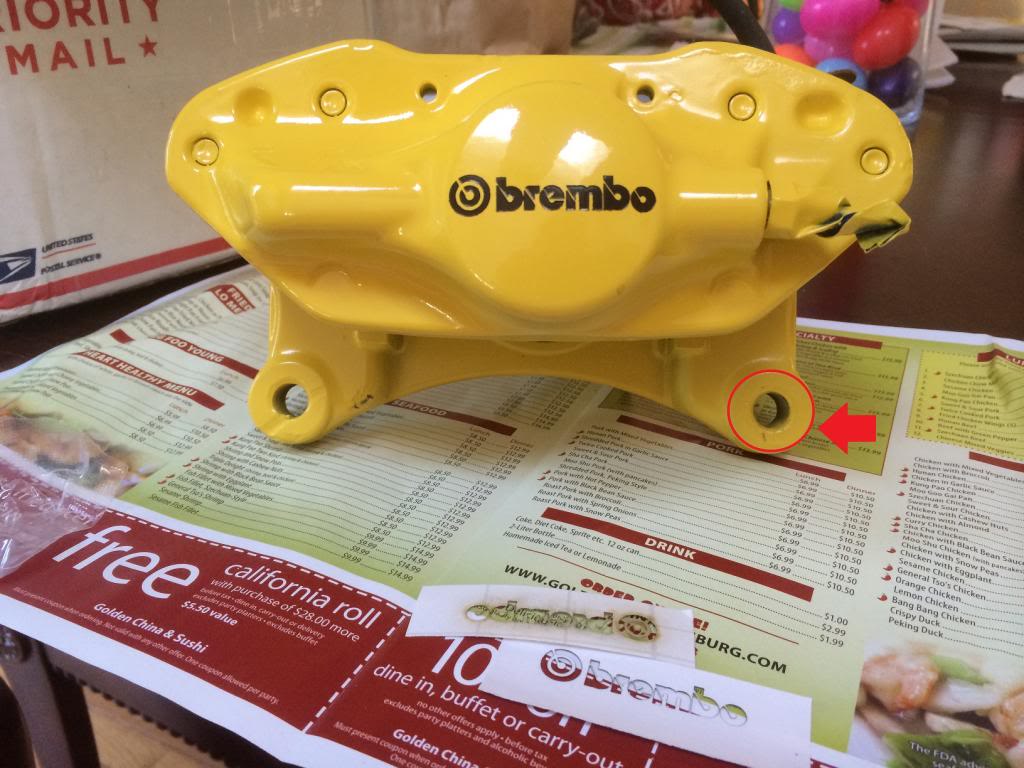
The fun part. Unfortunately, you HAVE to grind the X rear caliper to make it work. Using an angle grinder, grind down the parts of the caliper, shown below in red and green, both front sides shown. The inner tabs marked in green, you only have to do the "back" side. No modification to the tabs on the "Brembo side" of the caliper. Both parts need to be ground down about 0.100" (thickness of 2 dimes)
1) Jack up the car, and secure with Jack stands and remove the wheel.
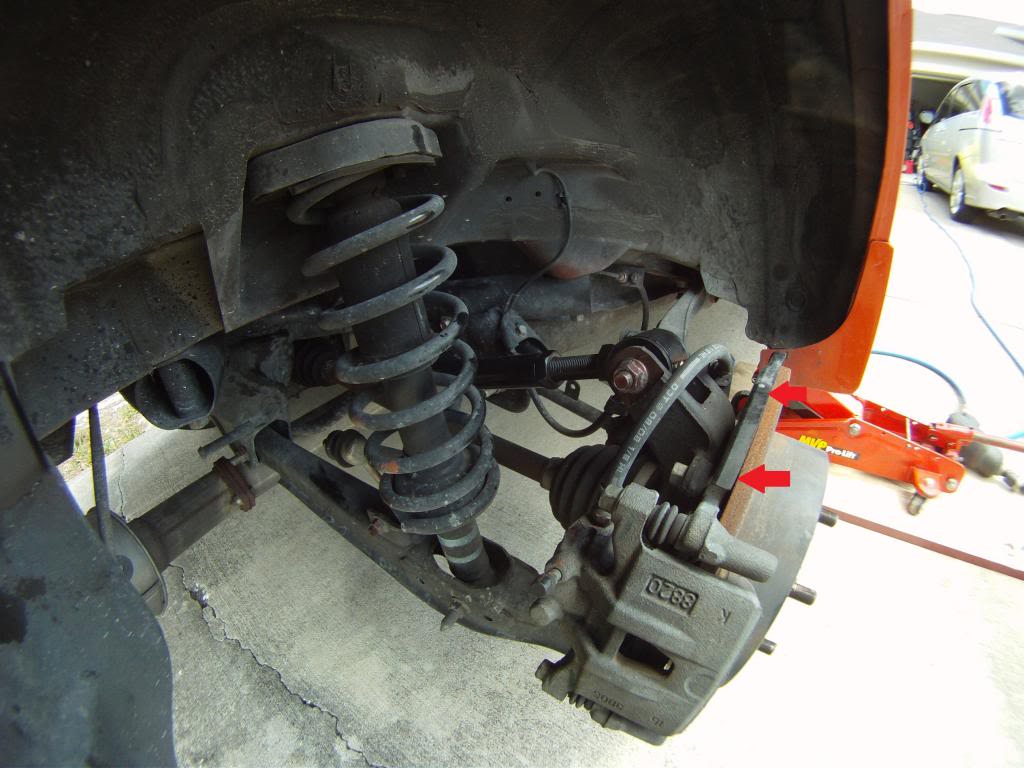
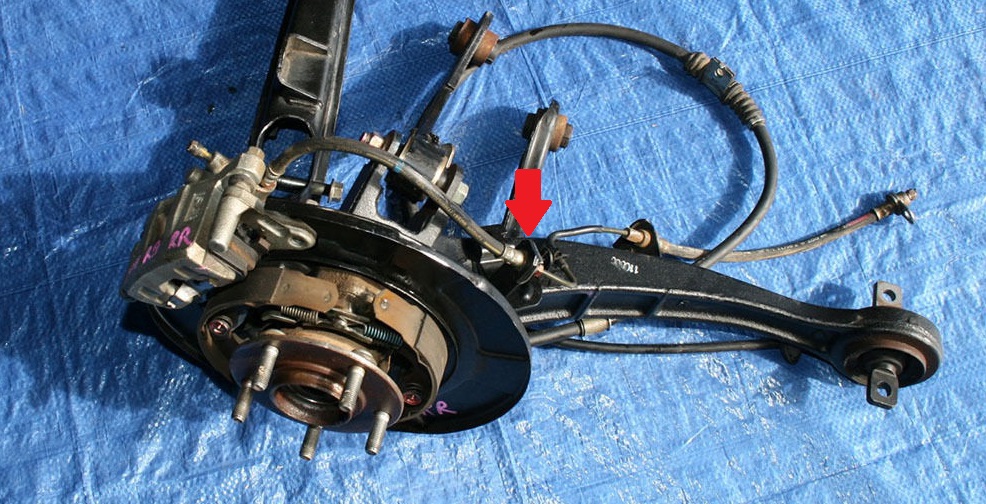
2) Before removing the stock caliper and rotor, bend the dust shield back by using a Tire Iron or Screwdriver to pry it away from the rotor by wedging it in between the rotor and the shield (shown below with red arrows). Make sure to pry it back all the way around the rotor, creating at least a 1/2" gap between the edge of the dust shield and the rear rotor surface.
3) Remove the stock caliper and rotor. I would recommend just sitting the caliper up out of the way, not disconnecting the line yet.
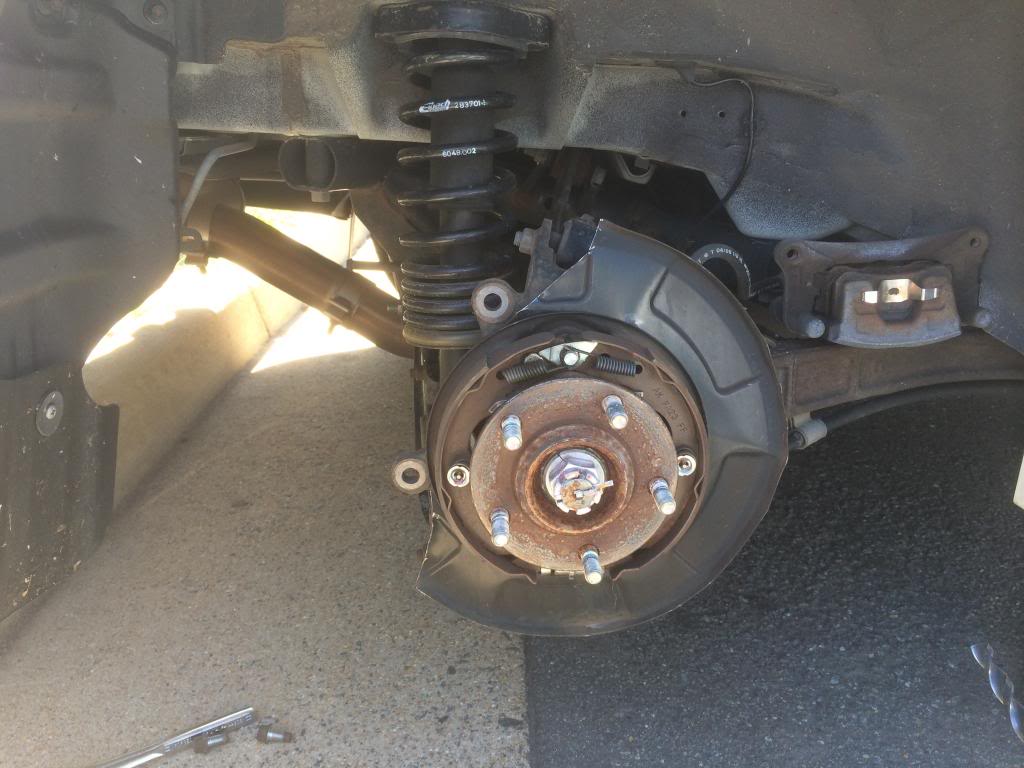
4) Trim the dust shield, as shown below, and drill out the caliper mounting points to 1/2" diameter.
5) Disconnect brake line where shown by prying off the clip, and using the brake line wrench to disconnect the line. Remove the stock caliper.
6) Mount the Evo X rear rotor on to the spindle, and tighten it down all the way flush with at least 2 lug nuts.
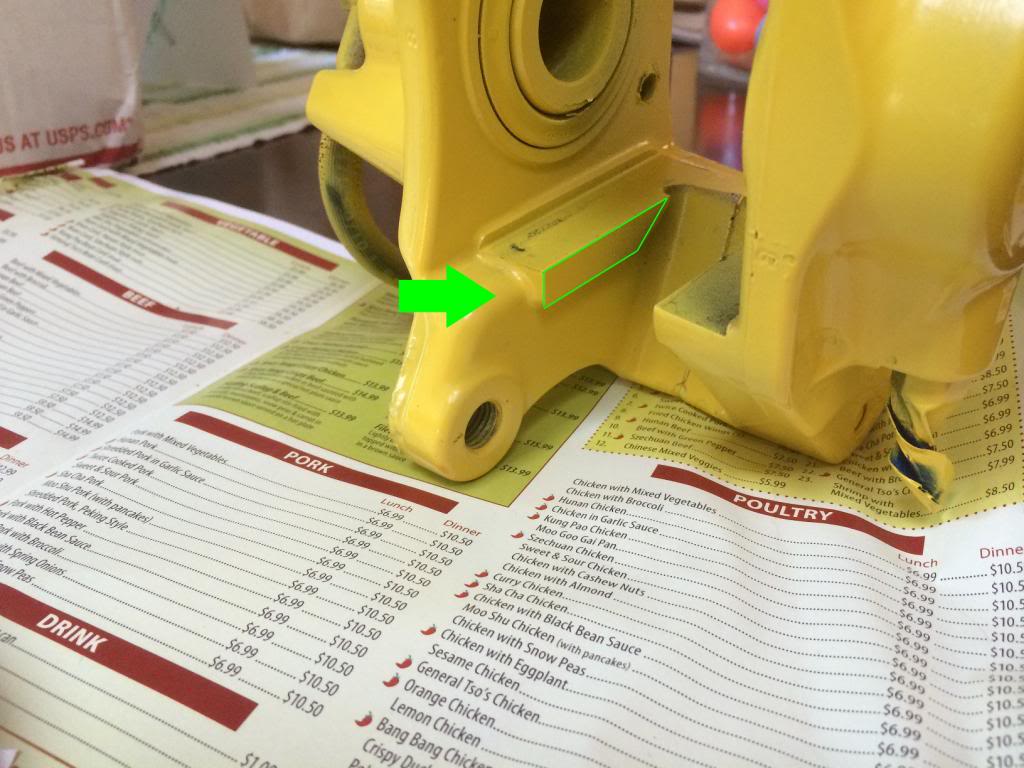
7) This is the point where you are going to check for clearance, to see if you need to grind the caliper more, or not. Mount the caliper (with no pads installed) on to the spindle, and look through to make sure it isn't contacting the back of the rotor in any place. If it is, obviously you need to grind more off. Also, make sure the mounting bolts don't protrude through the spindle, caliper, and come in contact with the rear of the rotor. I actually ground down the length of my caliper mounting bolts, but I don't think I needed to. Just check to be safe.
8) Once the caliper has enough clearance, and does not hit the rotor, mount the caliper, and install the pads/pins.
9) Hook up the end of the OEM Evo X line to the same location you disconnected the stock line. NOTE the line will be too long. I simply looped mine, and made sure it was clear of moving suspension parts until I can get proper lines fabricated.
10) Bleed the brakes, starting with the inside of the caliper, then the outside.
11) Reinstall the wheel, lower the car, blah blah, bed the brakes, blah blah.
You are DONE! BEER!!
Pedal feel afterwards is almost identical to my previous set-up (my BBK in front, oem rear). I expect it ti be slightly more aggressive than it was once the rear brakes are bedded. It is a pretty good upgrade, but if we are being honest, we know it isn't needed with the 6 pot monsters on the front..lol.
Technical specs:
Stock Ralliart Rear Rotors
Diameter: 302mm (11.9")
Thickness/construction: Solid rotor, 10mm thick
Weight: 12.5lbs
Evo X Rear Rotors
Diameter: 330mm (13.0")
Thickness/construction: Vented rotor, 22mm thick
Weight: 19.2lbs
Half **** before and after:
Parts needed:
Evo X rear rotors
Evo X rear calipers, pads, pin kit and caliper mounting bolts. Also, it would be VERY beneficial to have the OEM X rear brake lines already attached/uncut to them. If not, you will have to get creative with hooking up the lines, and you will need additional parts.
Tools needed:
Jack and Jack stands
Metric Socket Set
Angle Grinder
Tire Iron or large Flathead Screwdriver
Drill
1/2" Drill bit
Metric Brake Line Wrench Set
Tin Snips
Overview:
In short, this was a bigger pain in the **** to install than my BBK for the front was. Having said that, it is not that hard, and if you follow the steps, and check carefully, it isn't that bad. I will be skipping steps, because no one should need to know how to jack up a car, and remove a wheel...lol. Also, some of the pictures I will be using aren't the exact ones from my install, as I didn't get enough pictures. So don't be alarmed if things look different from picture to picture, or the picture isn't even of a RA. Just focus on the point being made in that specific step.
Prep:
The fun part. Unfortunately, you HAVE to grind the X rear caliper to make it work. Using an angle grinder, grind down the parts of the caliper, shown below in red and green, both front sides shown. The inner tabs marked in green, you only have to do the "back" side. No modification to the tabs on the "Brembo side" of the caliper. Both parts need to be ground down about 0.100" (thickness of 2 dimes)
1) Jack up the car, and secure with Jack stands and remove the wheel.
2) Before removing the stock caliper and rotor, bend the dust shield back by using a Tire Iron or Screwdriver to pry it away from the rotor by wedging it in between the rotor and the shield (shown below with red arrows). Make sure to pry it back all the way around the rotor, creating at least a 1/2" gap between the edge of the dust shield and the rear rotor surface.
3) Remove the stock caliper and rotor. I would recommend just sitting the caliper up out of the way, not disconnecting the line yet.
4) Trim the dust shield, as shown below, and drill out the caliper mounting points to 1/2" diameter.
5) Disconnect brake line where shown by prying off the clip, and using the brake line wrench to disconnect the line. Remove the stock caliper.
6) Mount the Evo X rear rotor on to the spindle, and tighten it down all the way flush with at least 2 lug nuts.
7) This is the point where you are going to check for clearance, to see if you need to grind the caliper more, or not. Mount the caliper (with no pads installed) on to the spindle, and look through to make sure it isn't contacting the back of the rotor in any place. If it is, obviously you need to grind more off. Also, make sure the mounting bolts don't protrude through the spindle, caliper, and come in contact with the rear of the rotor. I actually ground down the length of my caliper mounting bolts, but I don't think I needed to. Just check to be safe.
8) Once the caliper has enough clearance, and does not hit the rotor, mount the caliper, and install the pads/pins.
9) Hook up the end of the OEM Evo X line to the same location you disconnected the stock line. NOTE the line will be too long. I simply looped mine, and made sure it was clear of moving suspension parts until I can get proper lines fabricated.
10) Bleed the brakes, starting with the inside of the caliper, then the outside.
11) Reinstall the wheel, lower the car, blah blah, bed the brakes, blah blah.
You are DONE! BEER!!
Pedal feel afterwards is almost identical to my previous set-up (my BBK in front, oem rear). I expect it ti be slightly more aggressive than it was once the rear brakes are bedded. It is a pretty good upgrade, but if we are being honest, we know it isn't needed with the 6 pot monsters on the front..lol.
Technical specs:
Stock Ralliart Rear Rotors
Diameter: 302mm (11.9")
Thickness/construction: Solid rotor, 10mm thick
Weight: 12.5lbs
Evo X Rear Rotors
Diameter: 330mm (13.0")
Thickness/construction: Vented rotor, 22mm thick
Weight: 19.2lbs
Half **** before and after:
Last edited by Drew314; Apr 29, 2014 at 07:49 AM.
 Apr 29, 2014, 10:16 AM
#3

Definitly post up an update once you've used this awhile, im looking at either a ksport kit or one from the uk... But i prefer to stick with oem parts for ease of replacement
Dont suppose you happened to get any exact measurements of the areas you modified?
Dont suppose you happened to get any exact measurements of the areas you modified?
Apr 29, 2014, 10:33 AM
#5
Thanks!
Are you considering K-Sport or one from the UK for the rear, or front? This actually isn't that hard to do at all. The only thing is, there isn't much precision to it, as it doesn't really require proper machining, but just clearance. Like I mentioned, I estimate about 0.100" (2.5mm) needs to be taken off the surfaces marked. That literally takes about 5 minutes tops with a proper angle grinder. And the easy part is, as following along with the above how to, if you have to take a little more off, you will be able to clearly see where it does need to be removed from. I got a good pic of the clearance on the legs, but forgot to get one of the inside.
 May 9, 2014, 12:24 PM
#7
Newbie

Join Date: Nov 2013
Location: Los Angeles
Posts: 1
Likes: 0
Received 0 Likes
on
0 Posts
So quick question Would Stock Rotors for an EVO X be a direct replacement for my 2012 Ralliart Rotors?
BTW great write up! im learning as i go so write up like this helps!
BTW great write up! im learning as i go so write up like this helps!
Trending Topics

 Jun 26, 2014, 03:41 AM
#12
Evolving Member
Join Date: Oct 2010
Location: lethbridge, ab, canada
Posts: 130
Likes: 0
Received 0 Likes
on
0 Posts
Curious, couldn't you just buy the rear evo x spindles, calipers and rotors and put them on? Then you wouldn't have to cut, grind ect. or am i missing something?
Jun 26, 2014, 07:27 AM
#13
The track is wider, even if it would bolt up (I don't know if it would), so the rear wheels would protrude out more. But I can assure you that following this writeup would be MUCH faster than swapping the entire rear spindle out, and you would maintain the stock suspension geometry. With an proper angle grinder, from start to finish, this should take no longer than an hour to do.
Jun 26, 2014, 07:03 PM
#14
Evolving Member
Join Date: Oct 2010
Location: lethbridge, ab, canada
Posts: 130
Likes: 0
Received 0 Likes
on
0 Posts
The track is wider, even if it would bolt up (I don't know if it would), so the rear wheels would protrude out more. But I can assure you that following this writeup would be MUCH faster than swapping the entire rear spindle out, and you would maintain the stock suspension geometry. With an proper angle grinder, from start to finish, this should take no longer than an hour to do.
Great write up and easy to do! Have a similar one for the fronts?!!!
also you mentioned bleeding the inside of the calipers before the outside, I was always taught start at the furthest points (outside) first then do the inside, or are these brembos different?
Jun 27, 2014, 06:52 AM
#15
I always thought the increased track width was due to the LCA's being longer? Not sure if some one have compared the 2 side by side. Usually the spindle would be the same except where the caliper mounts?
Great write up and easy to do! Have a similar one for the fronts?!!!
also you mentioned bleeding the inside of the calipers before the outside, I was always taught start at the furthest points (outside) first then do the inside, or are these brembos different?
Great write up and easy to do! Have a similar one for the fronts?!!!
also you mentioned bleeding the inside of the calipers before the outside, I was always taught start at the furthest points (outside) first then do the inside, or are these brembos different?
As for the fronts, I made this "how to" mainly for guys that have purchased my 6 pot Brembo kit for the front of the RA, and I really do feel like that is by far not only the cheapest option, but best one. I would highly suggest buying a kit for the front (mine, or any other one out there) instead of trying to piece one together. People have tried and succeeded in putting the X fronts on the RA, but it requires a bracket, and some very unwholesome machining of the caliper support structure. This rear upgrade should work perfect with any of the front BBK options that I have seen.