Spoolin'Up COP Review


 Apr 23, 2010, 09:46 AM
#19
Update,
Matt has agreed to take back the plate and refund my money. THANKS
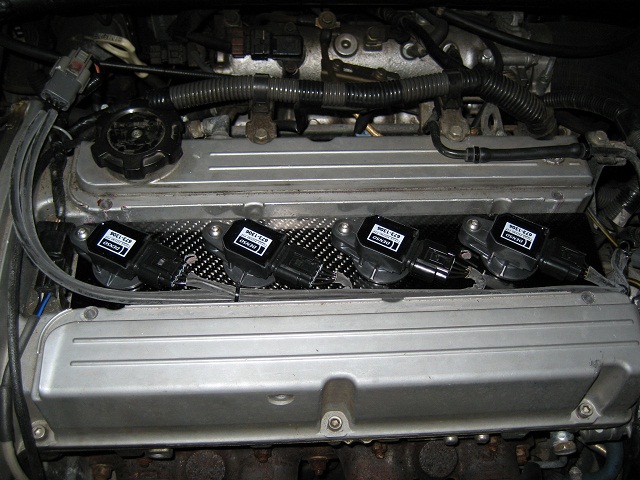
I spent this morning taking my own measurements to fabricate a new plate from 0.125" aluminum. The method is pretty straight forward as the two mounting bolts are on the center line for the spark plugs. I have 5 pieces of aluminum left over from an old intake manifold project and marked them up. Drilled the holes for the COP using a 1" hole saw and shaped the curvature for the IX valve cover.
I also angled the plug connectors towards the rear driver's side position and made sure they were all clocked the same. There is not much room and the far passenger side coil dictates the position. The only issue with mounting in this fashion is the driver's side coil securing bolt hits the valve cover. A quick trip to Lowes netted me a stainless T-nut and new stainless bolt. As a result of me having the T-nut head on the bottom I did place a washer ontop of the two valve cover mounting points so it would not tweak the plate.
Everything is in and working great. I may draw this using CAD and have a friend water jet me some plates. I think this is great option for new coils that can be hidden under the factory cover.
I am very glad I purchased this kit and once my $50 is returned for the plate I will have $200 in this setup and 5 hours of my time. Not a bad deal!


Matt has agreed to take back the plate and refund my money.
THANKSI spent this morning taking my own measurements to fabricate a new plate from 0.125" aluminum. The method is pretty straight forward as the two mounting bolts are on the center line for the spark plugs. I have 5 pieces of aluminum left over from an old intake manifold project and marked them up. Drilled the holes for the COP using a 1" hole saw and shaped the curvature for the IX valve cover.
I also angled the plug connectors towards the rear driver's side position and made sure they were all clocked the same. There is not much room and the far passenger side coil dictates the position. The only issue with mounting in this fashion is the driver's side coil securing bolt hits the valve cover. A quick trip to Lowes netted me a stainless T-nut and new stainless bolt. As a result of me having the T-nut head on the bottom I did place a washer ontop of the two valve cover mounting points so it would not tweak the plate.
Everything is in and working great. I may draw this using CAD and have a friend water jet me some plates. I think this is great option for new coils that can be hidden under the factory cover.
I am very glad I purchased this kit and once my $50 is returned for the plate I will have $200 in this setup and 5 hours of my time. Not a bad deal!
Apr 23, 2010, 09:52 AM
#20
BTW, when I took the two trips to the hardware store I had to put on the stock ignition. I could definitely tell the stock ignition did not like the gap I have on the denso plugs of 0.28" - 0.30". I could tell it has an ever so slight miss under full load. I will drive the car around for a few days and update my impression of the system.
Apr 23, 2010, 09:57 AM
#21
Evolving Member
iTrader: (41)
Join Date: Dec 2003
Location: Coatesville PA
Posts: 242
Likes: 0
Received 0 Likes
on
0 Posts
I bought just connectors and such so I can't speak with certainty but I was more than happy about the COP. I CNCd my own aluminum plates for 2 kits now and did all the wiring myself. I highly recommend the setup. It's considerably cheaper than the other stuff out there (I did it for $150 after shopping around) and Matt was super easy to work with. He answered questions he didn't have to answer and was quick about it too. I can't say enough good things about the spoolinup COP. The only downside is the plate cutout directions in the instructions could use some dimensions.
Apr 23, 2010, 10:04 AM
#22
Evolving Member
iTrader: (17)

Join Date: Sep 2006
Location: Redondo Beach, CA
Posts: 302
Likes: 0
Received 0 Likes
on
0 Posts
Very nice option for those people who'd like to keep the stock look. I hope you'll coordinated with Matt so the rest of the Evo Community can have this as well.
Nice work!
Nice work!
May 1, 2010, 02:55 PM
#24
I have had a few people send me messages about this setup. I notice that www.spoolinup.com now offers the Yaris coils for the VIII that allow for the factory cover to be used. Please see pictures below of this kit vs. what I did and you will see the plugs are angled differently.
VIII Setup using Yaris Coils
IX Setup using Yaris Coils
You notice the IX valve cover has those extra bulges that require you cut reliefs in the plate. When I decided to angle the connectors towards the driver's side rear, this was because it was the only way I could get all the connectors to clock at the same position. If I had clocked the connectors towards the driver's side front, the far driver's side coil connector interferes with the bulge. You also need to be careful that you don't interfere with the plate's mounting bolt hole.
Maybe Matt can clarify whether the new setup for the VIII using the Yaris coils will work correctly for the IX. I suspect the plug connectors need to be mounted as I have them in order for all COPs to be clocked the same. You can also notice in my setup for the IX, the passenger side COP mounting bolt is literally wedged in that corner between the valve cover and connector bracket. This COP is the one that dictates the clocking for all other COPS if you want them to be the same.
Last edited by 240Z TwinTurbo; May 1, 2010 at 02:59 PM.
May 2, 2010, 09:12 AM
#25
I have had a few people send me messages about this setup. I notice that www.spoolinup.com now offers the Yaris coils for the VIII that allow for the factory cover to be used. Please see pictures below of this kit vs. what I did and you will see the plugs are angled differently.
VIII Setup using Yaris Coils
IX Setup using Yaris Coils
You notice the IX valve cover has those extra bulges that require you cut reliefs in the plate. When I decided to angle the connectors towards the driver's side rear, this was because it was the only way I could get all the connectors to clock at the same position. If I had clocked the connectors towards the driver's side front, the far driver's side coil connector interferes with the bulge. You also need to be careful that you don't interfere with the plate's mounting bolt hole.
Maybe Matt can clarify whether the new setup for the VIII using the Yaris coils will work correctly for the IX. I suspect the plug connectors need to be mounted as I have them in order for all COPs to be clocked the same. You can also notice in my setup for the IX, the passenger side COP mounting bolt is literally wedged in that corner between the valve cover and connector bracket. This COP is the one that dictates the clocking for all other COPS if you want them to be the same.
VIII Setup using Yaris Coils
IX Setup using Yaris Coils
You notice the IX valve cover has those extra bulges that require you cut reliefs in the plate. When I decided to angle the connectors towards the driver's side rear, this was because it was the only way I could get all the connectors to clock at the same position. If I had clocked the connectors towards the driver's side front, the far driver's side coil connector interferes with the bulge. You also need to be careful that you don't interfere with the plate's mounting bolt hole.
Maybe Matt can clarify whether the new setup for the VIII using the Yaris coils will work correctly for the IX. I suspect the plug connectors need to be mounted as I have them in order for all COPs to be clocked the same. You can also notice in my setup for the IX, the passenger side COP mounting bolt is literally wedged in that corner between the valve cover and connector bracket. This COP is the one that dictates the clocking for all other COPS if you want them to be the same.
 May 2, 2010, 08:50 PM
#28

I don't understand why this wasn't done by the OP from the get go. You should always contact the original seller/manufacturer of the product if you have any issues or questions.
I don't know anyone who has any issues with your product. I have 2 personal friends who run it, and I know kracka and scheides both run it as well without any issues at all.
 to Matt a.k.a. Spoolin'Up. He'll def take care of you.
-Jalal
I don't know anyone who has any issues with your product. I have 2 personal friends who run it, and I know kracka and scheides both run it as well without any issues at all.
to Matt a.k.a. Spoolin'Up. He'll def take care of you.-Jalal
To the OP, 21psi with gap 0.028-0.030 is nothing, I run 0.030 gap with 26psi with NO break up, the other day while I was tuning it was boosting 30psi with no break up.
Jul 24, 2010, 02:56 PM
#29
I wanted to provide an update. Everything is working great with the COPs and I have recently completed 4 legs of 300miles with each leg taking 1 full tank of gas.
Trip 1: 23.8mpg
Trip 2: 22.8mpg
Trip 3: 23.0mpg
Trip 4: 23.4mpg
Pre COP average MPG was ~22.8 so I have only seen a very small bump in fuel economy if any.
Trip 1: 23.8mpg
Trip 2: 22.8mpg
Trip 3: 23.0mpg
Trip 4: 23.4mpg
Pre COP average MPG was ~22.8 so I have only seen a very small bump in fuel economy if any.
Jul 25, 2010, 11:38 AM
#30
i'm confused, so there are modifications that must be done if you buy one of the setups from spoolinup? i was assuming it was just something you can literally buy, get in the mail, pull out the old and put the new one in, put the cover back on and you're good to go