Custom dash piece (for iPad)
 Nov 14, 2013, 11:06 AM
#1
Newbie
Thread Starter

Join Date: Jun 2013
Posts: 61
Likes: 0
Received 0 Likes
on
0 Posts
Custom dash piece (for iPad)
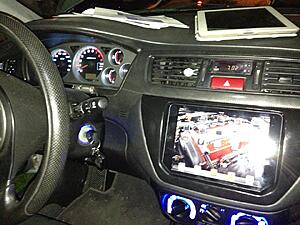
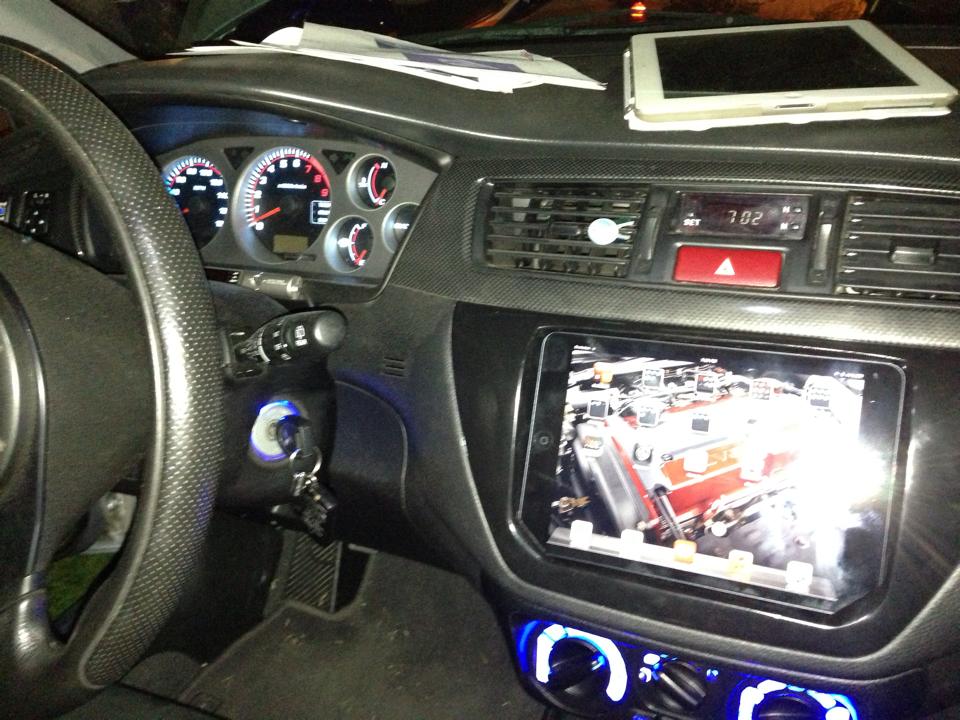
I wanted something a little different than the usual, so I decided to make a custom iPad mini dash mount for my car
It started with that, trying to figure out how it would work.
I personally fabricated my own holder for it, but you could also buy one premade like this one.
(( https://shop.soundmanca.com/ipad-min...4%A2-kit/dp/16 ))
and get a double-din kit from Japan-parts. and cut/fab it together.
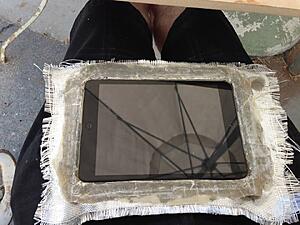
Here is sort of the process I used.. (I bought a fake iPad [display unit] off ebay for... $12-15 for the molding process)
I wrapped the unit in tape, then taped it down to a piece of MDF board, created a little bump on the bottom of the iPad (for press-to-release ability) did a few coats of mould release wax (I think ~$10 on Amazon and some Evercoat fiberglas release agent, also ~$10), the 2 different release agents arent necessarily needed, but I just wanted to make sure it didnt stick.
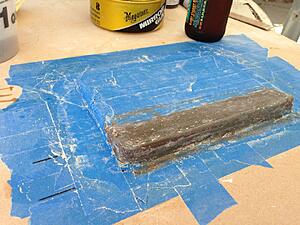
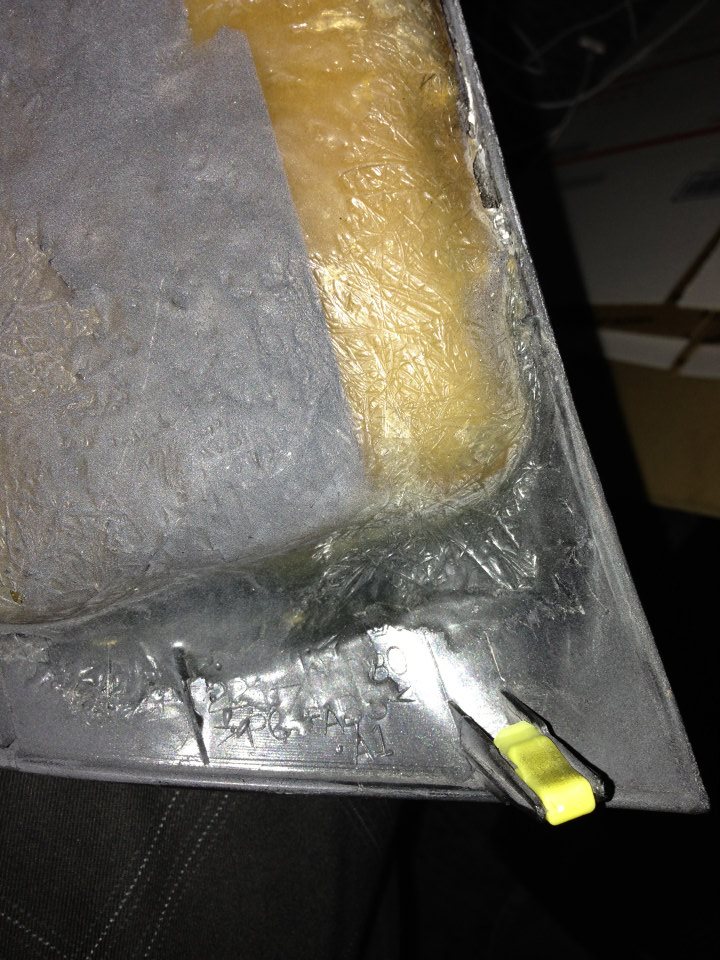
Then proceeded to coat it with 1 or 2 layers of fiberglass. I did not have a fiberglass roller to get out all the air pockets, so there were some. I just filled them with bondo later and smoothed them down.
This is what it will look like after you release it from the iPad
Real one fit's perfectly!
I don't have any pictures of the next step but.. I found some magnets online.. and I don't exactly remember where I got them.. but they are just high powered magnets, if you can.. I would recommend cutting up an iPad mini smart cover and cut a hole then glue/fiberglass the magnet strip in.
But I just got the magnets and put my iPad in the mount, then let the magnets grab where they wanted to grab and superglued them in (I fiberglass over them as well later)

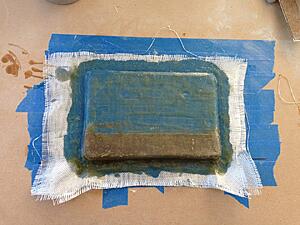
I also put some fiberglass down flat on the table where I wanted it to create support in the corners, then cut them down to size
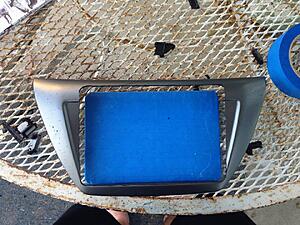
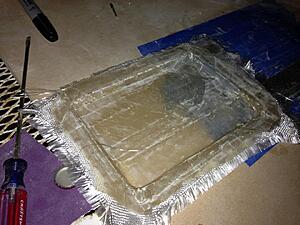
Then you take your double din mount you ordered from japan-parts (NOTE: The one from japan-parts isn't necessary, I didn't realize this until a while after, the USDM one should work just fine since you're cutting out the entire middle), and cut a hole big enough (I used a Dremel) to comfortably fit the iPad and fiberglass in from the back.

Once that is done you put bondo where you need it to be smooth (and want it). I filled up the indents on the dash mount to give it a better look, as well as over the corners I mentioned for support (to give shape/uniformity). [Sorry no pics on the bodo].
You can also grab some spot glazing putty and fill in any small spots after you're satisfied with the main bondo.
After that what I did was throw down some Filler primer to fill any small scratches from sanding.
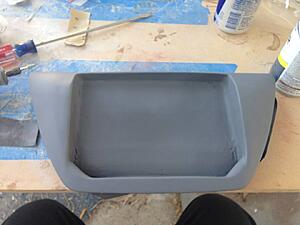
As you can see, the inside corners of the pan aren't perfect.. I went back and sanded them best I could but it's not super crucial, I tried to get it down as much to the pan as I could to not add tons of thickness
Once you're happy with the smoothness of the primer, shoot some paint over it, I personally used a semi-gloss, I initially tried gloss and it was WAY too shiny.
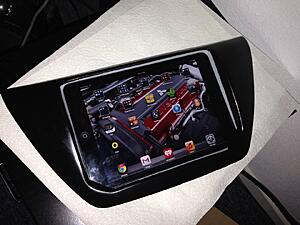
And as you can see behind the iPad, I masked of the layer of primer (again, keep thickness minimal)
Then I got some suede from my local fabric/craft store (I specifically went to Jo-Ann's Fabrics) I traced around the iPad upside down on the fabric (holding the pencil so it points outwards)
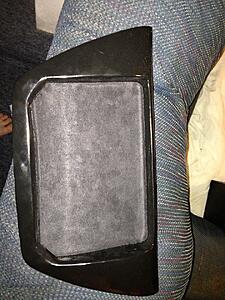
And that's what I did to make my iPad mount for my car!
Keep in mind, prior to this I had NO fiberglass experience.
It does not charge while being mounted in there, but I am also installing a USB charger into my arm rest/pocket holder place.
It plays through bluetooth to my Rockford 3Sixty.3

It started with that, trying to figure out how it would work.
I personally fabricated my own holder for it, but you could also buy one premade like this one.
(( https://shop.soundmanca.com/ipad-min...4%A2-kit/dp/16 ))
and get a double-din kit from Japan-parts. and cut/fab it together.
Here is sort of the process I used.. (I bought a fake iPad [display unit] off ebay for... $12-15 for the molding process)
I wrapped the unit in tape, then taped it down to a piece of MDF board, created a little bump on the bottom of the iPad (for press-to-release ability) did a few coats of mould release wax (I think ~$10 on Amazon and some Evercoat fiberglas release agent, also ~$10), the 2 different release agents arent necessarily needed, but I just wanted to make sure it didnt stick.

Then proceeded to coat it with 1 or 2 layers of fiberglass. I did not have a fiberglass roller to get out all the air pockets, so there were some. I just filled them with bondo later and smoothed them down.

This is what it will look like after you release it from the iPad


Real one fit's perfectly!
I don't have any pictures of the next step but.. I found some magnets online.. and I don't exactly remember where I got them.. but they are just high powered magnets, if you can.. I would recommend cutting up an iPad mini smart cover and cut a hole then glue/fiberglass the magnet strip in.
But I just got the magnets and put my iPad in the mount, then let the magnets grab where they wanted to grab and superglued them in (I fiberglass over them as well later)
I also put some fiberglass down flat on the table where I wanted it to create support in the corners, then cut them down to size
Then you take your double din mount you ordered from japan-parts (NOTE: The one from japan-parts isn't necessary, I didn't realize this until a while after, the USDM one should work just fine since you're cutting out the entire middle), and cut a hole big enough (I used a Dremel) to comfortably fit the iPad and fiberglass in from the back.
Once that is done you put bondo where you need it to be smooth (and want it). I filled up the indents on the dash mount to give it a better look, as well as over the corners I mentioned for support (to give shape/uniformity). [Sorry no pics on the bodo].
You can also grab some spot glazing putty and fill in any small spots after you're satisfied with the main bondo.
After that what I did was throw down some Filler primer to fill any small scratches from sanding.

As you can see, the inside corners of the pan aren't perfect.. I went back and sanded them best I could but it's not super crucial, I tried to get it down as much to the pan as I could to not add tons of thickness
Once you're happy with the smoothness of the primer, shoot some paint over it, I personally used a semi-gloss, I initially tried gloss and it was WAY too shiny.

And as you can see behind the iPad, I masked of the layer of primer (again, keep thickness minimal)
Then I got some suede from my local fabric/craft store (I specifically went to Jo-Ann's Fabrics) I traced around the iPad upside down on the fabric (holding the pencil so it points outwards)

And that's what I did to make my iPad mount for my car!
Keep in mind, prior to this I had NO fiberglass experience.
It does not charge while being mounted in there, but I am also installing a USB charger into my arm rest/pocket holder place.
It plays through bluetooth to my Rockford 3Sixty.3
Last edited by Syringe; Jun 17, 2014 at 07:41 AM.
 Nov 15, 2013, 06:57 PM
#4
Newbie
Thread Starter
Join Date: Jun 2013
Posts: 61
Likes: 0
Received 0 Likes
on
0 Posts
 Nov 18, 2013, 07:20 AM
#7
Newbie
Thread Starter
Join Date: Jun 2013
Posts: 61
Likes: 0
Received 0 Likes
on
0 Posts
Thanks guys.
I have the GoPoint BT1, and DashCommand, if I don't need to listen to music, I can connect that to the bluetooth and run that If I want. I haven't messed with it too much, but seems pretty cool so far.
I have the GoPoint BT1, and DashCommand, if I don't need to listen to music, I can connect that to the bluetooth and run that If I want. I haven't messed with it too much, but seems pretty cool so far.
Trending Topics

 Dec 14, 2013, 09:22 AM
#12
Newbie
Thread Starter
Join Date: Jun 2013
Posts: 61
Likes: 0
Received 0 Likes
on
0 Posts
I got the GoPoint one because I tried the other ones and they didnt work with iPads.
Jan 2, 2014, 07:26 PM
#14
Newbie
Thread Starter
Join Date: Jun 2013
Posts: 61
Likes: 0
Received 0 Likes
on
0 Posts