


How to enable the fog lights?


Thread Starter
Evolving Member
iTrader: (13)
Joined: Apr 2008
Posts: 251
Likes: 0
From: North Carolina
How to enable the fog lights?
I took my car to the dealership this past weekend to do the recalls and noticed tonight that my fog lights doesnt come on anymore. Does anyone know how to enable them?


Thread Starter
Evolving Member
iTrader: (13)
Joined: Apr 2008
Posts: 251
Likes: 0
From: North Carolina
Yes my fog lights worked before. If anyone can tell me where it connects at will be helpful. I know how to turn my fogs on the light in the dash comes on but not the actual lights.

To install your FMIC, you're going to have to remove the front bumper. This is a pretty easy task - I'd rate it maybe a 2 out of 10 if you've ever worked on a car before. Take your time, follow the directions, and everything will go smoothly.
You can do this with the car on the ground. If you've lowered your car, you may want to get it up on some jack stands though, since you'll need to get to some bolts and plastic clips underneath the front of the car. My car is at stock height and has the OEM ground effects package and I was able to do this with the car on the ground.
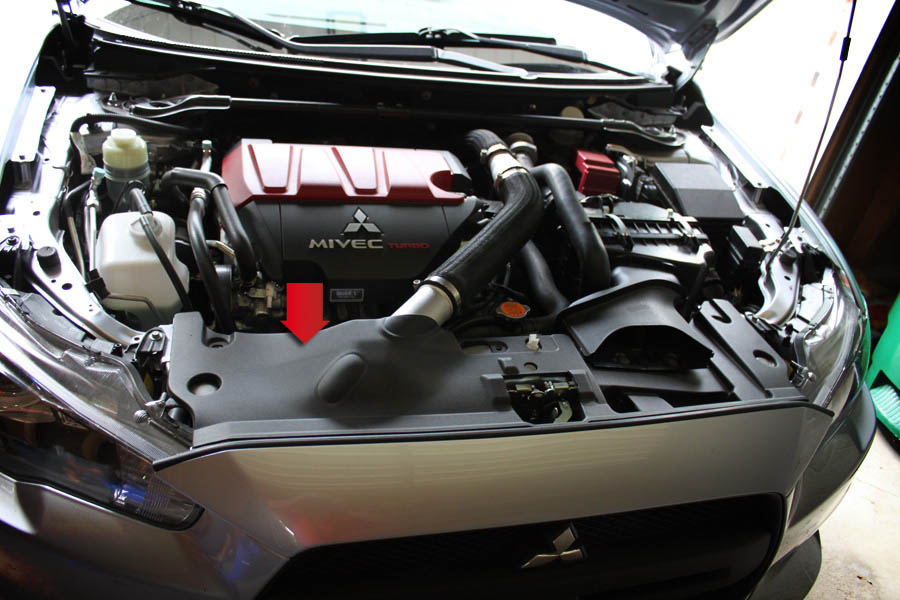
We're going to start off by removing the upper radiator cover. This cover is indicated in the illustration below with a red arrow. It's plastic, and flexes quite a lot.
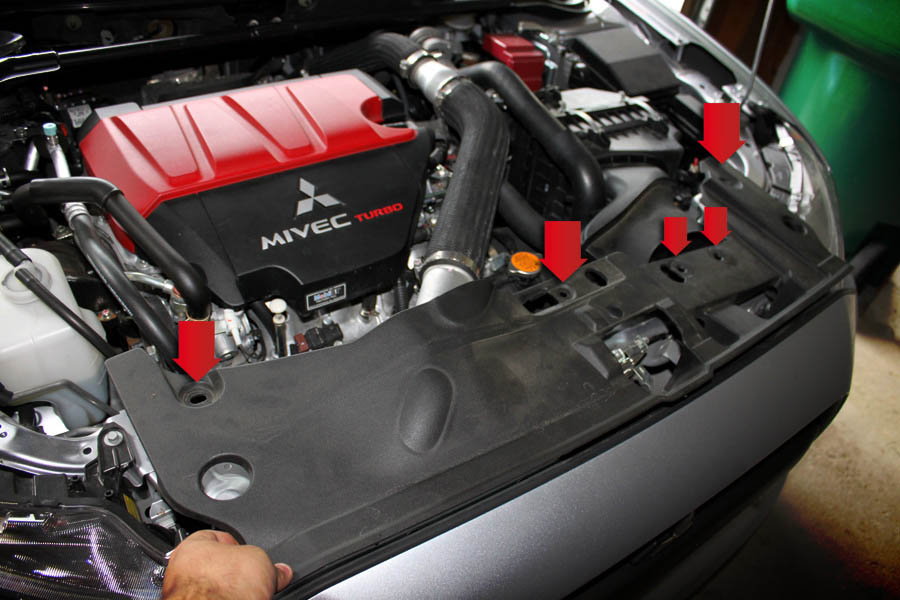
To remove the upper radiator cover, you'll have to remove 5 plastic clips. These clips are standard automotive clips and are used on many cars. They generally come in two flavors - one with a flat top and one with a top which looks like a Phillips screw. The two smaller clips, which hold the front of the airbox shroud down, are the Phillips screw type.
Use a standard Phillips screwdriver to remove the screw portion most of the way from the clip, and then pull the clip straight up and out. Be careful with these, as the threads on the screw are plastic. You don't want to strip them out because obviously they have to be re-used. Almost NO force should be required to put them back upon reinstallation.
The second type are what you'll run in to probably 90% of the time on this bumper removal project - they have a flat head to them, and you'll use a small flat-headed screwdriver to pop the head up before pulling the rest of the clip out. The head is attached to a shaft that's inside the clip, which causes little arms on the clip to expand once it's installed. Note that the shaft does not come all the way out - just pop it out until it's as far out as it will come, and then pull the plastic clip out.
You'll need to remove the two Phillips clips from the airbox shroud, and the 3 flat-headed plastic clips from the upper radiator cover as indicated below.
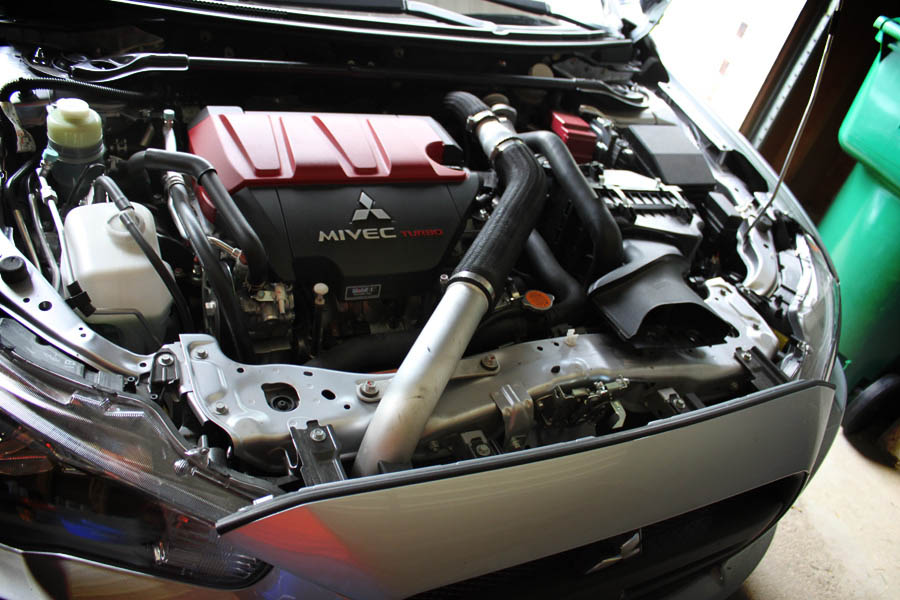
This is after the radiator cover has been removed. As you can see, we can now gain access to the 5 10mm bolts that hold the front bumper on, as well as the two 12mm bolts that hold the upper intercooler pipe in place.
The front bumper is held on up top by 5 10mm bolts and one plastic clip. Here are 4 of the bolts.
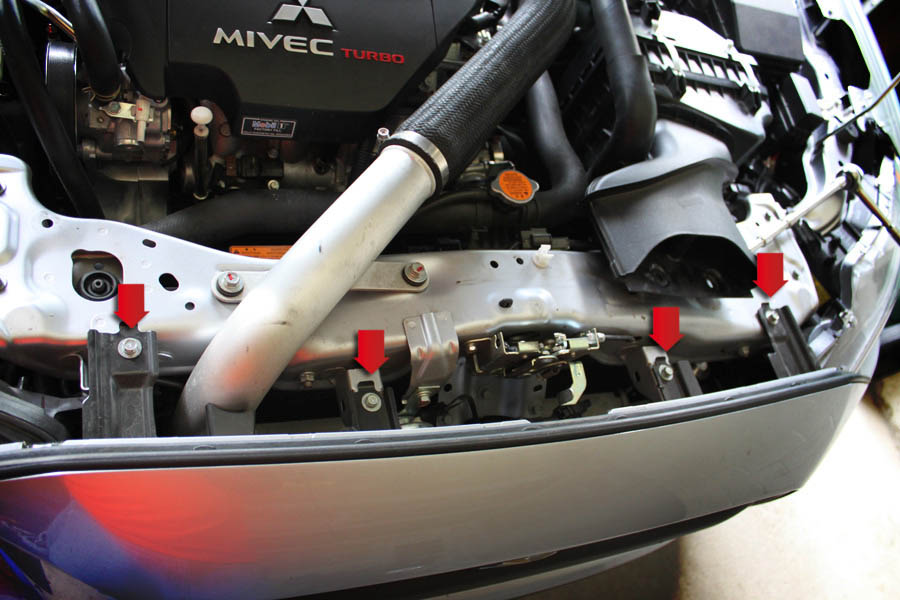
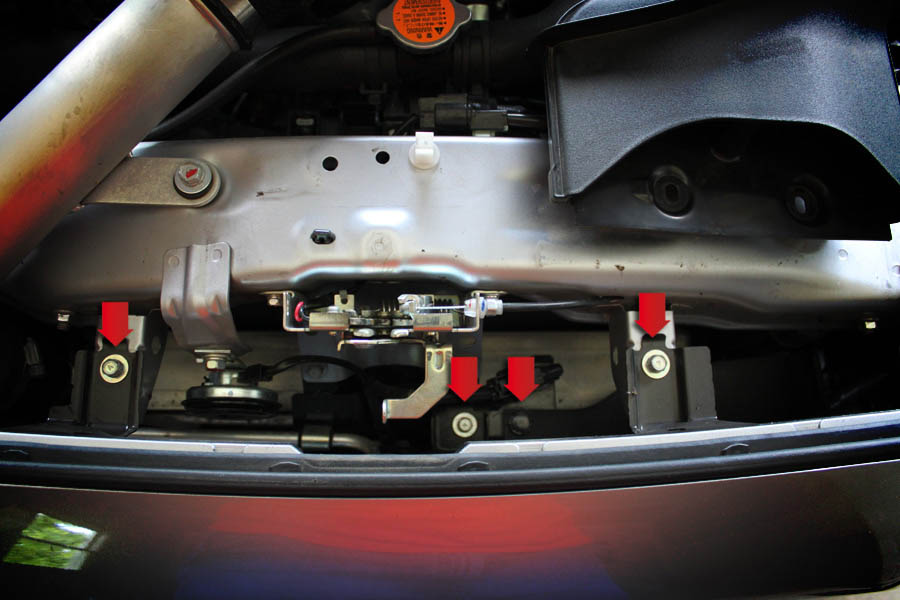
To gain access to the 5th bolt and the plastic clip, look straight down in next to the hood latch mechanism. This picture shows the 5th 10mm bolt and the plastic clip, as well as two of the 10mm bolts that we saw in the previous picture.
You can do this with the car on the ground. If you've lowered your car, you may want to get it up on some jack stands though, since you'll need to get to some bolts and plastic clips underneath the front of the car. My car is at stock height and has the OEM ground effects package and I was able to do this with the car on the ground.
We're going to start off by removing the upper radiator cover. This cover is indicated in the illustration below with a red arrow. It's plastic, and flexes quite a lot.
To remove the upper radiator cover, you'll have to remove 5 plastic clips. These clips are standard automotive clips and are used on many cars. They generally come in two flavors - one with a flat top and one with a top which looks like a Phillips screw. The two smaller clips, which hold the front of the airbox shroud down, are the Phillips screw type.
Use a standard Phillips screwdriver to remove the screw portion most of the way from the clip, and then pull the clip straight up and out. Be careful with these, as the threads on the screw are plastic. You don't want to strip them out because obviously they have to be re-used. Almost NO force should be required to put them back upon reinstallation.
The second type are what you'll run in to probably 90% of the time on this bumper removal project - they have a flat head to them, and you'll use a small flat-headed screwdriver to pop the head up before pulling the rest of the clip out. The head is attached to a shaft that's inside the clip, which causes little arms on the clip to expand once it's installed. Note that the shaft does not come all the way out - just pop it out until it's as far out as it will come, and then pull the plastic clip out.
You'll need to remove the two Phillips clips from the airbox shroud, and the 3 flat-headed plastic clips from the upper radiator cover as indicated below.
This is after the radiator cover has been removed. As you can see, we can now gain access to the 5 10mm bolts that hold the front bumper on, as well as the two 12mm bolts that hold the upper intercooler pipe in place.
The front bumper is held on up top by 5 10mm bolts and one plastic clip. Here are 4 of the bolts.
To gain access to the 5th bolt and the plastic clip, look straight down in next to the hood latch mechanism. This picture shows the 5th 10mm bolt and the plastic clip, as well as two of the 10mm bolts that we saw in the previous picture.
Even though this is an evo its the same thing. When you take off the radiator cover look straight down at your intercooler and you'll see where your fog lights connect. You can see it in this picture above under the third red arrow from the left.

Trending Topics
Thread Starter
Evolving Member
iTrader: (13)
Joined: Apr 2008
Posts: 251
Likes: 0
From: North Carolina
This was it thanks ralliart26 they disconnected the plug and didnt reconnect it. pictures were real helpful.


