


2009 Aussie RA - Tweaking and Tuning


Thread Starter
Evolved Member
Joined: Oct 2010
Posts: 2,447
Likes: 14
From: Australia
I got some quality skidpan time recently, and was able to fine-tune the spark timing map.
Early runs had knocksum activity that needed addressing (eg. 8, 5, 5, 6, 5, 7...).

Numerous ROM edits followed - tested, reviewed, revised... repeated until well cooked!
By the last run of the day, knocksum was pegged back to incidents of 1 or 2 value.

The last run still had a little more knock sensor activity that I'd like to see in an "ideal world", but I'll be patient and wait for the next session before doing any further retardation. For all I know, that final run was already worst-case scenario... hot day, heatsoaked piddly intercooler, etc.
Hope this is of interest to some!
Rich
Early runs had knocksum activity that needed addressing (eg. 8, 5, 5, 6, 5, 7...).
Numerous ROM edits followed - tested, reviewed, revised... repeated until well cooked!
By the last run of the day, knocksum was pegged back to incidents of 1 or 2 value.
The last run still had a little more knock sensor activity that I'd like to see in an "ideal world", but I'll be patient and wait for the next session before doing any further retardation. For all I know, that final run was already worst-case scenario... hot day, heatsoaked piddly intercooler, etc.
Hope this is of interest to some!
Rich

I looks to me that some of your knock in the first graph was in the transition between gears. If you were not aware, in addition to the Max Timing map, there is a Lower Boundary ignition map as well. On our cars, this is also used at shift points between gears. Find the load and rpm just before the shift point and adjust that value on this map. If I'm not mistaken, I believe GST tweaked this map to give better feeling shifts. While this did improve shifting, I occasionally found knock between gears that was fixed by changing this map while leaving the High Octane map the same so as not to loose hp by lowering timing in the upper rpm unnecessarily.
You might ask your special friend if he can find you the address for the Lower Boundary timing map for your rom. It's great to have people like that in the community who are willing to lend a helping hand in an area not widely understood, myself included.
I would be interested to see some specific values from your log. If you could attach a zip of the log, that would be great.
You might ask your special friend if he can find you the address for the Lower Boundary timing map for your rom. It's great to have people like that in the community who are willing to lend a helping hand in an area not widely understood, myself included.
I would be interested to see some specific values from your log. If you could attach a zip of the log, that would be great.
Thread Starter
Evolved Member
Joined: Oct 2010
Posts: 2,447
Likes: 14
From: Australia
I looks to me that some of your knock in the first graph was in the transition between gears. If you were not aware, in addition to the Max Timing map, there is a Lower Boundary ignition map as well. On our cars, this is also used at shift points between gears. Find the load and rpm just before the shift point and adjust that value on this map. If I'm not mistaken, I believe GST tweaked this map to give better feeling shifts. While this did improve shifting, I occasionally found knock between gears that was fixed by changing this map while leaving the High Octane map the same so as not to loose hp by lowering timing in the upper rpm unnecessarily.
On the day, I progressively pulled timing in the High Octane Spark Map at the related load/rpm cells. This had a very positive effect on the knock between gears (as you can see from the final graph).
I wasn't aware of the involvement of another map in this specific circumstance. Indeed, the timing values logged in the transitional cells (ie. the lower "return" part of the clockwise circle through the map) seemed to be bang-on accurate when compared to the rpm/load point in the map - I didn't see anything in the log that made me think there was another mechanism hidden behind the scenes. But I'll definitely keep an open mind!
Note that I was also getting "regular" WOT throttle knocksum events - addressed those too. Smooth and consistent map changes were the order of the day.
Rich
Throw this in your xml. This should be it, at 50795. If you want to have a look at this map.
evo10 base
<scaling name="Min timing" units="degrees" toexpr="x-20" frexpr="x+20" format="%.0f" min="-61" max="61" inc="1" storagetype="int8" endian="big"/>
<table name="Lower Bound Timing" category="Timing" type="3D" swapxy="true" scaling="Min timing">
<table name="X" type="X Axis" elements="21" scaling="Load"/>
<table name="Y" type="Y Axis" elements="16" scaling="RPM"/>
</table>
your rom id
<table name="Lower Bound Timing" address="50795">
<table name="X" address="613a8"/>
<table name="Y" address="6135c"/>
</table>
evo10 base
<scaling name="Min timing" units="degrees" toexpr="x-20" frexpr="x+20" format="%.0f" min="-61" max="61" inc="1" storagetype="int8" endian="big"/>
<table name="Lower Bound Timing" category="Timing" type="3D" swapxy="true" scaling="Min timing">
<table name="X" type="X Axis" elements="21" scaling="Load"/>
<table name="Y" type="Y Axis" elements="16" scaling="RPM"/>
</table>
your rom id
<table name="Lower Bound Timing" address="50795">
<table name="X" address="613a8"/>
<table name="Y" address="6135c"/>
</table>

Yup, it's 50795 and yes that map is used when shifting in the SST equipped mitsus.
I currently have it set at 2* less then main ignition map 5k on at WOT loads on the base maps.
- Bryan
I currently have it set at 2* less then main ignition map 5k on at WOT loads on the base maps.
- Bryan
Thread Starter
Evolved Member
Joined: Oct 2010
Posts: 2,447
Likes: 14
From: Australia
Throw this in your xml. This should be it, at 50795. If you want to have a look at this map.
evo10 base
<scaling name="Min timing" units="degrees" toexpr="x-20" frexpr="x+20" format="%.0f" min="-61" max="61" inc="1" storagetype="int8" endian="big"/>
<table name="Lower Bound Timing" category="Timing" type="3D" swapxy="true" scaling="Min timing">
<table name="X" type="X Axis" elements="21" scaling="Load"/>
<table name="Y" type="Y Axis" elements="16" scaling="RPM"/>
</table>
your rom id
<table name="Lower Bound Timing" address="50795">
<table name="X" address="613a8"/>
<table name="Y" address="6135c"/>
</table>
evo10 base
<scaling name="Min timing" units="degrees" toexpr="x-20" frexpr="x+20" format="%.0f" min="-61" max="61" inc="1" storagetype="int8" endian="big"/>
<table name="Lower Bound Timing" category="Timing" type="3D" swapxy="true" scaling="Min timing">
<table name="X" type="X Axis" elements="21" scaling="Load"/>
<table name="Y" type="Y Axis" elements="16" scaling="RPM"/>
</table>
your rom id
<table name="Lower Bound Timing" address="50795">
<table name="X" address="613a8"/>
<table name="Y" address="6135c"/>
</table>

I've translated that into the format used in my current XML def, and it looks good. Would that table be best described as "Spark Retard Boundary Map"?... as I already have its upper bound counterpart as "Spark Advance Boundary Map", thanks to Merlin. My other special friend.
And, interestingly, at Load 160, rpm 6000-8000, the High Octane Spark Map cells in my latest tune exactly match the "lower bound" map cell values.
Ditto for Load 180, rpm 6500-8000.
That little block is right in the thick of things... especially for gearshifts.
One more piece of the puzzle! Thanks a million. I'll send the XML to Merlin this evening, so he can slot it all into The Great Guide.
Now, specifically, how is this table best utilised for gearshift timing tuning? Simply dial in some additional headroom below the spark map values, and see if the ECU takes the bait?
Rich
Thread Starter
Evolved Member
Joined: Oct 2010
Posts: 2,447
Likes: 14
From: Australia
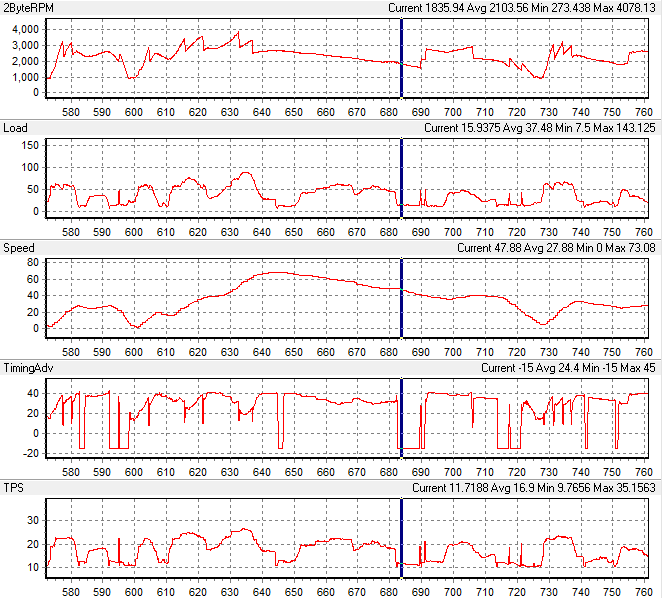
The car will also *not run lower ignition timing then this map at WOT*, even when not shifting, so it truly is a lower bound map.
Another map is used on decel, which hasn't been found (or looked for yet I believe) that bounds it to -15*
Decel timing:
- Bryan
Last edited by GST Motorsports; Nov 15, 2010 at 08:42 PM.
That is interesting data. Could this be the reason engine braking seems weak?
Bryan, will knock still pull timing below this lower bound map?
Bryan, will knock still pull timing below this lower bound map?
Last edited by Piper747; Nov 15, 2010 at 09:16 PM.

Evolved Member

Joined: Jun 2008
Posts: 824
Likes: 24
From: Sydney
Richard, sorry for the late response, I looked at the data you sent and arrived at exactly the same conclusion as Piper, specifically you were pulling timing from parts of the map that Bryan has got spot-on for a srtaight power run with no shifts.
And that you were probably hitting the lower boundary map.
I know you spent a lot of effort tuning on the day, but I think, for some of it, you might have gone backwards. Find the shift points, dont change Bryans spark at those points, do drop the lower bound map 10* in the shift area.
Then go thru the logs again, find the knock not associated with shifting, and fix the hi-octane map (as you already did). Does that make sense?
I need to get a draft copy of the guide to you, its all in there. My bad.
And that you were probably hitting the lower boundary map.
I know you spent a lot of effort tuning on the day, but I think, for some of it, you might have gone backwards. Find the shift points, dont change Bryans spark at those points, do drop the lower bound map 10* in the shift area.
Then go thru the logs again, find the knock not associated with shifting, and fix the hi-octane map (as you already did). Does that make sense?
I need to get a draft copy of the guide to you, its all in there. My bad.
Thread Starter
Evolved Member
Joined: Oct 2010
Posts: 2,447
Likes: 14
From: Australia
Richard, sorry for the late response, I looked at the data you sent and arrived at exactly the same conclusion as Piper, specifically you were pulling timing from parts of the map that Bryan has got spot-on for a srtaight power run with no shifts.
And that you were probably hitting the lower boundary map.
I know you spent a lot of effort tuning on the day, but I think, for some of it, you might have gone backwards. Find the shift points, dont change Bryans spark at those points, do drop the lower bound map 10* in the shift area.
Then go thru the logs again, find the knock not associated with shifting, and fix the hi-octane map (as you already did). Does that make sense?
I need to get a draft copy of the guide to you, its all in there. My bad.
And that you were probably hitting the lower boundary map.
I know you spent a lot of effort tuning on the day, but I think, for some of it, you might have gone backwards. Find the shift points, dont change Bryans spark at those points, do drop the lower bound map 10* in the shift area.
Then go thru the logs again, find the knock not associated with shifting, and fix the hi-octane map (as you already did). Does that make sense?
I need to get a draft copy of the guide to you, its all in there. My bad.
No worries... it's all a great learning experience!

Makes perfect sense.
And for your info, on the first 1-2 runs of the day the Lower Boundary timing map values were 2* to 3* lower than the High Octane Spark Map values. That's obviously not low enough, as I was seeing ks of 6,7,8 during some shifts. In my car, with 98RON fuel, it's obviously gotta be retarded some more, like you said. Will adjust by -10*.
I might go walking through the original stock ROM maps and look at the deltas used by
 ... could be a good benchmark in relative terms.
Rich
Thread Starter
Evolved Member
Joined: Oct 2010
Posts: 2,447
Likes: 14
From: Australia
Hi guys.
Is that lower boundary map also used when bouncing off the rev limiter?
edit: Here's a log, hopefully corresponding to the first run graph!
Rich
Is that lower boundary map also used when bouncing off the rev limiter?
edit: Here's a log, hopefully corresponding to the first run graph!
Rich
Last edited by richardjh; Nov 16, 2010 at 02:12 AM.
Thread Starter
Evolved Member
Joined: Oct 2010
Posts: 2,447
Likes: 14
From: Australia
Okay, review time!
I'm after a strong base for road and track driving, so a worry-free tune is the go... one that keeps the engine healthy for years. To be specific, I want logged knocksum events no greater than 1 or 2 (on track or off).
Following the very helpful discussions above, I've done a fair amount of consolidation of the timing maps - reviewing past logs, comparing maps against original Mitsubishi, ensuring suitable "headroom" between the spark maps and their boundary limits, etc. etc. Many thanks to everybody who has assisted in stuffing lots of new information into my brain! And of course to Bryan for kicking off the whole map roadshow.
This consolidation has involved...
High Octane Spark Map
Addressing some observed knock/retard events from: dyno run, various on-track driving, and (earlier on in the process) road driving.
From the original GST Base Map, I've retarded 1* in high RPM from load 160-200, and around 2* load 220 and above. A few other tweaks too, all based on observed knocksum events.
After finding that the Spark Advance Upper Boundary Map actually impacted GST timing cells in use, I've merged the GST upper limits into the map directly. I wasn't keen to simply open those cells up to new and untried advancement settings... hence the merging approach. Gives me sleep-at-night factor, which is not to be underestimated when you're still cutting your teeth on stuff.
Spark Advance Upper Boundary Map
Reworked the upper boundaries so they are never lower than the High Octane Spark Map.
Low Octane Spark Map
Using the original map relationships as a guide, I reworked the map so it was relative to the High Octane Spark Map. Tweaked a few areas to keep them from dropping below the Spark Advance Lower Boundary Map.
Spark Advance Lower Boundary Map
Reworked the lower boundaries so they are a good 10* below the High Octane Spark Map at the key "gearshift" points (and are never higher than the Low Octane Spark Map).
Sure, it would have been less work to just poke at individual cells in each map - the ones related to changes made, or obviously impacting each other - but the name of the game was to work systematically through the maps, learn as much as possible, get a feel for it all, and hopefully end up with a set of smooth tables that work well together.
And seeing as this thread just doesn't have enough oversized images plastered all over it, here are the EcuFlash maps and 3D graphs...
Thanks again for the invaluable advice, folks.
Rich
High/Low Octane Spark Maps

Upper/Lower Boundary Maps

I'm after a strong base for road and track driving, so a worry-free tune is the go... one that keeps the engine healthy for years. To be specific, I want logged knocksum events no greater than 1 or 2 (on track or off).
Following the very helpful discussions above, I've done a fair amount of consolidation of the timing maps - reviewing past logs, comparing maps against original Mitsubishi, ensuring suitable "headroom" between the spark maps and their boundary limits, etc. etc. Many thanks to everybody who has assisted in stuffing lots of new information into my brain! And of course to Bryan for kicking off the whole map roadshow.
This consolidation has involved...
High Octane Spark Map
Addressing some observed knock/retard events from: dyno run, various on-track driving, and (earlier on in the process) road driving.
From the original GST Base Map, I've retarded 1* in high RPM from load 160-200, and around 2* load 220 and above. A few other tweaks too, all based on observed knocksum events.
After finding that the Spark Advance Upper Boundary Map actually impacted GST timing cells in use, I've merged the GST upper limits into the map directly. I wasn't keen to simply open those cells up to new and untried advancement settings... hence the merging approach. Gives me sleep-at-night factor, which is not to be underestimated when you're still cutting your teeth on stuff.
Spark Advance Upper Boundary Map
Reworked the upper boundaries so they are never lower than the High Octane Spark Map.
Low Octane Spark Map
Using the original
map relationships as a guide, I reworked the map so it was relative to the High Octane Spark Map. Tweaked a few areas to keep them from dropping below the Spark Advance Lower Boundary Map.Spark Advance Lower Boundary Map
Reworked the lower boundaries so they are a good 10* below the High Octane Spark Map at the key "gearshift" points (and are never higher than the Low Octane Spark Map).
Sure, it would have been less work to just poke at individual cells in each map - the ones related to changes made, or obviously impacting each other - but the name of the game was to work systematically through the maps, learn as much as possible, get a feel for it all, and hopefully end up with a set of smooth tables that work well together.
And seeing as this thread just doesn't have enough oversized images plastered all over it, here are the EcuFlash maps and 3D graphs...
Thanks again for the invaluable advice, folks.
Rich
High/Low Octane Spark Maps
Upper/Lower Boundary Maps
Thread Starter
Evolved Member
Joined: Oct 2010
Posts: 2,447
Likes: 14
From: Australia
I've re-tested this gearshift timing thing, and can see that sometimes the ECU does indeed switch to the "Lower Boundary" map... but sometimes it doesn't.
Here's an example of each. Note that the maps in use are the ones displayed in the preceding post.
First, a log in which there was no deviation from the "High Octane" map.
In this example, the highlighted 11* logged value exactly matches the 5000/220 cell of the High Octane Spark Map:

Second, a log (same drive, just minutes later) showing a really nice bite taken out of the timing throughout an upshift.
Here, the highlighted 7* logged value exactly matches the 4000/160 cell of the Spark Advance Lower Boundary Map:
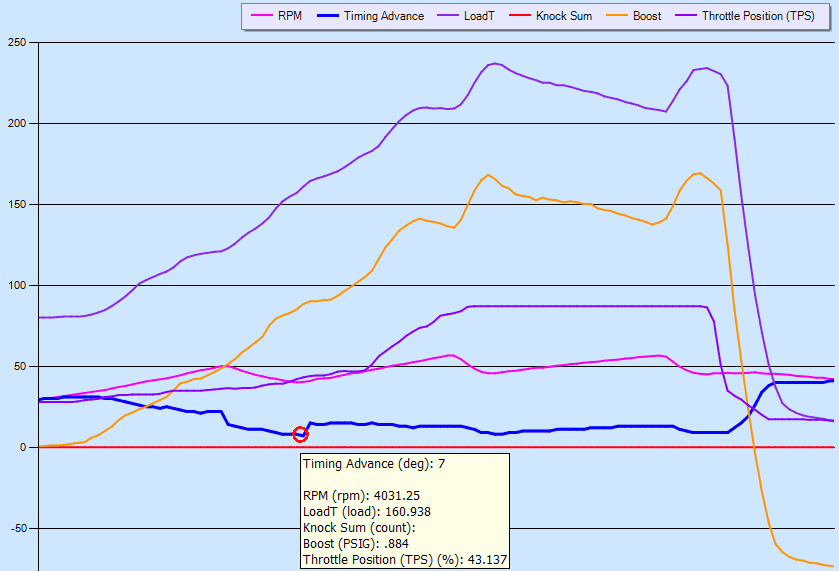
I wonder what logic is at work here. Why is the ECU deciding to do things one way in the first example, but a different way in the second?
Rich
Here's an example of each. Note that the maps in use are the ones displayed in the preceding post.
First, a log in which there was no deviation from the "High Octane" map.
In this example, the highlighted 11* logged value exactly matches the 5000/220 cell of the High Octane Spark Map:
Second, a log (same drive, just minutes later) showing a really nice bite taken out of the timing throughout an upshift.
Here, the highlighted 7* logged value exactly matches the 4000/160 cell of the Spark Advance Lower Boundary Map:
I wonder what logic is at work here. Why is the ECU deciding to do things one way in the first example, but a different way in the second?
Rich


