


HID headlight adjust...03 evo8


Thread Starter
Evolving Member
iTrader: (7)
Joined: Aug 2006
Posts: 341
Likes: 0
From: Placentia, CA
HID headlight adjust...03 evo8
I have a 03 Evo 8. The factory HID's are adjustable (up/down) from inside the car. The problem is, at the "up" setting they need to come up just a tad more (by preference of course). Is there a manual adjustment to aim the headlights up a tad more than what the in car "dash dial" can produce?

yes, if you look down around the back of the highbeam area, you'll see a black plastic 10mm hex head connected to a gear that is connected to a cable. you turn this geear which in turn adjusts the low beam/high beam at the same time. sometimes they seize though or the plastic gear will strip making your life difficult.

Search for headlight adjust... youll find about 30 pages on this topic with pics.. Use a 10mm socket on a 1/4 drive with a 3" extension.. not the "screwdriver" or "torx bit" method..
also adjust with the power to your lights OFF or you will strip out the plastic adjustment.. It takes alot of turning to make it move just a little. So be patient. If your looking at your windshield from in front of your car. Turn the bolt towards your right to aim them up.
also adjust with the power to your lights OFF or you will strip out the plastic adjustment.. It takes alot of turning to make it move just a little. So be patient. If your looking at your windshield from in front of your car. Turn the bolt towards your right to aim them up.
Last edited by sikrsix; May 29, 2007 at 07:56 AM.


+1 on search, if it's strips...you're going to have to take the light out and do it manually....i drove around with my lights uneven for about 1 year...adjusted them higher than standard, so my highest level basically has a bird blinding angle

Newbie
Joined: May 2007
Posts: 16
Likes: 0
From: Cerritos
This is for my 03, with HID, with height adjuster from the cabin.
I've read a bunch and the "noodle" method everyone refers to does not work so here's my own write up.
The low beam height adjuster is within the small plastic box that sits between the hi and low beam bulbs. To properly adjust follow some or all of the directions, depending on how lazy you feel.
Take a look at the back. the "cable" in this picture is tethered between the high and low beams adjusters, so you can simultaneously adjust height. This cable is junk. If you take it off and try and turn it, its pretty much stuck. its useless, throw it away. when you adjust the hight from your driver seat, it does not activate this anyway.
(and because of this reason, the noodle method does not work on cars equiped w/ this cable) I would suggest you don't try to adjust either beams without removing this cable, or at least make sure its free spinning. Someone in here decided to clean this cable thing. I tried for a minute and stopped cause i didn't see a reason to, i didn't think it was an advantage to be able to adjust them at the same time.
So here is what I did
remove bumper, removed headlight. removed the cables. removed the metal piece (where it says cut here) and hacksaw at that line, this will give you access to what you need to adjust the headlight.
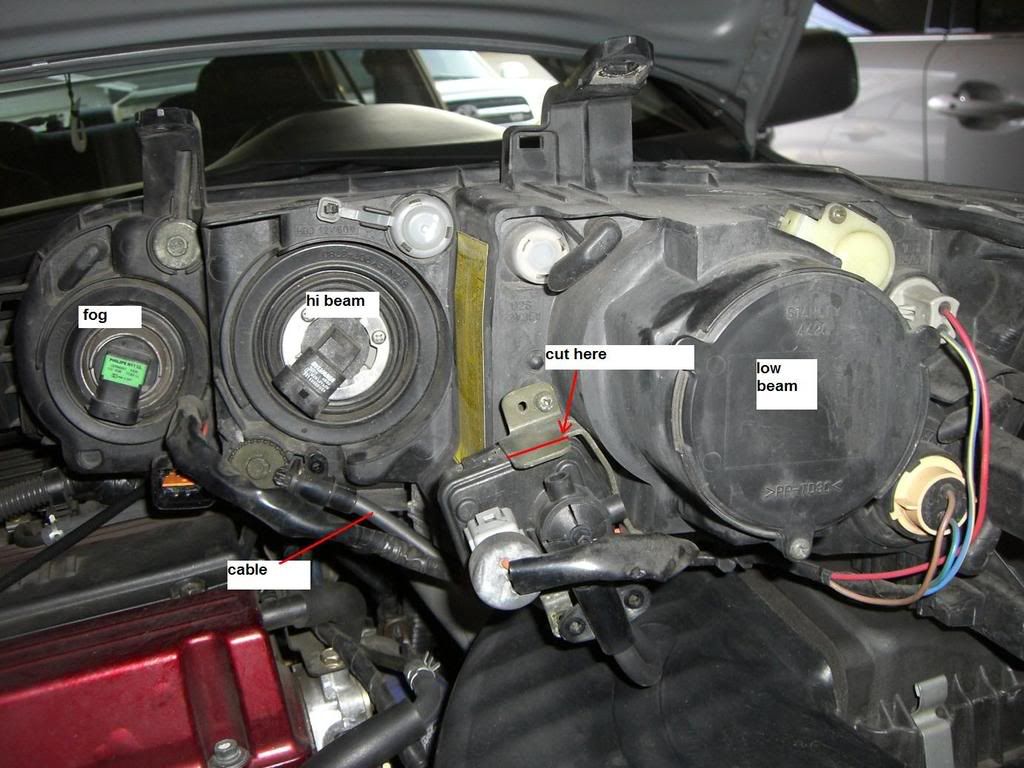
To be able to adjust your headlight, you need to turn a gear inside here
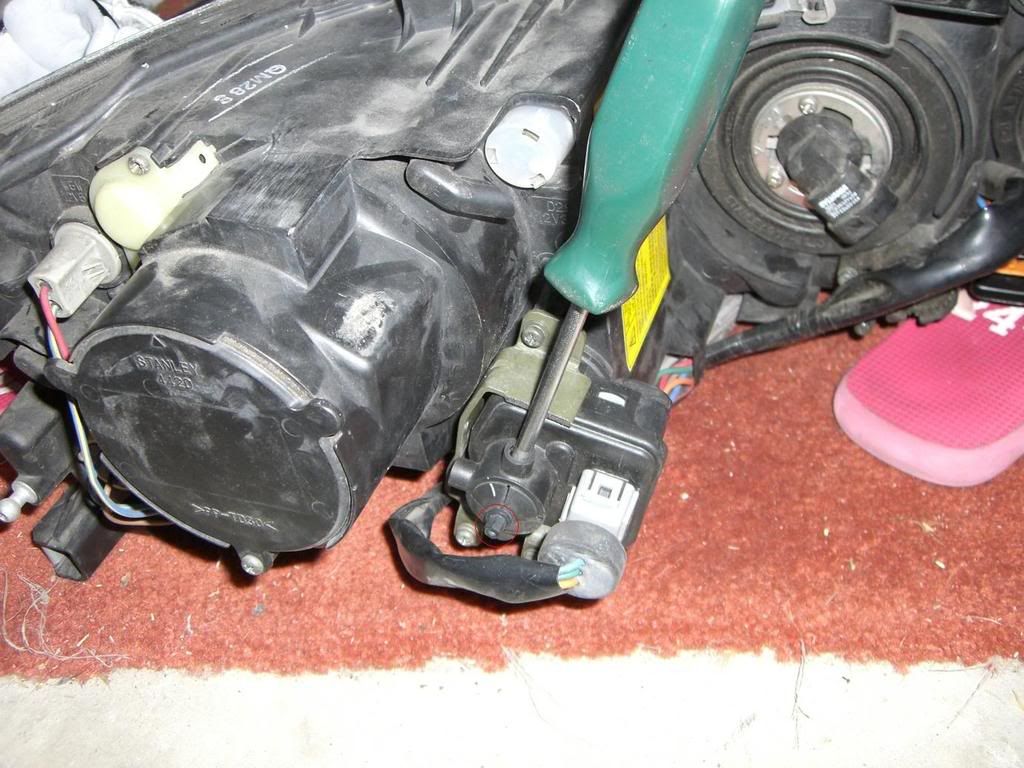
if you're able to turn the small plastic hex (might be 5mm?) then you can adjust it that way too. I decided to hack that metal thing because some people in here said they stripped the small plastic hex, so I wanted a second source incase that happened.
I think, both method is accessible with the headlight installed on the car. But for sure the screw driver method is.
be make sure you use the right size screw driver. Its really picky with size. Watch the little hex thing, it should turn as you turn the screwdriver. If its not turning, then its not working.
here's what it looks like under the hood, once you hacked away the metal guard thing
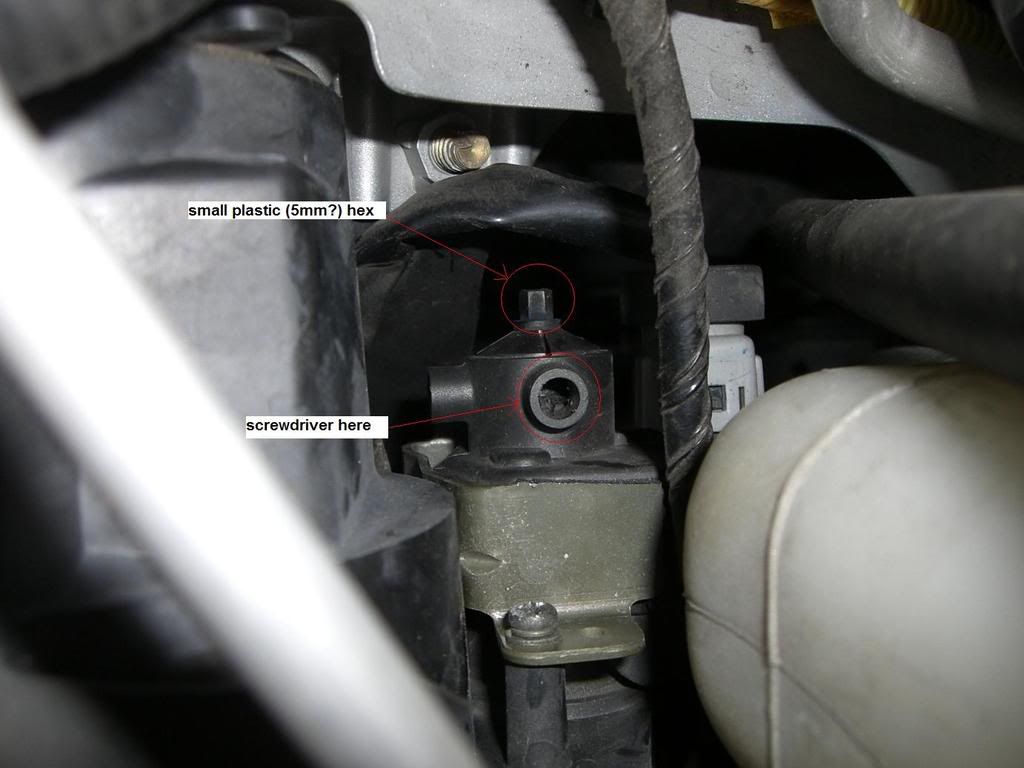
I've read a bunch and the "noodle" method everyone refers to does not work so here's my own write up.
The low beam height adjuster is within the small plastic box that sits between the hi and low beam bulbs. To properly adjust follow some or all of the directions, depending on how lazy you feel.
Take a look at the back. the "cable" in this picture is tethered between the high and low beams adjusters, so you can simultaneously adjust height. This cable is junk. If you take it off and try and turn it, its pretty much stuck. its useless, throw it away. when you adjust the hight from your driver seat, it does not activate this anyway.
(and because of this reason, the noodle method does not work on cars equiped w/ this cable) I would suggest you don't try to adjust either beams without removing this cable, or at least make sure its free spinning. Someone in here decided to clean this cable thing. I tried for a minute and stopped cause i didn't see a reason to, i didn't think it was an advantage to be able to adjust them at the same time.
So here is what I did
remove bumper, removed headlight. removed the cables. removed the metal piece (where it says cut here) and hacksaw at that line, this will give you access to what you need to adjust the headlight.
To be able to adjust your headlight, you need to turn a gear inside here
if you're able to turn the small plastic hex (might be 5mm?) then you can adjust it that way too. I decided to hack that metal thing because some people in here said they stripped the small plastic hex, so I wanted a second source incase that happened.
I think, both method is accessible with the headlight installed on the car. But for sure the screw driver method is.
be make sure you use the right size screw driver. Its really picky with size. Watch the little hex thing, it should turn as you turn the screwdriver. If its not turning, then its not working.
here's what it looks like under the hood, once you hacked away the metal guard thing
Last edited by drive01; Mar 3, 2008 at 02:03 PM.


Trending Topics


This is for my 03, with HID, with height adjuster from the cabin.
I've read a bunch and the "noodle" method everyone refers to does not work so here's my own write up.
The low beam height adjuster is within the small plastic box that sits between the hi and low beam bulbs. To properly adjust follow some or all of the directions, depending on how lazy you feel.
Take a look at the back. the "cable" in this picture is tethered between the high and low beams adjusters, so you can simultaneously adjust height. This cable is junk. If you take it off and try and turn it, its pretty much stuck. its useless, throw it away. when you adjust the hight from your driver seat, it does not activate this anyway.
(and because of this reason, the noodle method does not work on cars equiped w/ this cable) I would suggest you don't try to adjust either beams without removing this cable, or at least make sure its free spinning. Someone in here decided to clean this cable thing. I tried for a minute and stopped cause i didn't see a reason to, i didn't think it was an advantage to be able to adjust them at the same time.
So here is what I did
remove bumper, removed headlight. removed the cables. removed the metal piece (where it says cut here) and hacksaw at that line, this will give you access to what you need to adjust the headlight.
To be able to adjust your headlight, you need to turn a gear inside here
if you're able to turn the small plastic hex (might be 5mm?) then you can adjust it that way too. I decided to hack that metal thing because some people in here said they stripped the small plastic hex, so I wanted a second source incase that happened.
I think, both method is accessible with the headlight installed on the car. But for sure the screw driver method is.
be make sure you use the right size screw driver. Its really picky with size. Watch the little hex thing, it should turn as you turn the screwdriver. If its not turning, then its not working.
here's what it looks like under the hood, once you hacked away the metal guard thing
I've read a bunch and the "noodle" method everyone refers to does not work so here's my own write up.
The low beam height adjuster is within the small plastic box that sits between the hi and low beam bulbs. To properly adjust follow some or all of the directions, depending on how lazy you feel.
Take a look at the back. the "cable" in this picture is tethered between the high and low beams adjusters, so you can simultaneously adjust height. This cable is junk. If you take it off and try and turn it, its pretty much stuck. its useless, throw it away. when you adjust the hight from your driver seat, it does not activate this anyway.
(and because of this reason, the noodle method does not work on cars equiped w/ this cable) I would suggest you don't try to adjust either beams without removing this cable, or at least make sure its free spinning. Someone in here decided to clean this cable thing. I tried for a minute and stopped cause i didn't see a reason to, i didn't think it was an advantage to be able to adjust them at the same time.
So here is what I did
remove bumper, removed headlight. removed the cables. removed the metal piece (where it says cut here) and hacksaw at that line, this will give you access to what you need to adjust the headlight.
To be able to adjust your headlight, you need to turn a gear inside here
if you're able to turn the small plastic hex (might be 5mm?) then you can adjust it that way too. I decided to hack that metal thing because some people in here said they stripped the small plastic hex, so I wanted a second source incase that happened.
I think, both method is accessible with the headlight installed on the car. But for sure the screw driver method is.
be make sure you use the right size screw driver. Its really picky with size. Watch the little hex thing, it should turn as you turn the screwdriver. If its not turning, then its not working.
here's what it looks like under the hood, once you hacked away the metal guard thing


This is a bit off topic, but what are the 2 lights all the way to the right in this picture. I know one is the turn signal and is the other the running light? Does anyone know the part numbers?
Thanks and sorry for the off topic message, but I thought someone might be able to help me!

Thanks for your help. Would anyone happen to have the plastic plate that is shown on the back of the low beams or the connector for the low beam bulb? I bought a set of headlights that was missing this.
Thanks again!
Thanks again!


I would however advise taking the front bumper off; you will be able to get to the cable on the passenger side just by moving the coolant reservoir but on the driver’s side you are going to have to drop the intercooler sprayer reservoir and it has 4 bolts holding it in place. The 10mm one is right on the side but the other three 12mm bolts you will have to remove the splash shield to get to; and if you have an ARP CF wind shield like me and you opt out of removing the bumper you will have to take the driver’s side wheel off and the splash shield in the wheel well to get those last three friggin bolts.
Last edited by tiggeryellow1; May 3, 2008 at 12:09 PM.