MIVEC Timing discussion
 Jul 27, 2011, 09:40 AM
#1
Newbie
Thread Starter
MIVEC Timing discussion
Hey guys,
This is one of my first posts here, though I've been a member since I've had my Evo 9 SE (about a year now).
For the past couple months I have been reading and learning about tuning and I'm finally starting to play around with the tuning on my car.
One topic that seems to be relatively untouched compared to the standard ignition and fuel tuning, is the MIVEC tuning. I may be wrong, but I think I could count on one hand the number of useful threads on this topic.
Anyway, I just wanted to present some of my preliminary thoughts and throw up a couple pictures for discussion.

This may look familiar, as it is a map taken from this forum/merlin's tutorial (nj1266, I think).
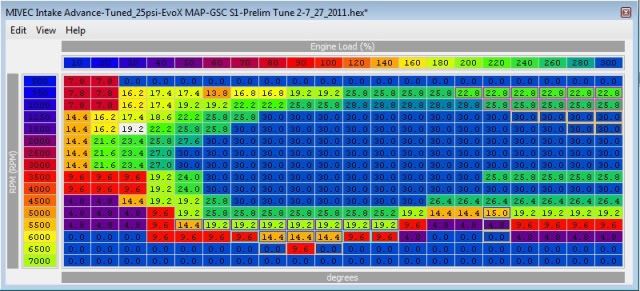
This map, I created on my own, mainly based on the graphs shown in this thread: (I will find it in a bit).
Basically, his dyno results showed that max advance below 3000 rpm, and minimum advance above 6000 rpm showed the most gains in the power/torque curve. It was also evident that the JDM map did best in between those ranges.
That said, I made this map to get into timing advance as quickly as possible, and get back out of it as quickly as possible after 6000 rpm.
Here are a couple CALCULATED power/torque graphs showing the differences between the two timing maps in a 3rd gear pull (back-to-back).
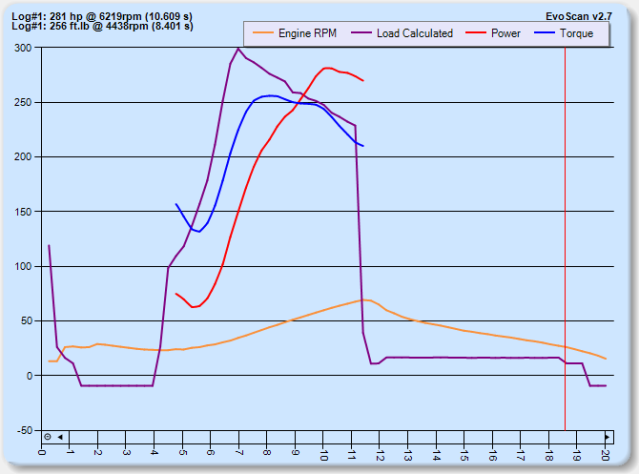
This is with the other forum member's tune.
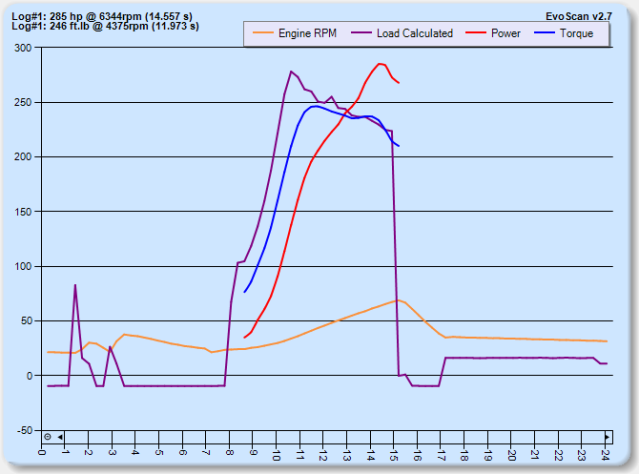
This is with my custom tune. Nothing else changed.
Peak torque comes a little sooner with my map, though is a decent amount less, while power increased a few hp and came abit later (this difference probably isn't that accurate due to logging/calculation error).
The biggest difference is in the calculated load. Can anyone explain this to me, as I'm not sure what would cause this. I'm running an AEM Truboost with the same settings both times, and I'm on the same, flat road for both runs.
Here are the pertinent details on my car:
-Tuned for approx 25 psi (obviously the boost is changing with the different mivec maps above) on 93 oct.
- LICP
- Apexi intake, K&N Intake pipe
- Apexi turbo-back exhaust
- GSC S1 Cams (just installed last week)
- Synapse DV
Hope this sparks some interesting discussion and leads to more insight, at least for me!
This is one of my first posts here, though I've been a member since I've had my Evo 9 SE (about a year now).
For the past couple months I have been reading and learning about tuning and I'm finally starting to play around with the tuning on my car.
One topic that seems to be relatively untouched compared to the standard ignition and fuel tuning, is the MIVEC tuning. I may be wrong, but I think I could count on one hand the number of useful threads on this topic.
Anyway, I just wanted to present some of my preliminary thoughts and throw up a couple pictures for discussion.
This may look familiar, as it is a map taken from this forum/merlin's tutorial (nj1266, I think).
This map, I created on my own, mainly based on the graphs shown in this thread: (I will find it in a bit).
Basically, his dyno results showed that max advance below 3000 rpm, and minimum advance above 6000 rpm showed the most gains in the power/torque curve. It was also evident that the JDM map did best in between those ranges.
That said, I made this map to get into timing advance as quickly as possible, and get back out of it as quickly as possible after 6000 rpm.
Here are a couple CALCULATED power/torque graphs showing the differences between the two timing maps in a 3rd gear pull (back-to-back).
This is with the other forum member's tune.
This is with my custom tune. Nothing else changed.
Peak torque comes a little sooner with my map, though is a decent amount less, while power increased a few hp and came abit later (this difference probably isn't that accurate due to logging/calculation error).
The biggest difference is in the calculated load. Can anyone explain this to me, as I'm not sure what would cause this. I'm running an AEM Truboost with the same settings both times, and I'm on the same, flat road for both runs.
Here are the pertinent details on my car:
-Tuned for approx 25 psi (obviously the boost is changing with the different mivec maps above) on 93 oct.
- LICP
- Apexi intake, K&N Intake pipe
- Apexi turbo-back exhaust
- GSC S1 Cams (just installed last week)
- Synapse DV
Hope this sparks some interesting discussion and leads to more insight, at least for me!
Last edited by railhomie; Jul 28, 2011 at 09:30 AM.
 Jul 27, 2011, 09:43 AM
#2
Account Disabled
iTrader: (26)

Join Date: Jul 2011
Location: Clinton, NJ - Myrtle Beach, SC
Posts: 1,784
Likes: 0
Received 1 Like
on
1 Post
This thread is almost 50 pages but has some good info...check it out...
https://www.evolutionm.net/forums/ec...ec-tuning.html
https://www.evolutionm.net/forums/ec...ec-tuning.html
Jul 27, 2011, 10:12 AM
#3
https://www.evolutionm.net/forums/6955113-post563.html
Here is an older example of MIVEC mapping that I do. I have made some interesting strides since this as the dyno graph included had S2s in it and I can make the same power with the exact setup but on STOCK cams now.
Aaron
Here is an older example of MIVEC mapping that I do. I have made some interesting strides since this as the dyno graph included had S2s in it and I can make the same power with the exact setup but on STOCK cams now.
Aaron
Jul 27, 2011, 10:24 AM
#4
Newbie
iTrader: (3)

Join Date: Apr 2010
Location: The Valley
Posts: 24
Likes: 0
Received 0 Likes
on
0 Posts
700+ posts, kinda dated and seems most are w/ stock cams (I may be wrong). It has alot of usefull info and time spent.
You're top map is the stocker. You lost tq w/ the one you made. Most will tell 30's don't work no matter what (you have diff cams which may play in some how), so..........
Try the RS JDM and do a pull. I think you should be making alot more power than what you have w/ all mechanicals up tight. I feel the MIVEC is kind of like trying to steer a hovercraft through an auto X course, just guiding/steering it through. Also what you have and what you log won't be the same.
HTH
Jul 27, 2011, 10:27 AM
#5
Account Disabled
iTrader: (26)
Join Date: Jul 2011
Location: Clinton, NJ - Myrtle Beach, SC
Posts: 1,784
Likes: 0
Received 1 Like
on
1 Post
https://www.evolutionm.net/forums/6955113-post563.html
Here is an older example of MIVEC mapping that I do. I have made some interesting strides since this as the dyno graph included had S2s in it and I can make the same power with the exact setup but on STOCK cams now.
Aaron
Here is an older example of MIVEC mapping that I do. I have made some interesting strides since this as the dyno graph included had S2s in it and I can make the same power with the exact setup but on STOCK cams now.
Aaron
Well that is an interesting Mivec MAP...You used that map with S2s?? I am currently using a Mivec map that is a mix between your old map, the JDM map & some minor tweaks I did myself...
Trending Topics
Jul 27, 2011, 11:52 AM
#8
Newbie
Thread Starter
Crap, I posted the wrong map for the first picture. Fixed now...
And yes, the numbers that the ecuflash power calculator is showing really don't seem near correct for my car, so I don't trust them. I just use them to see changes between tunes at this point.
And yes, the numbers that the ecuflash power calculator is showing really don't seem near correct for my car, so I don't trust them. I just use them to see changes between tunes at this point.
Last edited by railhomie; Jul 27, 2011 at 11:54 AM.
Jul 28, 2011, 05:28 AM
#10
Newbie
Thread Starter
Thanks, I will definitely try that virtual dyno.
So 30's don't work even if the max value is changed (not that the extra 1.2 degrees is really going to change that much anyway)?
Can anyone explain to me why my boost/load differs so much between the two maps?
So 30's don't work even if the max value is changed (not that the extra 1.2 degrees is really going to change that much anyway)?
Can anyone explain to me why my boost/load differs so much between the two maps?
 Jul 28, 2011, 11:33 AM
#14
Newbie
Thread Starter
