
sparco harness bar added installation details

sparco harness bar added installation details
as some of you have requested, the installation sheets that come with the bar is about 85% useful. here are a few extra pointers to make your install quick and seamless, but this should be used along with the installation manuals because i didn't duplicate what they already did.
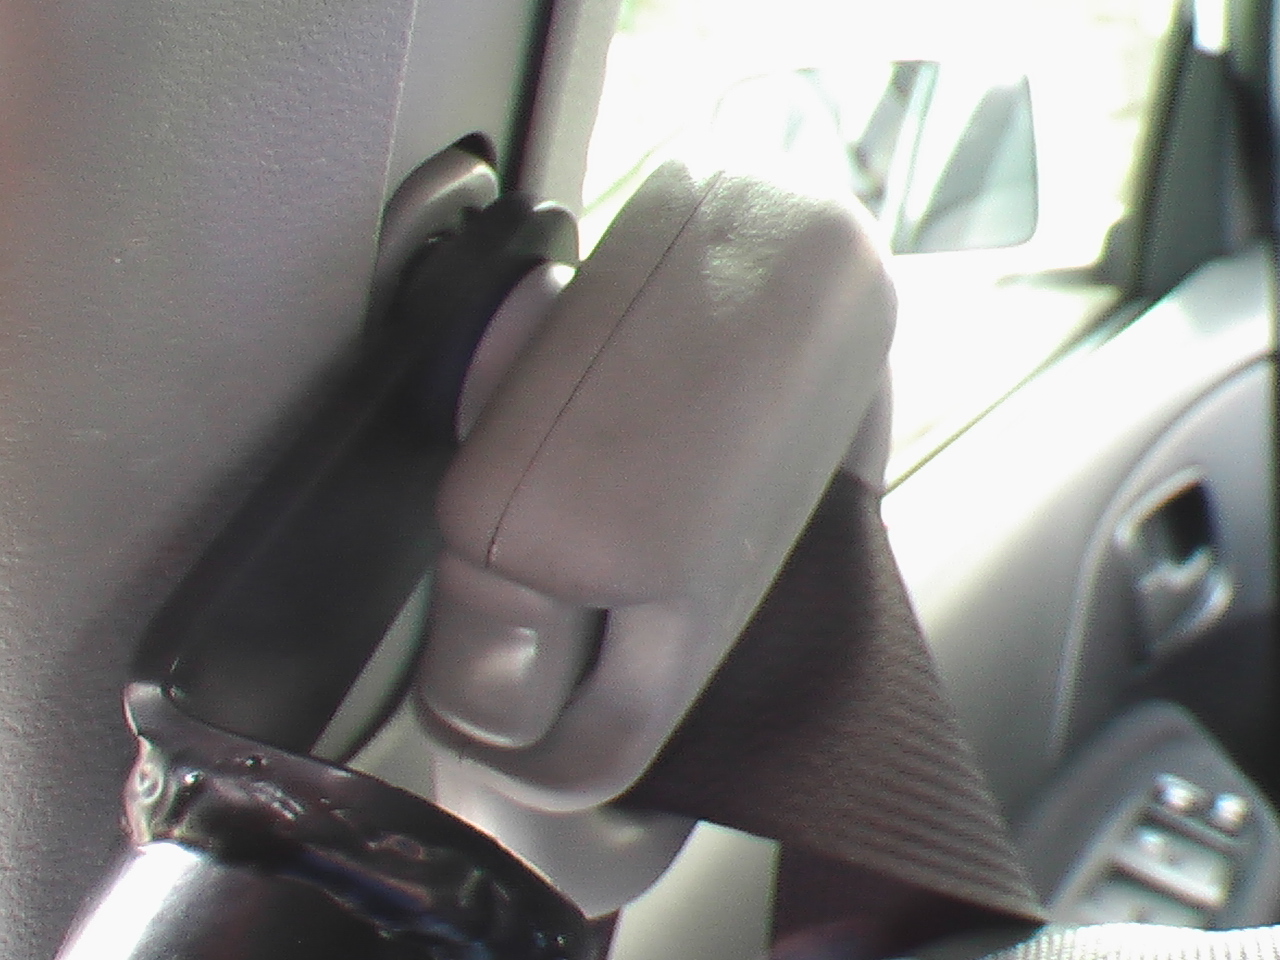
1) to start, lower the top factory seatbelt mount as far down as it can go. it is easy to raise it backup one the bar is on, but it is very tough to lower it if you can't get the bolts back in. once it is down, you can pop off the little cover with a sharp flat head screw driver. it comes off with a little bit of force, so don't be afraid to pry a little. the picture below shows the upper seatbelt mount:
2)once this is off, you need to grind out some extra plastic so the new longer bolt will fit in place of the original factory one. you can see what you need to grid off in the picture below: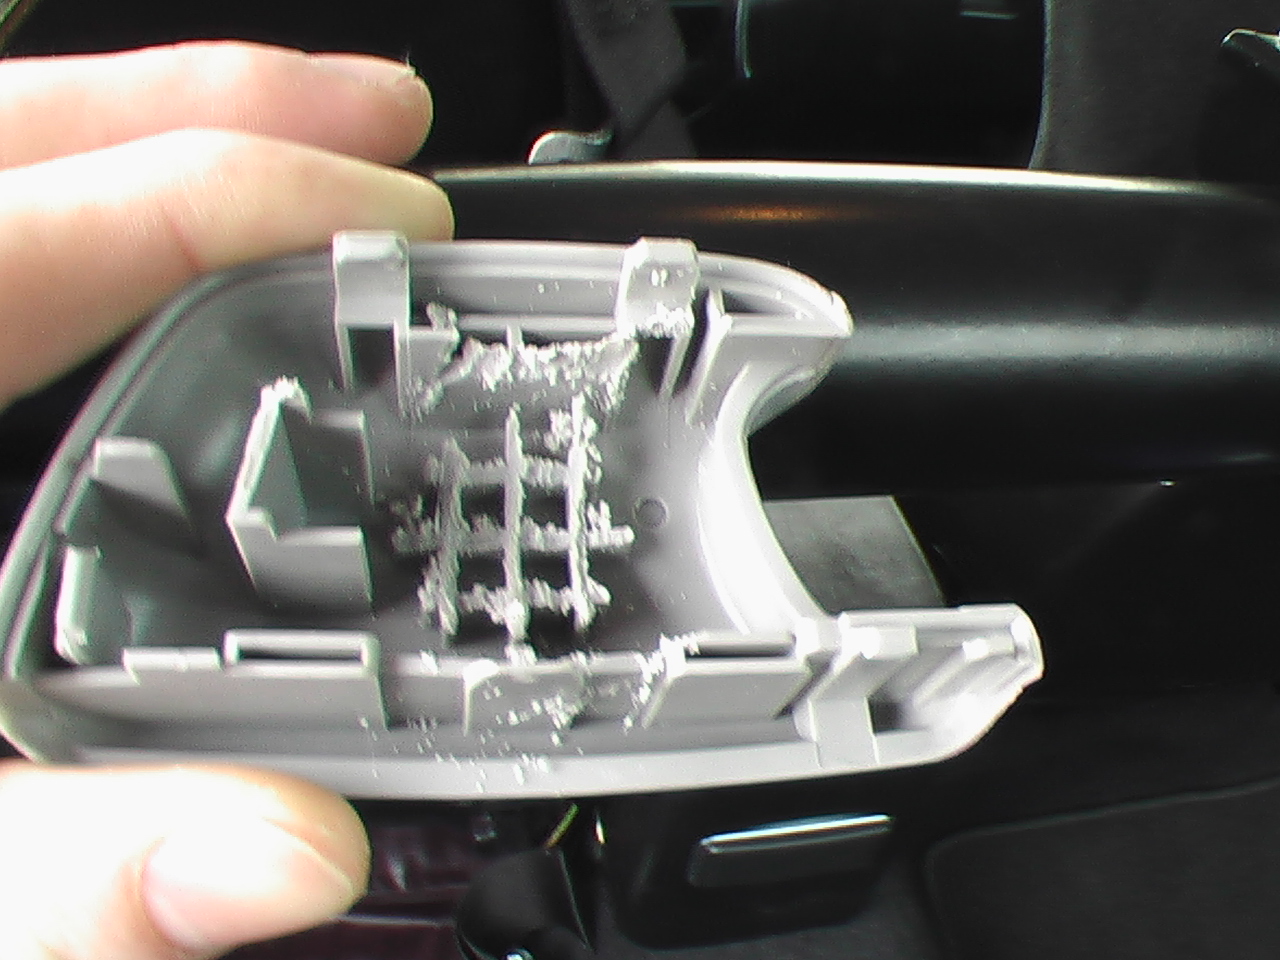
i got a little carried away with my dremel because i only have a cut-off saw on it and it's not good for grinding, but you get the point with the picture. the little honeycomb is what needs to be ground down. the sparco instructions don't show this step, but without it you wont get this cover back on.
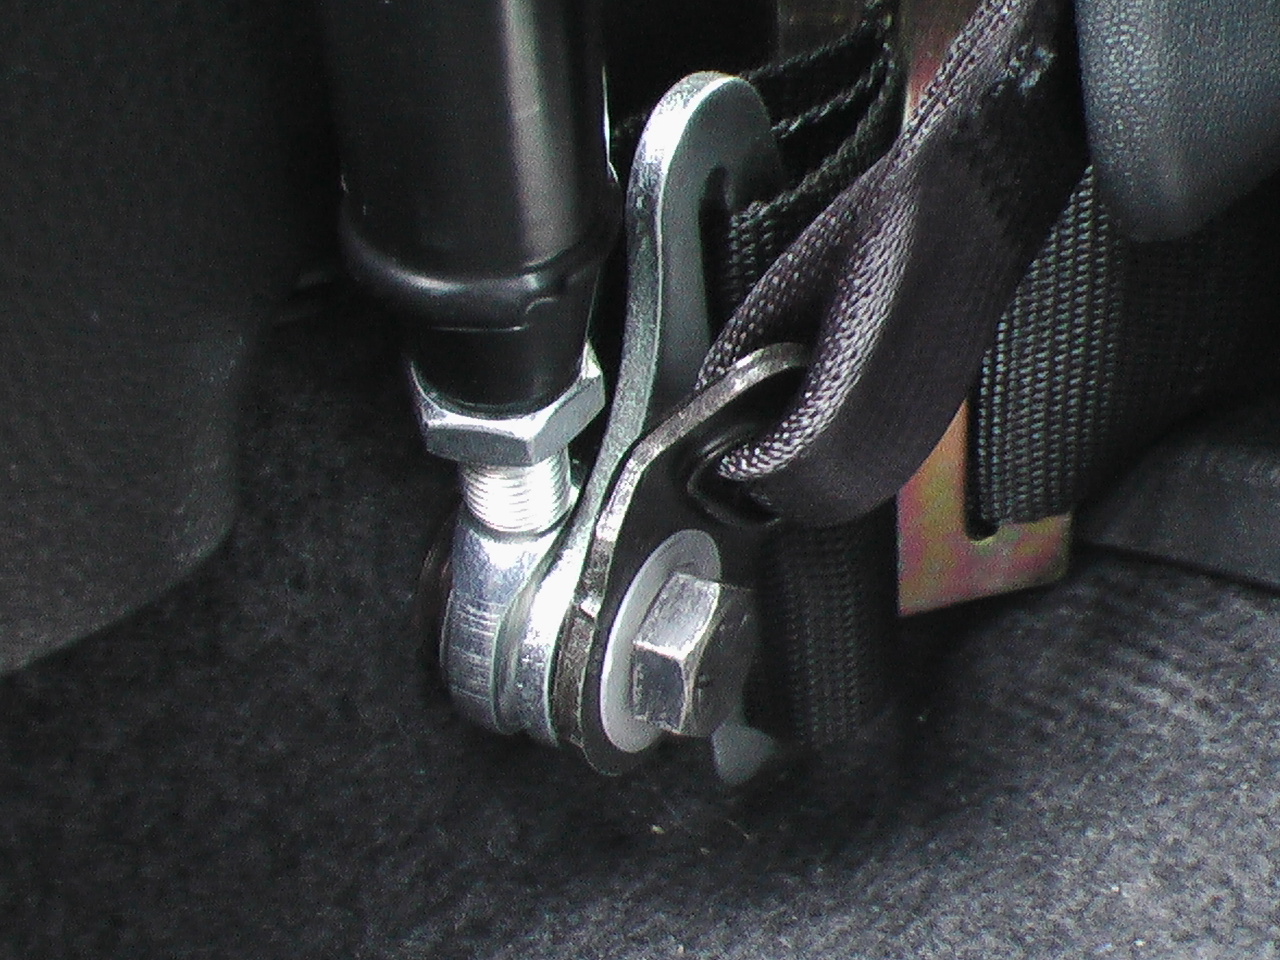
the next step is to attach the triangulation bars to the lower seatbelt mount. this is very simple. simply pull back the rubber bolt cover and remove the bolt. once the bolt is removed, follow step 4 in the sparco instructions for bolt/washer/spacer order.
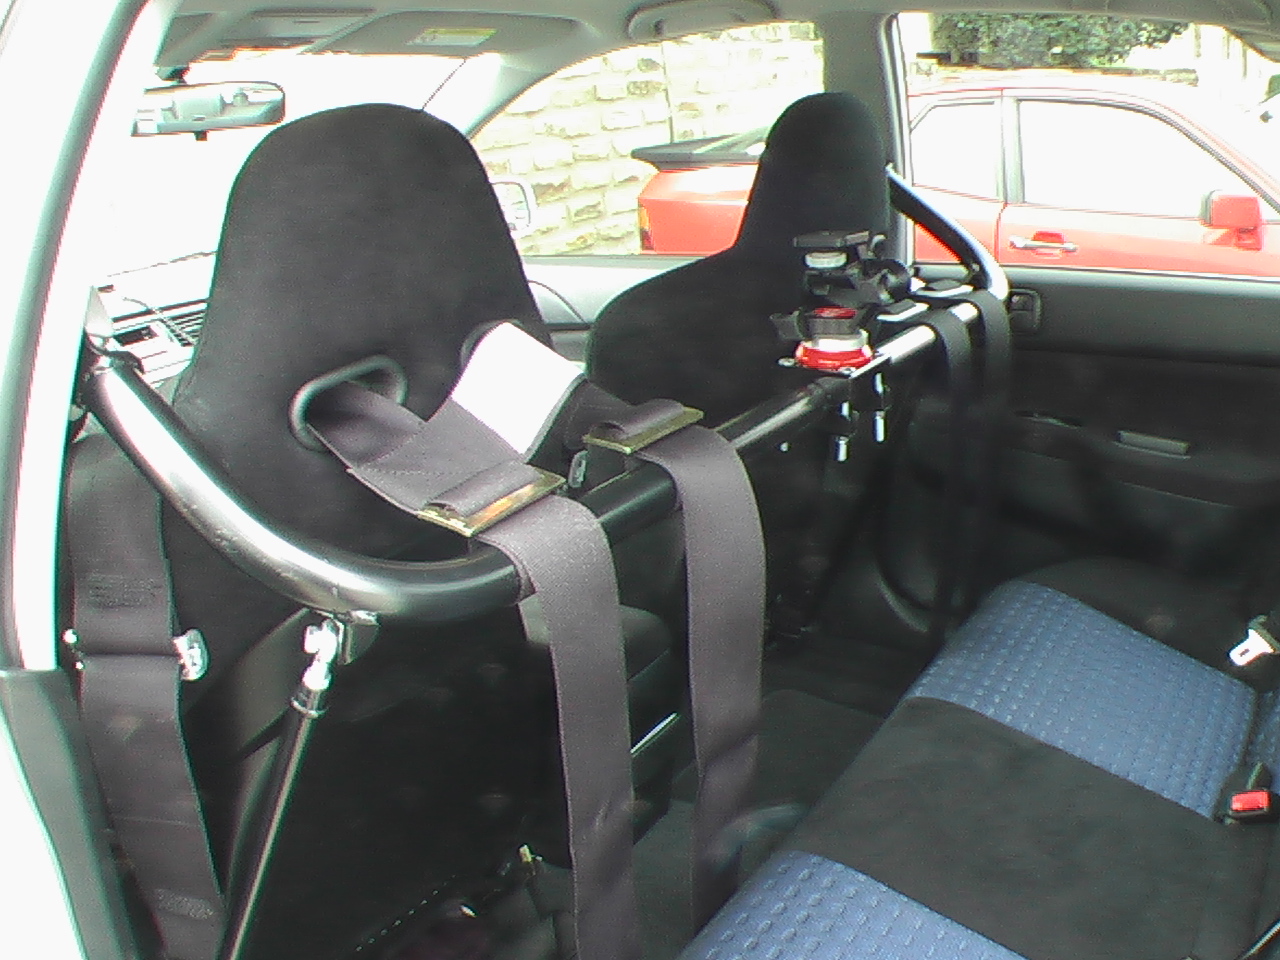
you can see what it should look like (with my addition of the 5 point harness strap). and once all the bars are attached you can simply connect them together at the triangulation point and the final product should look like this:
hope these few steps help in installing your harness bar.
1) to start, lower the top factory seatbelt mount as far down as it can go. it is easy to raise it backup one the bar is on, but it is very tough to lower it if you can't get the bolts back in. once it is down, you can pop off the little cover with a sharp flat head screw driver. it comes off with a little bit of force, so don't be afraid to pry a little. the picture below shows the upper seatbelt mount:
2)once this is off, you need to grind out some extra plastic so the new longer bolt will fit in place of the original factory one. you can see what you need to grid off in the picture below:
i got a little carried away with my dremel because i only have a cut-off saw on it and it's not good for grinding, but you get the point with the picture. the little honeycomb is what needs to be ground down. the sparco instructions don't show this step, but without it you wont get this cover back on.
the next step is to attach the triangulation bars to the lower seatbelt mount. this is very simple. simply pull back the rubber bolt cover and remove the bolt. once the bolt is removed, follow step 4 in the sparco instructions for bolt/washer/spacer order.
you can see what it should look like (with my addition of the 5 point harness strap). and once all the bars are attached you can simply connect them together at the triangulation point and the final product should look like this:
hope these few steps help in installing your harness bar.

 great job,
that will be in my how to for the 5 point harness installation 
only i don't have the sub belts installed yet, so it would be an incomplete 5 point install how to without it.
only i don't have the sub belts installed yet, so it would be an incomplete 5 point install how to without it.

How does it effect seat travel and recline? I've been wanting one for awhile now but am afraid of restricting these parameters. Being over 6'-5" can be a biotch sometimes!
you can see in the last picture where my seat is normally positioned. ther is about 6 inches of room between the seat and the bar. i am 6' 1". it really depends how you sit in your seat. i sit really upright and close to the wheel. the reason why is at any drivers ed event they will teach you to have more control sitting there vs reclined far back. basically sitting position should be that with your back and shoulders all the way back into your seat you should be able to touch your wrist to the top of your wheel.
aditionally the bar does have some room for adjustment as far as how close it is to the back of the seat. you can make that adjustment with the triangulation bars by moving them up and down. and the cross bar will move up and down (with a radius, thus it will get closer and rather from the seat).
aditionally the bar does have some room for adjustment as far as how close it is to the back of the seat. you can make that adjustment with the triangulation bars by moving them up and down. and the cross bar will move up and down (with a radius, thus it will get closer and rather from the seat).
oh wait, are you going to the conecrazy event at TWS or the NTEC meet at MSR? if you go to either you can sit in mine and give it a try with harnesses and all. that will let you know if you'll fit in with the bar or not.
Originally Posted by KevinD
that will be in my how to for the 5 point harness installation
only i don't have the sub belts installed yet, so it would be an incomplete 5 point install how to without it.
only i don't have the sub belts installed yet, so it would be an incomplete 5 point install how to without it.
Thanks,
Mark
Trending Topics
Thanks, Kevin. Oh, by the way, great write up, but HUGE pictures.
Originally Posted by KevinD
oh wait, are you going to the conecrazy event at TWS or the NTEC meet at MSR? if you go to either you can sit in mine and give it a try with harnesses and all. that will let you know if you'll fit in with the bar or not.
mark: i plan on running the sub belt over the front of the seat. i don't plan on cutting through it at all. i was a bit worried at first that it would be a bad idea to do it that way, but Eddiebear said that it passes tech in every state he races in (thats how he has it done). really the only purpose of the sub belt is to keep the lap belts from slidding up your waist and into your gut. the sub belt can do that from the front of the seat too. the key is to drill through the floor where the front of your seat is located in the position you race in. this way it doesn't wrap around your seat, but just goes straight up over the front of the seat. kind hard to explain but i will get it done and get pictures...
blackevoeight: i got the camera mount from http://www.speedwaremotorsports.com/access/cam.asp
and right now it is on sale for 89.99 (doh i paid 99 2 weeks ago!!)
great guys to work with and very very fast shipping.
blackevoeight: i got the camera mount from http://www.speedwaremotorsports.com/access/cam.asp
and right now it is on sale for 89.99 (doh i paid 99 2 weeks ago!!)
great guys to work with and very very fast shipping.
not yet actually. i have been busy helping wire a Formula SAE car all weekend. all that is left though is the sub belt so if you like i can post the how to for the 4 main points...
