
How to Install Power Locks on a RS

Thread Starter
Evolved Member
iTrader: (5)
Joined: Oct 2006
Posts: 3,805
Likes: 2
From: Sacramento, CA
How to Install Power Locks on a RS
This is a labor intensive process that requires the drilling of your rear doors so be warned...
Tools:
- Screwdrivers both kinds
- 12mm wrench
- 10mm socket and ratchet
- Drill
- Drill bits
- Bundle O zipties!
- Patience like a saint
The parts:
I used commando alarms system with 4 door actuators, control unit, alarm, siren, and trunk popper for the grand total of 120 bucks. Pretty much any 4 door actuator kit is going to be exactly the same and install the same way.
Picture of the actuators:

To begin pop the panels off the doors:
You'll need something to pry the cover tabs off the inside handle and latch. Be warned that the cover on the door handle likes to fly off. Also roll the windows down it helps when removing the panel in the final step.
Remove the screws on the outside and inside corners of the door with your Phillips screwdriver. remove the screws in the latch and inside the door handle. There are tabs on the cover for the latch so just lightly prying on the inside above the locking switch will release the cover.
Next is to remove the window roller its locked into place with a clip my favorite method to release the handle from the lever is to push the screwdriver and push the clip upward, the handle should pull off easily after that.


Pry the door off by gripping underneath it and yanking firmly the pop tabs will pop off and your panel will then be free. just slip the end piece off the window and you should be able to slide the panel free.
Remove the metal bracket for the door handle and peel off the plastic cover.
Step 2 Run the wires:
The front doors are easy on the RS. Take a window handle and roll the window all the way up then reach into the door frame near the inside corner and pop out the rubber gromet for door by pulling it inward. You can then push it back out slice the rubber inside part (don't get agressive and cut your speaker wires) then push the wires you need for the actuators into the rubber via the tube inside the cabin.

I used a 5 wire setup so when the doors are locked or unlocked they all lock or unlock. I used 2 wire actuators in the back. When running your wires make sure to zip tie them to the front of the door frame so they wont be hit by the window as it comes down. Pulling the clip off one of the window handles for testing is nice for this purpose. Make sure you remember to push the rubber grommet back into place when your done pulling wires through it.
The rear doors require drilling, so with that in mind your going to want to use some flex tubing (i used 3/8") and need a drill and appropriate drill bits. I choose to set a mark only a couple inches underneath the latch to aviod the triple plating below and the seat belts and respective wiring.
I'd drill the doors first then the B pillar mark your B pillar so your holes line up. When your done take the doors off, if your good at adjusting doors you wont need to mark the hinge locations otherwise mark them with a grease pen.

Step 3 (Intall the actuators and brackets):
Ironically the rear actuators are much easier to install than the front ones. The reason is the front door uses a cable system instead of a solid bar to move the locking mechanism. This requires you to carefully cut away at part of the cable, then zip tie the cable housing upward to provide adaquate tension so the locking mechanism will function normally. Here's a picture of another install with the cut away.

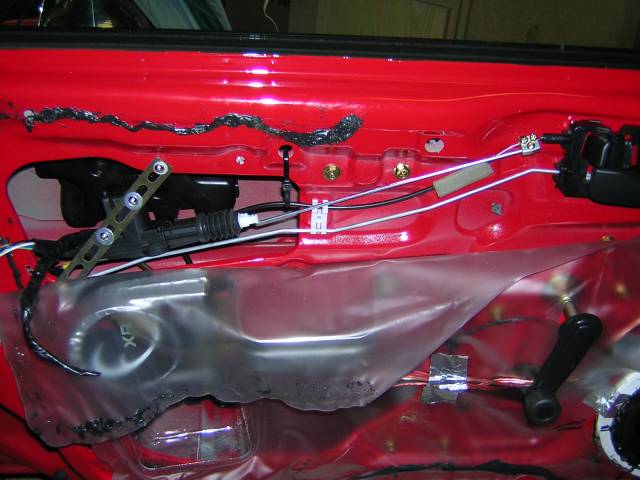
I used a drill and drill screws (3/4") to put the bracket on them used the provided bar and screws to attach the actuator to the bracket. Premeasure the distance to the cut away by pulling the actuator out fully when installing. Some man handling of the bracket and bending it towards you will help you prevent the bar from binding on the cable too much. When your done just connect your wires zip tie them and check that your window will still close properly.
The rear door is completely different in that it uses a solid bar. So while mounting is the same the install for the actuator is simplified in that you don't risk destroying your locking wire by a miscut.

Testing:
Its a good thing to test these units before buttoning everything back together. First test them with a remote power source like a spare battery. I have a battery jump starter so i used that in my testing. First make sure the units open and close fully without assistance. Next put the door panel mostly on and test again to be sure the unit isn't binding on the insulation or the foam pieces (which i tossed). On the rear for example a plastic peg got in the way so i just chopped it down and presto it worked perfect.
I'll leave it to you to decide where to mount the control module and supply the power source.
Tools:
- Screwdrivers both kinds
- 12mm wrench
- 10mm socket and ratchet
- Drill
- Drill bits
- Bundle O zipties!
- Patience like a saint
The parts:
I used commando alarms system with 4 door actuators, control unit, alarm, siren, and trunk popper for the grand total of 120 bucks. Pretty much any 4 door actuator kit is going to be exactly the same and install the same way.
Picture of the actuators:
To begin pop the panels off the doors:
You'll need something to pry the cover tabs off the inside handle and latch. Be warned that the cover on the door handle likes to fly off. Also roll the windows down it helps when removing the panel in the final step.
Remove the screws on the outside and inside corners of the door with your Phillips screwdriver. remove the screws in the latch and inside the door handle. There are tabs on the cover for the latch so just lightly prying on the inside above the locking switch will release the cover.
Next is to remove the window roller its locked into place with a clip my favorite method to release the handle from the lever is to push the screwdriver and push the clip upward, the handle should pull off easily after that.
Pry the door off by gripping underneath it and yanking firmly the pop tabs will pop off and your panel will then be free. just slip the end piece off the window and you should be able to slide the panel free.
Remove the metal bracket for the door handle and peel off the plastic cover.
Step 2 Run the wires:
The front doors are easy on the RS. Take a window handle and roll the window all the way up then reach into the door frame near the inside corner and pop out the rubber gromet for door by pulling it inward. You can then push it back out slice the rubber inside part (don't get agressive and cut your speaker wires) then push the wires you need for the actuators into the rubber via the tube inside the cabin.
I used a 5 wire setup so when the doors are locked or unlocked they all lock or unlock. I used 2 wire actuators in the back. When running your wires make sure to zip tie them to the front of the door frame so they wont be hit by the window as it comes down. Pulling the clip off one of the window handles for testing is nice for this purpose. Make sure you remember to push the rubber grommet back into place when your done pulling wires through it.
The rear doors require drilling, so with that in mind your going to want to use some flex tubing (i used 3/8") and need a drill and appropriate drill bits. I choose to set a mark only a couple inches underneath the latch to aviod the triple plating below and the seat belts and respective wiring.
I'd drill the doors first then the B pillar mark your B pillar so your holes line up. When your done take the doors off, if your good at adjusting doors you wont need to mark the hinge locations otherwise mark them with a grease pen.
Step 3 (Intall the actuators and brackets):
Ironically the rear actuators are much easier to install than the front ones. The reason is the front door uses a cable system instead of a solid bar to move the locking mechanism. This requires you to carefully cut away at part of the cable, then zip tie the cable housing upward to provide adaquate tension so the locking mechanism will function normally. Here's a picture of another install with the cut away.
I used a drill and drill screws (3/4") to put the bracket on them used the provided bar and screws to attach the actuator to the bracket. Premeasure the distance to the cut away by pulling the actuator out fully when installing. Some man handling of the bracket and bending it towards you will help you prevent the bar from binding on the cable too much. When your done just connect your wires zip tie them and check that your window will still close properly.
The rear door is completely different in that it uses a solid bar. So while mounting is the same the install for the actuator is simplified in that you don't risk destroying your locking wire by a miscut.
Testing:
Its a good thing to test these units before buttoning everything back together. First test them with a remote power source like a spare battery. I have a battery jump starter so i used that in my testing. First make sure the units open and close fully without assistance. Next put the door panel mostly on and test again to be sure the unit isn't binding on the insulation or the foam pieces (which i tossed). On the rear for example a plastic peg got in the way so i just chopped it down and presto it worked perfect.
I'll leave it to you to decide where to mount the control module and supply the power source.
Last edited by RoadSpike; Jan 22, 2007 at 12:27 AM.

Thread
Thread Starter
Forum
Replies
Last Post
vtluu
Evo How To Requests / Questions / Tips
15
Feb 7, 2008 09:40 PM
Grnd0Lancer
Lancer Show / Shine
21
Oct 10, 2005 07:17 AM
evo81
Evo How Tos / Installations
2
May 8, 2005 08:47 AM