
How to install hood pins

How to install hood pins
HOW TO INSTALL HOOD PINS........sorry for the large pictures.
This install was done on an EVO 9 and will work for most cars. The location chosen is specific to the Evo 9 and maybe if someone can confirm, it might be the same for an 8. This is a do at your own risk How To. I will not be responsible for any damages occur from this install.
Recommendations: work in a garage if possible. Wear a long sleeve shirt and gloves if you don�t want to itch and scratch like a crack head. Baby powder helps too. Do not work outside on a windy day or you will be itching regardless how long your sleeves are
Tools:
Drill
Drill bits: 1/16 and all the way up to your largest size
Adjustable wrench
Phillips Screwdriver
Vise
Tape Measure
Painter�s Tape
Grease or some KY
Garbage lid or drop cloth
Foam gasket material (optional)
Hack-Saw (optional)
Hood Pins
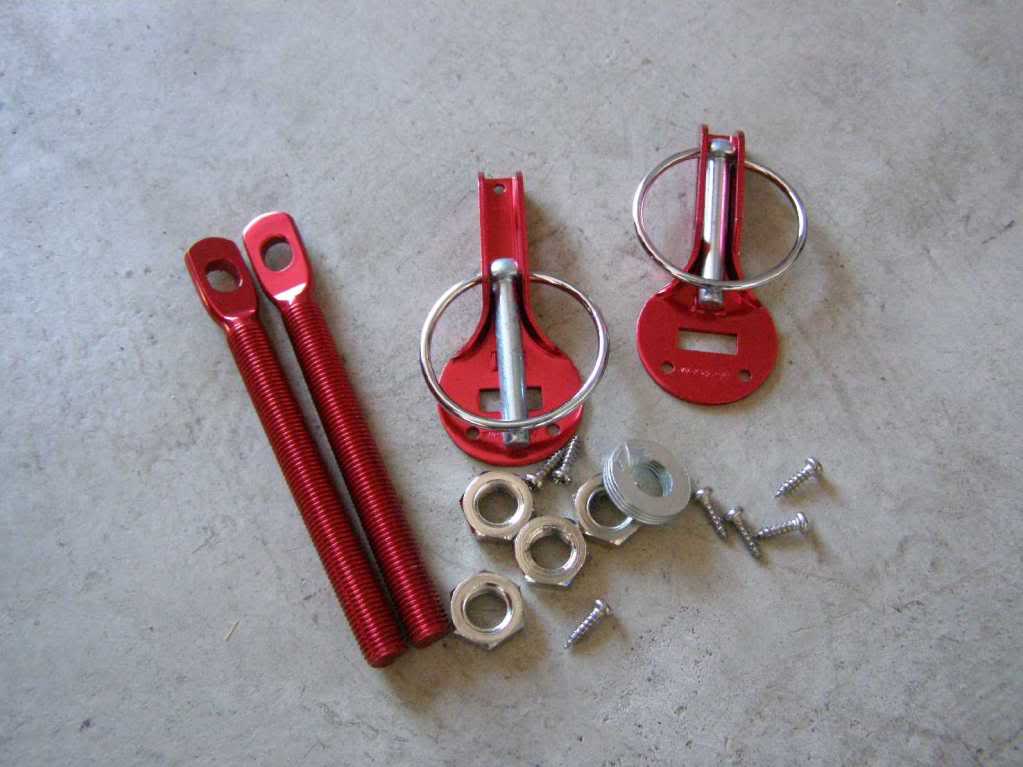
1. Pick a location where you want the pins to be installed. You may want to look on top of the hood and see what location looks best when installed. I chose the holes already drilled on the front beam. Also, small adjustments are easier to make when installed in these holes. We�ll get to this later.

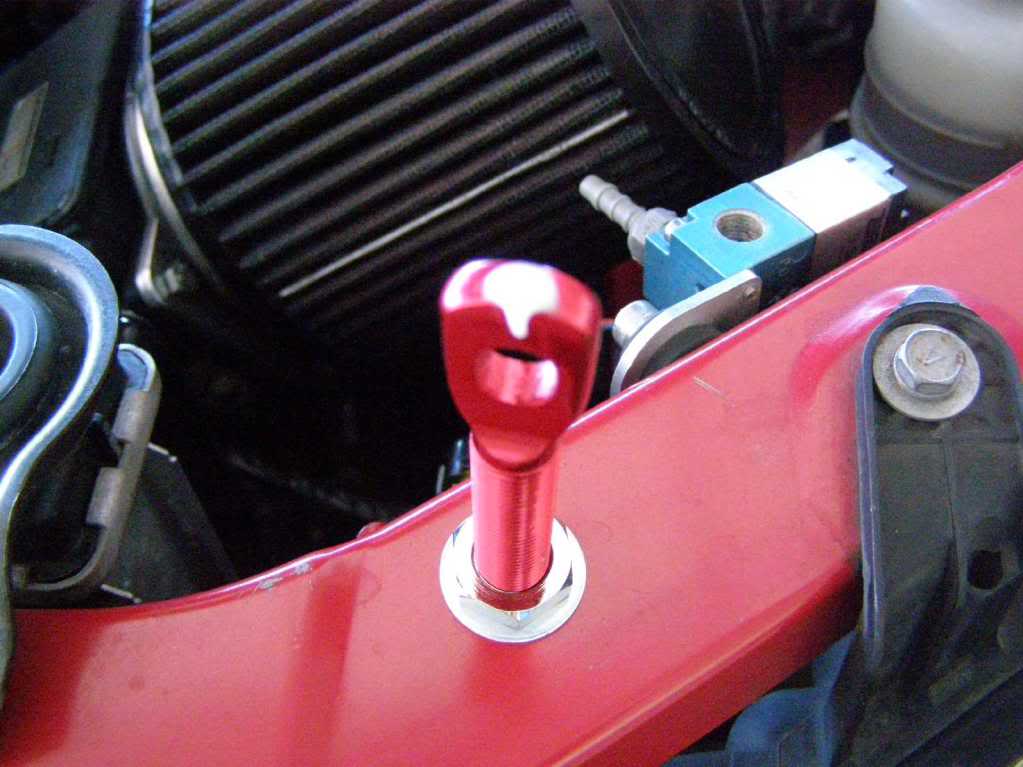
2. Install the studs to the beam. The nuts should be lightly tighten only. You will be adjusting them many times later. I installed them leaving about 2.75� sticking out. This was an estimate of what I needed when the hood is closed.
Things to watch out for: if you installed the studs too short and when you finally go to adjust the sliding pin to match with the hole, your stud may be hitting just outside your drilled hole. Remember, hoods don�t come straight down. It�s an arc when you close the hood so the hole you drilled may not be dead on. Same goes if you install your studs too high. Also in this install, note that the studs are not vertical but at an angle facing towards the front bumper.

Problem encounter: the studs I had were too long and it interfered below. I had to cut about an inch off with a hacksaw.

3. Apply a small amount of grease or KY jelly on top of each stud. This will mark the underside of the hood for drilling.
4. Close the hood to mark. If you don�t want a messy bay, place a garage lid or drop cloth below the drilling area. Using a drill and a 1/16 bit, drill a pilot hole into each marking. Increase the size of the bit until you get a hole that will fit the stud. Don�t be scared to do this. You�re only drilling into the bottom layer of the hood so any mistake here is hidden. You might find yourself run out of bit size as I did so I just use the largest bit I had and rotated it in circles until it cleared the studs when closed.


5. Apply the painter�s tape on the topside of the hood where the stud will come out at.

6. Go take a 10 minute break and think about what you�re doing. For God�s sake, don�t drink any alcohol while doing this. You�re going to put a ton of holes into your beautiful carbon fiber hood. Are you sure you want to continue?
7. Now that you have two big gaping holes on the underside, you want to apply a small amount of grease or KY jelly on top of each stud again. This will mark the underside of the top layer of the hood for drilling. The next step is the point of no return. Are you still sure you want to continue?
8. Using the 1/16 bit, drill a pilot hole into each marking.

9. From the topside of the hood, increase the size of the bit until you get a hole that will fit the stud. This is where mistakes are not so forgiving. Take your time and do it slowly so the hood doesn�t chip. Again, you might have to rotate it in circles to get the holes larger. Be careful not to slip or you will have a nice mark across your hood.


10. Place the pin assembly onto the hood the way you want it set. Adjust the stud so the pin slides in and out freely. You may have to do this several times before getting the stud set to the right height and getting both sides to close smoothly. It took me about a dozen tries. Once you have the stud set, tighten the nut. Note: the pin assembly is not screwed down at this time.


11. (OPTIONAL) This step is optional but I added a foam gasket between the hood and the pin assembly. I wanted something to protect the hood from the metal part of the pin assembly, even though I just drilled two gia-normous holes into the hood�.LOL. If you do this step, you may have to repeat the last step and adjust for the thickness of the foam gasket.


12. Once the stud is set the way you wanted, mark the holes for the pin assembly. Drill the marked holes using a 1/16 bit. Note: Depending on the hardware you were provided with, your bit size may differ in this step.


13. Remove the painter�s tape from the hood and secure the pin assembly with the hardware provided. Note: hand tighten only and working each side down evenly. Do not over-tighten! If the pin assembly is not flushed to the hood, STOP! Do not tighten any more or you will CRACK your hood.
Problem encounter: you may find that the location you placed the pin assembly is on a contour (arc). Using a vise, slightly bend the pin assembly to the slope of the hood.
As mentioned in step 1, if you�re having minor problems aligning the stud into the pin assembly, you can push or pull the stud by hand to the direction needed.

14. Close the hood and try out the pins. The pin mechanism should not be too loose or it will rattle during driving. If so, adjust the stud slightly lower to give a little friction when securing the hood.
16. Wipe off all the fingerprints you left on the hood and you�re DONE!

This install was done on an EVO 9 and will work for most cars. The location chosen is specific to the Evo 9 and maybe if someone can confirm, it might be the same for an 8. This is a do at your own risk How To. I will not be responsible for any damages occur from this install.
Recommendations: work in a garage if possible. Wear a long sleeve shirt and gloves if you don�t want to itch and scratch like a crack head. Baby powder helps too. Do not work outside on a windy day or you will be itching regardless how long your sleeves are
Tools:
Drill
Drill bits: 1/16 and all the way up to your largest size
Adjustable wrench
Phillips Screwdriver
Vise
Tape Measure
Painter�s Tape
Grease or some KY
Garbage lid or drop cloth
Foam gasket material (optional)
Hack-Saw (optional)
Hood Pins
1. Pick a location where you want the pins to be installed. You may want to look on top of the hood and see what location looks best when installed. I chose the holes already drilled on the front beam. Also, small adjustments are easier to make when installed in these holes. We�ll get to this later.
2. Install the studs to the beam. The nuts should be lightly tighten only. You will be adjusting them many times later. I installed them leaving about 2.75� sticking out. This was an estimate of what I needed when the hood is closed.
Things to watch out for: if you installed the studs too short and when you finally go to adjust the sliding pin to match with the hole, your stud may be hitting just outside your drilled hole. Remember, hoods don�t come straight down. It�s an arc when you close the hood so the hole you drilled may not be dead on. Same goes if you install your studs too high. Also in this install, note that the studs are not vertical but at an angle facing towards the front bumper.
Problem encounter: the studs I had were too long and it interfered below. I had to cut about an inch off with a hacksaw.
3. Apply a small amount of grease or KY jelly on top of each stud. This will mark the underside of the hood for drilling.
4. Close the hood to mark. If you don�t want a messy bay, place a garage lid or drop cloth below the drilling area. Using a drill and a 1/16 bit, drill a pilot hole into each marking. Increase the size of the bit until you get a hole that will fit the stud. Don�t be scared to do this. You�re only drilling into the bottom layer of the hood so any mistake here is hidden. You might find yourself run out of bit size as I did so I just use the largest bit I had and rotated it in circles until it cleared the studs when closed.
5. Apply the painter�s tape on the topside of the hood where the stud will come out at.
6. Go take a 10 minute break and think about what you�re doing. For God�s sake, don�t drink any alcohol while doing this. You�re going to put a ton of holes into your beautiful carbon fiber hood. Are you sure you want to continue?
7. Now that you have two big gaping holes on the underside, you want to apply a small amount of grease or KY jelly on top of each stud again. This will mark the underside of the top layer of the hood for drilling. The next step is the point of no return. Are you still sure you want to continue?
8. Using the 1/16 bit, drill a pilot hole into each marking.
9. From the topside of the hood, increase the size of the bit until you get a hole that will fit the stud. This is where mistakes are not so forgiving. Take your time and do it slowly so the hood doesn�t chip. Again, you might have to rotate it in circles to get the holes larger. Be careful not to slip or you will have a nice mark across your hood.
10. Place the pin assembly onto the hood the way you want it set. Adjust the stud so the pin slides in and out freely. You may have to do this several times before getting the stud set to the right height and getting both sides to close smoothly. It took me about a dozen tries. Once you have the stud set, tighten the nut. Note: the pin assembly is not screwed down at this time.
11. (OPTIONAL) This step is optional but I added a foam gasket between the hood and the pin assembly. I wanted something to protect the hood from the metal part of the pin assembly, even though I just drilled two gia-normous holes into the hood�.LOL. If you do this step, you may have to repeat the last step and adjust for the thickness of the foam gasket.
12. Once the stud is set the way you wanted, mark the holes for the pin assembly. Drill the marked holes using a 1/16 bit. Note: Depending on the hardware you were provided with, your bit size may differ in this step.
13. Remove the painter�s tape from the hood and secure the pin assembly with the hardware provided. Note: hand tighten only and working each side down evenly. Do not over-tighten! If the pin assembly is not flushed to the hood, STOP! Do not tighten any more or you will CRACK your hood.
Problem encounter: you may find that the location you placed the pin assembly is on a contour (arc). Using a vise, slightly bend the pin assembly to the slope of the hood.
As mentioned in step 1, if you�re having minor problems aligning the stud into the pin assembly, you can push or pull the stud by hand to the direction needed.
14. Close the hood and try out the pins. The pin mechanism should not be too loose or it will rattle during driving. If so, adjust the stud slightly lower to give a little friction when securing the hood.
16. Wipe off all the fingerprints you left on the hood and you�re DONE!


IMO any brand will do the job. It's just an added insurance so the hood don't go bye bye. When they do, it's not because of the pins that break but from a bad install. I like the aerocatch style latches best but I don't have the ***** to cut that much into my hood.
Trending Topics

Newbie
Joined: Sep 2004
Posts: 30
Likes: 0
From: Los Angeles, CA
Thanks .. I hear you. I know the latches you speak off. They look sooo nice and I'm sure a better overall latch. Ditto on the ***** situation. I would have a difficult time putting a small drill bit through. To cut any more than that, I would either have to be on some real good drugs or **** drunk 
Thanks .. I hear you. I know the latches you speak off. They look sooo nice and I'm sure a better overall latch. Ditto on the ***** situation. I would have a difficult time putting a small drill bit through. To cut any more than that, I would either have to be on some real good drugs or **** drunk
 all that being said... i love these latches...
 my sincerest apologies for the highjack... just figure it would be a nice addition
and as far as brand... I hate the type he used. my eclipse had them when i bought it... the cheap studs snapped and my hood hit the windshield. autozone sells harden steel studs but they wont work with most types of latches.. but will with cotter pins... for the hardcore racers dropping weight by pulling the factory hood latch system...

Newbie
Joined: Mar 2009
Posts: 15
Likes: 0
From: West Bloomfield, MI
You did a good job of detailing all the little things that an easier job like this could omit. Thanks for doing the hard parts for us. I bet the DIY took longer than the actual install.
Thank you!
Thank you!


