
Swaybar preload question

Thread Starter
Evolved Member
iTrader: (47)
Joined: Apr 2007
Posts: 1,320
Likes: 2
From: Kansas City
Swaybar preload question
I've been searching for about the last hour with no luck. I'm installing adjustable endlinks tomorrow (front and rear). Is there any rhyme or reason to setting swaybar preload with these, or is it set them to the stock length and install them? I have a Perrin rear bar and stock front (I plan on doing the adjustable mod while I'm at it).


Joined: Apr 2005
Posts: 9,002
Likes: 12
From: somewhere testing various tires, brakes, and suspensions.
^ that. Use one adjustable endlink per sway bar. With the car on the ground adjust the bars until the load is taken out. If you have a friend there. Sit him in the car to get the driver weight.
 I did finally find a couple threads after I posted this that helped too. I now understand the idea.


While you are at it, here is a trick I learned prior to the 2005 Nationals
Polyurethane bushings are notorious for binding, despite greasing. Tight fits and loss of grease = very uneven weight transfer, sticking and abrupt shifts in the car taking a set in the turns.
Buy some .020"thick PTFE thin film ( teflon film but much thicker than plumbing tape). Cut a piece to wrap around the bar so it just meets with no overlap. Make it only as wide as the poly bushing. Remove bushing from bar. Use a little grease to paste the film and hold it to the bar. Install the bushing over the film making sure the split in the bushing and the gap where the film meets are on opposite sides from each other.
Tighten the bushing to specs. Teflon is a great bushing material as it "flows" and is very slippery. So the bar will move much more easily, taking a set in turns properly, allowing the car to get to a set in the turn faster. This allows YOU to have more confidence and shaves precious tenths and distance on course. The better stability allows quicker throttle application and more predictable handling.
No it doesnt wear out like you would think. I have had this on my Evo for 2 years and have not had to grease again. And EVO people who drive it think highly of the way the car turns in and takes a set.
Try it you will like it !!! Do it on both bars if you can get to the front easily. McMaster sells this stuff in 12x12 sheets for like $10-12 pretty cheap mod and enough for 2 Evo's
Milburn
Last edited by WRC-LVR; Apr 28, 2009 at 08:01 PM.
I didn't have a helper to sit in the driver's seat, but if your car has pretty stiff spring rates (e.g., 500#/inch or more) it won't matter that much.
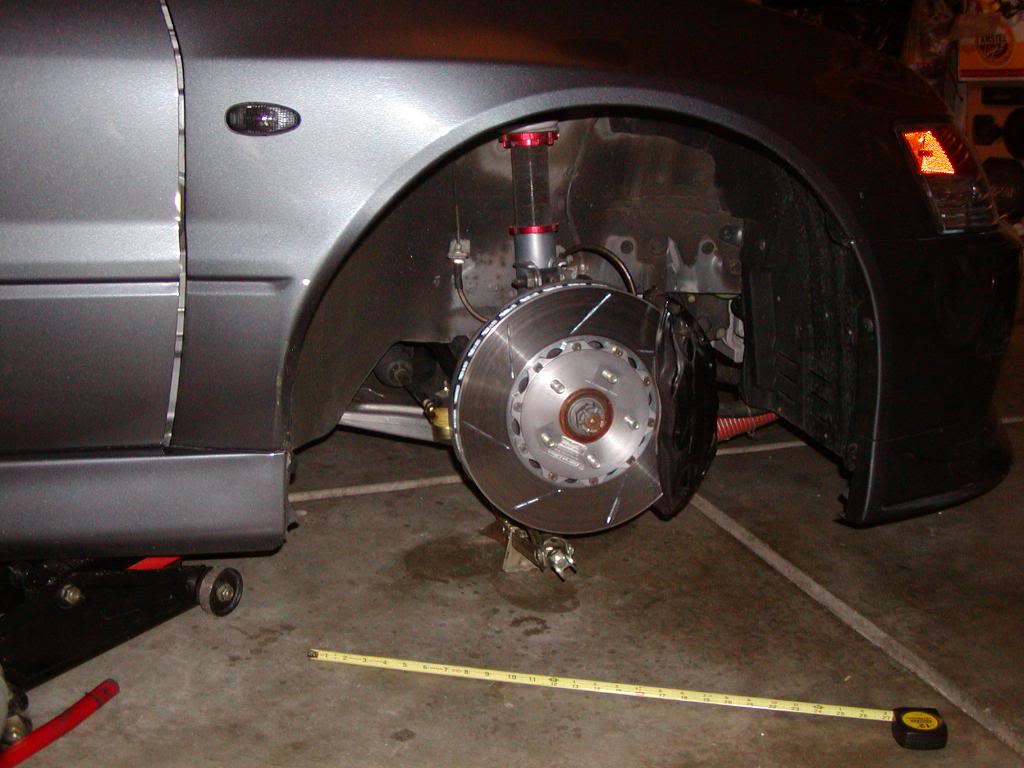
First, with the car sitting on flat ground, I measured the height of the wheel well opening and the distance between the garage floor and the bottom of the lower control arm, right under the attachment point of the swaybar endlink. With my car, the highest point of the wheel well in the fender was 25 7/8", and the clearance between the bottom of the LCA and the ground was 5 5/8".
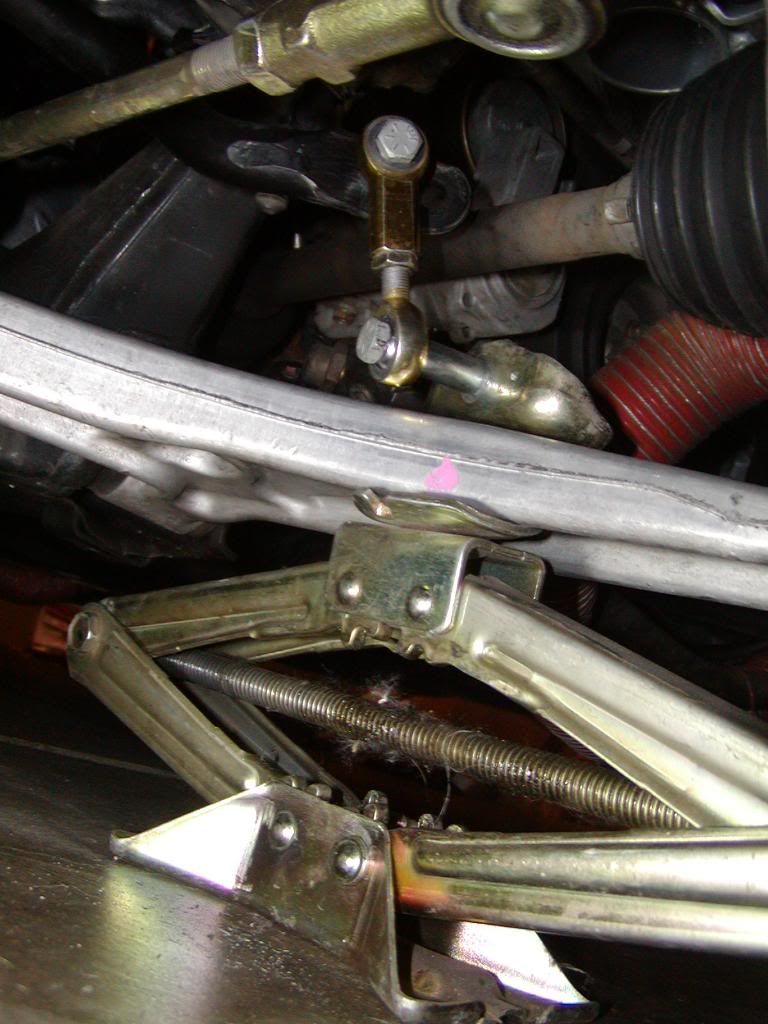
Next, I put a jack under the car at the lifting point under the front door and removed the front wheel. While the car is jacked up high enough to take most of the tension off the swaybar endlink, I removed the lower fixing bolt for the endlink. Then I put an OEM scissor jack under the control arm, set at around 5 5/8" high, and lowered the car and adjusted the scissor jack carefully until the control arm height was 5 5/8" again.
If you measured things accurately when the car was sitting level on all four wheels, the fender opening height (and therefore the stance of the car) should match what it was when the wheel was on, with the car now supported by the three remaining wheels and the scissor jack under the control arm at the corner you're working on.
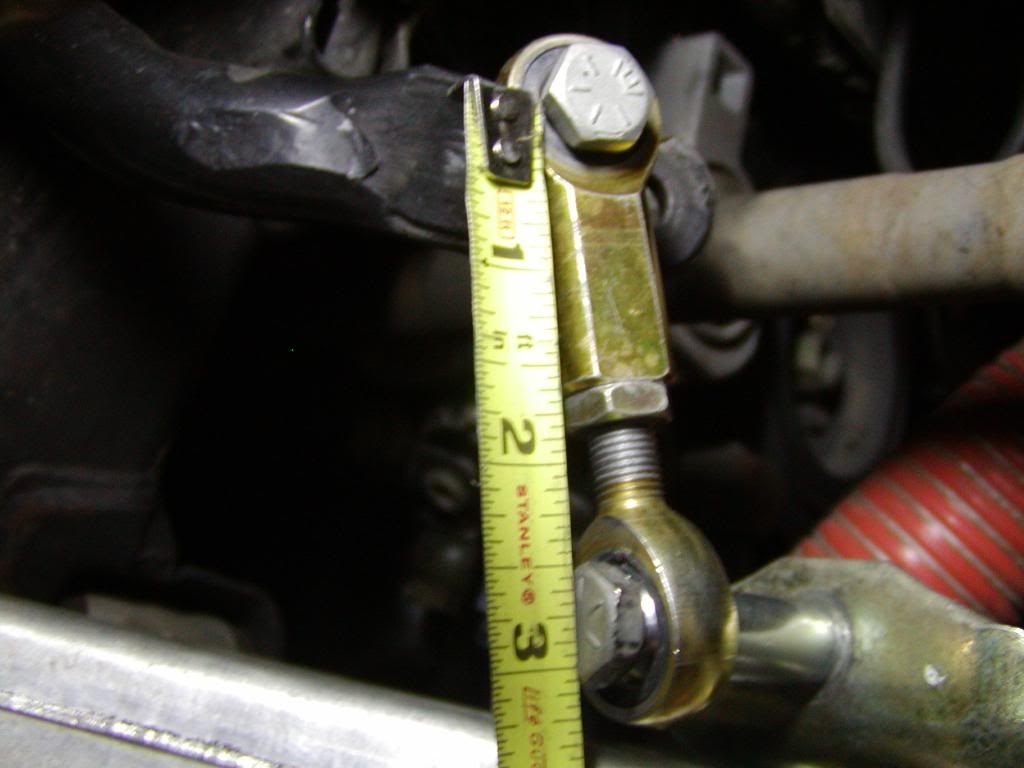
Now you can see how you need to adjust the endlink length so that the fixing bolt lines up with the hole in the attachment bracket on the LCA. In my case, I needed to lengthen my adjustable endlink... the correct endlink length for my car's ride height was about 2 3/4", eye to eye.
As SmikeEvo pointed out, you only need to do this on one side of the car for your front and rear bar, not at all four corners.
Also, if you'd like to build your own adjustable endlinks for significantly less than ones you can buy all ready to go, here's the link for you:
http://www.cs.unm.edu/~donour/cars/evo_endlinks/
Note that I've added a metal spacer in order to accommodate the relocated attachment point on the OEM swaybar... there's not enough articulation in the ball joints ends otherwise.
Hope this helps someone else out... and if this method of removing preload from the swaybars is suspect or incorrect, please let me know!
My Evo supported with the main jack, and the scissor jack under the LCA, at my car's normal ride height/suspension position:
The scissor jack under the LCA:
The length of the front endlink adjusted for my car's ride height:

EGbeater, what happened to your brake caliper? It looks black  Just curious, with your setup do you think going BBK would help a lot? How did you remove the tie rod from the arm to drill the swaybar?
Also, do you guys notice a big difference removing preload from the swaybars?
Just curious, with your setup do you think going BBK would help a lot? How did you remove the tie rod from the arm to drill the swaybar?Also, do you guys notice a big difference removing preload from the swaybars?
Trending Topics
Well, that is what happens when you beat the snot out of an Evo at the track and use the brakes really hard - the pads smoke and/or catch on fire, you boil your brake fluid, and the calipers eventually turn black.
I'd assume bigger front rotors would help somewhat, sure. I don't want to upgrade the front brakes with a big brake kit because of the enormous expense (of course), but also because of the extra weight of bigger rotors... plus, I'd imagine my choices of trackworthy pads would be pretty limited if I went to a Stoptech, Brembo or Rotara 14" big brake kit.
There's no need to remove the tie rod to drill the swaybar. If you meant the swaybar endlink, it's just a 14mm nut IIRC. My car's pretty new, so it wasn't rusted in place, which I've heard can happen.
If you do need to remove tie rod ends or ball joints, I find that a Harbor Freight pitman puller works great:
http://www.harborfreight.com/cpi/cta...temnumber=1752
Dunno about other people, but no - I didn't notice a marked difference.
Last edited by EGbeater; Oct 11, 2009 at 01:53 PM.


Also, if you'd like to build your own adjustable endlinks for significantly less than ones you can buy all ready to go, here's the link for you:
http://www.cs.unm.edu/~donour/cars/evo_endlinks/
Note that I've added a metal spacer in order to accommodate the relocated attachment point on the OEM swaybar... there's not enough articulation in the ball joints ends otherwise.
http://www.cs.unm.edu/~donour/cars/evo_endlinks/
Note that I've added a metal spacer in order to accommodate the relocated attachment point on the OEM swaybar... there's not enough articulation in the ball joints ends otherwise.
8/8/11 Shipped by UPS Ground. Paid by Credit Card.
1 2458K141 2 Each Carbon-fiber Insert Ball Joint Rod End, 3/8"-24 Rh Male Shank,3/8" Ball Id, 1-1/4"l Thrd
2 2458K341 2 Each Carbon-fiber Insert Ball Joint Rod End, 3/8"-24 Rh Female Shank,3/8" Ball Id,13/16"l Thrd
3 98017A199 1 Pack 300 Series Ss Nas 1149 Flat Washer, 3/8"l Sz, .625"od, .028"-.036"thk, Dash No. C0632r
4 97135A235 1 Pack Grade 8 Steel Nylon-insert Hex Locknut, Znc-yellow Pltd, 3/8"-24 Thrd Sz, 9/16"w, 29/64"h
5 91286A252 1 Pack Grade 8 Coated Alloy Steel Hex Head Cap Screw, 3/8"-24 Thread, 2" Length
(this was to build fronts only - I built 2 not knowing that I could do with just 1)
The site you linked lists these from pegasus:
Part No. Part Qty Unit Cost Cost
3068-06 3/8 inch Rod End Retaining Washer 8 2.39 19.12
AN316-6-L AN316 Jam Nut, 3/8-24 Left Hand 2 0.69 1.38
AN316-6-R AN316 Jam Nut, 3/8-24 Right Hand 4 0.39 1.56
I'd double up on the first item (3068-06) if making all 4 as I'm 99% sure they should be on both ends of the ball joint. If not the bottom of the bolt will hit the ball and could possibly damage it / cause unpredictable movement over time. The alternative solution is rounding the fastener, but i don't think that is a good solution especially when those are relatively cheap.
Buy some .020"thick PTFE thin film ( teflon film but much thicker than plumbing tape). Cut a piece to wrap around the bar so it just meets with no overlap. Make it only as wide as the poly bushing. Remove bushing from bar. Use a little grease to paste the film and hold it to the bar. Install the bushing over the film making sure the split in the bushing and the gap where the film meets are on opposite sides from each other.
I've recently experimented with using UHMW (Ultra Heavy Molecular Weight) polyethylene tape under my sway bar bushings... it works well. Supposedly UHMW is more abrasion resistant than Teflon.
From wikipedia:
UHMWPE is odorless, tasteless, and nontoxic. It is highly resistant to corrosive chemicals except oxidizing acids; has extremely low moisture absorption and a very low coefficient of friction; is self-lubricating; and is highly resistant to abrasion, in some forms being 15 times more resistant to abrasion than carbon steel. Its coefficient of friction is significantly lower than that of nylon and acetal, and is comparable to that of polytetrafluoroethylene (PTFE, Teflon), but UHMWPE has better abrasion resistance than PTFE.
For rubber/OEM style bushings, you still need to use grease over the tape; for aftermarket, urethane bushings, you can run without grease at all, although the bushings do turn significantly easier over the UHMW tape's surface with grease (using grease just means it'll attract dirt and dust, and eventually you may have to take it apart to clean it and re-grease).
This is the stuff I used... it's from McMaster-Carr (76445A724, .005" x 2" wide, 5 yards long, standard acrylic adhesive, $10.10 per roll):
http://www.mcmaster.com/#76445a724/=pu3td6
If/when I run out, and I see evidence that the bushing has worn the UHMW material significantly, I may try the slightly thicker .007" version (76445A744, $12.76 per roll):
http://www.mcmaster.com/#76445a744/=pu3vgw
Below are pics of the UHMW tape applied over a Cusco sway bar (not an Evo application); the roll of tape itself is in the picture too. I butted the ends of the tape by intentionally overlapping them a tiny bit, then running a fresh utility knife blade over the seam�letting the blade follow the "step" created by the overlap�to cut the top layer so I can peel that surplus off.
This method results in a near perfect seam... it's impossible to get it right by measuring the circumference of the bar with a paper tape measure and attempting to cut the UHMW tape to the EXACT perfect length in advance. Even if you nail the length perfectly, down to the tenth of a millimeter (unlikely), you'll probably apply the tape to the bar slightly askew, instead of perfectly perpendicular to the bar, and because of that, the tape ends won't line up perfectly anyway.
Last edited by EGbeater; Dec 26, 2013 at 06:03 AM. Reason: new info on using UHMW tape under swaybar bushings
Use the grease, the whole idea is to reduce friction. Dont worry about a little grease or dirt. Hose works well :-)
If you can, do a pre / post assessment and post up your results.
Im betting you will like the result.
http://www.mcmaster.com/#76445a744/=rmaxjx is now $13.14 a roll. Other sizes are also available as is PEEK tape which is more temp resistant ( -40F -300 F )
Last edited by WRC-LVR; Apr 20, 2014 at 07:49 AM.