


HOW TO: Brake Rotors and Pads Replacement


Thread Starter
Evolved Member
Joined: May 2008
Posts: 900
Likes: 1
From: Ashburn, VA
HOW TO: Brake Rotors and Pads Replacement
Finally got all the new brake components in. Hope some of you can use this to work on their own. If anyone can post any info I might have missed or you think is needed, please let me know and I'll add it. Its also possible I am wrong in some of these steps, but its a start.
PLEASE NOTE: Using this article is doing so at your own risk. I take no responsibility for any damage caused as a result of following these steps. Always have a first aid kit at hand.
Having said that, I think it makes sense if I detail my mistakes first and how costly they can be .
.
1) When doing the rear brakes. MAKE SURE YOUR HAND BRAKE IS RELEASED (down position). I cannot stress this enough. I had it unreleased and the rotor would not come off. I thought it was seized and tried to force it out and broke the drum brake shoe liner nails that hold them in place. cost me around 330 USD to fix. Funny thing is, it was still cheaper to do it myself despite this added cost.
2) Wear gloves often unless you really enjoy hurting yourself.
3) Having a second person help you would be better than trying to do it all by yourself.
4) Put the Vehicle in gear when working on it.
5) If using aluminum lug nuts, be sure to use a torque wrench to torque them down properly.
6) ensure when mounting the new rotors that they are installed correct directionally. You cannot put a rear left slotted rotor on the rear right for example. The slots need to be directionally correct and can be achieved only by paying attention.
Step 1:
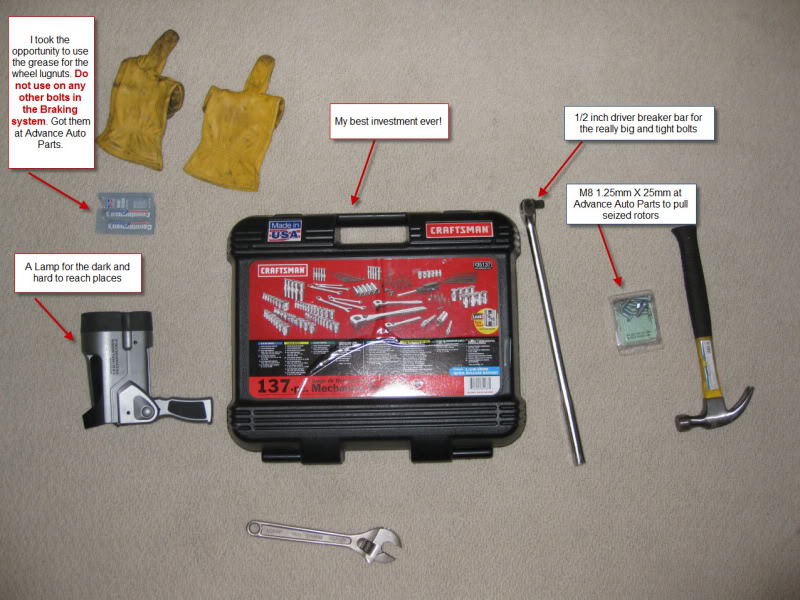
Gather the following tools:
2 Jack Stands.
1 Jack
Remaining as posted in the pic below:
Step 2:
Start with the fronts as they are easier. Lift the vehicle up and have it resting on the jack stands. Its okay to have the parking brake on to avoid the car from rolling. But remember to put it down when moving to do the rear brakes.
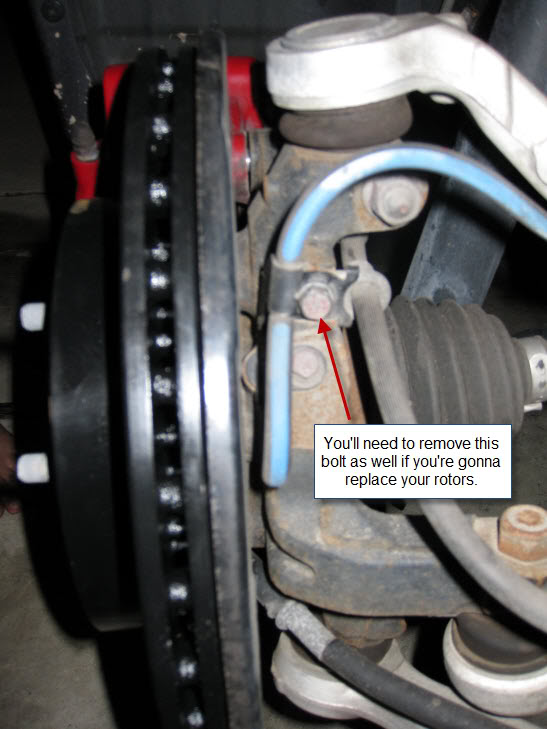
Once the vehicle is up and you have the wheels removed, start with loosening/removing screws that are likely to hamper your reach to the required bolts as follows:
Not needed for a simple brake pad job.
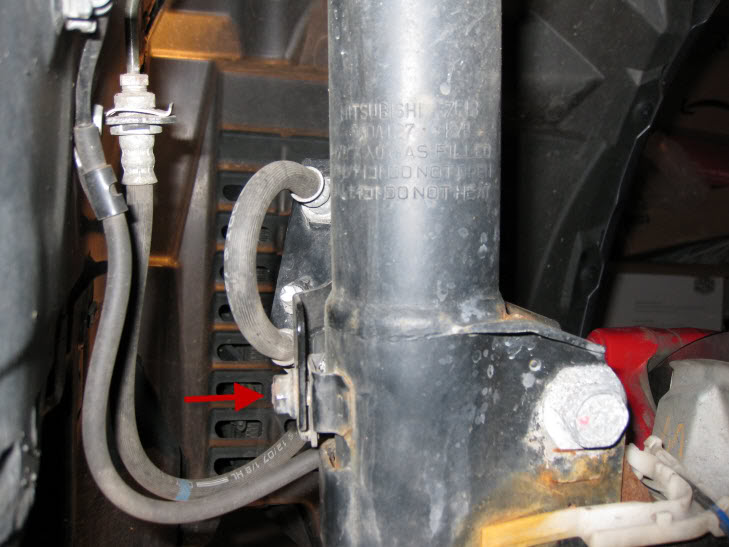
Remove the screw marked below on the backside of the strut. Not needed for a simple brake pad job.
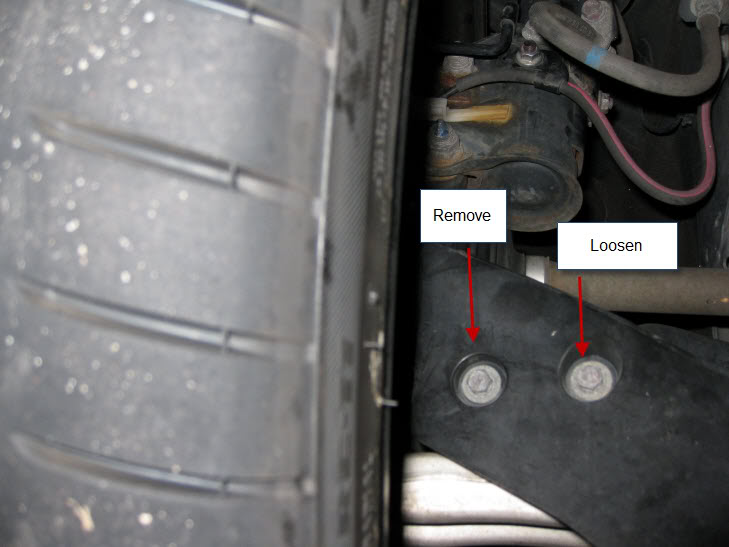
If you have brake air guides, and youplan on replacing the rotors, do the following. You do not need to do this for a plain brake pad job.
Step 3:
You'll then need to remove the retainer pins to be able to remove the pads.
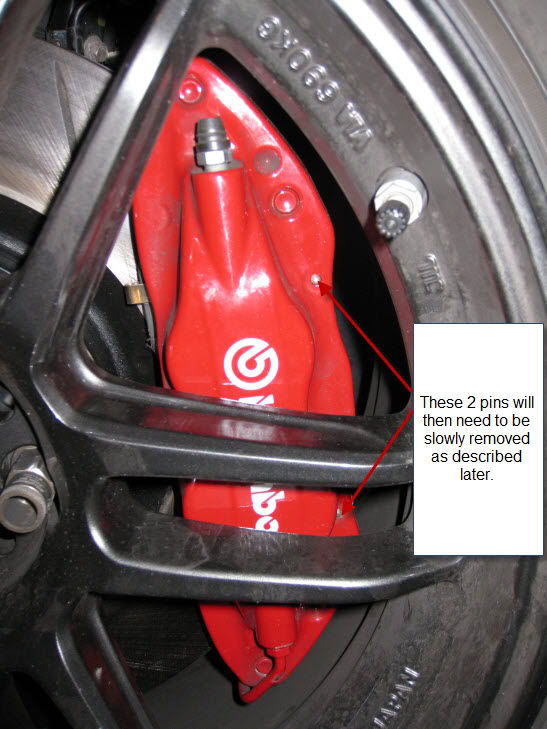
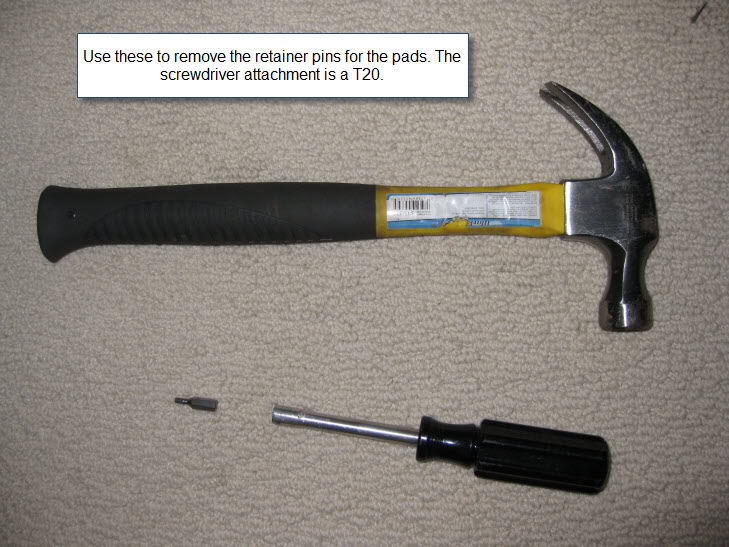
You can use the following tool combination to push them back. Remember, the retainer clip is held under tension, so be careful when removing the pins. I'll have more pics when I replace my pads with the Ferodos this coming weekend.
In the meantime, you can use the following excellent link to understand better. Its for an Evo VIII:
http://www.joe250.com/cars/evo8/evo8.html
Step 4:
You can now hammer out the pads with a screwdriver to replace the pads. If you're just doing the pads, be careful not to mess up the rotor with the screwdriver.
proceed as follows once the pads are all out.
Remove the large caliper bolts you loosened earlier completely. Be careful to hold the caliper and not to let it wall down. Otherwise it will cause the caliper to hang by the brake line which is not a good idea. Once the caliper is out, hang it using a thin rope or cable you might have lying around.
Step 5:
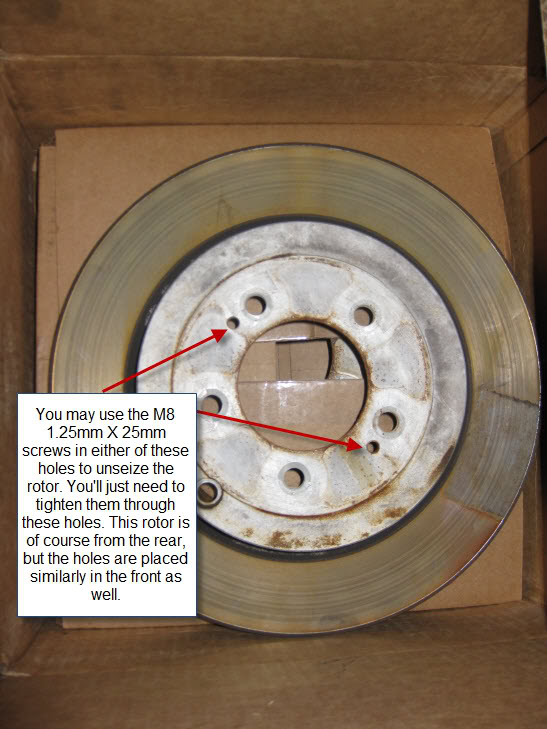
Once the caliper is out, its time to remove the rotor. There is a fair chance that the rotor is seized in there. If so, just use the bolts from the tools screen shot as shown below:
Step 6:
Once the rotor is out, just slide the new rotor in place, be sure you are putting the correct rotor in. Once the new rotor is in, bolt the caliper back on, but do not tighten it all the way in. Leave some wiggle room to be able to slide the pads. The caliper will now need the pads installed. Ensure the piston is compressed and then place the pads. Please follow directions on http://www.joe250.com/cars/evo8/evo8.html, I'll have pics later.
Step 7:
Once the pads are in, slide the retainer pins back in. Remember, The pins must be sticking out about a mm on the outer face of the caliper. Then, tighten all bolts (Except the air guide one) and reinstall all bolts you removed from the brake lines.
Use the breaker bar to tighten the big caliper bolts. Once all the bolts are tightened, reinstall the brake air guide screws and tighten them to spec.
Step 8:
Put the wheels back on, finger tight the lug nuts, lower the car and tighten the lugnuts again to spec with a torque wrench or breaker bar.
Step 9:
Time to do the rear brakes. ENSURE VEHICLE IS IN GEAR AND THAT THE PARKING BRAKE IS RELEASED BEFORE ATTEMPTING THIS.
Raise the vehicle using the jack and have it resting on the jack stands.
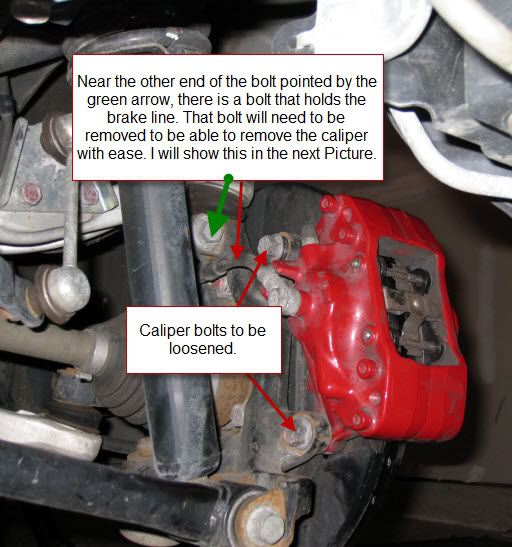
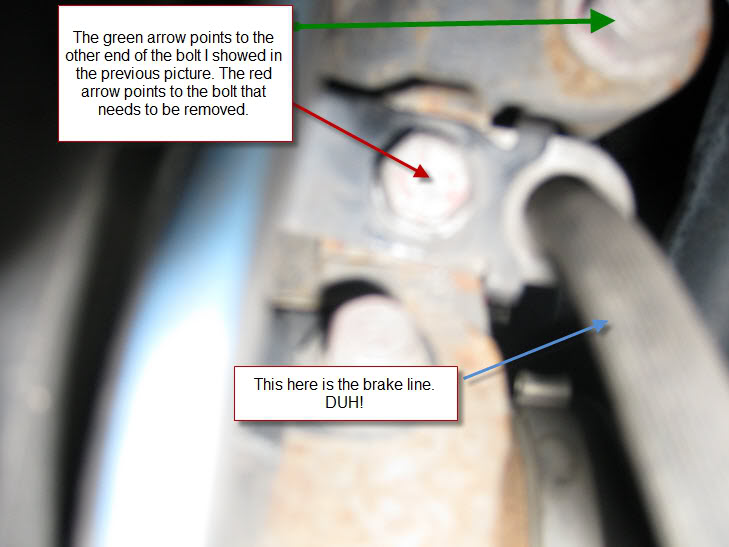
Loosen the big caliper bolts by a turn and remove the screw holding the brake line as shown below. You do not need to do this if you are just doing the pads:
Step 10:
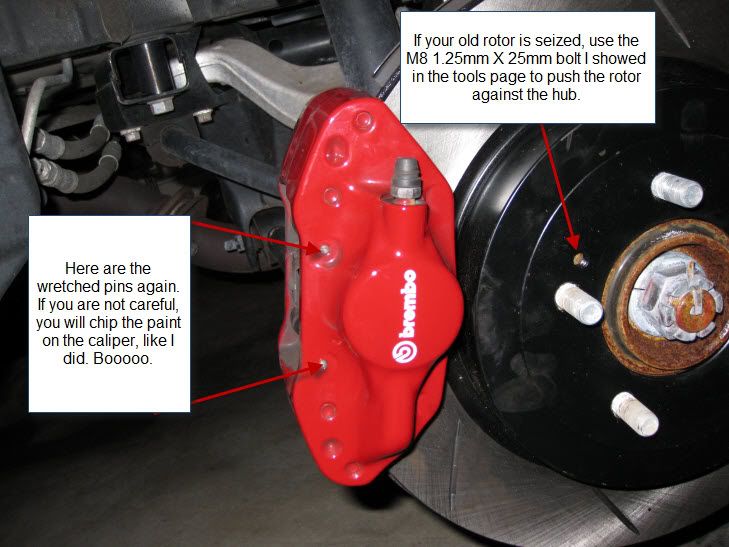
You'll then need to remove the retainer pins for the pads in order to be able to remove the pads.
Step 11:
Once the retainer pins and clip are off, try to slide the pads out slowly. hammer them out carefully if necessary while trying to avoid hitting the rotor itself.
Step 12:
Once the pads are out, you can proced to remove the caliper bolts completely and remove the caliper. Again, just as the front, do not let the caliper hang by the brakeline with its full weight. try to rest/hang it in away so as to reduce tension on the brake line. You may now remove the rotors in the same way as for the fronts.
ENSURE THE PARKING BRAKE IS OFF if you are having trouble removing the rotor before assuming that it is seized.
Once you have confirmed it is seized, you can use the bolts as described in the above screenshot to remove the rotor.
You can now put in the new rotor. ENSURE its the right rotor.
Step 13:
You can now start putting everything back in just like the fronts.
PLEASE NOTE: Using this article is doing so at your own risk. I take no responsibility for any damage caused as a result of following these steps. Always have a first aid kit at hand.
Having said that, I think it makes sense if I detail my mistakes first and how costly they can be
.1) When doing the rear brakes. MAKE SURE YOUR HAND BRAKE IS RELEASED (down position). I cannot stress this enough. I had it unreleased and the rotor would not come off. I thought it was seized and tried to force it out and broke the drum brake shoe liner nails that hold them in place. cost me around 330 USD to fix. Funny thing is, it was still cheaper to do it myself despite this added cost.
2) Wear gloves often unless you really enjoy hurting yourself.
3) Having a second person help you would be better than trying to do it all by yourself.
4) Put the Vehicle in gear when working on it.
5) If using aluminum lug nuts, be sure to use a torque wrench to torque them down properly.
6) ensure when mounting the new rotors that they are installed correct directionally. You cannot put a rear left slotted rotor on the rear right for example. The slots need to be directionally correct and can be achieved only by paying attention.
Step 1:
Gather the following tools:
2 Jack Stands.
1 Jack
Remaining as posted in the pic below:
Step 2:
Start with the fronts as they are easier. Lift the vehicle up and have it resting on the jack stands. Its okay to have the parking brake on to avoid the car from rolling. But remember to put it down when moving to do the rear brakes.
Once the vehicle is up and you have the wheels removed, start with loosening/removing screws that are likely to hamper your reach to the required bolts as follows:
Not needed for a simple brake pad job.
Remove the screw marked below on the backside of the strut. Not needed for a simple brake pad job.
If you have brake air guides, and youplan on replacing the rotors, do the following. You do not need to do this for a plain brake pad job.
Step 3:
You'll then need to remove the retainer pins to be able to remove the pads.
You can use the following tool combination to push them back. Remember, the retainer clip is held under tension, so be careful when removing the pins. I'll have more pics when I replace my pads with the Ferodos this coming weekend.
In the meantime, you can use the following excellent link to understand better. Its for an Evo VIII:
http://www.joe250.com/cars/evo8/evo8.html
Step 4:
You can now hammer out the pads with a screwdriver to replace the pads. If you're just doing the pads, be careful not to mess up the rotor with the screwdriver.
proceed as follows once the pads are all out.
Remove the large caliper bolts you loosened earlier completely. Be careful to hold the caliper and not to let it wall down. Otherwise it will cause the caliper to hang by the brake line which is not a good idea. Once the caliper is out, hang it using a thin rope or cable you might have lying around.
Step 5:
Once the caliper is out, its time to remove the rotor. There is a fair chance that the rotor is seized in there. If so, just use the bolts from the tools screen shot as shown below:
Step 6:
Once the rotor is out, just slide the new rotor in place, be sure you are putting the correct rotor in. Once the new rotor is in, bolt the caliper back on, but do not tighten it all the way in. Leave some wiggle room to be able to slide the pads. The caliper will now need the pads installed. Ensure the piston is compressed and then place the pads. Please follow directions on http://www.joe250.com/cars/evo8/evo8.html, I'll have pics later.
Step 7:
Once the pads are in, slide the retainer pins back in. Remember, The pins must be sticking out about a mm on the outer face of the caliper. Then, tighten all bolts (Except the air guide one) and reinstall all bolts you removed from the brake lines.
Use the breaker bar to tighten the big caliper bolts. Once all the bolts are tightened, reinstall the brake air guide screws and tighten them to spec.
Step 8:
Put the wheels back on, finger tight the lug nuts, lower the car and tighten the lugnuts again to spec with a torque wrench or breaker bar.
Step 9:
Time to do the rear brakes. ENSURE VEHICLE IS IN GEAR AND THAT THE PARKING BRAKE IS RELEASED BEFORE ATTEMPTING THIS.
Raise the vehicle using the jack and have it resting on the jack stands.
Loosen the big caliper bolts by a turn and remove the screw holding the brake line as shown below. You do not need to do this if you are just doing the pads:
Step 10:
You'll then need to remove the retainer pins for the pads in order to be able to remove the pads.
Step 11:
Once the retainer pins and clip are off, try to slide the pads out slowly. hammer them out carefully if necessary while trying to avoid hitting the rotor itself.
Step 12:
Once the pads are out, you can proced to remove the caliper bolts completely and remove the caliper. Again, just as the front, do not let the caliper hang by the brakeline with its full weight. try to rest/hang it in away so as to reduce tension on the brake line. You may now remove the rotors in the same way as for the fronts.
ENSURE THE PARKING BRAKE IS OFF if you are having trouble removing the rotor before assuming that it is seized.
Once you have confirmed it is seized, you can use the bolts as described in the above screenshot to remove the rotor.
You can now put in the new rotor. ENSURE its the right rotor.
Step 13:
You can now start putting everything back in just like the fronts.
Last edited by CatalystGod; May 10, 2010 at 06:22 PM.


Just changed my rotors at almost 100k from the OEM rotors.
Some details I'd like to add though. Mine was evo 8 though.
Before removing the pads or knocking the retaining pins out, place paper towels or rags right underneath to catch all the brake dust that's going to fall off. It'll make cleanup a lot easier....
Also the FRONT CALIPER Bolts are 80Ft/lbs +/- 7ft/lbs
The REAR CALIPER Bolts are 40ft/lbs +/- 4ft/lbs
Oh yea I used an old pressure plate bolt to get my seized rotors loose, fit perfect.
Nice writeup though, I'm always too lazy to go through the extra hassle of taking pictures and putting it on the computer and writing up a long explanation.
Some details I'd like to add though. Mine was evo 8 though.
Before removing the pads or knocking the retaining pins out, place paper towels or rags right underneath to catch all the brake dust that's going to fall off. It'll make cleanup a lot easier....
Also the FRONT CALIPER Bolts are 80Ft/lbs +/- 7ft/lbs
The REAR CALIPER Bolts are 40ft/lbs +/- 4ft/lbs
Oh yea I used an old pressure plate bolt to get my seized rotors loose, fit perfect.
Nice writeup though, I'm always too lazy to go through the extra hassle of taking pictures and putting it on the computer and writing up a long explanation.
Last edited by intj123; May 10, 2013 at 07:44 PM.


Trending Topics


Shouldn't you clean the hub of rust / dirt before installing the new rotor?
Is a wire brush fine? Or should you use something like a Roloc disc drill attachment? Anyone have specific examples of a good wire brush or roloc disc?
Is a wire brush fine? Or should you use something like a Roloc disc drill attachment? Anyone have specific examples of a good wire brush or roloc disc?


Evolving Member
Joined: Oct 2014
Posts: 287
Likes: 1
From: Arnold, MO
I'm going to have to cut out a set of the pins
they're seized. Does anyone know the correct part number? This:
they're seized. Does anyone know the correct part number? This:


Shows how closely I read this howto. I also used the m8 bolts to pop off the stubborn rear disk on one side only to realize the handbrake was on (D'oh!). The other side slid off like butter. Thankfully my handbrake isn't that tightly wound so no damage.
