
headlight bobbing up and down on it's own

*PLEASE READ FOLLOWING POSTS, this is not the fix*
I finally have had enough of this. I unscrewed the small motors from the big adjustment gear. Those motors are the reason why it's hard to move that adjustment gear with a screwdriver by the way, because they are preventing it to move. Except when they feel like - they move it themselves.
So the motors are mounted on the bottom of that level adjustment gear, i couldn't figure out how to disconnect the wire going to them - there's no connections in sight, so i unscrewed them. They are held with 2 tiny phillips head screws.
In order to do the whole thing you basically only need 2 tools - a shorty phillips screwdriver and a 10mm socket wrench with an extension.
Passenger side is really easy - take out the coolant reservoir and unscrew the little bugger:


The driver side takes more work on '03 because the IC spray reservoir is right in the way. I couldn't get it out, so i undid the bumper (it's actually real easy if you havent done it before - undo 2 bottom fenderliner clips, then a bolt right next to them, then 2 clips by the top radiator support, 2 bolts by the radiator suppoert, 2 bolts by the intercooler - and just slide it off a bit.
Then undo 4 bolts that hold the headlight and slide it out a bit too and you'll be able to get to that motor and undo it.

Took me about 30 min.
Hopefully this will help someone..
I finally have had enough of this. I unscrewed the small motors from the big adjustment gear. Those motors are the reason why it's hard to move that adjustment gear with a screwdriver by the way, because they are preventing it to move. Except when they feel like - they move it themselves.
So the motors are mounted on the bottom of that level adjustment gear, i couldn't figure out how to disconnect the wire going to them - there's no connections in sight, so i unscrewed them. They are held with 2 tiny phillips head screws.
In order to do the whole thing you basically only need 2 tools - a shorty phillips screwdriver and a 10mm socket wrench with an extension.
Passenger side is really easy - take out the coolant reservoir and unscrew the little bugger:
The driver side takes more work on '03 because the IC spray reservoir is right in the way. I couldn't get it out, so i undid the bumper (it's actually real easy if you havent done it before - undo 2 bottom fenderliner clips, then a bolt right next to them, then 2 clips by the top radiator support, 2 bolts by the radiator suppoert, 2 bolts by the intercooler - and just slide it off a bit.
Then undo 4 bolts that hold the headlight and slide it out a bit too and you'll be able to get to that motor and undo it.
Took me about 30 min.
Hopefully this will help someone..
Last edited by mplspilot; May 27, 2008 at 08:08 PM.


Joined: Mar 2003
Posts: 394
Likes: 7
From: Used to be in Nor Cal, now working in Seoul
Great post, but I have one quick question.
Is it a cable or actually a motor unit? Because this post says it is just a cable.
https://www.evolutionm.net/forums/sh...ight=headlight
And it seems the gear attached to the cable is not moving when you adjust the level switch inside the cabin according to the thread above.
Did you try to adjust your level switch, and confirmed that the low beam is not moving any more?
Last edited by ace33joe; May 26, 2008 at 05:27 PM.
Well it's a cable with a small gear on its end that moves the big metal gear which is part of the headlight, which adjusts the level. That cable is operated by a motor located somewhere (i have no idea where, or whether it has its own fuse, noone in this thread seemed to know) which activates by the in-cabin switch (yes i tried 2 different switches to make sure it's not the problem), but in my case the switch doesn't do much, the motor activates itself, when it feels like it.. So by detaching those cables with gears the headlight won't be adjusting on its own anymore. The motor will still do its crazy thing, but whatever, it's not attached.
Last edited by mplspilot; May 26, 2008 at 07:05 PM.
Ok i see what you're saying... that thread has these pics
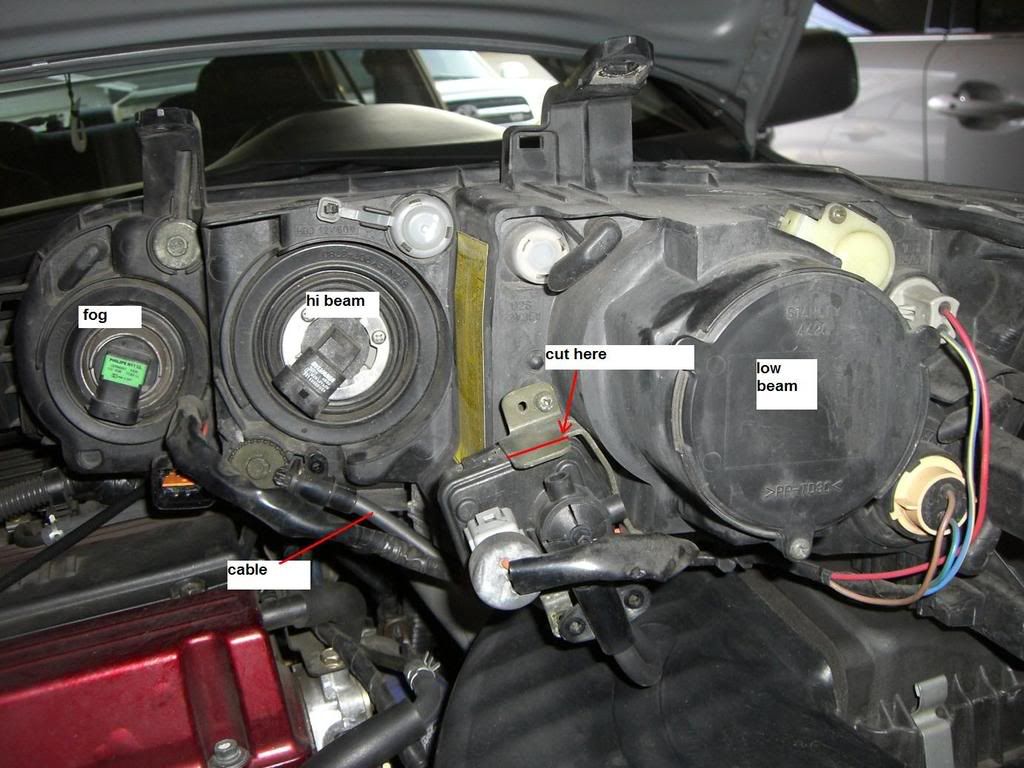

And it looks like there's 2 cables with gears going to the headlight, one for high beam and one for low beam in that picture. It seems to be that i removed the high beam cables.... Maybe i didn't notice the other ones, it means i will have to get there again and remove the other 2 cables.
I was actually under the impression the whole assembly is adjusted with that one metal gear. Looks like i was wrong and there's separate adjustments for low/high beam. More freaking work for me
Last edited by mplspilot; May 26, 2008 at 07:16 PM.
Joined: Mar 2003
Posts: 394
Likes: 7
From: Used to be in Nor Cal, now working in Seoul
Thanks for a quick reply. In my opinion, there is a big chance that your motor still adjusts the low beam level regardless of the cable detachment.
Therefore, removing the cable from the headlamp assembly do not help correcting this bobbing problem.
At least we know a temperal fix - setting it to level 1 instead of 0, and we can do manual height adjustment to compensate the lowering.
I ordered the level switch unit, so we will see if it fixes this problem, although I do not expect much.
Joined: Mar 2003
Posts: 394
Likes: 7
From: Used to be in Nor Cal, now working in Seoul
I am not sure, but that connector might powers the level control motor.
Actually I want to know which connector powers low beam and level control motor.
Unplug it and try turning on the low beam, and adjusting the level. Then you should be able to find out what function that connector does.
Please let us know how the experiment turns out.
Actually I want to know which connector powers low beam and level control motor.
Unplug it and try turning on the low beam, and adjusting the level. Then you should be able to find out what function that connector does.
Please let us know how the experiment turns out.

Ok, so looks like unplugging this connector takes the power away from the motor, which should fix the problem, so long as you don't mind not being able to adjust the headlight level from inside the car.
This connector:

Now i had to remove the bumper again and both headlights to be able to remove the retarded "noodle" that looks more like a Ford design than anything that should come from Japan... Whoever came up with this whole clever idea of adustment design of these lamps needs to be kicked in the nuts VERY freaking hard and a lot of times...
Noodle that belongs in the trash can:

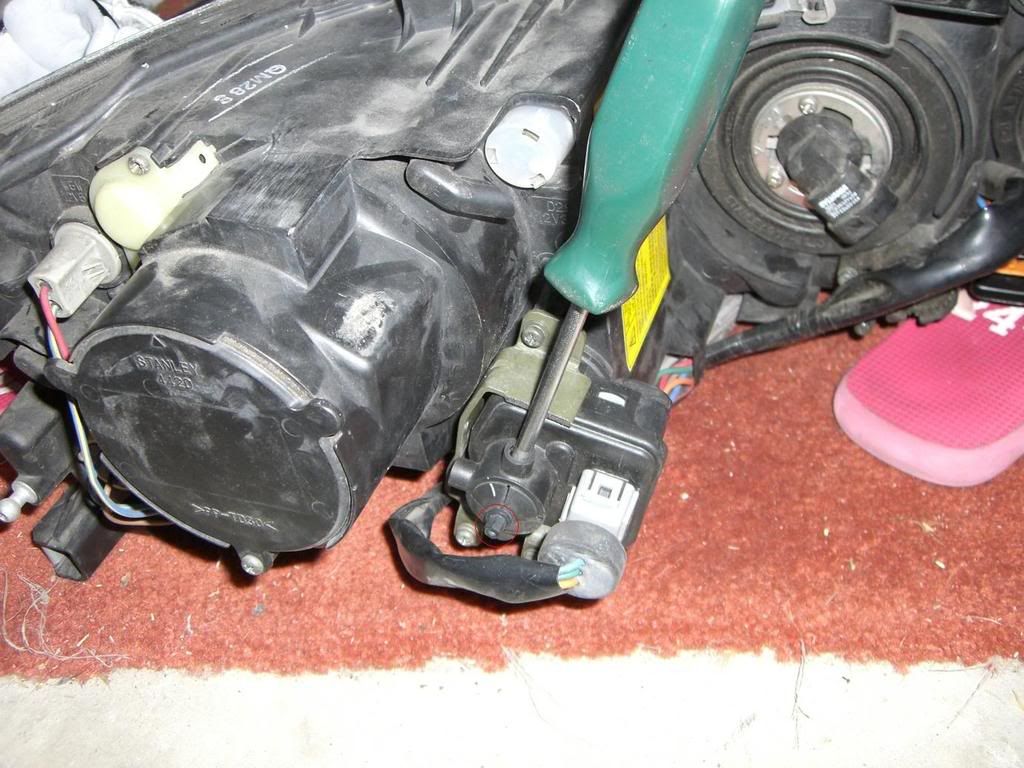
Once the noodle is removed and if you unplug the power from the motor the only way to adjust the level is manually with this round thing on the left:
You can rotate that little stub with a 3/16 socket, but you'd have to remove the headlight to get to it or at least stuff around it. Or you can adjust it by sticking a philips head screwdriver in its top opening, but you have to bend away the piece of metal that gets in the way on top (bracket)
Bent bracket:

Once it's bent, it's actually pretty easy to adjust the level with a screwdriver with the headlight on the car. Provided it works ok. My driver side one works like a champ, but the pass side doesn't want to cooperate with the screwdriver...
This connector:
Now i had to remove the bumper again and both headlights to be able to remove the retarded "noodle" that looks more like a Ford design than anything that should come from Japan... Whoever came up with this whole clever idea of adustment design of these lamps needs to be kicked in the nuts VERY freaking hard and a lot of times...
Noodle that belongs in the trash can:
Once the noodle is removed and if you unplug the power from the motor the only way to adjust the level is manually with this round thing on the left:
You can rotate that little stub with a 3/16 socket, but you'd have to remove the headlight to get to it or at least stuff around it. Or you can adjust it by sticking a philips head screwdriver in its top opening, but you have to bend away the piece of metal that gets in the way on top (bracket)
Bent bracket:
Once it's bent, it's actually pretty easy to adjust the level with a screwdriver with the headlight on the car. Provided it works ok. My driver side one works like a champ, but the pass side doesn't want to cooperate with the screwdriver...
Last edited by mplspilot; May 27, 2008 at 08:09 PM.
So basically to fix the problem, wait till the headlights bob to the place/position/level where you like them and unplug the gray connector. Getting to it on the driver side will be a pain if you still have the IC spray reservoir.
Joined: Mar 2003
Posts: 394
Likes: 7
From: Used to be in Nor Cal, now working in Seoul
Wow, congratulations! At least your headlight won't move itself again. Great post! I will try a new level switch, because I ordered one already, and if it does not fix the problem, I will just disconnect the plug and adjust the level manually.
Thanks for the experiment and a solution!
Thanks for the experiment and a solution!
Joined: Mar 2003
Posts: 394
Likes: 7
From: Used to be in Nor Cal, now working in Seoul
Probably that would be the start of the problem. Since EVO does not have an auto-leveling system, light is not supposed to move up and down when turned-on. There is a good chance that it will move while driving also, which is really hard to notice unless you are at complete stop and you can clearly see the reflected headlight beam pattern. (such as dark parkling lot next to a wall)
Last edited by ace33joe; May 28, 2008 at 10:14 PM.


Ok, so looks like unplugging this connector takes the power away from the motor, which should fix the problem, so long as you don't mind not being able to adjust the headlight level from inside the car.
This connector:
Now i had to remove the bumper again and both headlights to be able to remove the retarded "noodle" that looks more like a Ford design than anything that should come from Japan... Whoever came up with this whole clever idea of adustment design of these lamps needs to be kicked in the nuts VERY freaking hard and a lot of times...
Noodle that belongs in the trash can:
Once the noodle is removed and if you unplug the power from the motor the only way to adjust the level is manually with this round thing on the left:
You can rotate that little stub with a 3/16 socket, but you'd have to remove the headlight to get to it or at least stuff around it. Or you can adjust it by sticking a philips head screwdriver in its top opening, but you have to bend away the piece of metal that gets in the way on top (bracket)
Bent bracket:
Once it's bent, it's actually pretty easy to adjust the level with a screwdriver with the headlight on the car. Provided it works ok. My driver side one works like a champ, but the pass side doesn't want to cooperate with the screwdriver...

OMFG thank you!!!!!! I have gone through soooo many threads trying to figure out how to do this. I started to get the dancing passenger headlight, than it was the drivers side.
")
I would sit there and play with the adjustments till it stopped, worrying about when I have to start my car again if it will do it.
I tried to pretend it did not bother me, but it really ate away at me that my lights were aimed at the floor, and that my lights wanted to dance. My car was already on jack stands and I said hell with it, i'll give it a shot with theses instructions.
One hour later, no more dancing and my beams are where I want them.
