How do you turn the heat on manually under the dash?
 Apr 1, 2010, 05:39 PM
#1
Newbie
Thread Starter

Join Date: Feb 2010
Location: colorado
Posts: 30
Likes: 0
Received 0 Likes
on
0 Posts
How do you turn the heat on manually under the dash?
I read all the heater knob post but still couldnt find detailed instructions on how to do this.
a step to step tutorial would be great!
since im already posting i might as well try to get some help on other problems.
1. my rear window defroster button is on and will stay ON, my AC button wont even come on with a light. the 3 little buttons under the 3 main knobs arent working properly any one know how to fix this? the buttons are kinda hard to push too
2. my dome light doesnt work when i open my car doors but can turn on when i slide it to the ON position with some force
any help would be great! Thanks

 Apr 1, 2010, 06:51 PM
#3
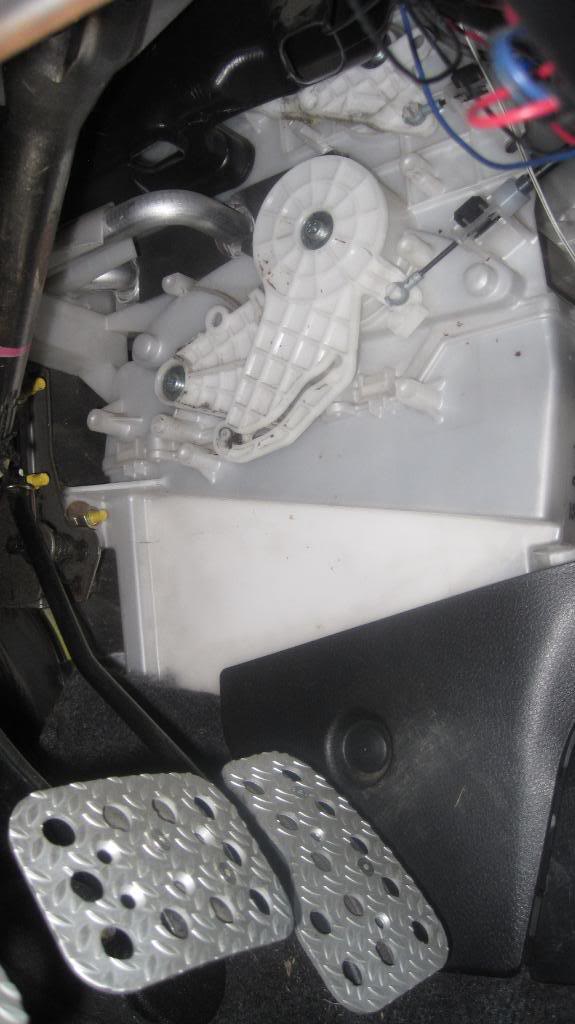
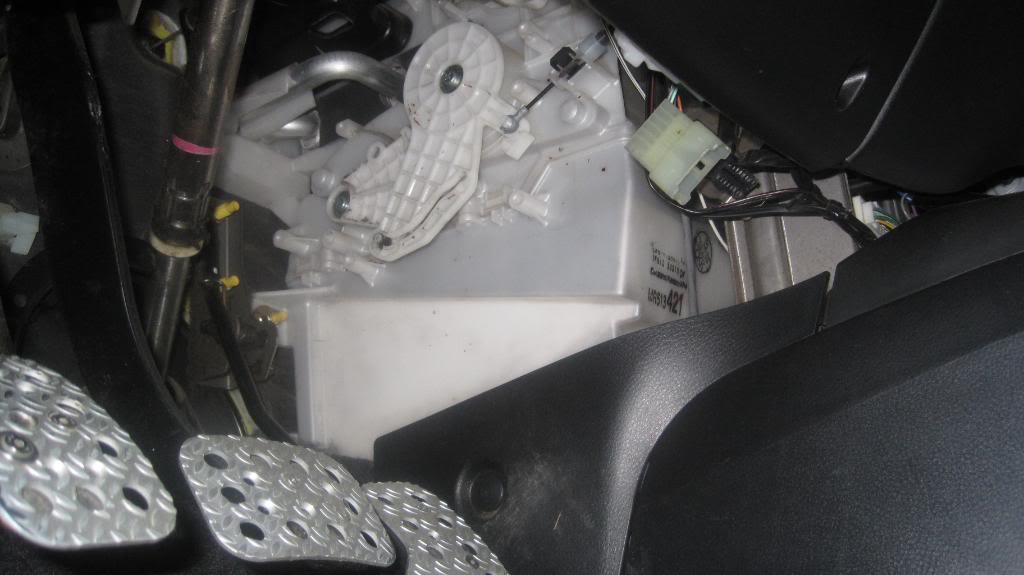
theres a white "lever" plastic piece with a cable attached to it under the driver side behind the climate control console. you can reach under there and turn it with you fingers. i had to do this cause the knob broke off. if you turn it one way, you got a/c and the opposite way the heat will come on. i hope this helps. you can see it if you look under there.
Trending Topics
Apr 3, 2010, 10:06 AM
#8
Evolving Member
iTrader: (4)
Join Date: Nov 2008
Location: in fooking bruges!
Posts: 319
Likes: 0
Received 0 Likes
on
0 Posts
there should be a large white plastic contraption behind the center console, upper right f your pedals. you can move it back or forth, i believe back brings heat. for your dome lights may just be your bulbs o a fuse, for the vac problem, may be you hvac or check your connections
 Apr 9, 2010, 03:37 PM
#12
Newbie
Thread Starter
Join Date: Feb 2010
Location: colorado
Posts: 30
Likes: 0
Received 0 Likes
on
0 Posts
Yes thanks TIBO i guess i was looking at it the whole time and didnt realize it. thought it was a cable i had to pull or something, but i got it now and my heat is working. Too bad i just got it working when its spring already -_-
Apr 9, 2010, 03:42 PM
#13
Evolving Member
iTrader: (8)

Join Date: Mar 2010
Location: Minot, ND
Posts: 156
Likes: 0
Received 0 Likes
on
0 Posts
Thankfully the dealership warrantied my "hard to turn temp knob" problem just this weds...involved pulling the entire dash and heater case to change out the door and gears...I don't want to know what that would cost if a guy had to pay for it.
Apr 9, 2010, 03:52 PM
#14
entire dash ? i just bought the parts to fix it myself no need to rip dash apart
tsb uploaded here:
http://members.***.net/elixirm2u81/tsb/tsb0455003.pdf
or
http://www.megaupload.com/?d=9KLSZL4Z

This picture is what it looks like after the job is done
what i did was i took a pair of needle nose pliers and flatend out the cable..
now the knob turns freely make sure you apply grease where noted in the tsb
tsb uploaded here:
http://members.***.net/elixirm2u81/tsb/tsb0455003.pdf
or
http://www.megaupload.com/?d=9KLSZL4Z
This picture is what it looks like after the job is done
what i did was i took a pair of needle nose pliers and flatend out the cable..
now the knob turns freely make sure you apply grease where noted in the tsb
Apr 9, 2010, 04:24 PM
#15
Evolving Member
iTrader: (8)
Join Date: Mar 2010
Location: Minot, ND
Posts: 156
Likes: 0
Received 0 Likes
on
0 Posts
The bulletin for my 06 is different:
2006 Mitsubishi Lancer Evolution L4-2.0L DOHC Turbo
Vehicle Level Technical Service Bulletins All Technical Service Bulletins A/C - Temperature Knob Hard to Turn
A/C - Temperature Knob Hard to Turn
Notes
No: TSB-055-003
DATE: December, 2005
MODEL: See below
SUBJECT:
HEATER TEMPERATURE DIAL
HARD TO TURN
This TSB supercedes TSB-04-55-003, issued March, 2004, to add new heater blend door replacement procedures and information, and to update the affected vehicles.
PURPOSE
The heater temperature dial on some affected vehicles may be difficult to turn. This is caused by the heater air blend door link and lever binding, or a dirty and/or damaged blend door gear track preventing the door from moving freely.
To prevent this condition, install a new, improved heater blend door as described in this bulletin.
If a customer complains that the heater temperature dial is difficult to turn:
^ Install the new, improved heater blend door (listed in the PARTS INFORMATION section of this bulletin).
^ For 2002-2003 models only, if the vehicle has NOT already had the heater air blend link and lever replaced as described in TSB-04-55-003, replace the heater air blend link and lever.
On vehicles that do not have a blower motor housing filter already installed as original equipment, install a filter to the top of the blower motor housing, to prevent entry of dirt and debris.
AFFECTED VEHICLES
2002-on Lancer and Lancer Evolution
2003-on Outlander
PROCEDURE
1. Remove the heater case from the vehicle as follows. Refer to Group 55 in the service manual.
a. Discharge and recover the refrigerant.
b. Clamp the heater inlet and outlet hoses near the bulkhead and remove the hoses from the heater core pipes.
c. Disconnect the A/C pipes and remove the expansion valve block.
d. Remove the instrument panel. Refer to Group 52A in the service manual.
e. Remove the heater case assembly.
2. Remove the seal from the case and discard it.
3. Use a flat-blade screwdriver to pry off the clip.
4. Remove the connector.
Do not remove the fin temperature sensors from the evaporator. If a sensor location is changed, compressor failure may result.
Do not remove the fin temperature sensors from the evaporator. If a sensor location is changed, compressor failure may result.
5. Remove the temperature control linkages and gear.
6. Position the heater case on the bench with the control linkage gear side facing down.
7. Open the case. Remove and discard the blend door assembly. Do not remove the mode doors.
8. Install the new blend door (provided in the heater blend door kit listed in the PARTS INFORMATION section of this bulletin). Use the location pins on the door to align it properly.
9. Move the blend door all the way to the left. Then install the gear.
10. 2002-2003 MODELS ONLY
If the vehicle has NOT already had the heater blend link and lever replaced as described in TSB-04-55-003:
Use the heater air blend link and lever kit listed in the PARTS INFORMATION section of this bulletin.
Apply a small amount of grease to the slot in the new door link, and to the gearteeth on the new lever.
Install the new link and lever to the heater box.
11. Adjust the gear so that the raised dot on the gear is aligned with the notch in the blend door as shown.
IMPORTANT :The raised dot on the gear for the door track must be aligned with the notch in the door lever to achieve proper timing. If the link and lever are not installed properly, binding will result.
12. Install the new seal provided in the heater blend door kit.
13. Reassemble the case. Use all of the screws provided in the kit, as there may be one or more broken case tabs. Be sure that there are no gaps after reassembly.
14. Reinstall the heater case and expansion valve block. Reconnect the hoses and pipes. Reinstall the instrument panel.
15. On vehicles that do not have a blower motor housing filter already installed as original equipment, install a blower motor housing filter as follows:
a. Remove the glove box lid.
b. Use a knife to cut a section from the top of the blower motor housing, along the perforated lines as shown.
c. Install the filter with the air flow directional arrow pointing down.
d. Secure the filter with two 5X14 self-tapping screws listed in the PARTS INFORMATION section of this bulletin.
PARTS INFORMATION
Use the Genuine Mitsubishi Parts listed.
WARRANTY INFORMATION
Special Warranty Information: On vehicles that do not have a blower motor housing filter already installed as original equipment, the filter installation described in this TSB should only be done on a customer complaint basis and may be claimed as part of this HVAC system warranty repair. However, future replacements of these installed filters are considered a customer maintenance expense just like any other vehicle filter (oil, air, fuel, etc.).
On vehicles with blower motor housing filters already installed as original equipment, filter replacement is considered a not warrantable customer maintenance item.
� 2010 ALLDATA LLC. All rights reserved.
Terms of Use