
Ralliart Foglamp Delete - Ghetto Style!

Thread Starter
Evolved Member
Joined: Oct 2010
Posts: 2,447
Likes: 14
From: Australia
I thought it was time I got some more air through the SST fluid cooler. Time for the stock foglamps to come out!
Instead of finding some easy kit to buy that would make it an easy job, I thought I'd go down to Ghetto Harware, buy some cheap old tack and make my own.
In case anyone else wants to spend less than $50 for foglamp deletes - and tons of joyous weekend "tool-time" - here's how.
Supplies
First off, you need to get the stupid old foglamps out of the spoiler.
Unscrew the screw in the top corner of the stock plastic foglamp/grille assembly.
Pull hard at the bottom of the grille. It should pop out a bit.
Pull hard at the top of the grille. It should pop out a bit more.
Pull the entire assembly forward, and the final catch should release, in the outer lower corner.
Unscrew the three screws holding in the foglamp. Unhook the wire from the globe at the back.
Stow the old wire somewhere, up out of the way inside the spoiler. I ended up taking off the whole bottom tray assembly (fun), the air snorkel and the top intercooler plastic cover. This allowed me to unhook some of the foglamp wiring and feed it up into a sheltered area. If you're worried about water and muck getting into the plug, cover it with a small plastic ziplock bag and secure with an elastic band.
That's the old tat out of the way. Time to build some new tat to replace it with!
Construction
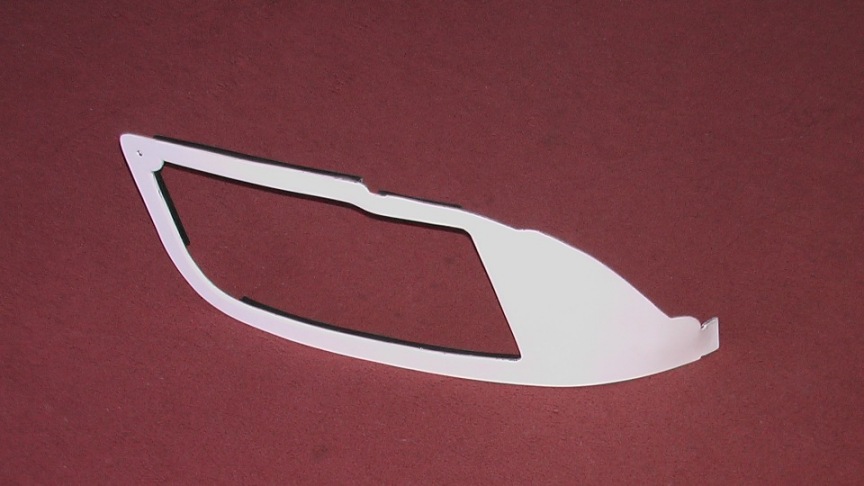
First, you need a shape. I've got a template that works well. If anyone is interested, I'll find a way to scan it and upload it. But it was really easy to make with some cereal packet cardboard. Just mess around with different shapes, styles, etc. until you find something you like.
Then, simply trace the template onto the 3mm plastic card and jigsaw it out with a nice, fine-cut blade... something that lets you turn tight corners. without much hassle.
As usual, if you cut it 1-2mm larger than you need, it's easier to sand/trim back than it is to bin it and cut a new one!
Sand, file and trim it as required. Use frequent test-fits to see exactly where you need to remove plastic. This card should be bendy enough for you to try out various different shapes and positions. Repeat until you are happy with it.
My Arts&Crafts masterpieces...

Note the funky tabs I left on the far right for slotting into the existing foglamp slip locations... and the drilled hole for the single screw.
I sanded the inside edge pretty hard, and got a smooth curve inward. It looked nicer than a wobbly sharp edge!
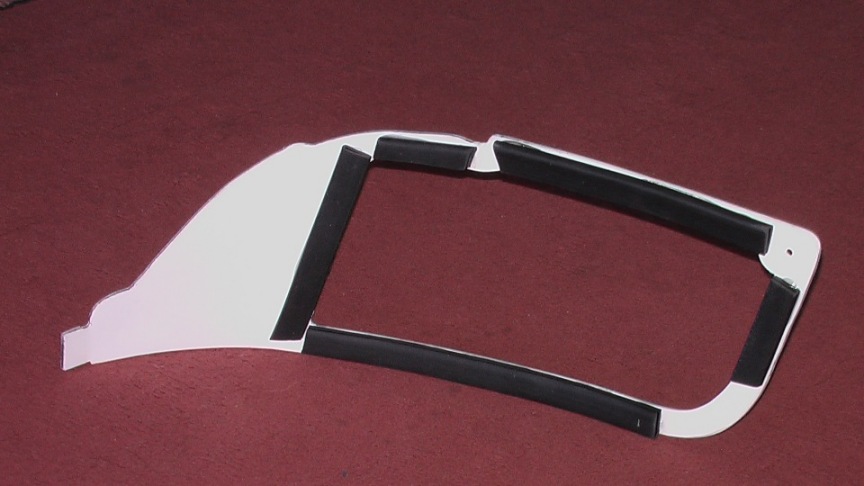
Sand back the front face of the plastic card with your course sandpaper. I used 180 grade. Then go for finer sandpaper. Sand as much as you like - remove any scratches, swirls and such. Ensure there aren't any glossy-smooth areas, as we'll eventually be spray-painting this side.
Note: You should also sand the rear face! We'll be using a bit of glue on the back, and glossy-smooth plastic won't hold well. Trust me, I found out the hard way.
Next, go crazy with a heat gun, and get a suitable bend into the plastic. This stuff is really easy to shape - it takes some heat, but it's pretty well behaved. No scorching, bubbling or warping occurred at any point when I was shaping it.
After waving a heat gun around for an hour or so, it looked more like this:
The black stuff you see peeking out there is rubber weather strip, glued to the back of the plastic card. This is where the metal grille will sit once we have it.
The weather strip you need depends on your shape, how much edge width you have, how thick your grille metal is, etc. I found some standard U shape strip in a local hardware shop - it was precisely the same width as the edges. The Gods smiled on me (for once). If the Gods don't smile on you, just trim down the strip to size with a scalpel and something like a metal ruler (for straight cuts).
Before you glue the rubber to the plastic, ensure you sanded back the rear face. It'll stick much better than it will if left shiny gloss.
Here's a shot of the back, with the strip attached.
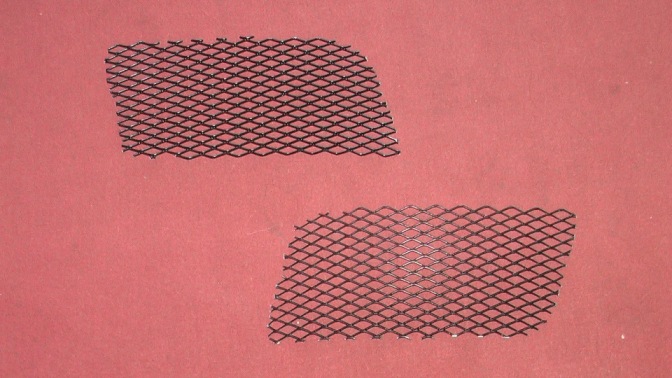
Time to get the metal grille ready. Use wire cutters or tin snips to get your basic shape. Bend gently so it follows the contours of your plastic piece, and ensure it all fits nicely into the rubber weather strips.
You might want to make a point of ensuring a complete, enclosed "hole" exists at the exact point the screw goes through (ie. top corner). That way, your grille is firmly attached to the front spoiler. If you hit a rat/cat/dog/kangaroo/bison/elephant, you will be perfectly sure your metal grille won't get dislodged.
Grilles:
Too easy!
Instead of finding some easy kit to buy that would make it an easy job, I thought I'd go down to Ghetto Harware, buy some cheap old tack and make my own.
In case anyone else wants to spend less than $50 for foglamp deletes - and tons of joyous weekend "tool-time" - here's how.
Supplies
- 3mm thick plastic hobby card. Enough to make the foglamp replacement surrounds.
- Some ricer-style black metal grille stuff.
- Some rubber weather strip.
- A can of black spray paint suitable for use on plastic bumpers/fenders.
- Some glue - flexible when set, suitable for rubber-to-plastic join.
- Philips screwdriver.
- Beer.
- Jigsaw.
- Heat gun.
- Woodworking style file.
- Sandpaper (eg. coarse:180, finer:280).
- Wire clippers.
- Scalpel/hobby knife.
- Bandaids, for when you cut your finger with Item 6.
First off, you need to get the stupid old foglamps out of the spoiler.
Unscrew the screw in the top corner of the stock plastic foglamp/grille assembly.
Pull hard at the bottom of the grille. It should pop out a bit.
Pull hard at the top of the grille. It should pop out a bit more.
Pull the entire assembly forward, and the final catch should release, in the outer lower corner.
Unscrew the three screws holding in the foglamp. Unhook the wire from the globe at the back.
Stow the old wire somewhere, up out of the way inside the spoiler. I ended up taking off the whole bottom tray assembly (fun), the air snorkel and the top intercooler plastic cover. This allowed me to unhook some of the foglamp wiring and feed it up into a sheltered area. If you're worried about water and muck getting into the plug, cover it with a small plastic ziplock bag and secure with an elastic band.
That's the old tat out of the way. Time to build some new tat to replace it with!
Construction
First, you need a shape. I've got a template that works well. If anyone is interested, I'll find a way to scan it and upload it. But it was really easy to make with some cereal packet cardboard. Just mess around with different shapes, styles, etc. until you find something you like.
Then, simply trace the template onto the 3mm plastic card and jigsaw it out with a nice, fine-cut blade... something that lets you turn tight corners. without much hassle.
As usual, if you cut it 1-2mm larger than you need, it's easier to sand/trim back than it is to bin it and cut a new one!
Sand, file and trim it as required. Use frequent test-fits to see exactly where you need to remove plastic. This card should be bendy enough for you to try out various different shapes and positions. Repeat until you are happy with it.
My Arts&Crafts masterpieces...
Note the funky tabs I left on the far right for slotting into the existing foglamp slip locations... and the drilled hole for the single screw.
I sanded the inside edge pretty hard, and got a smooth curve inward. It looked nicer than a wobbly sharp edge!
Sand back the front face of the plastic card with your course sandpaper. I used 180 grade. Then go for finer sandpaper. Sand as much as you like - remove any scratches, swirls and such. Ensure there aren't any glossy-smooth areas, as we'll eventually be spray-painting this side.
Note: You should also sand the rear face! We'll be using a bit of glue on the back, and glossy-smooth plastic won't hold well. Trust me, I found out the hard way.
Next, go crazy with a heat gun, and get a suitable bend into the plastic. This stuff is really easy to shape - it takes some heat, but it's pretty well behaved. No scorching, bubbling or warping occurred at any point when I was shaping it.
After waving a heat gun around for an hour or so, it looked more like this:
The black stuff you see peeking out there is rubber weather strip, glued to the back of the plastic card. This is where the metal grille will sit once we have it.
The weather strip you need depends on your shape, how much edge width you have, how thick your grille metal is, etc. I found some standard U shape strip in a local hardware shop - it was precisely the same width as the edges. The Gods smiled on me (for once). If the Gods don't smile on you, just trim down the strip to size with a scalpel and something like a metal ruler (for straight cuts).
Before you glue the rubber to the plastic, ensure you sanded back the rear face. It'll stick much better than it will if left shiny gloss.
Here's a shot of the back, with the strip attached.
Time to get the metal grille ready. Use wire cutters or tin snips to get your basic shape. Bend gently so it follows the contours of your plastic piece, and ensure it all fits nicely into the rubber weather strips.
You might want to make a point of ensuring a complete, enclosed "hole" exists at the exact point the screw goes through (ie. top corner). That way, your grille is firmly attached to the front spoiler. If you hit a rat/cat/dog/kangaroo/bison/elephant, you will be perfectly sure your metal grille won't get dislodged.
Grilles:
Too easy!
Last edited by richardjh; Jul 29, 2012 at 09:25 PM.
Thread Starter
Evolved Member
Joined: Oct 2010
Posts: 2,447
Likes: 14
From: Australia
It's now time to paint your masterpieces... before you actually fit the grilles.
Follow the directions on the spraycan (ie. lots of thin coats, let each coat dry, etc.). I probably laid down ten coats in all - they came up looking pretty nice:

Once your paint is totally dry, you can fit your metal grille inserts. If the U-shape weather strip is nice an pliable, it's just a matter of sliding it in lengthwise and bending the rubber up and over the final end once it's in place.
Car Prep and Fitment
You either need to REMOVE the old foglamp fitment spoiler stuff, or black it out.
If your RA is already black, then to you! Mine is white, so any spoiler bits behind the grille looks rubbish. I didn't want to cut it away, so I blacked it out as best I could with some thin, black plastic sheeting I found around the house...

Note: This part is totally cosmetic, and can be ignored if you just don't care.
Then, you're all set for final fitment. Slot your awesomely cheap, ghetto foglamp replacements in, stand back and check out their majesty...

That should get some more air through to the SST cooler!
And as for the other side... well, that'll keep your stupid 400 litre windscreen washer reservoir nice and cool too.

Yes, NOW you drink the beer.
Cheers.
Rich
Follow the directions on the spraycan (ie. lots of thin coats, let each coat dry, etc.). I probably laid down ten coats in all - they came up looking pretty nice:
Once your paint is totally dry, you can fit your metal grille inserts. If the U-shape weather strip is nice an pliable, it's just a matter of sliding it in lengthwise and bending the rubber up and over the final end once it's in place.
Car Prep and Fitment
You either need to REMOVE the old foglamp fitment spoiler stuff, or black it out.
If your RA is already black, then
to you! Mine is white, so any spoiler bits behind the grille looks rubbish. I didn't want to cut it away, so I blacked it out as best I could with some thin, black plastic sheeting I found around the house...Note: This part is totally cosmetic, and can be ignored if you just don't care.
Then, you're all set for final fitment. Slot your awesomely cheap, ghetto foglamp replacements in, stand back and check out their majesty...
That should get some more air through to the SST cooler!
And as for the other side... well, that'll keep your stupid 400 litre windscreen washer reservoir nice and cool too.
Yes, NOW you drink the beer.
Cheers.
Rich
Last edited by richardjh; Jun 12, 2011 at 01:06 AM.
Thread Starter
Evolved Member
Joined: Oct 2010
Posts: 2,447
Likes: 14
From: Australia
Hi-res PDF template now available, in two parts...
Template PDF 1
Template PDF 2
These PDFs are one megabyte each.
Each half was scanned in as A4 size. Original template was on 5mm-square paper, and I added 10cm sizing markers. There is convenient overlap for the two halves. Resize to suit. Hope they work for you...
Rich
Template PDF 1
Template PDF 2
These PDFs are one megabyte each.
Each half was scanned in as A4 size. Original template was on 5mm-square paper, and I added 10cm sizing markers. There is convenient overlap for the two halves. Resize to suit. Hope they work for you...
Rich
Last edited by richardjh; Sep 27, 2011 at 06:50 PM.
Thread Starter
Evolved Member
Joined: Oct 2010
Posts: 2,447
Likes: 14
From: Australia
I considered that, until I took off the original fitting and looked at the internal spoiler area behind the foglamp itself. The entire "outer" corner is blocked off (second image in first post).
With a grille going all the way to the edge, not only would there be no airflow, but there would be all that plastic visibly present right behind the grille. I couldn't see a way to hide it... and I didn't want to slice it all out. Everything I did is reversible.
However, if someone else goes all ghetto-foglamp-delete on their RA, I'd love to see an elegant solution. Maybe a black plastic panel backing the grille in the corner. That would have the look of a neat grille from one end to the other, just blanked off behind the metal.
Rich
With a grille going all the way to the edge, not only would there be no airflow, but there would be all that plastic visibly present right behind the grille. I couldn't see a way to hide it... and I didn't want to slice it all out. Everything I did is reversible.
However, if someone else goes all ghetto-foglamp-delete on their RA, I'd love to see an elegant solution.
Maybe a black plastic panel backing the grille in the corner. That would have the look of a neat grille from one end to the other, just blanked off behind the metal.Rich
Trending Topics
wow this looks sooooo much better than mine! I just replaced the whole housing with mesh and it was a pita to cut to form. for some reason I didn't think to make a surround
http://i81.photobucket.com/albums/j2...iart/006-2.jpg
but I'm so exhausted from working on the engine bay I don't think I'll ever have time to get to this. if you weren't in AUS I would pay you to make a set for me and ship
http://i81.photobucket.com/albums/j2...iart/006-2.jpg
but I'm so exhausted from working on the engine bay I don't think I'll ever have time to get to this. if you weren't in AUS I would pay you to make a set for me and ship

Thread Starter
Evolved Member
Joined: Oct 2010
Posts: 2,447
Likes: 14
From: Australia
I worry about how bad stone-chips will look, with black paint covering white plastic. Regular resprays will be needed.
I also need to find a way to secure the lower corner opposite the screw. Currently there's nothing holding that flush - currently relying on the bend from heating/reshaping the plastic. The shape might go dodgy when it gets over 40C in summer, so I really should think up a neat way of securing it at a third point.
All good fun.
Rich

I also need to find a way to secure the lower corner opposite the screw. Currently there's nothing holding that flush - currently relying on the bend from heating/reshaping the plastic. The shape might go dodgy when it gets over 40C in summer, so I really should think up a neat way of securing it at a third point.
 Since the plastic is already shaped, for the most part, it would be more of a retention issue than anything and that little bit may just be enough. It wouldn't help to secure it, obviously, but it may be enough to help keep the shape, if nothing else.
Thread Starter
Evolved Member
Joined: Oct 2010
Posts: 2,447
Likes: 14
From: Australia
Thread Starter
Evolved Member
Joined: Oct 2010
Posts: 2,447
Likes: 14
From: Australia
I'm still running stock SST cooler... and the ghetto foglamp delete.
As far as my logs show, 120 seconds of hard track driving raises the SST temp by 5C.

This log was of the last two runs of the day, pretty much back-to-back.
From an "air-for-cooling" perspective, this isn't actually too bad for my expected usage patterns. I don't plan on doing 20 minutes of non-stop lapping in the RA. Consequently, the SST-temp equation boils down to the combination of these two:
So, if you'll excuse me, I'm off to visit the other how-to thread regarding cooling fans!
Rich
As far as my logs show, 120 seconds of hard track driving raises the SST temp by 5C.
This log was of the last two runs of the day, pretty much back-to-back.
From an "air-for-cooling" perspective, this isn't actually too bad for my expected usage patterns. I don't plan on doing 20 minutes of non-stop lapping in the RA. Consequently, the SST-temp equation boils down to the combination of these two:
- Starting temperature.
- Rate of temperature rise
So, if you'll excuse me, I'm off to visit the other how-to thread regarding cooling fans!
Rich