
The New Guy, New @ Cars "Build"

Thread Starter
Evolving Member


Joined: Nov 2013
Posts: 126
Likes: 10
From: Northeast, USA
JukEboX - "New In Blue" Build
Ok so little background. I am JukEboX. I deal with mostly electronics and power. I bought my 09 Lancer GTS in November when my 03 Rally died and went to the crusher. I loved that car.
Anyway it has stopped snowing and its higher than 9 degrees outside so I figure it's time to start messing with my first play car.
Mind you this is my everyday car. I am a poor guy and trying to build a family with my wife so when I work on the car I need it to be drive able the next day. Now what I can tell you is that whoever owned the car before me did lower the car and put in a stiffer suspension. I don't know what they put in because I can't see any part names or manufacturers when I take the tires off but I can take some pictures next time I have the wheels off.
I took out all the bulbs in the car except of the Headlights and put in LEDs in them all to make them brighter and save power on the battery because I will need all the power I can get when I put the new system in. Anyway I also put in 50watt 6OHM resistors in to prevent hyperflashing.
Anywa first real project is to take off the wheels and get the more polished and clean. The person before me took the wheels and just sprayed on some basic Matte black. That has to go.
Here is what it used to look like...
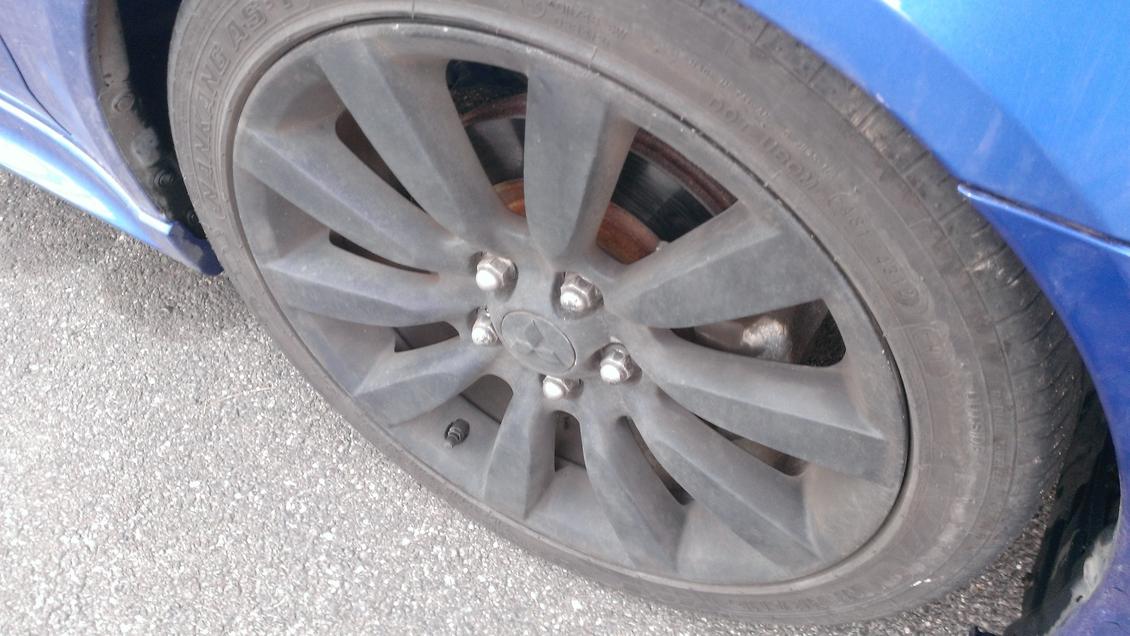
I sanded that black crap off of it and finally it took 3 days but I finally got them all down and ready for paint.

Now it started getting windy and started to rain so I guess I am driving around looking like this till Wednesday. I have a pretty sick idea on what to do on the rims but I can tell you they will be black with some accenting. More to come.
Stick around!
Anyway it has stopped snowing and its higher than 9 degrees outside so I figure it's time to start messing with my first play car.
Mind you this is my everyday car. I am a poor guy and trying to build a family with my wife so when I work on the car I need it to be drive able the next day. Now what I can tell you is that whoever owned the car before me did lower the car and put in a stiffer suspension. I don't know what they put in because I can't see any part names or manufacturers when I take the tires off but I can take some pictures next time I have the wheels off.
I took out all the bulbs in the car except of the Headlights and put in LEDs in them all to make them brighter and save power on the battery because I will need all the power I can get when I put the new system in. Anyway I also put in 50watt 6OHM resistors in to prevent hyperflashing.
Anywa first real project is to take off the wheels and get the more polished and clean. The person before me took the wheels and just sprayed on some basic Matte black. That has to go.
Here is what it used to look like...
I sanded that black crap off of it and finally it took 3 days but I finally got them all down and ready for paint.
Now it started getting windy and started to rain so I guess I am driving around looking like this till Wednesday. I have a pretty sick idea on what to do on the rims but I can tell you they will be black with some accenting. More to come.
Stick around!
Last edited by JukEboXAuDiO; Jul 2, 2014 at 08:42 PM. Reason: Updating thread
Thread Starter
Evolving Member
Joined: Nov 2013
Posts: 126
Likes: 10
From: Northeast, USA
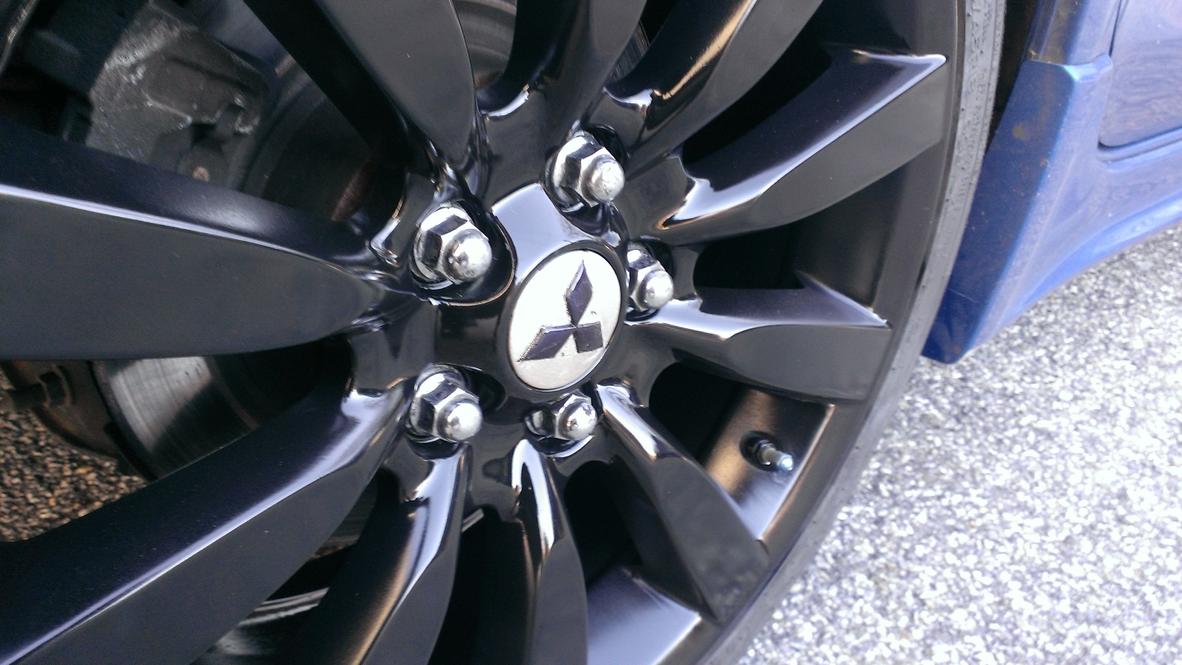
Center Caps An 1 Rim Done
Horray for Wednesday!
Got out of work early and finally got a chance to finish up the center caps and paint an entire 1 rim.
Lets start with the center caps. I wanted to do something difference but still pop on the car. So the idea would be to silver up the outside of the Mitsubishi Symbol and then throw some pearlescent blue/purple on the symbol itself.
Here is what the cap originally started out as. The rims and caps where originally painted just matte black and looked like crap.

First step was to sand it down and prime it up. I used some Rustoleum Plastic Primer after sanding off 1 layer of matte black, and 2 layers of primer and blue.

Next I taped the symbol so I can still hold the primer on the symbol.

Next I silver painted with Silver Dipliocolor Metallic silver paint.

Got out of work early and finally got a chance to finish up the center caps and paint an entire 1 rim.
Lets start with the center caps. I wanted to do something difference but still pop on the car. So the idea would be to silver up the outside of the Mitsubishi Symbol and then throw some pearlescent blue/purple on the symbol itself.
Here is what the cap originally started out as. The rims and caps where originally painted just matte black and looked like crap.
First step was to sand it down and prime it up. I used some Rustoleum Plastic Primer after sanding off 1 layer of matte black, and 2 layers of primer and blue.
Next I taped the symbol so I can still hold the primer on the symbol.
Next I silver painted with Silver Dipliocolor Metallic silver paint.
Thread Starter
Evolving Member
Joined: Nov 2013
Posts: 126
Likes: 10
From: Northeast, USA
JukEboX - "New In Blue" Build
Next I took the paint off the logo and taped the outside covering the silver and painted it over with Rustoleum Black Enamel and Rustoleum Midnight Blue pearlescent.
 [/img]https://www.evolutionm.net/forums/attachment.php?attachmentid=222015&stc=1&d=1397152 353[/img]
Finally I took all the tape off and covered the cap with 2 coats of Rustoleum Clear Coat.

Meanwhile I Primed the Rim with Rustoleum etching primer, 2 coats of Rustoleum Black Enamel and 2 coats of Rustoleum Clear Coat. Put it back on the car.

Finally I put the cap on just to see how it looks.

Here is the look with it both together!

Overall I think I did very well for my first time. Sadly not all the center caps look that good but they do look pretty sweet.
Question for you guys. Should I keep the center caps like that look or just sand it all back down and pearl up the entire cap considering it needs to be on a black coat to go on anyway.
I also have to put on 2 more coats of High Performance clear coat to protect the paint and that would be it.
More to come.
[/img]https://www.evolutionm.net/forums/attachment.php?attachmentid=222015&stc=1&d=1397152 353[/img]Finally I took all the tape off and covered the cap with 2 coats of Rustoleum Clear Coat.
Meanwhile I Primed the Rim with Rustoleum etching primer, 2 coats of Rustoleum Black Enamel and 2 coats of Rustoleum Clear Coat. Put it back on the car.
Finally I put the cap on just to see how it looks.
Here is the look with it both together!
Overall I think I did very well for my first time. Sadly not all the center caps look that good but they do look pretty sweet.
Question for you guys. Should I keep the center caps like that look or just sand it all back down and pearl up the entire cap considering it needs to be on a black coat to go on anyway.
I also have to put on 2 more coats of High Performance clear coat to protect the paint and that would be it.
More to come.
Last edited by JukEboXAuDiO; Jul 2, 2014 at 08:42 PM. Reason: Updating was needed.
The wheels turned out really good, man. 100% better then what they looked like before. The center caps are definitely unique but I don't think they look bad. If you like them, keep them! Modding is about trying new things and thinking outside the box. This website would be really boring if everybody did the same thing
Thread Starter
Evolving Member
Joined: Nov 2013
Posts: 126
Likes: 10
From: Northeast, USA
Yeah I actually only put the Rustoleum crystal clear enamel on them as a cover until the Rustoleum High Performance Clear Coat gets here. I spent all day friday looking for a can of it off the list that said where it was on their website and found that there isn't a single can in the entire New Haven County. UNBELIEVABLE.
I am also working on 2 over center cap styles. Will post them and will probably get a vote going.
I am also working on 2 over center cap styles. Will post them and will probably get a vote going.
Trending Topics
Thread Starter
Evolving Member
Joined: Nov 2013
Posts: 126
Likes: 10
From: Northeast, USA
Update time!!!
Ok so all 4 wheels are painted but now I have a problem. I have 3 different caps that I have been designing and messed with. Here is what they look like on the rim.


If you have a second please go give me a vote for which looks best for the car here:--> https://www.evolutionm.net/forums/pa...nter-caps.html
MORE PICTURES IN LINK!
Anyway moving on here is what the rims like so far. They have only 2 layers of light clear enamel protecting them at the moment till the clear coat gets here on Wednesday. I will have a good picture of what they look like when the clear coat is on and finished. And the car is probably cleaned up.
As for now the next project is the gas door. I have the aluminum door which looks terrible and beat. it does not match the colors of the car.

I found the paint color for the car which is D06 and I am thinking of blacking out either the outer circle, silvering up the door and painting the work LANCER with the same blue as the car. I could use some feedback on this.
Also as promised here is some pictures I was able to get of the suspension under the front of the car. Don't know what you can get out of them but it does seem like the car is lowered.


Please post some feed back on the fuel door. Should I black the whole thing and blue the letters or silver the outer or inner. Any help would be helpful.
Ok so all 4 wheels are painted but now I have a problem. I have 3 different caps that I have been designing and messed with. Here is what they look like on the rim.
If you have a second please go give me a vote for which looks best for the car here:--> https://www.evolutionm.net/forums/pa...nter-caps.html
MORE PICTURES IN LINK!
Anyway moving on here is what the rims like so far. They have only 2 layers of light clear enamel protecting them at the moment till the clear coat gets here on Wednesday. I will have a good picture of what they look like when the clear coat is on and finished. And the car is probably cleaned up.
As for now the next project is the gas door. I have the aluminum door which looks terrible and beat. it does not match the colors of the car.
I found the paint color for the car which is D06 and I am thinking of blacking out either the outer circle, silvering up the door and painting the work LANCER with the same blue as the car. I could use some feedback on this.
Also as promised here is some pictures I was able to get of the suspension under the front of the car. Don't know what you can get out of them but it does seem like the car is lowered.
Please post some feed back on the fuel door. Should I black the whole thing and blue the letters or silver the outer or inner. Any help would be helpful.
your suspension looks like the eibach pro kit springs.
As for the gas door, experiment with plastidip before you figure out a permanent solution. Plastidip carries many different colors to choose from.
As for the gas door, experiment with plastidip before you figure out a permanent solution. Plastidip carries many different colors to choose from.
Thread Starter
Evolving Member
Joined: Nov 2013
Posts: 126
Likes: 10
From: Northeast, USA
Wheels Finished!
Ok so it's been a while because of the weather but I finally to the finishing touches on the wheels. Center caps I will be doing today.
Because of the cold weather, wind, and SNOW... that's right snow, I wasn't able to finish the clear coat until yesterday. What I was waiting for finally came in. The Rustoleum High Performance Wheel Clear Coat.
I took the wheels off yesterday and applied 2 really good coats and put them back on. Outcome was exactly what I was looking for.


Up next the center caps.
Because of the cold weather, wind, and SNOW... that's right snow, I wasn't able to finish the clear coat until yesterday. What I was waiting for finally came in. The Rustoleum High Performance Wheel Clear Coat.
I took the wheels off yesterday and applied 2 really good coats and put them back on. Outcome was exactly what I was looking for.
Up next the center caps.
Thread Starter
Evolving Member
Joined: Nov 2013
Posts: 126
Likes: 10
From: Northeast, USA
Update!!!
Great News! The center caps are done.
As shown above I had 3 designs. After messing around with different paints, methods, and coats I came up with the final design.
Here is the final product of cap. This consisted of the following:
Final Product:

Upon completion and after 6 hours drying time I put them on the newly painted wheels and it just came out amazing.


All that was left was the glamour shots.


Total Time On Project: 3 Weeks.
Products Used:
Next Project: Paint of upper and lower grill lips. More information to come.....
As shown above I had 3 designs. After messing around with different paints, methods, and coats I came up with the final design.
Here is the final product of cap. This consisted of the following:
- 1 Coat Rustoleum Plastic Primer
- 2 Coats Rustoleum Black Enamel
- 3 Coats Rustoleum Color Shift Pearlescent Purple/Blue Enamel
- 2 Coats Diplo-color Metallic Silver Enamel
- 3 Coats Rustoleum High Performance Wheel Clear Coat
Final Product:
Upon completion and after 6 hours drying time I put them on the newly painted wheels and it just came out amazing.
All that was left was the glamour shots.
Total Time On Project: 3 Weeks.
Products Used:
- Rustoleum Plastic Primer
- Rustoleum Etching Primer
- Rustoleum Black Enamel
- Rustoleum Color Shift Pearlescent (Purple/Blue)
- Rustoleum High Performance Wheel Clear Coat (Hard To Find)
- Diplo-Color Metallic Silver Enamel
- 60/100/300 Grit Sandpaper
- Blue Painters Tape.
Next Project: Paint of upper and lower grill lips. More information to come.....
Not bad for a rustoleum jobber! I'm thinking the original finish on those wheels were plasti dip. Which means citra-solv would of been able to strip it and you would of been left with the original finish.
Thread Starter
Evolving Member
Joined: Nov 2013
Posts: 126
Likes: 10
From: Northeast, USA
From what I understand about plasti-dip you can pull it right off. But no I don't think this was. When I was sanding it, it was definitely primed because it was white under the black coats. BUT it looks like they used plastic primer instead of etching primer like they should. So I am hoping this will hold an protect better.
Thread Starter
Evolving Member
Joined: Nov 2013
Posts: 126
Likes: 10
From: Northeast, USA
Ok so finally got the front grills down.
Turns out the bottom grill is held on with epoxy and some screws. Had to clean that one up with it on there. Finally got all that crappy Plastidip off of it. I think it looks much better now.

Time Spend: 5 Hours
Also got the plastidip off the badge on the rear as well.


I am looking for a place to order the "Mitusbishi" badge and one that say "GTS" anyone know where I can get one?
Waiting on the paint I need that is the same car color to work on the next project. Stay tuned....
Turns out the bottom grill is held on with epoxy and some screws. Had to clean that one up with it on there. Finally got all that crappy Plastidip off of it. I think it looks much better now.
Time Spend: 5 Hours
Also got the plastidip off the badge on the rear as well.
I am looking for a place to order the "Mitusbishi" badge and one that say "GTS" anyone know where I can get one?
Waiting on the paint I need that is the same car color to work on the next project. Stay tuned....