
Enhanced resolution


Thread Starter

Joined: Jan 2004
Posts: 11,406
Likes: 78
From: Northwest

thanks Bryan. I think this comes from some dark recess of my mind and the little voice that says "why not?". My normal street version looks like this:

Extra cells would be great. How can I add them?
In the meantime I've scaled the cells to provide more resolution in the areas of greatest change to nearly all maps in the ECU. The car drives super duper smooth now, no more sawtooth anything, way responsive and has lots of punch when tipping into the throttle.
On a side note I'm interested in what people know about the EGR on the EVO. Are there any maps for this? I'm getting 300 miles to the tank and that includes goofing around too. The best I've gotten so for is 350 miles on a tank, took just under 12 gallons of fuel to fill it back up all the way and I think that I could do better if the EGR map could be modified.

If you were to log that compared to these radical rescales, I suspect the timing numbers would be near identical.
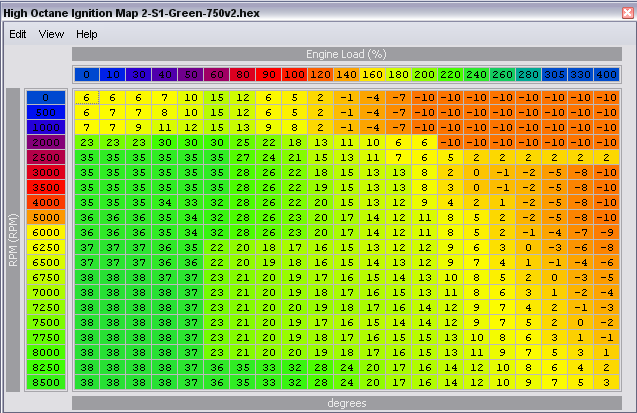
So couple questions on that map. I take it this is on pump gas? If so, then why rescale to 400? Also, why the horz band of 2's at 2500?

While I'm probably not racing around as much as some of you, I sure ain't driving driving Miss Daisy either.
The car is stock other than ECU Flash, EVOScan, wide band o2 and some S1 bumpsticks with the intake -4...and reading the EcuFlash forum. You guys are brilliant and your knowledge is much appreciated.

Anyways, I did away with scaling the engine load in the 10,20,30,40 fashion and rescaled it so the 3D graphic is more evenly spaced in relation to change of the data number.... it just made sense to me. Look at your maps in 3D and rescale it to space things out so that you have better resolution where the greatest change is happening.
I'm allowing the ECU to stay in closed loop further out by changing the TPS and engine loads before it goes to open loop and trimmed fuel accordingly.
I trimmed my accel enrichment down between 2500 - 4000 rpm so my twitchy foot and bumps in the road aren't giving a squirt of fuel.
I also have the boost maps adjusted so it runs around 18psi around torque peak and proportionately raising up to whatever the turbo can make as the rpms climb. That way I'm not having to throw fuel or pull timing unnecessarily just to keep knock out of the picture.
I'm no expert with it comes to ECU stuff but I'm not getting any check engine lights and only a couple points of knock here and there but I'm not on the bleeding edge anywhere and the car drives very smooth. Low octane & timing maps are conservative.
Need gas receipts for proof? I got them and I really feel that there is no reason that the EVO can't get at least 27mpg going down the highway with traffic if you drive it right.
Thread Starter
Joined: Jan 2004
Posts: 11,406
Likes: 78
From: Northwest
Scott and Bryan,
Scott first- This map was more proof of concept and has actually been changed since to take advantage of the better resolution. Initially I generated the values by using the interpolate 2D function so it would have been exactly what the ECU was doing anyway. Like I mentioned earlier in this thread though if I get knock with a timing value of lets say at 6000 so rather than take out 1* at 6000 and affect the whole curve from 6000 to 6499 now its just 6249 and I leave 6250-6499 alone. I have found that the timing maps vs log at high boost on pump tend to look like a sine wave its doesnt always hold as a linear curve. Is it needed for 99.9% of the cars out there? Probably not to be perfectly honest (including me) but I have a car thats really close to maxxed on pump gas at 26psi so I am looking for the last .1% I can safely get. I'll send you a full map if you would like to see it? Another thing is I can be very precise on where I take out timing for the launch control versus how I was doing it last summer when it was just 2 or 3 cells at one rpm. For the street this map is 100% unneccessary unless you were using meth or 100+ and basically were racing (because of fuel). Because of how my timing curve is for the boost (I really need to consider that I am probably at the point of power loss because of timing retard to boost ratio) I wanted to make sure that I had as much control. I havent done alot of logging with this versus my standard map but I think you are correct that the interpolation between cells is very close between the maps. I have also been messing around with closer load resolution (which probably benefits more than the RPM) to see if that helps any.
Bryan- I have since dropped that to 375 and the reason is I have hit over 335 with the green on race gas so I have that as net if you will. The 2's I think were just part of my old system of a divider since its an area that will never generate that load with a Green. Those should be meshed with the rest of the map for safety and the sake of doing it completely asced (instead of half asced). (edit) Also I have found that if you fall off the map the car goes into a rapidly decaying tailspin. It doesnt seem to just keep interpolating like I used to believe, so its a safety net. Whether it needs to be done or not (or to that extent) I dont think so. I am just trying to illustrate what can be done more or less.
Edit-
Actually I have lowered the boost a little, and it seems to like me better and gets more timing. It loads up odd though with the MBC where if I load it quick like a drag race launch I get 23ish but if its roll into boost I will get 25 or so and hold. I guess maybe I should be my EBC in to keep it consistent.
Last edited by JohnBradley; Sep 28, 2007 at 12:41 PM.

Thread Starter
Joined: Jan 2004
Posts: 11,406
Likes: 78
From: Northwest
My research has kind of led me to believe that resolution greater than 24x24 isnt really needed and even 20x21 is pretty good since really the problem areas arent going to be really huge and need lots of attention.
For instance with my car the trouble area is really only 5500-7000 rpm, maybe right there can use the help, but 5500 and down is okay as is 7K and up. I have a tendency to overdo it just to be sure that my testing is thorough.
For instance with my car the trouble area is really only 5500-7000 rpm, maybe right there can use the help, but 5500 and down is okay as is 7K and up. I have a tendency to overdo it just to be sure that my testing is thorough.

Thread
Thread Starter
Forum
Replies
Last Post
98autogstspyder
EvoM New Member / FAQs / EvoM Rules
657
Apr 27, 2022 01:48 PM