
Came up with a quick fix for SSQV users

Came up with a quick fix for SSQV users
I know this is a pretty well hated valve, and with good right. During the course of me swapping to stock ecu speed density I've been playing with several different valves to see how much they will hold and how bad the compressor surge is. Pretty much none of the usual suspects seem to hold what I wanted and most tended to leak after 24psi. As bummed as I was, I came across a deal on both a real HKS SSQV and an ebay knockoff. So I grabbed both just to see how they reacted. Both of them had ridiculous amounts of surge during light throttle use, and even though the sound is incredible, having surge is just not worth it. So after a few days I figured I'd rip the ebay one apart to see how it worked.
It's a pretty neat design, different than most valves out there and will hold 30+psi of pressure (don't ask me how I know that lol). With a little time, epoxy, and a drill, I managed to get rid of ALL surge associated with this valve and still hold 30+psi.
You have to remove the back of the valve where the spring is held. Once that's off, remove the nut with the "one way" valve built in. This so called "one way" valve causes a lot of problems...it basically bleeds pressure and vacuum into the other sealed side of the chamber since the check valve never seems to work right. It acts just like a fish tank check valve, but for some reason never seals right.
Once the nut is off, fill the drilled out center of the actuator with epoxy and let it dry. Take a small drill bit and drill 2 holes in the top of that sealed chamber (between the fins) that will be covered up by the cover. Assemble it back together just like you took it apart, and voila'...no more surge and the valve opens quicker than a stock Evo 9 valve.


i think i found out why alot of people are having surge. I was having surge unless over 10psi and sometimes at 11-12psi. I took it apart tightened up the big nut in side, compressed the spring a couple times by hand and put it back together making sure the seal was in the proper grove. Put it pac on the car and i dont get compressor sugre at all in boost even at 0-1psi. Sometimes ill get compressor surge at -2vac but never in boost. And the sound is double as loud.
Trending Topics
Forward view...you have to remove the tall 4 screws from the shield in order to remove it to get to the screws for the rear of the valve...

View of the valve with the cover and sound ring removed...

Once all the screws are removed for the rear chambers of the valve, this is what's left with the spring/diaphragm/large nut with the check valve...

Here is the shaft of the valve. You have to insert a small rod through the hole in the shaft in order to loosen the nut/check valve. Once the nut is off, you will see a hole drilled through the center of the shaft. That is what needs to be filled shut...

Once the epoxy has dried, drill 1 or 2 holes in the top of that rear chamber (the 2 black spots on the chamber shown in the above pic...I accidentally drilled them off center) and reassemble the valve in the reverse of how you took it apart.
That's all there is to it, took me about 15 minutes to do it. The valve pretty much has the same reaction time as a Greddy type-S valve with no tension on a single spring, but with the added benefit of a positive pressure seal on the piston to keep from leaking.
*Note: I haven't tried this out on a maf-based setup yet, so far all testing has been done on my speed density setup. However, getting rid of any type of surge tends to make any maf-based setup run much better as the car will buck heavily due to stalled air flow through the maf, so I would imagine this mod would smooth the drive out considerably.
View of the valve with the cover and sound ring removed...
Once all the screws are removed for the rear chambers of the valve, this is what's left with the spring/diaphragm/large nut with the check valve...
Here is the shaft of the valve. You have to insert a small rod through the hole in the shaft in order to loosen the nut/check valve. Once the nut is off, you will see a hole drilled through the center of the shaft. That is what needs to be filled shut...
Once the epoxy has dried, drill 1 or 2 holes in the top of that rear chamber (the 2 black spots on the chamber shown in the above pic...I accidentally drilled them off center) and reassemble the valve in the reverse of how you took it apart.
That's all there is to it, took me about 15 minutes to do it. The valve pretty much has the same reaction time as a Greddy type-S valve with no tension on a single spring, but with the added benefit of a positive pressure seal on the piston to keep from leaking.
*Note: I haven't tried this out on a maf-based setup yet, so far all testing has been done on my speed density setup. However, getting rid of any type of surge tends to make any maf-based setup run much better as the car will buck heavily due to stalled air flow through the maf, so I would imagine this mod would smooth the drive out considerably.
I'm slightly confused on your thought process. Correct me if I'm wrong. It is 4am where I live right now, and I'm a bit tired.
With your design, the spring tension must be great enough to keep the valve from opening under vacuum. But now what helps open the valve? If your spring negates the vacuum force, and there isn't any positive pressure in B, it wouldn't open. Especially with pressure holding the valve closed.
The Type-S has the pressure to help push it open.
So either your valve is open under vacuum conditions, or it isn't opening as fast as a Type-S.
I'll have to tear mine apart tomorrow and take a closer look for myself.
I'm slightly hesitant to epoxy and drill unless I have this all figured out for myself.
Just check to see if it is now open under idle for me.
Mine doesn't really sit open at idle, but I also idle at 8 in/hg or ~-4psi due to my cams. Under larger amounts of vacuum I can definitely hear it opening, and depending on where I have the throttle at and how much vacuum is made depends on how long it stays open.
Just for the hell of it, I tossed my crushed 9 valve on this morning for the drive to work, and I still get wastegate chatter with that one as well. The premature opening of the SSQV was solved, but I still would get some intermittent wastegate chatter in 5th gear, but it has to be cold weather related since I've tried a MBC, EBC, and the stock psi and load based ecu boost control.
I have another idea I'm going to test tomorrow not related to the SSQV, like a cheaper modified version of a synchronic.
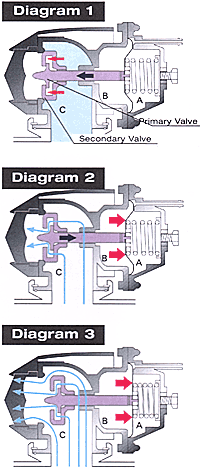
And as to your diagram, the design you have shown is why it pops open so often, because the slightest change in pressure difference between chamber A and chamber B will cause it to open (differences such as wastegate chatter which varies pressure at a fast rate). Then again, since the one way valve never quite seals right, both chambers will also have vacuum applied to them, and with chamber A having the extra spring pressure applied will cause it to NOT open fast at low pressures.
Just for the hell of it, I tossed my crushed 9 valve on this morning for the drive to work, and I still get wastegate chatter with that one as well. The premature opening of the SSQV was solved, but I still would get some intermittent wastegate chatter in 5th gear, but it has to be cold weather related since I've tried a MBC, EBC, and the stock psi and load based ecu boost control.
I have another idea I'm going to test tomorrow not related to the SSQV, like a cheaper modified version of a synchronic.
And as to your diagram, the design you have shown is why it pops open so often, because the slightest change in pressure difference between chamber A and chamber B will cause it to open (differences such as wastegate chatter which varies pressure at a fast rate). Then again, since the one way valve never quite seals right, both chambers will also have vacuum applied to them, and with chamber A having the extra spring pressure applied will cause it to NOT open fast at low pressures.

Evolving Member
Joined: Oct 2007
Posts: 119
Likes: 0
From: at home
After many months of my SSQ giving me issues I pulled it and put my stock bov back on the car. Tonight I pulled the SSQ apart and modified it according to the OP. Ed anyven though I used a quick set JB weld to fill the hole in the actuator I am going to let it sit overnight to allow the epoxy to completely harden. I've already reinstalled it on the car so I suppose tomorrow I'll find out if I've resolved any problems I've been having with it.