
Wideband in clock position


haha...I'm actually doing this right now! I'm using the Zeitronix wideband lcd display (http://www.zeitronix.com/Products/zt2/zt2.htm#LCD).
So far, I pulled the display apart and separated the main circuit for the lcd circuit board. Then I soldiered wires to the pins where the two boards connect so I can mount the main board remote from the lcd.
Next, I took apart the dash and removed the clock. The clock is held on by two tabs. These tabs are then cut off to make room for the lcd. Everything on the black plastic vent piece is removed (vents, the flaps, hazard button). You end up with the vent piece as a single piece of plastic. Then you have to do some slight trimming of the back of the vent piece to make room for the lcd.
This is the farthest i have gotten so far. By doing this, you will lose the ability to open and close you vents because there isn't enough room for the open/close mechanism and the lcd ( so it's always open now).
The lcd screen is too big to fit in the clock position but the part you actually read is a perfect fit in the hole.
I wish i had some pictures. This all probably sounds pretty confusing. I'll try to get some if there is enough interest ( i have to learn how to post pic again...lol)
 please post some pics and more guidance this has sticky written all over it
I may have to get another overlay myself then as I want to do this. I'll just have to suss out how to actually attach the LCD to the carbon fibre.
The LCD has 4 holes. If you add four standoffs with small machine screws to the plate you can attach it to the back of the carbon fiber plate.
Take ESD precautions when playing with naked electronics.
Take ESD precautions when playing with naked electronics.

Sorry it took so long. Still not done yet. Sorry for crappy camera phone pictures and kinda boring pictures. Hopefully I'll finish it soon.


I don't have pictures of it but I had to file/sand the slot where the display is going to go. The slot is actually tapered so when I measured the slot from the outside, the display would fit, but when I measured it from the inside slot was a little bit too small.
I don't have pictures of it but I had to file/sand the slot where the display is going to go. The slot is actually tapered so when I measured the slot from the outside, the display would fit, but when I measured it from the inside slot was a little bit too small.
More work, less PBR... 
Sorry guys, I've been really busy with school and other things so I haven't had the chance to work on it very much. I'll try to get pictures asap.
LOL I had one of the beers. The other two are my roommate's

LOL I had one of the beers. The other two are my roommate's
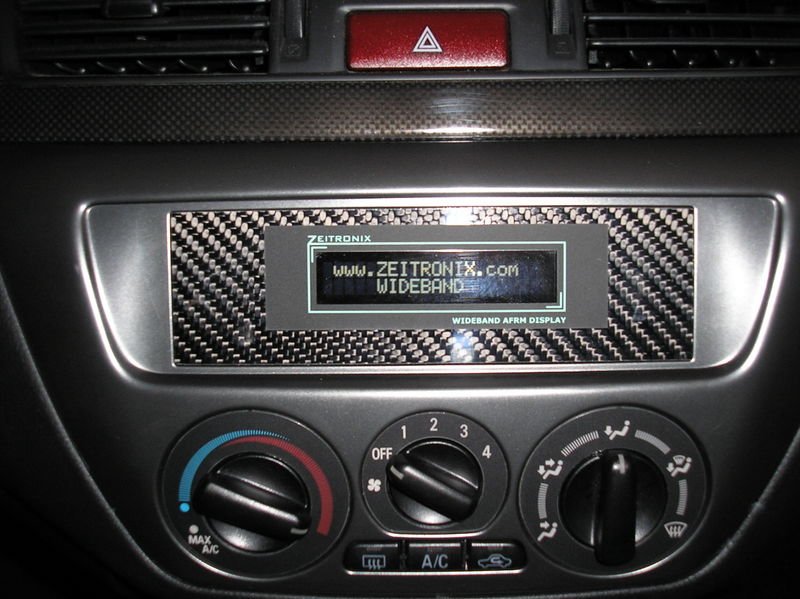
Hey guys, so school got really busy and to top it off i hit a deer....but the evo is back from the shop and I finally finish the wideband!


Before anyone asks, the top button is the max hold button for the Zeitronix and the lower one is the hazard button.
Sorry it took so long and not taking anymore step by step pictures. If someone wants to do this and needs some tips PM me or just reply on this thread.
I'm open to all opinions
Before anyone asks, the top button is the max hold button for the Zeitronix and the lower one is the hazard button.
Sorry it took so long and not taking anymore step by step pictures. If someone wants to do this and needs some tips PM me or just reply on this thread.
I'm open to all opinions